Author: [email protected]

  • Plant-Based Pros Share Their Favorite Quick Vegan Dinner Ideas

    Plant-Based Pros Share Their Favorite Quick Vegan Dinner Ideas

    Don’t have time on busy weeknights to cook up a culinary masterpiece for dinner? We spoke to some of our favorite plant-based pros about what they like to eat when time is tight. These quick and healthy meals are packed full of fresh flavors that will delight your taste buds and satisfy a rumbling stomach after a long day of work. Just as easy as microwave meals and far more nutritious, these delicious recipe ideas from the experts are perfect in a pinch.

    Neal Barnard’s BBQ Bean Tortas

    “BBQ bean tortas are a quick and easy meal when I have little time for meal prep. You just need 8 corn tortillas or 4 toasted whole wheat hamburger buns; a 15-oz. can of low-sodium black beans, rinsed and drained; ½ cup each of barbecue sauce and chopped pineapple; 1 cup fresh salsa or diced tomato; and guacamole (optional). If using tortillas, preheat the oven to 375°F and bake them 5 to 10 minutes or until crisp. Warm beans with barbecue sauce. Then spoon onto tortillas or buns and top with pineapple, salsa, and guacamole.”—Neal Barnard, MD, FACC, president of the Physicians Committee for Responsible Medicine and author of Your Body in Balance: The New Science of Food, Hormones, and Health

    The Winter 2023 Issue
    is here!

    Our gorgeous “bookazine” features expert tips, inspiration, and 81 comforting recipes for Winter.

    Ian Cramer’s Burrito Bowl

    “I reach for a rice bowl: warmed brown rice on a bed of spinach with black beans, salsa, and a quick avocado sauce made with avocado, garlic, lemon juice, and a bit of salt to taste. My trick for this is meal prep: Have starchy staples like brown rice, any kind of potato, quinoa, or other whole grain on hand week to week that you prep on Sundays.”—Ian Cramer, host of The Ian Cramer Podcast, endurance athlete, and public speaker
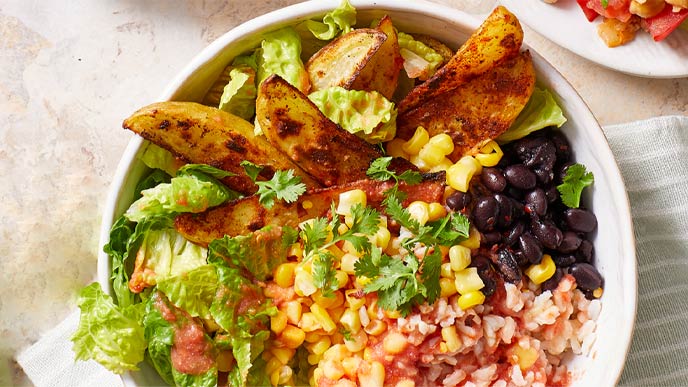
    Ian Cramer’s Burrito Bowl

    Joel Kahn’s Hearty Arugula Salad

    “I love a giant arugula salad (I’m hooked on arugula) with some lupini beans, a few walnuts, a sprinkle of hemp hearts, sun-dried tomatoes, lemon juice, and balsamic vinegar.” —Joel Kahn, MD, founder of the Kahn Center for Cardiac Longevity in Bingham Farms, Michigan, and author of The Whole Heart Solution
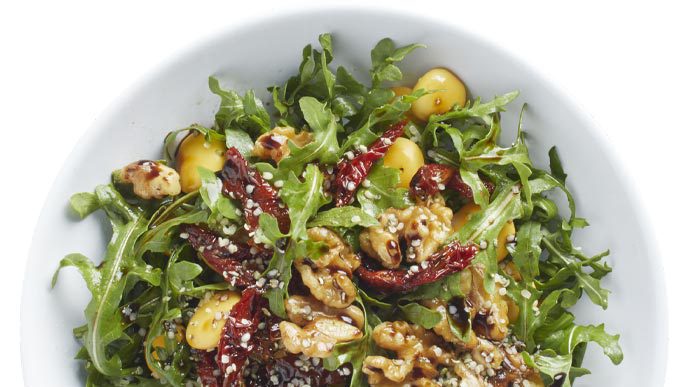
    Joel Khan’s Hearty Arugula Salad

    Cory Warren’s Spicy Beans and Rice

    “My go-to meal is rice and beans in the Instant Pot. Place a cup of dry brown rice at the bottom of the pot and pour in 1½ cups of water or veggie broth. Place a can of beans in an oven-safe bowl with 1 teaspoon each of paprika, garlic powder, oregano, cumin, and onion powder. Put the bowl on a rack on top of the rice. Cook for 22 minutes non low-pressure natural release, and you’ve got the best rice and beans ever. I can even take a shower and come back, and it’s ready for me and my family!”—Cory Warren, chief dad/founder of leangreendad.com

    Shivam Joshi’s Mediterranean Veggie Sandwich

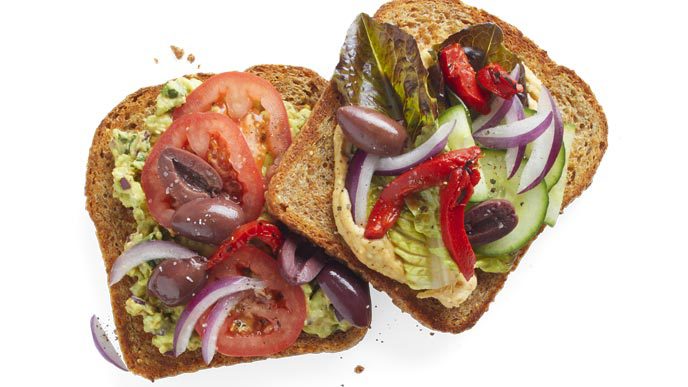
    “I recently got into sandwiches, and one of my favorites is my Mediterranean sandwich. Just toast two slices of Dave’s Killer Bread and spread a low-calorie (equal or less than 40 calories per serving) hummus on one slice and guacamole on another slice. Layer kalamata olives, sliced tomatoes, roasted red pepper, fresh onions, cucumbers, and red leaf lettuce on one slice. Assemble and enjoy!”—Shivam Joshi, MD, board-certified internal medicine physician at NYC Health + Hospitals Bellevue and clinical assistant professor of medicine at New York University Grossman School of Medicine
    Angie Sadeghi’s Tofu and Sautéed Veggie Salad

    “When I get home from work, I’m usually tired so I make something quick that doesn’t involve

    hours in the kitchen (I’d rather spend that time with my son). I grab a pack of sriracha tofu from Trader Joe’s, cut it into small cubes, and put it into an air fryer for 10 minutes. While that’s cooking, I take out a variety of frozen veggies, including broccoli, edamame, and bell pepper, and sauté for 5 minutes in a pan over high heat. I serve this on a bed of greens with a side of avocado and some oil-free avocado dressing from Whole Foods.”—Angie Sadeghi, MD, gastroenterologist in Newport Beach, California, and president/CEO of The Institute for Plant-Based Medicine

    Cathy Fisher’s Bean Tostadas

    “Because I usually have the ingredients on hand, my favorite quick meal is tostadas. I add canned black or pinto beans to cooked rice, but if I don’t have prepared rice, I’ll just heat the beans with a little chili powder and corn. I crisp my oil-free corn tortillas under the broiler. I also love shredded cabbage on my tostadas, and sometimes grated carrots, chopped onion, and cilantro—and of course, sliced avocado.”—Cathy Fisher, author of the Straight Up Food cookbook and creator of straightupfood.com
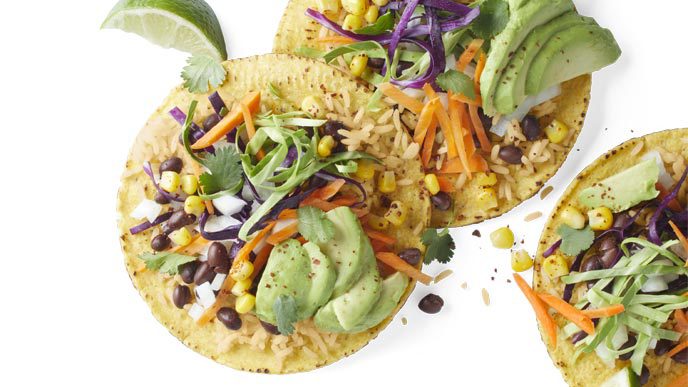

    Cathy Fisher’s Bean Tostadas

    Credit: Source link

  • Sesame Crusted Tofu Bowls

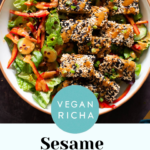
    This Crispy Sesame crusted Tofu is Quick and super delicious! Tofu cubes are tossed in the peanut sauce then coated in sesame seeds and baked until crispy. Serve over greens dressed in peanut sauce, in a wrap or over noodles! Peanut-free  & soy-free version included.

    a salad bowl topped with sesame crusted tofu and drizzled with peanut sauce

    I’ve developed a full-blown obsession with these sesame-coated tofu bowls!

    I don’t know whether it’s the nutty, crunchy sesame-crusted baked tofu that does it for me or the totally addictive peanut sauce…it’s most likely the combination of both because I would not want to do without any of these additions.

    a salad bowl topped with sesame crusted tofu and drizzled with peanut sauce

    I love that the sesame-crusted tofu is baked in the oven and turns out super crispy without having to add any flour or breadcrumbs the to coating.

    Before coating the tofu in sesame, we toss the tofu cubes in some of our peanut sauce to allow the seeds to stick to them properly. This works way better than egg wash AND adds a bunch of flavor to our baked tofu.

    These bowls are perfect for meal prep and the spicy peanut dressing keeps in the fridge for a whole week.

    More bowl recipes:

    Berbere Chickpea Bowl

    Vietnamese Inspired Caramelized Pork Bowls with Lentils

    Vegan Pizza Bowl

    Spicy Maple Mustard Tofu Bowl with Sweet Potatoes

    Cajun Roasted Vegetable Bowl with Garlic Sauce

    26 Vegan Bowl Recipes

    Print Recipe

    Sesame Tofu Bowl with Peanut Sauce

    These Sesame Tofu Bowls with Peanut Sauce are a true lifesaver come dinner time! Tofu cubes are tossed in peanut sauce then coated in sesame seeds and baked until crispy. Serve over greens dressed in peanut sauce, in a wrap or over noodles! Options for Soyfree and peanut-free included

    Prep Time10 mins

    Cook Time20 mins

    Pressing tofu10 mins

    Total Time40 mins

    Course: Main Course

    Cuisine: American

    Keyword: sesame crusted tofu, vegan tofu bowl

    Servings: 4

    Calories: 275kcal

    Author: Vegan Richa

    Ingredients

    For the peanut sauce:

    • 1/4 cup (64.5 g) smooth peanut butter
    • 1 tablespoon soy sauce or use tamari for gluten-free
    • 1 teaspoon toasted sesame oil
    • 1 tablespoon sambal oelek or other Asian chili sauce or use Gochujang
    • 1 teaspoon ginger garlic paste or use minced ginger garlic
    • 1/4 cup (60 ml) hot water

    For the tofu:

    • 14 oz (396.89 g) firm or extra firm tofu, pressed for at least 15 minutes
    • 1/4 cup (59.15 g) of the peanut sauce from above
    • 1 tablespoon cornstarch or tapioca starch
    • 1/4 cup white sesame seeds
    • 3 tablespoons black sesame seeds

    For the bowl:

    • Greens of choice or lettuce
    • 1 bell pepper thinly sliced
    • 1 cup Cucumber or carrots thinly sliced
    • Optional additions: Pickled radish or cucumber, Other crunchy veggies
    • Chopped peanuts optional

    Instructions

    • Make the peanut sauce; In a medium bowl add all the peanut sauce ingredients and mix really well until combined and set aside. Add more hot water a tbsp at a time if needed to make a drizzle-able sauce.  (You can also blend them in a small blender. If using a blender, you can add whole garlic clove and 1/4 inch ginger instead of mincing)

    • Make Sesame Tofu: Press the tofu if you haven’t already then cut it into rectangles or squares. In a small bowl add 1/4 cup of the prepared peanut sauce and the cornstarch and mix really well.

    • Add the tofu to the sauce and make sure all the sides are coated.

    • In another shallow bowl add the sesame seeds and transfer the coated tofu to the sesame seeds bowl to coat on all sides or just the top and sides. Repeat with all the tofu slices. You might need more sesame seeds depending on the size of the tofu slices.

    • Place the coated tofu on a parchment paper-lined baking sheet. Preheat your oven to 400ºF (205ºC). Bake the tofu in the preheated oven for 20 minutes. Check at the 18-minute mark if the tofu is done otherwise bake for 2-4 more minutes.

    • Remove the tofu from the oven and set aside.

    • Prepare your bowl by adding the greens, sliced bell peppers, cucumber, peanuts, etc as you like. Place the baked tofu in the bowl. Drizzle with peanut sauce and serve.

    • To store: refrigerate the sesame tofu separately in a closed container for upto 4 days.

    Notes

    Calories do not include bowl bases  Make Wraps: ,  add some greens or lettuce to a tortilla wrap and add the tofu and other veggies of your choice and a good drizzle of the peanut sauce and serve. Peanut free: use sunflower seed butter. Soyfree: Omit the soy sauce and add 1/4 tsp salt. Use chickpea tofu or pumpkin seed tofu. You can see that half the tofu used in the pictures is greenish. It’s pumfu (pumpkin seed tofu) 

    Nutrition

    Nutrition Facts

    Sesame Tofu Bowl with Peanut Sauce

    Amount Per Serving

    Calories 275 Calories from Fat 162

    % Daily Value*

    Fat 18g28%

    Saturated Fat 3g19%

    Polyunsaturated Fat 8g

    Monounsaturated Fat 7g

    Sodium 289mg13%

    Potassium 261mg7%

    Carbohydrates 16g5%

    Fiber 4g17%

    Sugar 4g4%

    Protein 16g32%

    Vitamin A 958IU19%

    Vitamin C 39mg47%

    Calcium 265mg27%

    Iron 4mg22%

    * Percent Daily Values are based on a 2000 calorie diet.

    vegan sesame crusted baked tofu bowls drizzled with homemade peanut sauce

    Ingredients:

    • For the tofu, I recommend you use firm or extra firm tofu and we will need to press it for at least 15 minutes
    • for the sauce, we mix smooth peanut butter with soy sauce, sesame oil, sambal oelek, ginger garlic paste, and hot water for thinning it out
    • some of the peanut sauce is thickened with cornstarch or tapioca starch to make the coating for the tofu
    • the breading is gluten-free, made with a mix of black and white sesame seeds
    • For the bowl, use your favorite greens, then bell pepper, cucumber or carrots, quinoa, and any other crunchy veggies

    Tips:

    • You can also use the tofu to make wraps,  add some greens or lettuce to a tortilla wrap and add the tofu and other veggies of your choice and a good drizzle of the peanut sauce and serve.
    • To make it peanut free use sunflower seed butter.
    • To make Soyfree: Omit the soy sauce and add 1/4 tsp salt. Use chickpea tofu or pumpkin seed tofu.

    ingredients needed for making sesame crusted tofu bowls on a concrete countertop

    How to make Sesame Tofu Bowls:

    peanut coating for tofu being mixed in a bowl

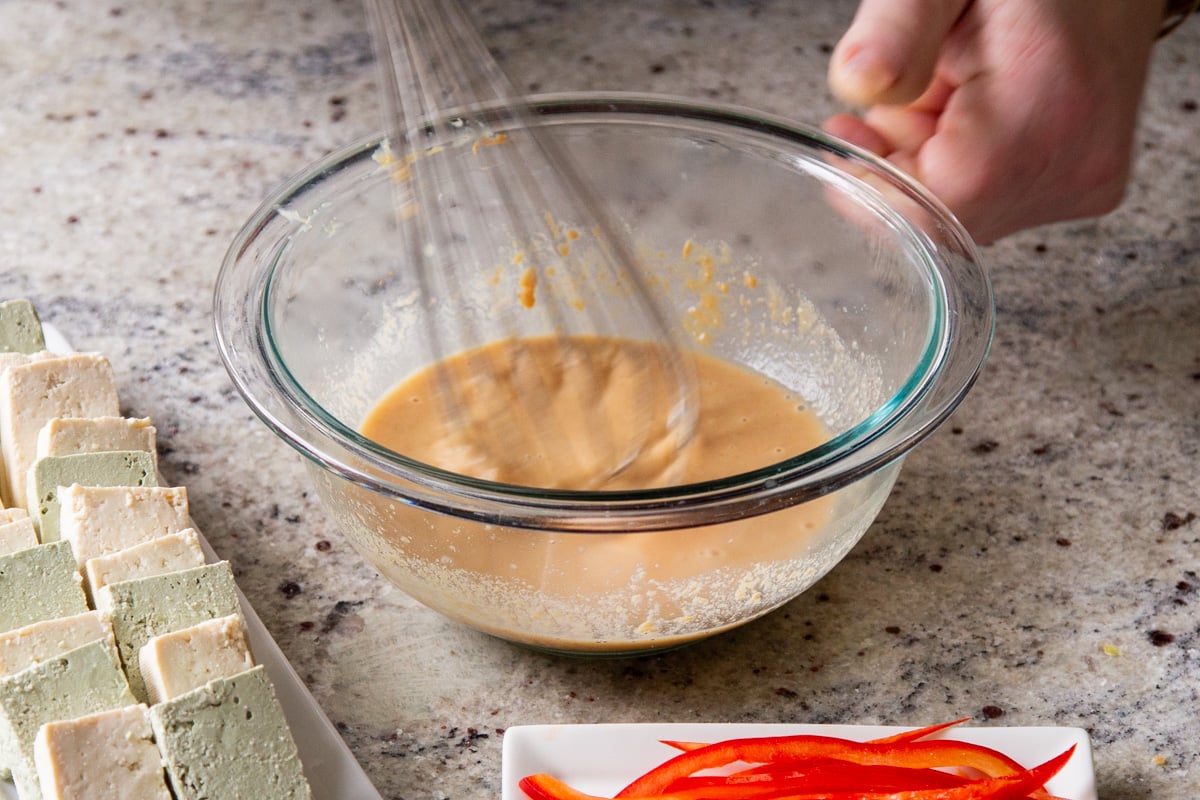
    Make the peanut sauce; In a medium bowl add all the peanut sauce ingredients and mix really well until combined and set aside. Add more hot water a tbsp at a time if needed to make a drizzle-able sauce.  (You can also blend them in a small blender.  You can add whole garlic clove and 1/4 inch ginger instead of mincing)
    a small food processor with peanut sauce ingredients

    peanut sauce ingredients in a small glass bowl

    peanut sauce in a glass bowl with a metal whisk

    a bowl with vegan peanut sauce and a plate with sesame seeds on. a concrete countertop

    Press the tofu if you haven’t already then cut it into rectangles or squares. In a small bowl add 1/4 cup of the prepared peanut sauce and the cornstarch and mix really well.

    a piece of tofu being tossed in peanut sauce

    Add the tofu to the sauce and make sure all the sides are coated really well.

    In another shallow bowl add the sesame seeds and transfer the coated tofu to the sesame seeds bowl to coat on all sides. Repeat with all the tofu slices. You might need more sesame seeds depending on the size of the tofu slices.

    peanut sauce coated chunk of tofu being turned in plate with sesame seeds to make sesame crusted tofu

    tofu cubes coated with peanut butter and sesame seeds

    Place the coated tofu on a parchment paper-lined baking sheet. Preheat your oven to 400ºF (205ºC).

    Bake the tofu in the preheated oven for 20 minutes. Check at the 18-minute mark if the tofu is done otherwise bake for 2-4 more minutes.

    blocks of tofu coated with peanut butter and sesame on a baking sheet

    sesame crusted tofu on a baking sheet

    Remove the tofu from the oven and set aside.

    Prepare your bowl by adding the greens, sliced bell peppers, cucumber, peanuts, etc.

    greens and sliced bell peppers in a shallow bowl

    Pace the cooked tofu on top of the bowl. Drizzle with peanut sauce.

    a shallow bowl with greens topped with sesame crusted tofu

    Storage

    Refrigerate the sesame tofu and dressing and bowl ingredients separately. Reheat the tofu in the oven or microwave. Let the cold dressing come to room temperature to use. Or add some hot water to the dressing, mix and use

    sesame crusted baked tofu on a bowl with greens and veggies drizzled with peanut sauce


    Credit: Source link

  • Six Easy Meals to Make with Leftover Chili

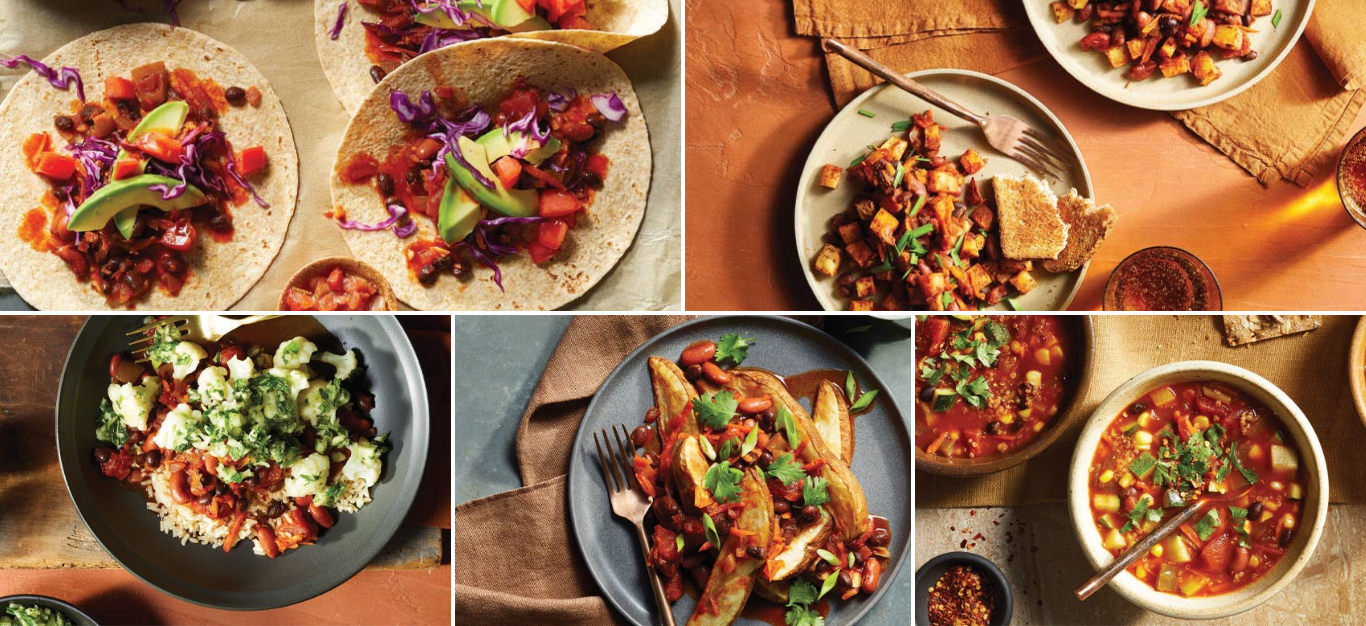
    Six Easy Meals to Make with Leftover Chili

    Vegan chili is the perfect meal for warming you up from the inside out, and there are plenty of creative possibilities for enjoying its fiery flavors outside of serving it in a bowl. We’ve created a smoky, satisfying bean chili recipe that can be transformed into six alternative recipes to showcase its wholesome ingredients in fresh new ways. From tacos to soup to mac and cheese, you’ll love how easily this versatile recipe will freshen up your weeknight dinners with minimal effort. Hungry yet? Let’s dig in!

    Note: The base recipe makes four generous 1½ cup servings, so depending on how many people you’re cooking for, you may want to double the recipe. It also freezes well, so be sure to keep a batch tucked away for nights when you’re short on time.

    Struggling to cook healthy meals at home?

    Forks Meal Planner is here to help.

    Base Recipe: Smoky 2-Bean Chili

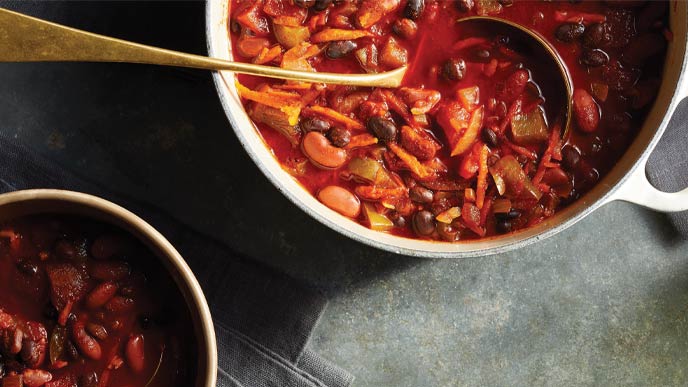
     Smoky 2-Bean Chili in a white Druch oven

    1 hour l Makes 6 cups

    This bold-flavored chili is thickened with grated carrots, which also lend a hint of natural sweetness. Simmering the sauce ingredients and spices before adding the beans allows the flavors to develop, giving you the depth you expect from a top-notch pot of chili, without having to fry or sauté anything.

    Ingredients

    • 1 15-oz. can no-salt-added diced tomatoes
    • 2 cups chopped onions
    • 1 cup chopped green bell pepper
    • 1 cup grated carrots
    • 3 cloves garlic, minced
    • 3 tablespoons chili powder
    • 2 teaspoons ancho chile powder
    • 1 15-oz. can kidney beans, rinsed and drained (1½ cups)
    • 1 15-oz. can black beans, rinsed and drained (1½ cups)

    Instructions

    In a large saucepan or Dutch oven combine the first seven ingredients (through ancho chile powder) and 3 cups water. Cover and bring to boiling over medium; reduce heat. Simmer, covered, 30 minutes. Stir in kidney beans and black beans. Cover and simmer about 20 minutes more or until chili is thick.

    What to Do With Leftover Chili

    After you’ve enjoyed that first cozy bowl of chili, use next-day leftovers to create something totally new. These six tasty meal ideas show you how to make the most out of your extra portions.

    1. Oven-Roasted Breakfast Hash

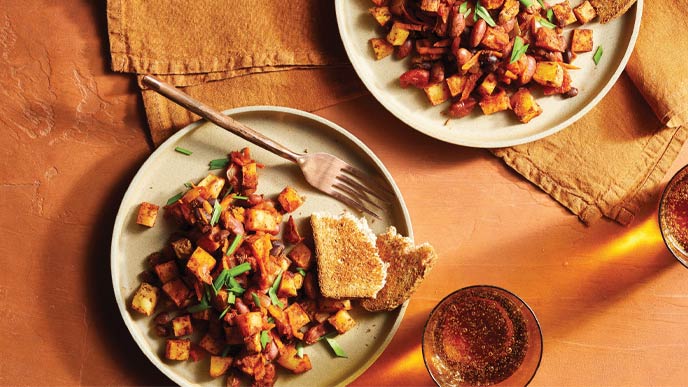
    Bored with your breakfast routine? Roast seasoned potatoes to crispy perfection and pour leftover chili over the top for the last few minutes of roasting time. The result: a hearty morning meal that will give you plenty of energy to face the day.

    Oven-Roasted Breakfast Hash on gray ceramic plates on an orange tabletop

    Instructions

    Preheat oven to 400°F. In a bowl toss 1½ cups diced raw potatoes with 1 teaspoon paprika and ½ teaspoon garlic powder. Spread potatoes on a parchment-lined baking sheet; roast 25 to 30 minutes or until crisp and browned, stirring once or twice during roasting time. Pour 1 cup hot chili over potatoes on baking sheet, stir to coat, then roast 5 to 10 minutes more or until most of the chili moisture has evaporated and potatoes crisp up again. Makes 2 cups.

    2. Baked Chili Mac

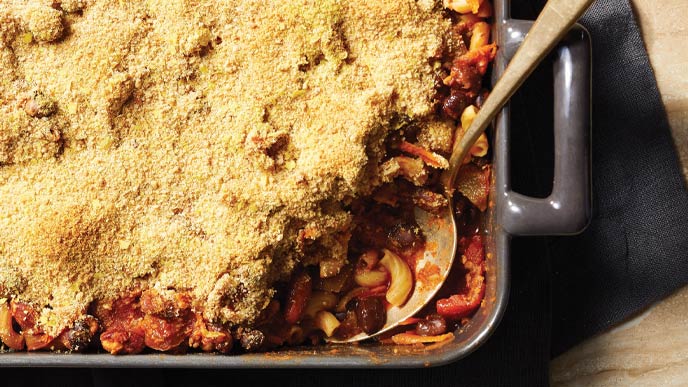
    Combine hearty macaroni noodles with your leftover chili to create this super-tasty casserole. The cheesy garlic-breadcrumb topping adds an extra layer of flavor and satisfying texture.

    Baked Chili Mac in a rectangular dish with a metal serving spoon

    Instructions

    Preheat oven to 350°F. In a 2-quart baking dish stir together 2 cups chili and 1 cup cooked whole wheat macaroni; spread evenly. In a small bowl stir together ½ cup whole wheat bread crumbs, 2 tablespoons nutritional yeast, and 1 teaspoon garlic powder; sprinkle over chili mixture. Bake, uncovered, 30 minutes. Makes 3 cups.

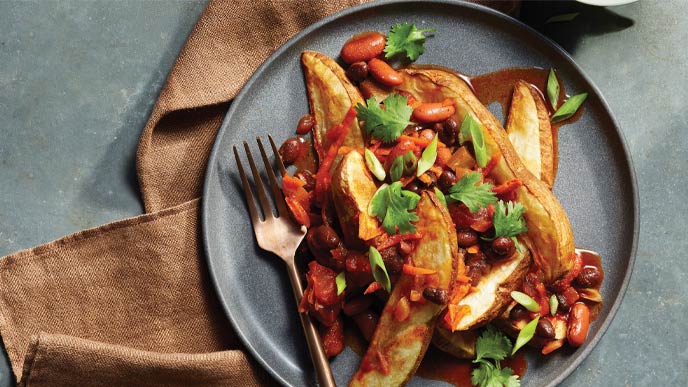
    3. Easy Chili Fries

    This variation is perfect for game day or a quick dinner for one—simply air fry some potato wedges, top with chili, and add fresh herbs for a punch of zesty flavor.

    Easy Chili Fries on a gray plate with a brown cloth napkin

    Instructions

    Cut 1 large unpeeled russet or sweet potato lengthwise into wedge-style fries. Soak wedges in water 10 minutes; drain and pat dry. Preheat an air fryer to 375°F. Air-fry potato wedges 10 to 12 minutes or until browned. Serve topped with ½ cup hot chili, 2 tablespoons sliced scallion, and 2 teaspoons chopped fresh cilantro. Makes 2 cups.

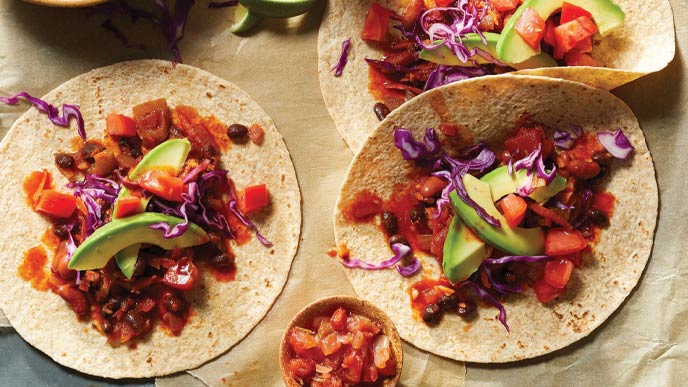
    4. Chili Tacos

    Taco Tuesday just got a whole lot better with this spicy Southwest combo. Grab a few corn tortillas and fill them with your chili then add fresh tomatoes, creamy avocado, crunchy cabbage, and hot sauce.

    Chili Tacos on brown parchment paper

    Instructions

    Fill each of two 6-inch whole wheat or corn tortillas with ⅓ cup hot chili, 3 tablespoons diced tomatoes, 2 slices avocado, and 2 tablespoons thinly shaved red or green cabbage. Serve with salsa and hot sauce. Makes 2 tacos.

    5. Zesty Chili Bowl with Cucumber-Mint Relish

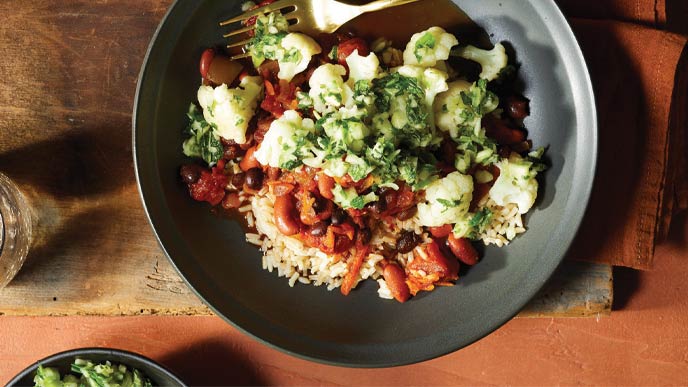
    This refreshing recipe balances out the smoky flavors of the chili with an herbaceous cucumber-mint relish. Steamed cauliflower adds extra veggie goodness while a bed of brown rice delivers satisfying heft.

    Zesty Chili Bowl with Cucumber-Mint Relish in a gray ceramic bowl with a metal fork

    Instructions

    For relish, in a blender combine 1½ cups chopped peeled cucumber; 1 cup fresh mint leaves;

    4 scallions, roughly chopped; and 1 teaspoon lemon or lime juice. Cover and pulse until chunky. Fill each of two large bowls with ½ cup hot cooked brown rice or other whole grain, ½ cup steamed cauliflower, and ½ cup hot chili. Top with relish. Makes 2 bowls.

    6. Southwest Vegetable Soup

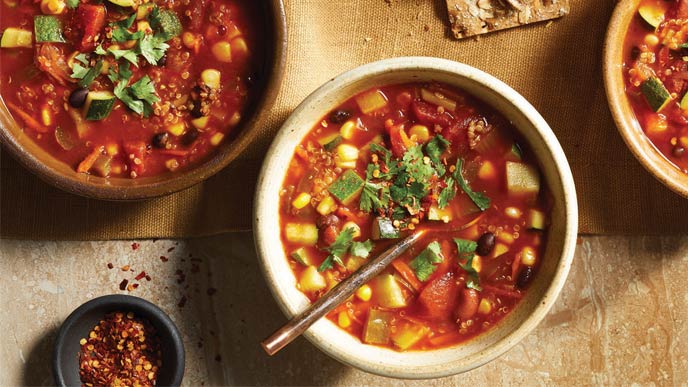
    This lip-smacking soup is perfect for using up straggler chili leftovers: Simply toss the chili in a pot with some low-sodium vegetable broth, chopped or frozen veggies, and a whole grain of your choice. This soup has a flavor profile similar to minestrone and is great paired with a side of crusty whole wheat bread.

    Southwest Vegetable Soup in white bowls

    Instructions
    In a large saucepan stir together 2 cups chili, 2 cups vegetable broth, 1 cup chopped zucchini, 1 cup fresh or frozen corn, and ½ cup cooked quinoa or other whole grain. Bring to a simmer; cook about 20 minutes or until zucchini is tender. Serve garnished with fresh cilantro. Makes 4 cups.

    Credit: Source link

  • Berbere Sheet Pan Dinner – Vegan Richa

    Spice up your dinner routine with this flavorful Berbere Sheet Pan Dinner! Veggies, beans and tofu cubes are seasoned with a bold Ethiopian spice blend, baked until caramelized, then drizzled with a creamy lemon tahini dressing. Glutenfree Nutfree, Soyfree substitute option.

    Everyone loves a sheet pan dinner. Everything we love about a one-pot dinner flipped onto a sheet pan. I mean, what’s better than dumping some ingredients onto a sheet pan, popping it into the oven, setting a timer, and letting the oven do its magic while you move on to more fun things.

    a bowl of baked veggies and tofu seasoned with berbere and drizzled with creamy tahini sauce

    This vegan sheet pan dinner can be left completely unattended apart from the odd peek through the oven door. Clean-up is minimal as well because, again – just one pan.

    Ok, we have one more dish because we make a little tahini sauce on the side to drizzle the sheet pan dinner with after cooking. While the tahini sauce is optional, it is totally recommended because the creaminess of the tahini really lifts the whole dinner to a completely new level of delish.

    What makes this sheet pan dinner exceptionally good is the use of berbere – a spicy Ethiopian spice blend that contains over a dozen different ingredients.

    Amongst them are red chili peppers, fenugreek, and ginger, as well as other warming spices like coriander, cardamom, allspice, cumin, peppercorns, cloves, and cinnamon.

    You can find berbere in the spice or international section of any well-stocked supermarket or get it online or make your own!

    More vegan sheet pan dinners:

    Sheet Pan mediterranean dinner with roasted root veggies  

    Sheet Pan Thanksgiving Dinner (Vegan)

    Sheet Pan Veggie Dinner with miso maple dressing 

     Sheet Pan Fajitas Dinner with Chipotle Garlic Sauce 

    Sheet Pan Cheeseburger Veggie Dinner with Garlic Mayo Dressing

    Print Recipe

    Smoky Berbere Sheet Pan Veggie Dinner with tahini dressing

    Spice up your dinner routine with this flavorful Berbere Sheet Pan Dinner! Veggies, beans and tofu cubes are seasoned with a bold Ethiopian spice blend, baked until caramelized, then drizzled with a creamy lemon tahini dressing. Glutenfree Nutfree, Soyfree substitute option. 

    Prep Time15 mins

    Cook Time30 mins

    Total Time45 mins

    Course: Main

    Cuisine: fusion

    Keyword: vegan sheet pan dinner

    Servings: 4

    Calories: 383kcal

    Author: Vegan Richa

    Ingredients

    • 4 oz quartered white or cremini mushrooms 1-inch or smaller size pieces
    • 1 small zucchini chopped into thick slices
    • 1 bell pepper sliced into thick slices (red pepper or a mix of red and green bell peppers or other colours)
    • 7 oz firm or extra firm tofu pressed and cubed
    • 1.5 – 2 cups small chopped broccoli
    • 15 oz can white beans or chickpeas or other beans of choice or 1.5 cups cooked
    • 2 teaspoons lime juice
    • 2 teaspoons oil

    For the spices:

    • 1 tablespoon berbere blend
    • 2 teaspoons paprika
    • 1 teaspoon dried thyme
    • 1/2 teaspoon black pepper
    • 3/4 teaspoon salt
    • 1 teaspoon garlic powder
    • 2 teaspoons onion flakes

    For the tahini dressing:

    • 1/4 cup tahini
    • 1/4 cup warm water
    • 1 tablespoon lemon juice
    • 1/2 teaspoon dried dill or parsley
    • 1/4 teaspoon salt
    • 1/4 teaspoon garlic powder
    • Cilantro or parsley for garnish
    • 2 Tablespoons pumpkin seeds or hemp seeds for crunch optional

    Instructions

    • Chop or cube all the veggies and the tofu if you haven’t already. Then add them to a big sheet pan or baking dish (11×13 inches or larger size). Then drizzle the lime juice and oil on to the veggies and toss to coat well. If the veggies are not fully coated then add some more lime juice and another teaspoon of oil and toss.

    • In another bowl mix all the spices and sprinkle all over and toss well so all the veggies, tofu and beans are coated with the spice mixture. (You can use other spices like garam masala, baharat, curry powder etc. for variation)

    • Preheat the oven to 400ºF (205ºC) and place the baking pan in the preheated oven.

    • Bake for 25-30 minutes. At about the 18-20 minute mark check the veggies if they are getting evenly cooked and the edges are not getting scorched. Move them around. If the broccoli or mushrooms are not cooked through let them bake for another 10 minutes or so.

    • Meanwhile make the tahini dressing. Add the tahini, 2 tablespoons of water, lemon juice, dried dill, salt and garlic powder to a bowl. Mix really well. Add more water as needed to make a creamy thick dressing. Taste and adjust salt, tang and flavor.

    • Once the veggies are done cooking, remove from the oven and plate them in your serving bowls and drizzle with the tahini dressing. You can add some pumpkin seeds or chopped pecans for crunch(optional). Garnish with parsley.

    • You can also add these veggies in a pita wrap and add some lettuce and tahini dressing. Or you can add these veggies to a bowl with some cooked grains , and make a bowl.

    Notes

    This recipe is nut-free, gluten-free
    • Soy-free:  omit the tofu and add more veggies of choice, more mushroom or more beans.
    • Make pita wrap or tortilla wraps – You can also add these veggies in a pita wrap and add some lettuce and tahini dressing.
    • Make a bowl: add these veggies to a bowl with some cooked grains if you like.
    • You can find berbere in the spice or international section of any well-stocked supermarket or get it online or make your own!
    • You can use other spices like garam masala, baharat, curry powder etc
    • Oilfree: Use aquafaba instead of oil for baking 

    Nutrition

    Nutrition Facts

    Smoky Berbere Sheet Pan Veggie Dinner with tahini dressing

    Amount Per Serving

    Calories 383 Calories from Fat 135

    % Daily Value*

    Fat 15g23%

    Saturated Fat 2g13%

    Sodium 622mg27%

    Potassium 926mg26%

    Carbohydrates 46g15%

    Fiber 13g54%

    Sugar 10g11%

    Protein 20g40%

    Vitamin A 1868IU37%

    Vitamin C 95mg115%

    Calcium 188mg19%

    Iron 7mg39%

    * Percent Daily Values are based on a 2000 calorie diet.


    Ingredients:

    • veggies: cremini mushrooms, zucchini, bell pepper, and broccoli
    • our protein of choice here is tofu along with white beans
    • spices: Ethiopian spice mix berbere, paprika, thyme, pepper, garlic powder and onion powder
    • for the tahini dressing, we mix tahini with warm water, lemon juice, salt, dill ad garlic powder for flavor

    Tips:

    • Make pita wrap or tortilla wraps – You can also add these veggies in a pita wrap and add some lettuce and tahini dressing.
    • Make a bowl: add these veggies to a bowl with some cooked grains if you like.
    • You can use other spices like garam masala, baharat, curry powder etc
    • This recipe is nut-free, and gluten-free. To make it soy-free omit the tofu and add some more veggies of choice, more mushrooms or more beans.

    How to make Vegan Berbere Sheet Pan Dinner:

    Chop or cube all the veggies and the tofu if you haven’t already.

    Then add them to a big sheet pan or baking dish (11×13 inches or larger size).

    Then drizzle the lime juice and oil onto the veggies and toss to coat well. If the veggies are not fully coated then add some more lime juice and another teaspoon of oil and toss.

    In another bowl mix all the spices and sprinkle all over and toss well so all the veggies, tofu and beans are coated with the spice mixture.

    Preheat the oven to 400ºF (205ºC) and place the baking pan in the preheated oven.
    Bake for 25-30 minutes.

    At about the 18-20 minute mark check the veggies if they are getting evenly cooked and the edges are not getting scorched. If the broccoli or mushrooms are not cooked through let them bake for another 10 minutes or so.

    Meanwhile make the tahini dressing. Add the tahini, 2 tablespoons of water, lemon juice, dried dill, salt and garlic powder to a bowl. Mix really well.

    Add more water as needed to make a creamy thick dressing. Taste and adjust salt, tang and flavor.

    Once the veggies are done cooking, remove from the oven and plate them in your serving bowls and drizzle with the tahini dressing.

    a baking pan with sheet pan veggies drizzled with creamy tahini sauce

    Ways to serve berbere sheet pan dinner:

    You can also add these veggies in a pita wrap and add some lettuce and tahini dressing. To make a wrap you can use tortillas. Or you can add these veggies to a bowl with some cooked grains if you like.

    a plate with berbere sheet pan veggies drizzled with tahini dressing

    Storage

    Refrigerate the roasted veggies and bean mix in a closed container for upto 3 days. Refrigerate dressing separately. Reheat the veggies in the oven or microwave , then dress and serve.

    Credit: Source link

  • As Early as Day 3 on a WFPB Diet, I Noticed I Had So Much More Energy

    As Early as Day 3 on a WFPB Diet, I Noticed I Had So Much More Energy

    I grew up believing that eating meat was necessary. I was encouraged to follow the family traditions and not question them. Why would I? Everyone around us was eating the same foods. My diet consisted of red meat, chicken, fish, eggs, lots of saturated fat, butter and buttermilk, obscene amounts of sugar, and just a handful of vegetables.

    My biggest health concern was my weight. When I started piling on the pounds during my teenage years, I was told to simply cut down the amount that I ate. Every diet I tried only lasted for a limited time. I’d always give up and return to my old ways. Sometimes setting my mind up for a diet was too challenging. Even after reading through all aspects of a new “regimen” in a magazine, I would flip the magazine over and go indulge in sweets.

    Master plant-based cooking with Forks

    Get 25% off through February 13

    In 2020, when COVID-19 hit, health became the most talked about topic worldwide. In researching the leading causes of death, I was surprised to find that most of them were lifestyle-related, and that many of the diseases had been linked specifically to diets high in animal products. I was flabbergasted. I watched Cowspiracy, What the Health, and Game Changers. I followed up on the expert sources in these documentaries and read Dr. Michael Greger’s book How Not to Die followed by How Not to Diet. His research led me to Dr. T. Colin Campbell’s book Whole, which explains how a whole-food, plant-based diet provides optimal nutrition. My nutrition education continued with Dr. Neal Barnard, Dr. Caldwell Esselstyn, and Rich Roll. All of my inherited beliefs regarding diets, health, and nutrition were completely upended.

    But the idea that we could prevent and reverse chronic diseases just by eating fruits, veggies, and whole grains almost sounded too good to be true. I was skeptical that food could have such a significant influence. My partner and I decided to test it for ourselves. The fact that nobody was trying to sell us anything—nobody was trying to get us to subscribe to expensive supplements or pay to join a club—is what convinced us to give it a try. There were zero costs involved. The local grocery store had everything we needed to start our experiment. We challenged ourselves to go one month on a whole-food, plant-based diet. I used the Forks Over Knives website as a source for meal and cooking ideas. After getting an understanding of the principal points, I established a menu for us for the month. And we went all-in, cold turkey (pun intended).

    Never Going Back

    Two weeks of eating WFPB was all it took for me to say, “I will never eat meat again.”

    I started feeling the positive changes right away, as soon as Day 3. The amount of extra energy I had—and the feeling of being as light as a feather, even after a meal—were mind-blowing. I’d never felt so good after eating in my life. I was convinced.

    I was surprised that I no longer experienced hunger attacks: Technically, I was on a diet, but it didn’t feel that way. I was able to have more food than ever before. Every diet I’d tried before had strict portion sizes, allocated time slots for eating, no variations; they all required a lot of hard work, were not enjoyable, and left me feeling hopeless. The WFPB lifestyle suits me so much better.

    It’s also improved my understanding of nutrition. It’s made me question why I was eating certain products in the first place. I later realized that I was simply following cultural and family habits.

    Eating this way has also opened me up to a seemingly infinite array of vegetables and a wide world of spices. It’s improved my relationship with food.

    Since making the switch, all forms of exercise have become much easier. Today I look better and feel happier than I did 20 years ago. I am delighted to speak to anyone who has an interest in a plant-based lifestyle. I feel obliged to share the positivity and empower others. People have the right to know that they can improve their mental and physical health by replacing what’s on their plate.

    To learn more about a whole-food, plant-based diet, visit our Plant-Based Primer.

    Credit: Source link
  • Saag Cornbread Casserole – Vegan Richa

    Saag Cornbread Casserole – a fragrant Indian mustard greens stew baked in the oven and topped with a cornbread topping. So flavorful and comforting. Baked Sarson da saag Makki roti casserole. Nutfree Soyfree recipe.  Oil-free and gluten-free versions are included.

    a slice of saag cornbread casserole on a white plate

    I am back with another Indian-inspired casserole dish! To help you try Indian flavors and foods in a a simpler format. Saag Cornbread Casserole – flavorful, super nourishing and oh-so satisfying.

    Saag is a dish from the northern part of India that uses greens. It can use different types of greens that are locally available. The most common version uses either all mustard greens or a mix of mustard greens and spinach or bathua (a type of amaranth) leaves. It is often slow cooked for a while then mashed and cooked again to make a spiced mashed greens stew that is served topped with vegan butter, Indian pickle and with flatbread.

    overhead shot of a casserole dish with vegan saag cornbread casserole

    Saag is usually served with a maize flour/fine cornmeal based flatbread (called Makki ki roti).

    Makki/makai ki roti (corn flatbread) is somewhat similar to Mexican corn tortillas but uses maize flour that hadn’t been nixtamalized.  Hence it has a different flavor and texture from corn tortillas. The process for making both the roti and saag can take quite some time, so I converted this delicious Punjabi comfort food staple into a simple casserole dish that you can make in a baking dish!

    a slice of saag casserole topped with cornbread topping on two stacked white plates

    The greens used in this casserole are chopped up and placed at the bottom of the casserole dish alongside the tempered spices and flavors of Saag. I add some quinoa to increase the protein content of this vegan casserole dish. You can use split red lentils instead or some potatoes.

    While our saag casserole bakes, we make a cornbread-type topping using Indian spices and cornmeal instead of making corn flatbread on the side.

    close-up overhead shot of vegan saag cornbread casserole

    Then we layer that cornbread mixture over the pre-cooked greens,  cover it with parchment paper and bake the whole assembled casserole again until the cornbread sets.

    I love to serve this as is or with some vegan butter on top. It’s hearty, delicious and checks all the Makki ki roti and sarson da saag flavor and the ease of a casserole.

    More vegan casserole dishes:

    Shahi Tofu Kofta Casserole

    Jalapeno Chili Cornbread Casserole

    Lentil Curry Casserole

    Baked Kitchari Casserole (Spiced Lentil Rice Casserole)

    South Indian Eggplant Curry Recipe (Baked Casserole)

    Madras Curry Tofu Casserole

    Baked tofu curry – makhani 

    Print Recipe

    Saag Cornbread Casserole

    Saag Cornbread Casserole – a fragrant Indian mustard greens stew baked in the oven and topped with a cornbread topping. So flavorful and comforting. Casserole version of sarson da saag, Makki ki roti. Oil-free and gluten-free versions are included. 

    Prep Time15 mins

    Cook Time1 hr 5 mins

    Total Time1 hr 20 mins

    Course: Main Course

    Cuisine: main

    Keyword: cornbread casserole vegan, Indian vegan casserole

    Servings: 4

    Calories: 310kcal

    Author: Vegan Richa

    Ingredients

    • 2 teaspoons oil
    • 1/4 teaspoon cayenne or 1/2 teaspoon paprika – for less heat
    • 1/4 teaspoon turmeric
    • 1/4 teaspoon salt
    • 1 teaspoon dried fenugreek leaves (Kasoori methi)
    • 1/2 – 1 teaspoon garam masala
    • 1/2 teaspoon ground cumin
    • 1/2 teaspoon salt
    • 1 tablespoon ginger garlic paste or use 1-inch of ginger and 3-4 garlic cloves minced
    • 1/2 cup (80 g) chopped onion
    • 1 green chili finely chopped
    • 1 (16 oz) bunch of mustard greens chopped and discard the hardest stems at the bottom. the softer stems are edible
    • 1/4 cup (45 g) quinoa or use split red lentils(masoor dal)
    • 1.5 cups (350 ml) water or stock

    For the cornbread topping:

    • 3/4 cup (95 g) all-purpose flour , see notes for gluten-free
    • 1/2 cup (80 g) fine or medium-sized cornmeal
    • 1/3 teaspoon salt
    • 1 teaspoon baking powder
    • 1/4 teaspoon Ajwain or carom seeds or use cumin seeds
    • 1 cup (250 ml) water (or unsweetened non dairy milk)
    • 1 tablespoon oil

    For the tempering:

    • 2 teaspoons oil
    • 1/4 teaspoon cumin seeds
    • 2 dried red chilies cayenne or Indian for hot, California red for mild. Or use 1/4 tsp pepper flakes
    • 2 garlic cloves finely minced

    For garnish/topping:

    • Sliced green chilies
    • Sliced onions
    • Vegan butter to serve
    • Cilantro, lemon juice

    Instructions

    • Chop the mustard greens if you haven’t already. Use the entire leaf because the stems are quite tender. Sometimes I cut out a little bit of the bottom stem because they might be a little dirty or thick but the rest of the stem is all edible. Finely chop the entire leaf and stem.

    • You can also add other greens and use half the mustard green and half other(amaranth (bathua) or chard). Spinach has a pretty strong flavor, so I usually avoid using spinach when making mustard greens saag.

    • Saag: In a 9×9-inch baking dish add 2 teaspoons of oil and the spices and mix well. Add the ginger garlic paste and onion and mix again. Then add the mustard greens, quinoa, and water and mix well to coat all the mustard greens. Press the greens down to submerge them in the water.

    • Preheat the oven to 400ºF (205ºC). Cover the baking dish with parchment and bake in the preheated oven for 35-45 minutes.

    • In the meantime, prepare the cornbread topping. In a large bowl add the all-purpose flour, cornmeal, salt, baking soda, and carom seeds and mix really well.

    • Add one tablespoon of oil and 3/4 cup of water and mix well. Set aside.

    • Once the greens are wilted and the quinoa is cooked, remove the baking dish from the oven.

    • Make the tempering by heating up the oil in a small skillet over medium-high heat. Once the oil is hot, add the cumin seeds and cook until the cumin seeds change color significantly. Then reduce the heat to medium-low. Add the red chilies and the minced garlic and mix well for a few seconds. Switch off the heat and mix again for a few seconds so that the garlic is cooked. Add the tempering to the greens in the baking dish. And gently mix in but not entirely mixed.

    • If the cornbread mixture is too thick then add some water, one tablespoon at a time until you achieve a thinner and easier-to-spread batter. If the saag greens have dried out too much, gently pour 1/4 cup water or non dairy milk in the baking dish and mix in.

    • Then Spread the cornbread mixture over the cooked greens and top it with sliced jalapenos/ green chilies and sliced onion. Cover again with parchment and bake for 15-17 minutes or until the cornbread is cooked through.

    • Remove the baking dish from the oven, let it cool for a few minutes, and squeeze a little bit of lemon juice on top. Garnish with pepper flakes and cilantro. Slice and serve topped with a vegan butter on each of the cornbread portions.

    • Store the casserole dish covered in the fridge for upto 3 days. Or store individual portions in a closed container refrigerated for upto 3 days

    Notes

    • Oil-free, omit the oil in the casserole dish. Omit the oil from the cornbread as well. To omit the oil in the tempering, dry roast the cumin seeds, then add 2-3 tablespoons of broth. Add the garlic and red chilies and saute.
      The cornbread layer might dry out a little bit if you are not using oil. So brush it with aquafaba (canned chickpea liquid) or non-dairy milk after baking , to moisten it.
    • Gluten-free, use a 3/4 cup gluten-free flour blend of choice. I like to use 1/2 cup almond flour, 1/4 cup oat flour, 1/4 cup potato starch, and mix and use.  Use 3/4 cup of this flour mixture and add more if needed.
    • To make it more hearty- add cooked chickpeas into the saag just before adding the cornbread layer. Add more spices for the added volume of the chickpeas 

    Nutrition

    Nutrition Facts

    Saag Cornbread Casserole

    Amount Per Serving

    Calories 310 Calories from Fat 90

    % Daily Value*

    Fat 10g15%

    Saturated Fat 1g6%

    Sodium 605mg26%

    Potassium 534mg15%

    Carbohydrates 47g16%

    Fiber 6g25%

    Sugar 3g3%

    Protein 9g18%

    Vitamin A 1545IU31%

    Vitamin C 65mg79%

    Calcium 122mg12%

    Iron 4mg22%

    * Percent Daily Values are based on a 2000 calorie diet.

    ingredients for saag cornbread casserole

    Ingredients:

    • for the saag stew, I used a large bunch of mustard greens, but you can use a mix of spinach and mustard greens
    • ground spices: cayenne, turmeric, fenugreek leaves, garam masala and cumin
    • ginger garlic paste, onion and chili – the Indian trifecta
    • quinoa adds protein
    • For the cornbread topping, we mix all-purpose flour with cornmeal
    • baking powder helps the cornbread mixture rise in the oven
    • for seasoning the cornbread, we add Ajwain or carom seeds or cumin seeds
    • For the tempering, we fry cumin seeds, chilies, and garlic in oil
    • For garnish/topping, I like cilantro, chilies, onions, and vegan butter (to serve)

    Tips:

    • You can also use other greens instead of mustard greens or only use half the mustard green and replace the other half with chard or amaranth leaves . Spinach has a pretty strong flavor, so I usually avoid using spinach when making mustard greens saag. Some chard and amaranth leaves will work great.
    • Quinoa sub: substitute the quinoa with 1/4 cup of red lentils.
    • If the greens have dried out too much, before spreading the cornbread batter mix 1/4 cup of water in the greens. And then top it with the cornbread batter.
    • To make the cornbread batter even moist, use unsweetened non-dairy milk or coconut milk instead of water.
    • To make this recipe oil-free, omit the oil in the casserole dish. Omit the oil from the cornbread as well. To omit the oil in the tempering, dry roast the cumin seeds, then add 2-3 tablespoons of broth. Add the garlic and red chilies and saute.
      The cornbread layer might dry out a little bit if you are not using oil. So brush it with aquafaba (canned chickpea liquid) or non-dairy milk after baking, to moisten it.
    • To make this recipe gluten-free, use a 3/4 cup gluten-free flour blend of choice. I like to use 1/2 cup almond flour, 1/4 cup oat flour, 1/4 cup potato starch, and mix and use.  Use 3/4 cup of this flour mixture and add more if needed.

    ingredients for saag cornbread casserole topping

    How to make Saag Cornbread Casserole:

    mustard greens on a wooden chopping board with spices and chopped onions in small dishes to one side

    chopped mustard greens on a chopping board

    Chop the mustard greens if you haven’t already. You can use the entire leaf because the stems are quite tender. Sometimes I cut out a little bit of the bottom stem because they might be a little dirty or thick but the rest of the stem is all edible.

    Finely chop the entire leaf and stem.

    spices and oil in a square red casserole dish

    In a 9×9-inch baking dish add 2 teaspoons of oil and the spices and mix well. Add the ginger garlic paste and onion and mix again.

    oil, spices, ginger and garlic in a red casserole dish


    chopped onions and ginger with spices in a red casserole dish

    Then add the mustard greens, quinoa, and water and mix well to coat all the mustard greens. Press the greens down to submerge them in the water.

    chopped mustard greens being added to a red casserole dish

    Preheat the oven to 400ºF (205ºC). Cover the baking dish with parchment and bake in the preheated oven for 35-45 minutes.

    a casserole dish with mustard greens topped with a piece of parchment paper

    In the meantime, prepare the cornbread topping. In a large bowl add the all-purpose flour, cornmeal, salt, baking soda, and carom seeds and mix really well.

    cornmeal, flour and spices in a glass bowl

    Add one tablespoon of oil and 3/4 cup of water and mix well. Set aside.

    cornbread topping for casserole in a glass bowl

    Once the greens are wilted and the quinoa is cooked, remove the baking dish from the oven.

    mustard greens in a red casserole dish

    baked Indian saag stew in a red casserole dish

    Make the tempering by heating up the oil in a small skillet over medium-high heat. Once the oil is hot, add the cumin seeds and cook until the cumin seeds change color significantly. Then reduce the heat to medium-low.

    cumin seeds and oil in a frying pan

    Add the red chilies and the minced garlic and mix well for a few seconds. Switch off the heat and mix again for a few seconds so that the garlic is cooked.

    cumin seeds and chili in a frying pan

    cumin seeds, garlic and chili in a frying pan

    Add the tempering to the greens in the baking dish. And gently mix in but not too much.

    greens, chili and garlic in a red casserole dish

    Top the greens with the cornbread mixture. If the cornbread mixture is too thick then add some water, one tablespoon at a time until you achieve a thinner and easier-to-spread batter.

    cornbread topping being spread on greens in a red casserole dish

    Then spread the cornbread mixture over the greens and (optional) top it with sliced jalapenos/ green chilies and sliced onion. Cover again with parchment and bake for 15-17 minutes or until the cornbread is cooked through.

    saag casserole topped with cornbread topping, sliced onions and chilies

    a casserole dish dopped with a piece of parchment paper

    Remove the baking dish from the oven, let it cool for a few minutes, and squeeze a little bit of lemon juice on top.

    Garnish with pepper flakes and cilantro and serve topped with a vegan butter on each of the cornbread portions.

    cornbread casserole topping with onion and chilie

    a slice of saag cornbread casserole on two stacked plates

    Storage

    Store the casserole dish covered in the fridge for upto 3 days. Or store individual portions in a closed container refrigerated for upto 3 days.

    Credit: Source link
  • This USDA Program Is Looking to Make Vegan Dairy, Plant-Based Foods More Accessible

    This USDA Program Is Looking to Make Vegan Dairy, Plant-Based Foods More Accessible

    Forty-two percent of Americans believe that plant-based foods will overtake meat options by 2032, and now, a major government program might help millions gain access to vegan dairy products such as dairy-free milk, yogurt, and more, along with other plant-based foods.

    The United States Department of Agriculture is proposing to expand the number of vegan dairy products included in the Special Supplemental Nutrition Program for Women, Infants, and Children (WIC). The food-assistance program, which serves about half of all infants born in the United States, aims to support the health and general well-being of women and children nationwide who suffer from nutritional deficiencies or food insecurity.

    Last chance to save!


    Limited-Time Offer

    20% Off Forks Meal Planner!

    The proposed measures will increase the level of dairy and eggs provided to WIC users, but the USDA included alternatives to give users a choice to eat plant-based. The USDA will include product substitutes such as soy yogurt and vegan cheese as well as tofu.

    “USDA is committed to advancing maternal and child health through WIC, helping mothers, babies, and young kids thrive,” Tom Vilsack, U.S. secretary of agriculture, said in a statement. “These proposed changes will strengthen WIC … by ensuring it provides foods that reflect the latest nutrition science to support healthy eating and bright futures.”

    Treating Nutrient Deficiency With Plant-Based Foods

    About 94% of Americans suffer from at least one nutrient deficiency. By introducing more vegan options and plant-based whole foods to nearly 6 million participants nationwide, the USDA is effectively working to fill nutritional gaps. If the proposed changes are approved, WIC will also offer participants a greater number of whole grains, a larger volume of fruits and vegetables, and canned beans, in addition to dried.

    “It is great to see USDA’s new proposed rule increase WIC’s fruit and vegetable benefit,” says Sen. Cory Booker. “The new WIC package will strengthen a program that is proven to help mothers and babies flourish.”

    “For the more than 6 million moms, babies, and young children who participate in WIC—and the millions more eligible to participate—these proposed revisions have the potential to make positive, life-long impacts on health and well-being,” says Stacy Dean, USDA deputy undersecretary for food, nutrition, and consumer services.

    The USDA is taking comments on its new proposed updates until Feb. 21, 2023.

    To learn more about a whole-food, plant-based diet, visit our Plant-Based Primer. For meal-planning support, check out Forks Meal Planner, FOK’s easy weekly meal-planning tool to keep you on a healthy plant-based path.

    Credit: Source link
  • Black Pepper Cauliflower – Vegan Richa

    This easy recipe for Black Pepper Cauliflower is a vegan spin on black pepper chicken. Bake the cauliflower, make the sweet and spicy pepper sauce, combine and your meal is ready. Nut-free & glutenfree!

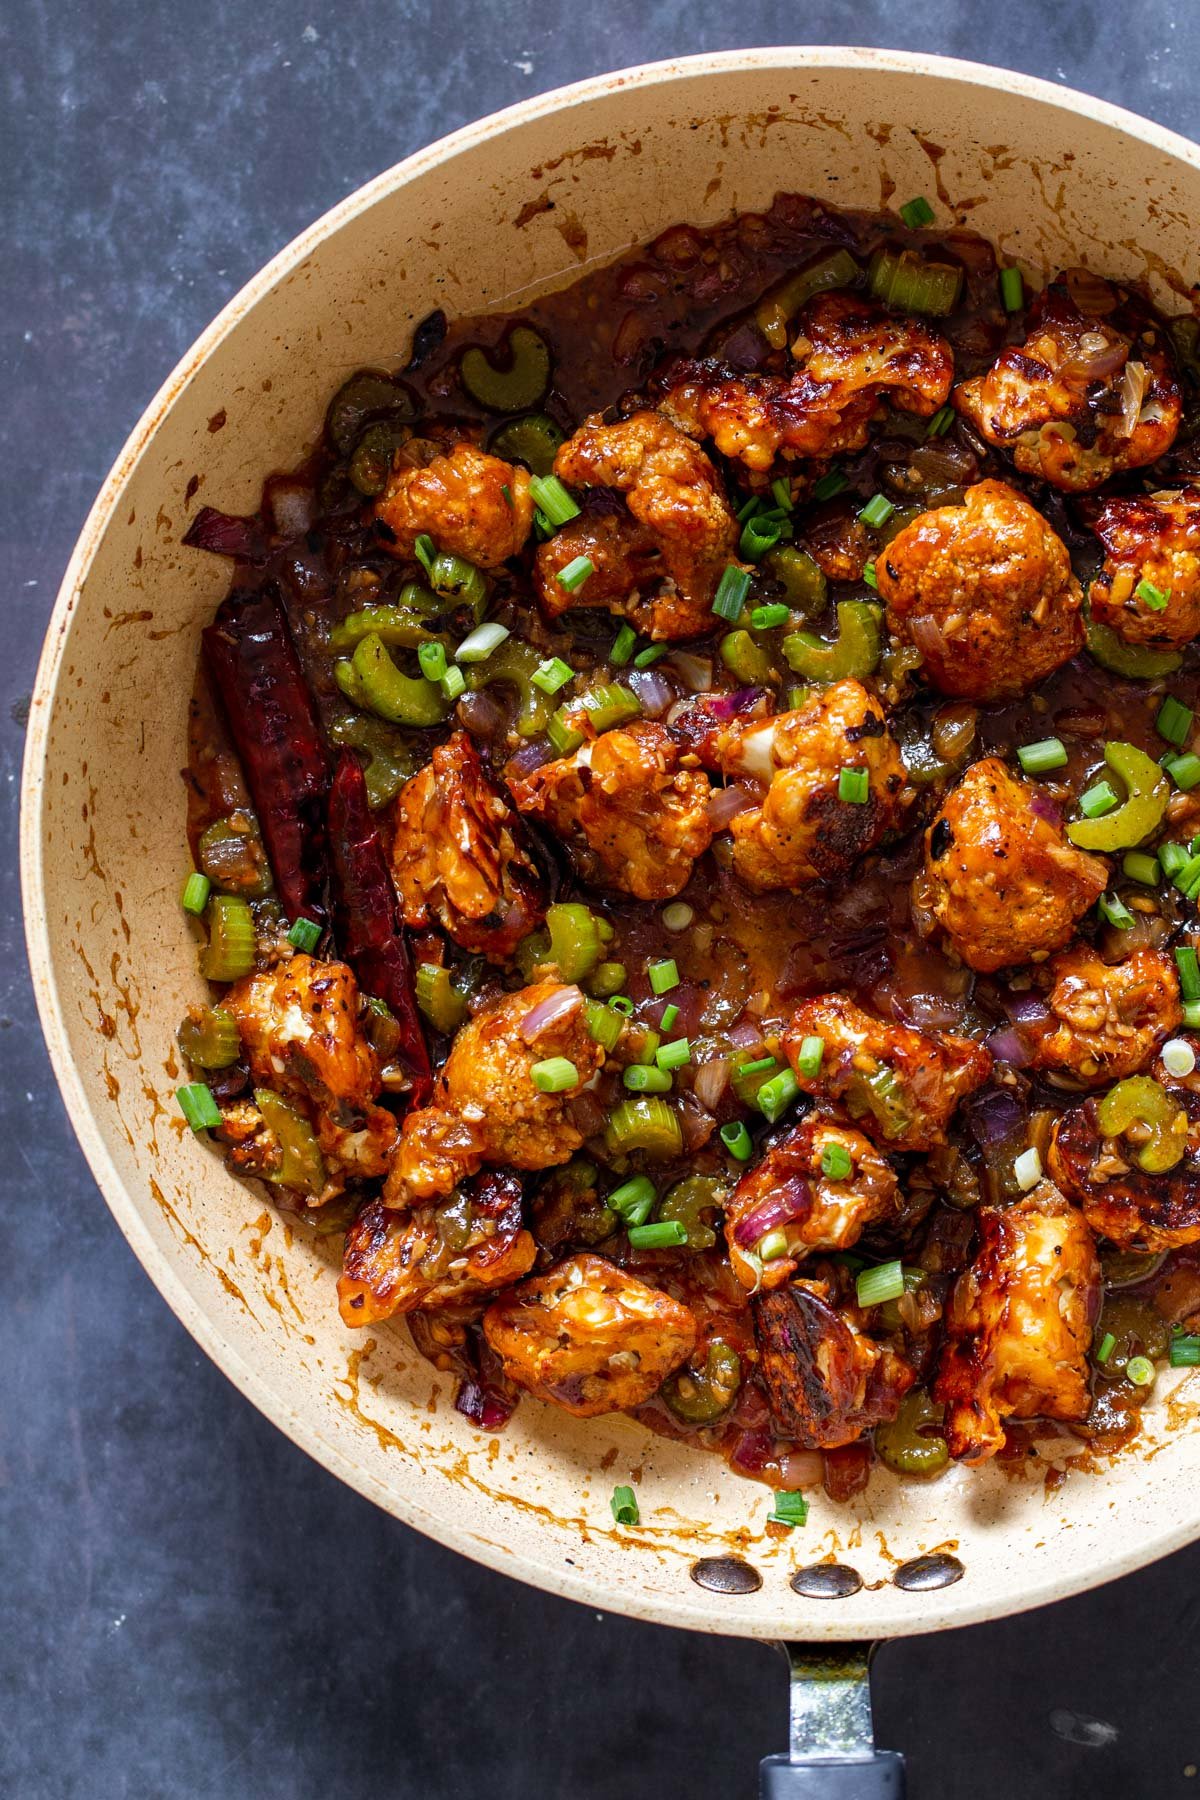
    vegan baked cauliflower and celery tossed with spicy sweet sauce in a white bowl

    Craving takeout? Make Black Pepper Cauliflower! Ever since  General Tso Cauliflower and Cauliflower Wings recipes became viral on social media, we all know that cauliflower is a fantastic veggie to carry all these delicious sweet and sticky sauces we love and usually get delivered from our local takeout favorite.

    This recipe for Black Pepper Cauliflower is a new favorite and a vegan spin on black pepper chicken. Bake, make the sauce, combine and yummy! Your meal is ready.

    vegan black pepper cauliflower being tossed with sweet and spicy sauce in a saucepan

    Unlike many other cauliflower recipes, this one does not require frying. We simply toss the cauliflower florets in cornstarch and some spices – freshly ground black pepper obviously being the most important one – then bake them.

    While the cauliflower bakes we make our spicy, sticky sauce, then toss everything together.

    a bowl of vegan black pepper cauliflower coated in sweet spicy sauce

    For the sauce, we rely on the magic sweet-salty combination of soy sauce and maple syrup along with white pepper, ginger and red chili for a bit of heat. You will love the combination of spicy, sweet and salty in this dish.

    I like to add some chopped celery stalks for some fresh crunch.

    overhead shot of a bowl with sweet and spicy black pepper cauliflower

    You can serve the Black Pepper Cauliflower as is, or with rice, or as a topping for bowls or as a filling for lettuce wraps.  Any way you serve it up will be delicious.

    More cauliflower dishes:

    Baked Gobi Manchurian; Cauliflower Manchurian

    Sticky Sesame Cauliflower

    Bbq Cauliflower Wings

     Nashville Hot Cauliflower Bites

    Spicy Baked Cauliflower Bites with Celery Ranch. 

    Print Recipe

    Black Pepper Cauliflower

    This easy recipe for Black Pepper Cauliflower is a new favorite and a vegan spin on black pepper chicken. Bake the cauliflower, make the sweet and spicy sauce, combine and your meal is ready. Nut-free & glutenfree! 

    Prep Time10 mins

    Cook Time40 mins

    Total Time50 mins

    Course: Main Course

    Cuisine: American, Indian

    Keyword: black pepper cauliflower, vegan cauliflower recipe

    Servings: 4

    Calories: 108kcal

    Author: Vegan Richa

    Ingredients

    • 3 heaping cups (300 g) cauliflower florets, a small head of cauliflower

    For the marinade:

    • 1 tablespoon soy sauce or use tamari for gluten-free
    • 1 teaspoon ketchup
    • 2 teaspoons oil
    • 1/4 teaspoon salt
    • 1/4 teaspoon garlic powder
    • 1/2 teaspoon freshly ground black pepper
    • 2-3 tablespoons cornstarch

    For the sauce:

    • 1 teaspoon oil
    • 4 cloves garlic minced
    • 1/2 inch ginger minced
    • 2 dried red chilies, such as cayenne, or use California red for less heat or use Chinese, Indian or Thai for spicier
    • 1/4 cup chopped red onion
    • 3/4 cup chopped celery
    • 2 tablespoon soy sauce or use tamari for gluten-free
    • 1 tablespoon maple syrup
    • 3/4 teaspoon or more freshly ground black pepper
    • 1/8 teaspoon white pepper
    • 1.5 teaspoons cornstarch
    • 1/2 cup (120 ml) water
    • Green onion and sesame seeds for garnish

    Instructions

    • Chop up the cauliflower into small to medium size florets and add to a large bowl.

    • In a small bowl combine the soy sauce, ketchup, oil, salt, garlic powder and black pepper. Pour the mixture over the cauliflower and toss to coat really well. Sprinkle 2 tablespoons cornstarch over the cauliflower and toss again until all the cauliflower florets are coated.

    • If there’s any sauce in the bowl then add some more cornstarch. The cauliflower florets should not be wet and also should not have any dry patches of cornstarch.

    • Once all the cauliflower florets are evenly coated, transfer them to a parchment-lined baking sheet and spread them around so they are not touching each other.

    • Bake at 400ºF (200ºC) for 24-28 minutes. Check at the 24-minute mark if the cauliflower florets are done, otherwise bake for 5 more minutes or so.

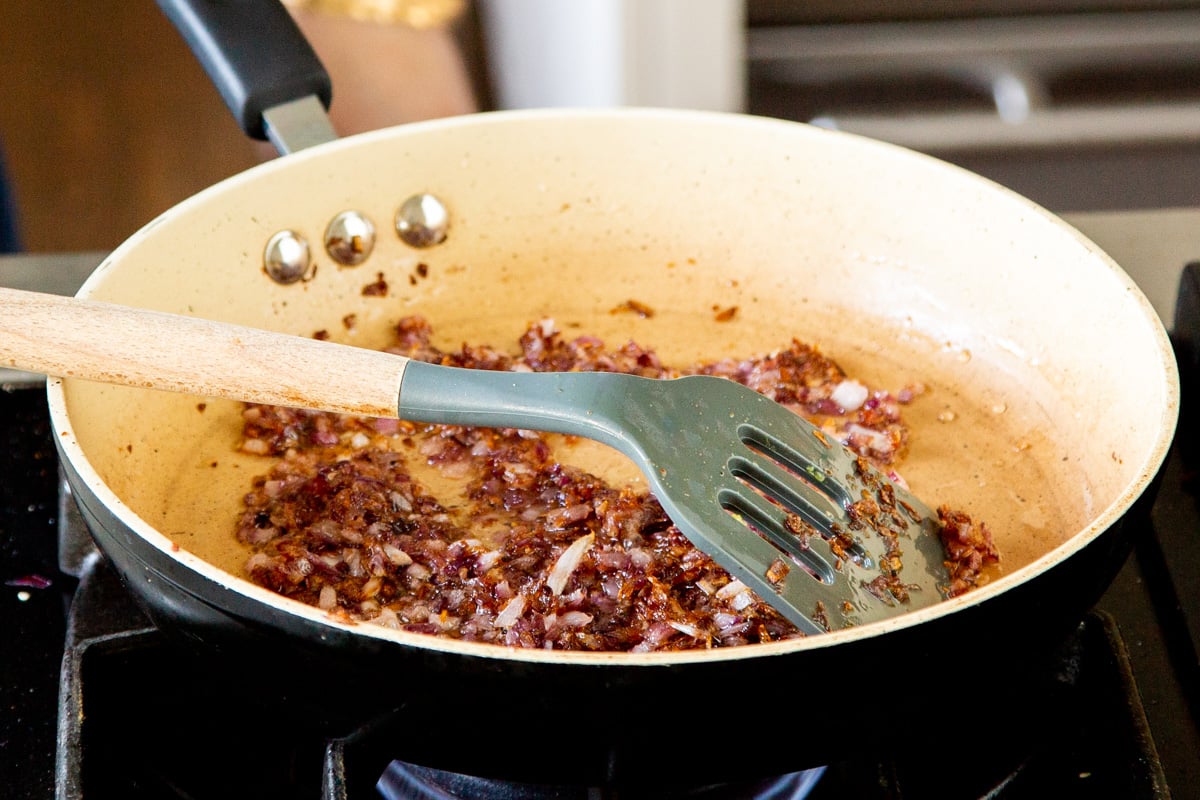
    • Meanwhile make the sauce: Heat a large skillet over medium high heat. Add oil and once the oil is hot add the garlic, ginger and dried red chilies and stir for a few seconds. Then add in the onion, celery and a good pinch of salt. Mix really well and cook until the onion just starts to turn translucent.

    • Then add in the soy sauce, maple syrup, black and white pepper and mix in. Mix the cornstarch in the 1/2 cup of water. Then pour that mixture into the pan and mix well. Once the sauce comes to a boil and thickens, switch off the heat.

    • Take the cauliflower out of the oven and add to the sauce. Toss to coat really well. Garnish with green onion and sesame seeds and serve as it is or with rice or quinoa.

    • Store refrigerated in a closed container for upto 3 days.This makes a light dinner as is over rice or a side salad. For heartier meal, serve over quinoa or replace half the cauliflower with tofu  to make black pepper cauliflower tofu.

    Notes

    • This recipe is nut-free, gluten-free(with tamari) 
    • To make it without cornstarch use another starch such as tapioca starch or potato starch.
    • Dried red chilies substitute, use 1/4 teaspoon red pepper flakes.

    Nutrition

    Nutrition Facts

    Black Pepper Cauliflower

    Amount Per Serving

    Calories 108 Calories from Fat 27

    % Daily Value*

    Fat 3g5%

    Saturated Fat 0.4g3%

    Sodium 632mg27%

    Potassium 441mg13%

    Carbohydrates 18g6%

    Fiber 3g13%

    Sugar 7g8%

    Protein 3g6%

    Vitamin A 309IU6%

    Vitamin C 71mg86%

    Calcium 48mg5%

    Iron 1mg6%

    * Percent Daily Values are based on a 2000 calorie diet.

    a small bowl of vegan black pepper cauliflower with a golden fork on the side

    Ingredients:

    • cauliflower florets – a small head of cauliflower makes enough
    • the cauliflower is seasoned with  soy sauce, ketchup, and oil as well as garlic powder and ground black pepper
    • cornstarch helps turn the dry and liquid seasoning ingredients into a breading that coats the cauliflower
    • For the sauce we sautee ginger, garlic and chili
    • veggies:  red onion and celery provide some crunch
    • soy sauce and maple syrup are added to achieve that sweet and salty
    • black pepper and white pepper are added for heat
    • a cornstarch slurry helps thicken the sauce
    • garnish: Green onion and sesame seeds

    Tips:

    • This recipe is nut-free and gluten-free.
    • To make it without cornstarch use another starch such as tapioca starch or potato starch.
    • If you don’t have dried red chilies, add 1/4 teaspoon red pepper flakes.
    • for the chilies, you can use California red for less heat or use Chinese, Indian or Thai for spicier

    How to make Black Pepper Cauliflower

    ingredients for black pepper cauliflower on a marble countertop

    Chop up the cauliflower into small to medium size florets and add to a large bowl.

    cauliflower florets in a small bowl being drizzled with spicy sauce

    In a small bowl combine the soy sauce, ketchup, oil, salt, garlic powder, and black pepper. Pour the mixture over the cauliflower and toss to coat really well.

    cauliflower florets tossed with spicy sauce in a white bowl

    Sprinkle 2 tablespoons of cornstarch over the cauliflower and toss again until all the cauliflower florets are coated.

    If there’s any sauce in the bowl then add some more cornstarch. The cauliflower florets should not be wet but also should not have any dry patches of cornstarch.

    Once all the cauliflower florets are evenly coated, transfer them to a parchment-lined baking sheet and spread them around so they are not touching each other.

    cauliflower florets on parchment lined sheet

    Bake at 400ºF (200ºC) for 24- 28 minutes. Check at the 24 minute mark if the cauliflower florets are done, otherwise bake for 5 more minutes or so.

    minced garlic and ginger in a pan

    Meanwhile make the sauce: Heat a large skillet over medium high heat. Add oil and once the oil is hot add the garlic, ginger and dried red chilies and stir for a few seconds then add in the onion, celery and a good pinch of salt.

    minced garlic, dried chili and ginger sauteeing in a frying pan


    onion and celery sauteeing in a pan

    Mix really well and cook until the onion just starts to turn translucent. Then add in the soy sauce, maple syrup, black and white pepper and mix in. Mix the cornstarch in the 1/2 cup of water. Then pour that mixture into the pan and mix well. Once the sauce comes to a boil, switch off the heat.

    celery and onion in a saucepan with soy sauce and maple syrup

    black pepper sauce and vegetables in a sauteeing pan

    Take the cauliflower out of the oven and add  to the sauce. Toss to coat really well.

    baked cauliflower being tossed with sweet and spicy sauce in a sauteeing pan

    Garnish with some green onion and sesame seeds and serve as it is or with some rice or quinoa for added protein.

    This makes a light dinner as is over rice or a side salad. For heartier meal, serve over quinoa or replace half the cauliflower with tofu  to make black pepper cauliflower tofu.

    overhead shot of a saucepan with black pepper cauliflower tossed with sweet spicy sauce

    Store refrigerated for upto 3 days.


    Credit: Source link
  • Caramelized Onion Dal – Vegan Richa

    This rich and creamy Caramelized Onion Dal is the perfect comfort food for a cold day! It is bursting with flavor from caramelized onions and whole spices which are tempered in oil! Serve with rice for a delicious Indian meal.

    a bowl with caramelized onion dal served alongside a side of rice and sprinkled with freshly chopped cilantro

    Coming at you with a simple lentil dal that is bursting with flavor. This is another dal that I just made one night when I was craving a light dal and rice meal.

    This caramelized onion dal is a creamy concoction of two types of lentils – red and yellow ones – which are cooked on the stove or using an Instant Pot and then simmered along with fragrant seasoned oil – tadka (tempering).

    a frying pan with caramelized onion dal sprinkled with chopped cilantro

    The caramelized onions add a whole bunch of umami flavor while the cumin and black pepper mixture added to the tempering provide some heat and a refreshing flavor!

    To take this dish to the next level of deliciousness we serve this lentil dish drizzled with another round of tempering. This second mix of whole spices fried in oil until sizzling and aromatic gets folded through the creamy dal just before serving

    Use whatever lentils you have on hand. I used a mix of yellow and red lentils. You can cook them on the stovetop or in the instant pot.

    creamy lentil dal sprinkled with cilantro served next to rice on a plate

    More daal recipes:

    Dhaba Style Butter Dal (vegan)

    Sabut Moong Dal  Creamy Green Mung Beans

    Vegan Handi Lentils (Creamy Indian Dal)

    Masoor Dal Tadka (Indian Split Red Lentil Dal)

    Spicy Urad Dal (Black Gram Lentil Dal)

    Print Recipe

    Caramelized Onion Tadka Dal

    This rich and creamy Caramelized Onion Dal is the perfect comfort food for a cold day! It is bursting with flavor from caramelized onions and whole spices which are tempered in oil! Serve with rice or flatbread for a delicious Indian meal. Glutenfree Soyfree Nutfree

    Prep Time20 mins

    Cook Time17 mins

    Total Time37 mins

    Course: Main Course

    Cuisine: Indian

    Keyword: dal recipes, lentil recipes vegan

    Servings: 4

    Calories: 217kcal

    Author: Vegan Richa

    Ingredients

    For the lentils:

    • 1/2 cup red lentils or masoor dal
    • 1/2 cup petite yellow lentils or moong dal (or you can use more red lentils)
    • 1 tomato chopped
    • 1/2 teaspoon salt
    • 1/2 teaspoon dried fenugreek leaves optional
    • 3 cups water

    For the tempering spices:

    For the first tempering:

    • 2 teaspoons oil
    • 1 cup chopped onion
    • 3 cloves of garlic minced
    • 1/2 inch ginger minced
    • 1/2 hot green chili minced, I use serrano or Indian or Thai
    • 1/4 teaspoon salt
    • 1/2 to 1 teaspoon garam masala
    • 5-6 curry leaves (fresh or dried or frozen)

    For the second tempering:

    • 1 teaspoon oil
    • The crushed spices from above

    Instructions

    • Cook the lentils; To cook the lentils in the instant pot, wash the lentils really well and drain. Add the to the instant pot with the rest of the ingredients and pressure cook for 7 minutes. Let the pressure release naturally for 10 minutes and then open the lid.

    • To cook the lentils in a saucepan add the washed and drained lentils with all the ingredients for the lentils to a saucepan, partially covered, and cook. You might need to add 1/2 cup more water if the lentils thicken too much. Transfer the lentils to a serving dish.

    • For the tempering spices; add the cumin seeds and black peppercorns to a mortar and pestle and crush them. You can also use a spice grinder to make them into a coarse mixture and set them aside.

    • For the first tempering: heat the oil in a medium skillet, once hot, add half of the crushed cumin and peppercorn mixture then add the onion and a good pinch of salt and cook until the onion is translucent.(5-7 mins) Then add the garlic, ginger, green chili, and the rest of the salt and continue to cook until the onion is golden (2-4 mins). Add the garam masala and curry leaves and cook for another half a minute.

    • Add this caramelized onion mix to the cooked lentils. (Or add cooked lentils to the caramelized onion skillet). Gently stir but don’t mix completely. You want some clusters of caramelized onion throughout the dal.

    • Make the second tempering: Heat the oil in a small skillet, once hot add the remaining cumin seeds/ peppercorn mixture and cook until the mixture becomes fragrant. Then pour it over the dal/cooked lentils. Garnish it with cilantro and lemon juice.

    • Store in a closed container for upto 3 days. Freeze for upto a month.To make ahead: keep the tempering separate and heat and add just before serving

    Notes

    • Curry leaves: If you cannot find curry leaves , leave them out and add 2 bay leaves and lime juice
    • To make this without onion and garlic: use neutral veggies such as peeled and chopped zucchini, summer squash or opo squash(lauki) , or chopped celery or fennel instead of onion. Add a generous pinch asafetida or 1 teaspoon dried fenugreek leaves as a substitute for garlic. 
    • Oilfree: sauté onion in broth. Dry toast the cumin pepper mixture on a dry skillet until fragrant and then use. 
     

    Nutrition

    Nutrition Facts

    Caramelized Onion Tadka Dal

    Amount Per Serving

    Calories 217 Calories from Fat 36

    % Daily Value*

    Fat 4g6%

    Saturated Fat 0.3g2%

    Sodium 471mg20%

    Potassium 586mg17%

    Carbohydrates 34g11%

    Fiber 15g63%

    Sugar 4g4%

    Protein 13g26%

    Vitamin A 330IU7%

    Vitamin C 36mg44%

    Calcium 58mg6%

    Iron 4mg22%

    * Percent Daily Values are based on a 2000 calorie diet.

    Indian Caramelized Onion Dal served in a bowl along with rice
    Ingredients:

    • For the lentils, I used a mix of red lentils and yellow lentils(masoor dal and moong dal). You can use all red or all yellow or any lentils you have on hand
    •  fresh tomato adds acidity and sweetness
    • spices: For the tempering, we fry crushed cumin seeds and black peppercorn in some oil then add garam masala
    • as with most daal recipes, fresh ginger, garlic, and chili are added to the tempering after the whole spices
    • curry leaves add a nutty and earthy flavor to this daal – use dry or fresh or frozen

    Tips & Substitutions:

    • If you cannot find curry leaves , leave them out and add 2 bay leaves and lime juice
    • To make this without onion and garlic: use neutral veggies such as peeled and chopped zucchini, summer squash or opo squash(lauki) , or chopped celery or fennel instead of onion. Add a generous pinch asafetida or 1 teaspoon dried fenugreek leaves as a substitute for garlic.

    ingredients for making caramelized onion dal on a marble countertop

    How to make caramelized onion dal:

    Cook the lentils: To cook the lentils in the instant pot, wash the lentils really well and drain. Add the to the instant pot with the rest of the ingredients and pressure cook for 7 minutes. Let the pressure release naturally for 10 minutes and then open the lid.

    cooked lentils being poured into caramelized onion tadka

    To cook the lentils in a saucepan add the washed and drained lentils with all the ingredients for the lentils to a saucepan, partially cover, and cook. You might need to add 1/2 cup more water if the lentils thicken too much.

    cumin and peppercorn in a marble mortar

    For the tempering spices; add the cumin seeds and black peppercorns to a mortar and pestle and crush them. You can also use a spice grinder to turn them into a coarse mixture and set them aside.

    a sauteeing pan with oil with some cumin and crushed pepperflakes

    minced onion sauteeing in a bit of oil in a sauteeing pan

    For the first tempering, heat the oil in a medium skillet. Once hot, add half of the crushed cumin and peppercorn mixture then add the onion and a good pinch of salt and cook until the onion is translucent.

    caramelized onion in a sauteein pan

    Then add the garlic, ginger, green chili, and the rest of the salt and continue to cook until the onion is golden. Add the garam masala and curry leaves and cook for another half a minute or so.

    minced ginger and green chili along with caramelized onions sauteeing in a frying pan

    onion and chili in a sauteeing pan

    Transfer the cooked lentils to a serving bowl.  add this onion mixture to the lentils. (Or transfer cooked lentils to the skillet with the onions). Gently stir but don’t mix the onions in completely.

    tempering being added to dal in a saucepan

    Make the second tempering: Heat the oil in a small skillet, once hot add the remaining cumin seeds/ peppercorn mixture and cook until the mixture becomes fragrant. Then pour it over the dal/cooked lentils. Garnish it with cilantro and lemon juice.

     cumin peppercorn final tempering for dal

    tempered oil being poured over a pan with yellow lentil dal

    Storage:

    Store in a closed container for upto 3 days. Freeze for up to a month. To make ahead: keep the tempering separate and heat and add just before serving

    dal served next to white rice in a shallow bowl

    What to serve with this caramelized onion dal

    Serve with flatbread, roti , naan or with rice. and a side or cauliflower potatoes, crispy cumin potatoes or green bean carrots. and a side salad-  Kachumber Salad.

    a sauteeing pan with dal topped with chopped cilantro


    Credit: Source link
  • How to Roast Garlic, Plus More Ways to Get the Best Garlicky Flavor

    How to Roast Garlic, Plus More Ways to Get the Best Garlicky Flavor

    There’s nothing quite like garlic in the kitchen. Its segmented bulb sets it apart from other members of the allium family (onions, shallots, and leeks) as does its unmistakable flavor and pungency. Here’s everything you need to know about cooking with the punchy ingredient, from mincing fresh cloves and roasting whole heads to the best ways to select and store.

    Fresh Garlic Selection and Storage

    Garlic bulbs are harvested while the plant above ground is still green, then they are trimmed and cured in a dry environment for extended storage. As the garlic heads dry, their outer layers become thin and papery and the cloves develop a thick skin that encases the pungent pulp. Both the papery wrapper and the cloves’ peels help keep garlic fresh and flavorful for months.


    JOIN THE
    NEW YEAR RESET

    START 2023 ENERGIZED, EMPOWERED, AND REFRESHED

    When you’re shopping for garlic, look for garlic heads that are still encased in their papery skins; these natural “wrappers” protect them from mold and bruising for longer storage times. Give each head a squeeze to make sure it has no soft spots; then take a quick sniff. Whole garlic heads should have no detectable scent. Refrigerate fresh garlic that has been peeled or chopped, but keep whole heads and unpeeled cloves in a dry, well-aerated place at room temperature. You can also freeze whole heads, peeled cloves, and minced garlic for up to 3 months.

    Fresh garlic develops a stronger flavor and bite over time. The cloves may begin to brown at the base, and even sprout. These dark germs—which can run from the base to the tip of the cloves before sprouting—are safe to eat, but some cooks prefer to remove them before cooking with the cloves, to eliminate any trace of bitterness.

    How to Peel Garlic

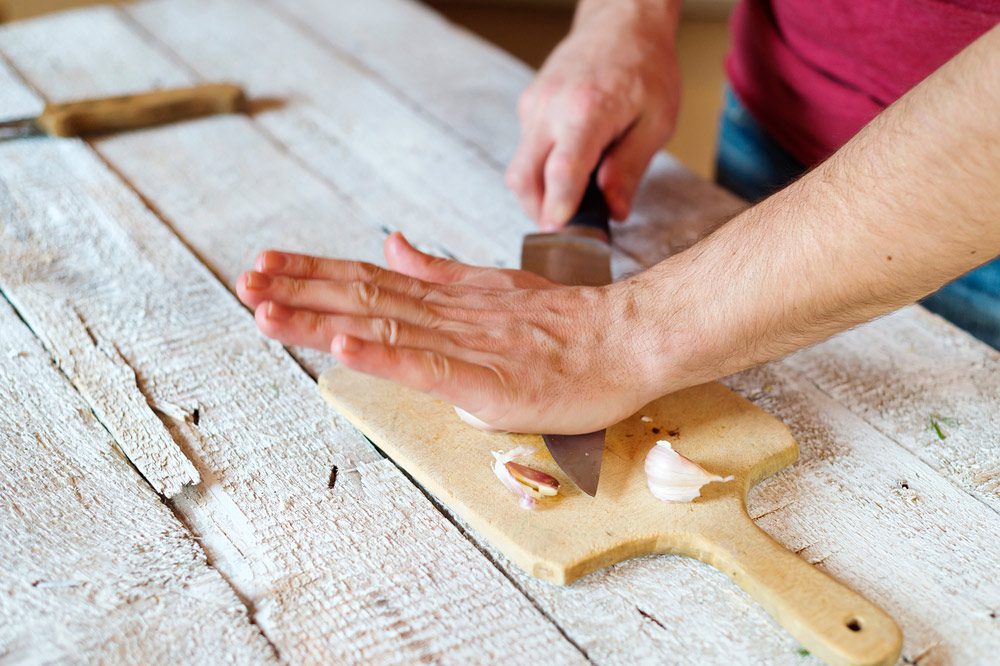
    A man's hand presses down on garlic on a cutting board using the side of a knife, to make it easier to peel

    Unless a recipe calls for whole smashed cloves as a seasoning, fresh garlic needs to be peeled before it’s used in a recipe. Here are three easy ways to accomplish the task.

    Countertop

    Pull off and discard the papery wrapper that encases the garlic bulb. Pull the cloves apart by hand or, if they are tightly clustered together, place the garlic head between two cutting boards and press down on the top board to separate. Set the cloves flat on the cutting board, and gently crush them with the side of a knife or the bottom of a bowl to loosen the skin so it peels away easily.

    Shaker or Jar

    Separate the cloves. Place them in a large jar or cocktail shaker, and shake 20 or so times. As the cloves knock against each other, they will rub off their skins.

    Microwave

    Place a whole head of garlic in the microwave, and cook on high power for 20 seconds to loosen the clove skins. Allow the garlic head to cool, then separate the cloves and gently squeeze each one to loosen and pull away the skin.

    How to Mince Fresh Garlic

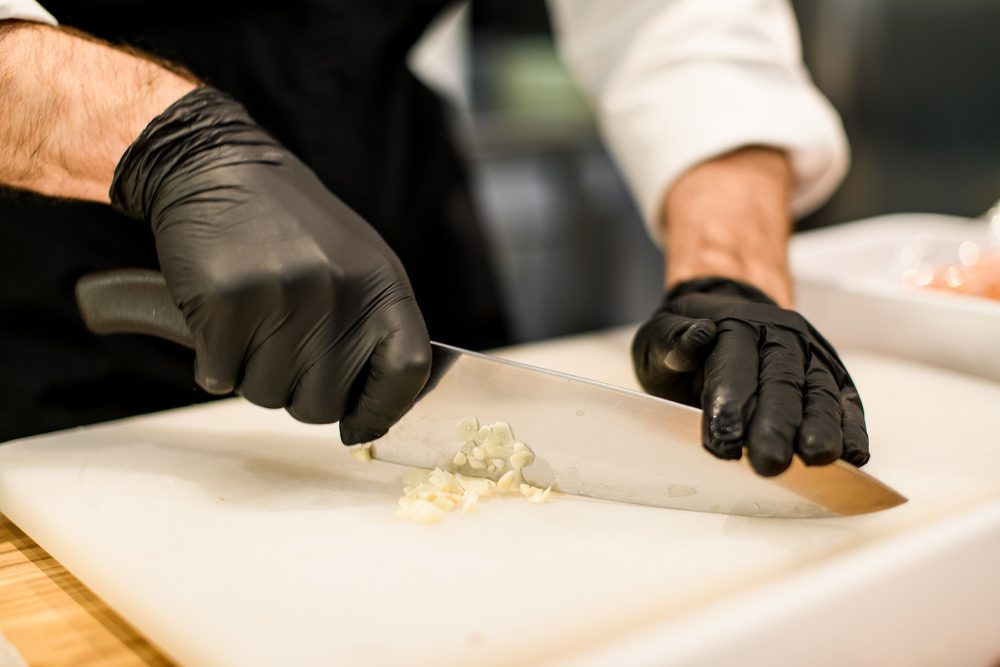
    Hands wearing black gloves mincing garlic on a cutting board using a chef's knife

    Every cook seems to have a favorite way to mince (finely chop) garlic. Here’s a quick rundown of the options, as well as the advantages of each. Note: 1 medium clove of garlic = 1 teaspoon minced garlic.

    Knife

    Using a knife to mince garlic lets you control the final size and texture of the mince, and to chop a lot at one time. Place peeled garlic cloves on a cutting board, and gently crush with the side of a knife. (Crushing the cloves gives them extra traction and helps the pulp break down faster.) Hold the knife in one hand, set the other on the tip of the knife, then move the knife up and down over the garlic cloves in a chopping motion. Work back and forth over the garlic until it is finely chopped or minced.

    Garlic Press

    A garlic press offers a hands-off technique with minimal clean-up and yields a uniform pulp. Place whole peeled or unpeeled cloves in a garlic press, then close and squeeze to force the clove’s flesh through the holes of the press. Scrape the minced garlic off with a knife; then remove the peel (if pressing unpeeled garlic cloves).

    Microplane Zester

    Grating peeled garlic cloves on a Microplane Zester (a popular rasp-style grater) yields ultra-fine minced garlic without the germ, aka the root end. Hold the peeled garlic cloves by the germ; then grate on the Microplane Zester. Discard the ends

    How to Roast Garlic

    Roasting a whole head of garlic transforms the pungent, firm cloves into a sweet, mellow, creamy paste that can be used to flavor recipes or eaten on its own as a spread.

    Start by slicing off the top of the garlic head just enough to reveal the tips of the cloves, then set it on a piece of aluminum foil. Drizzle the garlic head with 1 teaspoon water; then wrap it in the foil and bake in a 350°F to 400°F oven for 30 to 45 minutes, or until the head feels soft when gently squeezed (like a baked potato). Once the garlic head is cool enough to handle, squeeze the soft, caramelized flesh from each clove into a bowl.

    To save time and energy, we recommend roasting garlic alongside other dishes you are baking; an exact oven time and temperature aren’t necessary.

    You can also speed the process by starting the roasted garlic in the microwave: Place a sliced head in a covered dish with a little water, then microwave 8 to 9 minutes, or until soft. Finish the garlic on a baking sheet in a 350°F oven for 10 minutes to brown and caramelize the cloves.

    Other Forms of Garlic

    The supermarket offers several ready-to-use alternatives to whole heads of fresh garlic. Here’s the scoop on how they differ.

    Pre-Peeled Cloves

    The testers at America’s Test Kitchen have given pre-peeled garlic cloves their seal of approval as a fresh garlic option that comes without the hassle of peeling each clove.

    Jarred Minced Garlic

    Jars of pre-minced garlic are convenient but won’t have the same fragrant bite as fresh, because the minced cloves are preserved in water and citric acid to give them a longer shelf life. Shelf-stable minced garlic has also been pasteurized (heated to 161˚F), which further alters the flavor. The best use for jarred minced garlic is in soups, sauces, and stews where the garlic will cook and mingle with other flavors.

    Frozen Crushed Garlic

    Frozen crushed or minced garlic retains its bright, garlicky flavor that’s as close as you’ll get to fresh in a prepared product.

    The Difference Between Garlic Powder and Granulated Garlic

    Garlic powder and granulated garlic are dehydrated garlic cloves that have been ground to different sizes. Garlic powder has a fine, flour-like texture, while granulated garlic is made up of meal-like flecks. Both have a mellow, almost sweet garlicky flavor, which make them a good option for cooks who are put off by the pungency of fresh garlic. Count ¼ teaspoon garlic powder or ½ teaspoon garlic granules per 1 teaspoon minced garlic called for in a recipe.

    Keep powdered and granulated garlic in the fridge to prevent caking.

    How (and Why) to Substitute Garlic Powder for Garlic Salt

    Many recipes call for garlic salt, which can unnecessarily spike the sodium content of a meal. For a healthier option, you can just as easily use garlic powder. Since garlic salt is a 1:3 combination of garlic powder to salt, all you have to do is reduce the measurement by two-thirds. For example, if a recipe calls for 1 teaspoon garlic salt, substitute ⅓ to ½ teaspoon garlic powder.

    Garlicky Goodness

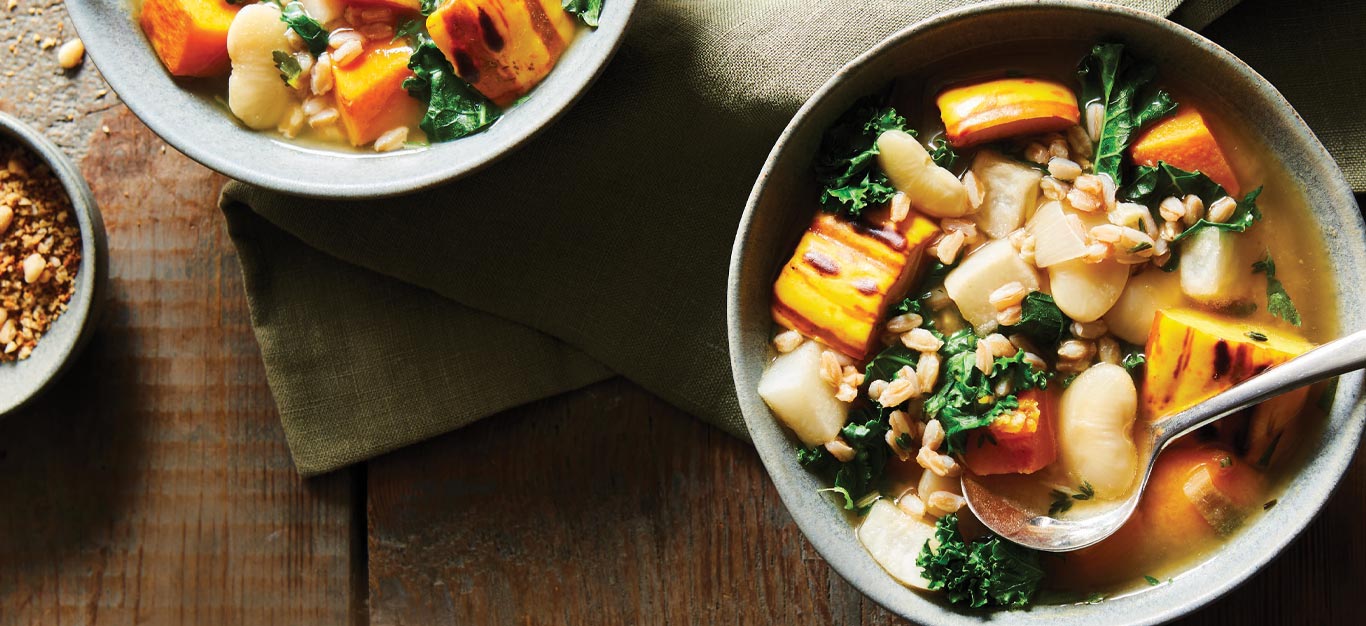
    Roasted Garlic, Delicata Squash, and Farro Stew in light gray bowls on a wooden tabletop

    Here are our favorite recipes where garlic plays a starring role.

    Learn more essential kitchen skills and become a plant-based home chef in 90 days with the Forks Over Knives Cooking Course!

    Credit: Source link