Have you ever hiked or camped in the desert Southwest after a rare, life-giving rain? The air is thick, heavy, and unmistakably pungent—an earthy, resinous aroma that seems to cling to the very landscape itself. This curious scent is
likely coming from the potent and historically revered Chaparral plant or Creosote Bush (Greek “Kréos” meaning “flesh” and “Zoto/Sote” meaning “preserver”). Once you identify it, you will never mistake it. In early spring you will see the yellow hue of its 5-petal flowers from the roadside signaling to its message of strength and resiliency.
A Legend of Survival
The Papago people tell a story from when the world was young and a great flood threatened to engulf the earth. Itoy, the Elder Brother, was not afraid. He knew his land was also the land of the Creosote Bush. He simply crafted a floating cask from its thick, black gum, climbed inside, and sailed safely
around the world four times before the waters receded.
This legend witnesses to the unmatched resilience of this plant. Classed in the Zygophyllaceae family, Chaparral is one of the most drought-tolerant plants on the planet, capable of surviving for two years without a single drop of water. When you consume the leaves of this
plant, you are absorbing that same biological stamina and strength.
Science Meets Tradition
The science behind Chaparral is impressive. Its primary active agent, Nordihydroguaiaretic Acid (NDGA), is a powerhouse of
biological activity. Researchers have identified that this compound, along with a complex array of lignans, flavonoids, and tannins, may offer antimicrobial properties aiding the body in fighting persistent pathogens; can help reduce oxidative stress caused by daily exposure to modern pollutants, and shows promise as antitumor, neuroprotective, hepatoprotective, and regenerative.
Beyond the laboratory, the historical applications are inspiring. From the Navajo and Hopi brewing it for respiratory ailments, rheumatism and arthritis, to the Pima using its sap for toothaches, and the Apache holding it as a sacred gift, this plant was the cornerstone of desert survival. Today, many herbalists believe this plant supports the body’s natural ability to clear stagnation—a traditional approach to wellness that
focuses on helping the body maintain its own internal balance.
Building Your Apothecary
If you’re able to wild-harvest this desert herb yourself, you’re lucky. Otherwise, look for it in your local herb shop bulk
section to use as an infusion or select a good quality tincture. As fair warning – the taste is pungent and bitter—a hallmark of a true, active botanical, which if you are not used to, may prove rather intense. But before you reach for the honey or other sweetener, allow yourself the privilege of tuning your body back to nature, starting with your tastebuds.
A Perspective on Healing
We live in a wonderful world, but surrounded by not so wonderful contaminants — from microplastics to industrial chemicals, to artificial ingredients. Many practitioners argue that our bodies are not just fighting disease; they’re fighting congestion. I agree. Congestion, stagnation, constipation – these
are the cumulative effects of toxic environments, poor choices, and our disconnected way of living. I am reminding you that medicinal herbs and whole food plants have long been used in all cultures to support the body’s natural cleansing and enhance overall health. It’s interesting to note that the precise fit of plant compounds with human receptors is not random, but rather evidence of our co-creation and botanical kinship.
Whether for aiding healing, removing constipation, or boosting general health, Chaparral is a testament to the fact that God’s medicine is often signaling to us with its beautiful blooms and rain-soaked aromas – inviting us to take a walk and embrace nature’s free gifts.
Travis Haws, MPH, MH is a Master Herbalist, a veteran corporate wellness consultant, a health and longevity adventurist, and author, lecturer, and philosopher. He currently resides in St. George can be reached for questions and comments at [email protected].
Coffee can improve Parkinson’s symptoms within three weeks compared to placebo, but do the benefits last?
When James Parkinson described the classic symptoms of Parkinson’s disease, “he could hardly foresee the evolution of our understanding over the next two hundred years”—like the role of nutrition. High dietary intakes of animal fat, mercury, iron, and dairy products seem to increase Parkinson’s disease risk, while a plant-based dietary pattern and the intake of antioxidants may be protective.
“Plant-based diets are known to preserve body tissues from oxidative stress and inflammation, both hallmarks of chronic-degenerative diseases” like Parkinson’s. However, animal-based foods, particularly those rich in animal proteins and saturated fats, are correlated with the promotion of neurodegenerative diseases, in addition to some of our leading killers like cancer, heart disease, and diabetes.
Not all plants are necessarily good, though. For example, consider the potential neurotoxicity of graviola, a fruit known as soursop. Consumption of soursop can lower blood pressure and uric acid levels but may also cause an atypical form of Parkinson’s disease because the fruit contains neurotoxic compounds. Indeed, population studies do show a link between the overconsumption of soursop with neurodegenerative disease.
Those who follow a predominantly plant-based diet may show the lowest prevalence and incidence of Parkinson’s disease, but plant-based nutrition is not just about reducing the risk. It can also be used to manage the disease.
I’ve previously discussed a case report in which a diet low in animal fat that included whole grains every day, as well as one to two cups a day of strawberries, seemed to be effective in reducing symptoms of Parkinson’s disease. But there are about 20,000 edible plant varieties worldwide, and only a limited number have been studied for anti-Parkinson’s activity.
One plant that’s gotten a lot of attention is coffee, which is “likely to exert a protective effect against the development of [Parkinson’s disease].” It may even help slow the disease’s progression, based on various studies, including one that shows that Parkinson’s patients who drink coffee or caffeinated tea appear to cut their risk of dying prematurely in half. But correlation doesn’t mean causation. You don’t know if caffeine really works until you put it to the test.
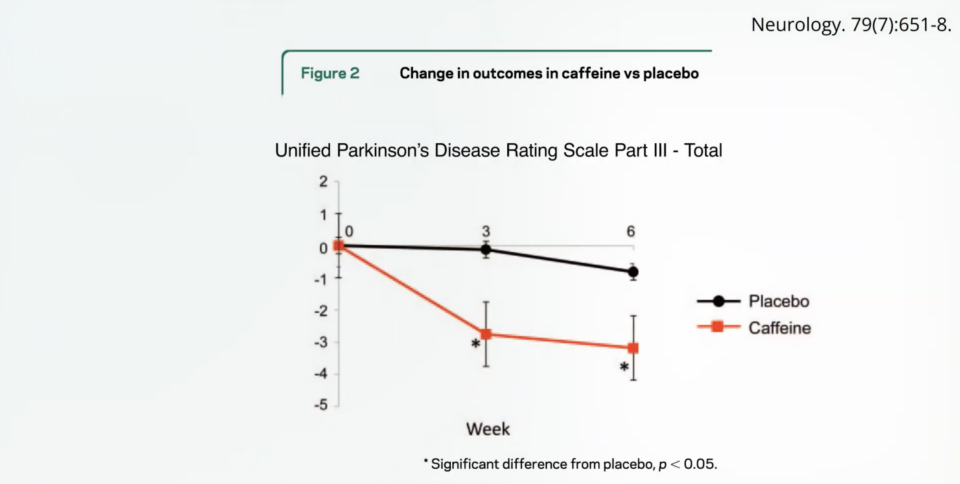
In a six-week, randomized, placebo-controlled, double-blind study, researchers tested caffeine as a potential treatment for Parkinson disease. Participants in the caffeine group started with approximately a cup of coffee’s worth of caffeine twice a day—once in the morning and once after lunch—and then increased to two cups’ worth twice a day, roughly equivalent to four cups of black tea twice a day or six cups of green tea. The result? A significant improvement in Parkinson’s symptoms within three weeks compared to placebo, as you can see below and at 3:05 in my video Coffee Put to the Test for Treating Parkinson’s Disease.
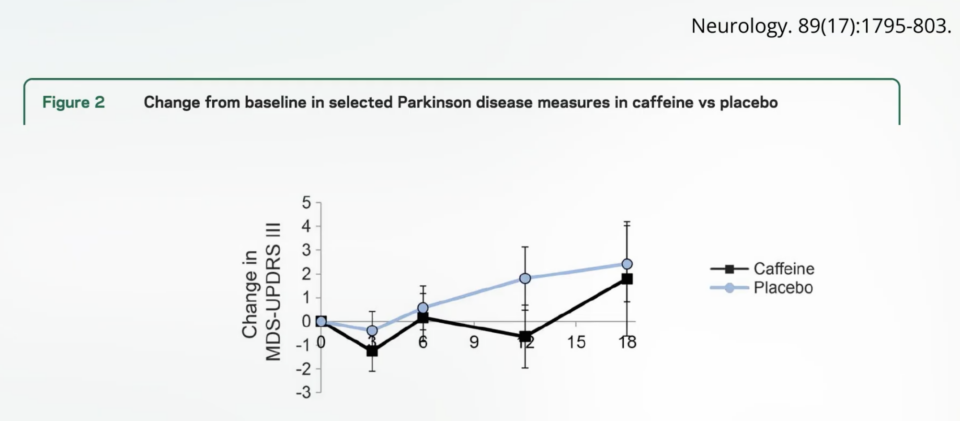
Coffee may be a cheap, safe, simple treatment for Parkinson’s, though an important limitation was the duration of the study. Caffeine has what’s called “tachyphylactic” properties, meaning its effect tends to diminish over time with repeated use (at least when trying to combat sleepiness), so it would be helpful to see the study repeated over a longer time frame. As it so happens, five years later, a longer-term study was published. Patients with Parkinson’s were randomized to about two cups of coffee’s worth of caffeine twice a day for not six weeks, but more than six months, and…no benefit over placebo. Drats. You can see for yourself below and at 3:49 in my video.
Caffeine didn’t provide sustained symptomatic benefit after all. So, caffeine may offer a short-term benefit that quickly dissipates. Regardless, “caffeine cannot be recommended as symptomatic therapy for parkinsonism.”
Our gut flora is determined by what we eat, for good or for ill.
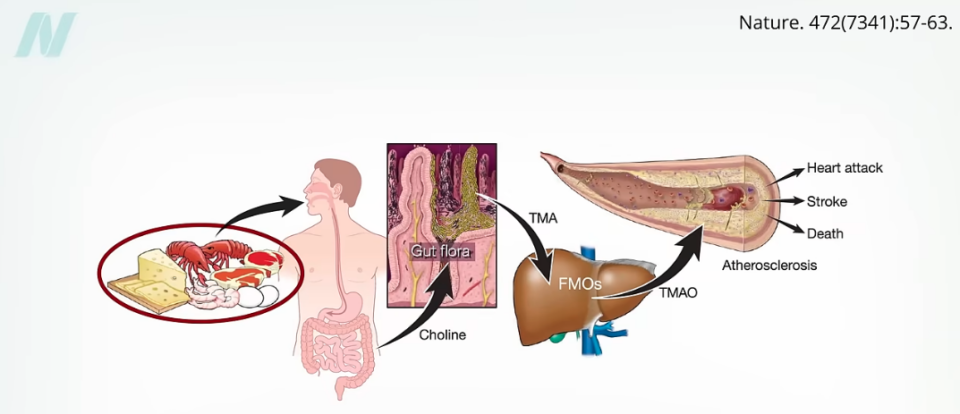
When we eat meat (including seafood), dairy, or eggs, our gut flora can take certain components in them (carnitine and choline) and produce something that ends up as a toxic compound called TMAO, which may set us up for a heart attack, stroke, and death. The process is illustrated below and at 0:26 in my video How to Cultivate a Healthy Gut Microbiome with Food.
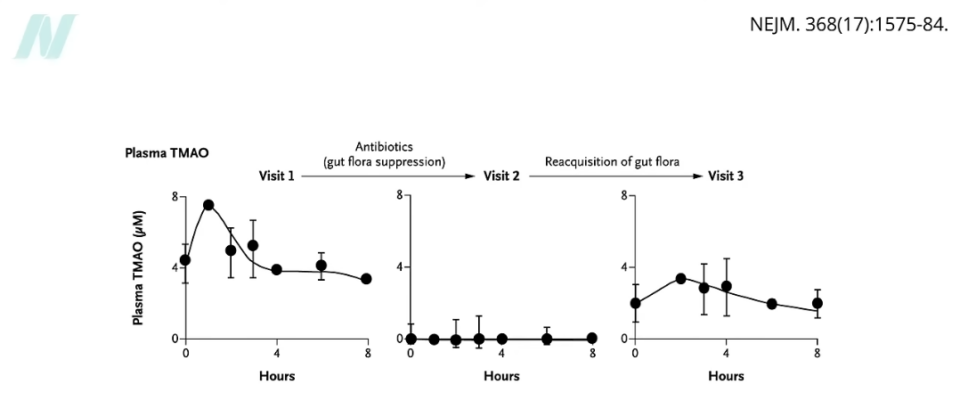
Give people two eggs, and they get a spike of TMAO in their bloodstream within hours of consumption. However, because gut bacteria play a critical role in this process, if they are then given a week of antibiotics to wipe out their gut flora and fed two more eggs, nothing happens. There’s no TMAO in their bloodstream because they have no egg-eating bacteria to make it. But once their gut bacteria have a month to start growing back, the eggs start to cause TMAO production once again, as you can see below and at 1:12 in my video.
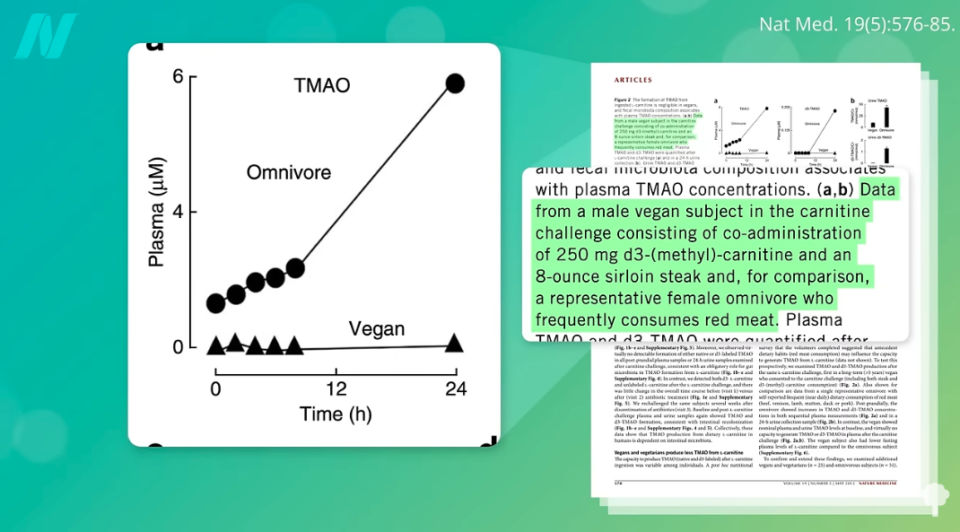
The same thing happens with meat. Give people the equivalent of an 11-ounce steak, and TMAO levels shoot up in the blood. But feed them the same amount after a week of antibiotics, and nothing happens. So, developing problems requires both the meat and the meat-eating bugs. That’s why a vegan can eat a sirloin and not produce TMAO within their body. They just don’t have the meat-eating bugs in their gut. You can see the difference below and at 1:36 in my video.
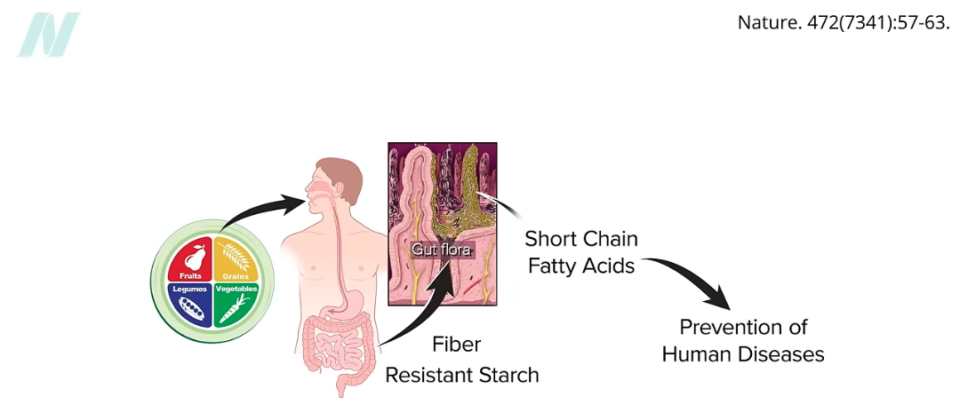
This should all be old news for those who have been following the science. But I want to emphasize: This phenomenon happens the other way around, too. When we eat whole plant foods, like fruits, vegetables, whole grains, and beans, along with nuts and seeds, our gut flora can take certain components in them (fiber and resistant starch) and produce short-chain fatty acids, which can set us up for the prevention of diseases, as you can see below and at 2:07 in my video.
Short-chain fatty acids like butyrate can help seal up a leaky gut, fight inflammation, prevent weight gain, improve insulin sensitivity, accelerate weight loss, and fight cancer.
But these benefits rely on two things—eating fiber and having fiber-feeding bugs—just like the detrimental effects from TMAO required not only eggs, dairy, or meat, but also the egg-, dairy-, or meat-munching bugs.
Give people whole intact grains—in the case of this particular study, barley kernels, also known as barley groats (three servings a day, like I recommend in my Daily Dozen app)—and within just three days of eating that extra 30 or so grams of fiber and resistant starch, their gut bugs were so happy and produced so many short-chain fatty acids that people’s insulin levels improved by 25%, which means their bodies needed to produce less insulin to take care of the same amount of white bread, while still dampening the blood sugar spike. But this was on average.
Some people responded to all that extra fiber with beautiful, striking dips in blood sugar and insulin responses, but in others, the same amount of fiber and resistant starch didn’t work at all. Why? Because fiber alone isn’t enough—fiber-feeding bugs like Prevotella are also needed. How do you get more Prevotella so you can take full advantage of the health benefits of plants? Eat more plants, because “Prevotella abundance is associated with long-term fiber intake.”
Rural African children eating 97% whole food, plant-based diets have Prevotella levels that are off the charts compared to kids eating standard western diets, and this is reflected in the amount of short-chain fatty acids they churn out in their poop.
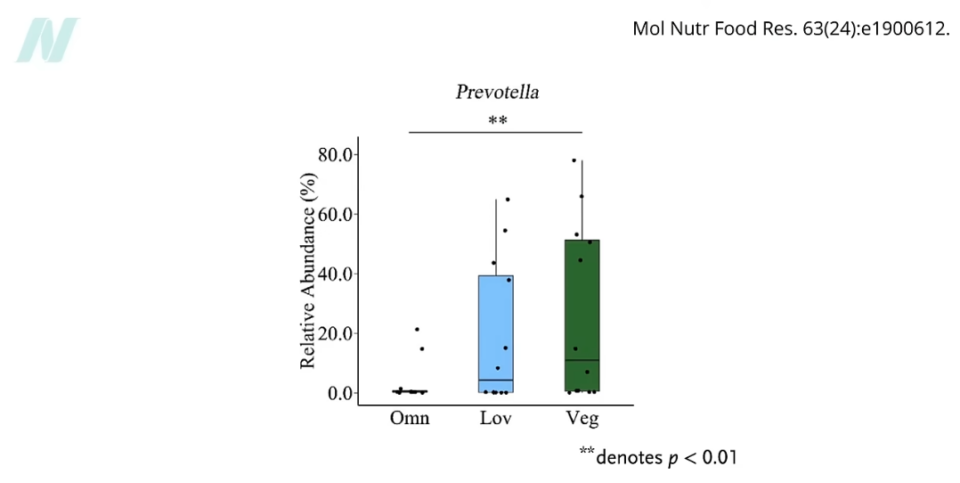
In the industrialized world, habitually eating vegetarian and vegan diets promotes enriching the gut’s fiber-eating bacteria. Below and at 4:11 in my video, you can see the relative Prevotella abundance between those who eat meat, no meat, or all plants.
This may help explain why omnivores have a worse inflammatory profile compared to vegetarians. Based on the findings relative to bacteria abundance, the researchers “suggest that exposure to animal foods may favor an intestinal environment which could trigger systemic inflammation and insulin resistance-dependent metabolic disorders,” such as type 2 diabetes. And it’s the reduced levels of inflammation that may be the key factor linking a plant-based gut microbiota with protective health benefits. But can’t meat-eaters eat lots of plants too? Omnivores have “constraints on diet-dependent gut microbiota metabolite production.” In other words, it’s the flipside of the vegan eating a steak—they can eat all the fiber they want but may be lacking in fiber-munching machinery.
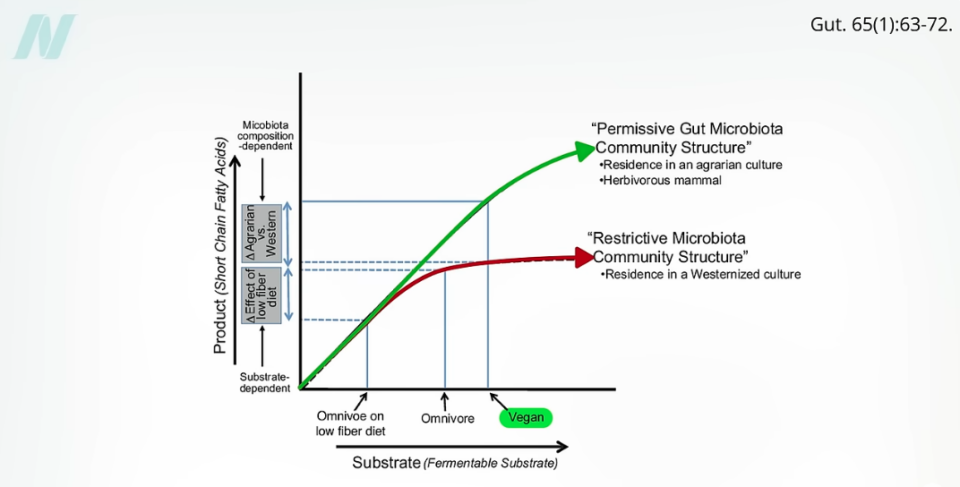
At low levels of fiber intake, the more you eat the more of the beneficial short-chain fatty acids are made. But at a certain point your available fiber-feeders are maxed out, and there’s only so much you can benefit, as you can see below and at 5:22 in my video.
But those habitually eating a plant-based diet have been cultivating the growth of these fiber-feeders, and the sky’s the limit, unless of course you’re eating vegan junk food. But a whole food, plant-based diet should be “effective in promoting a diverse ecosystem of beneficial bacteria to support both human gut microbiome and overall health.”
Doctor’s Note
I have a lot of videos on our microbiome and gut health. Here are some of the most popular ones:
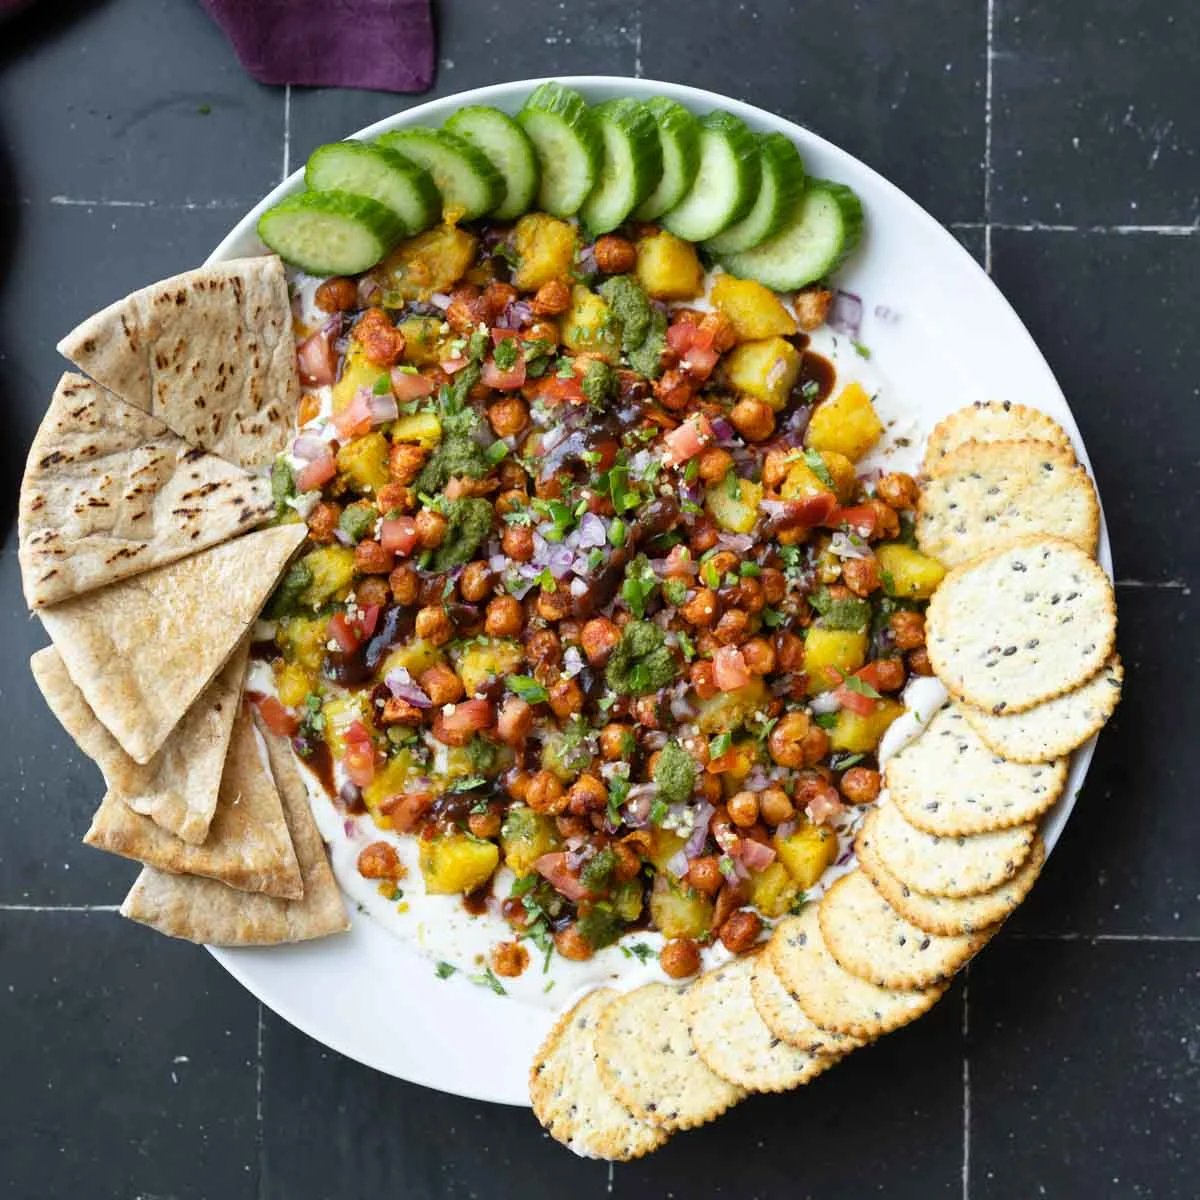
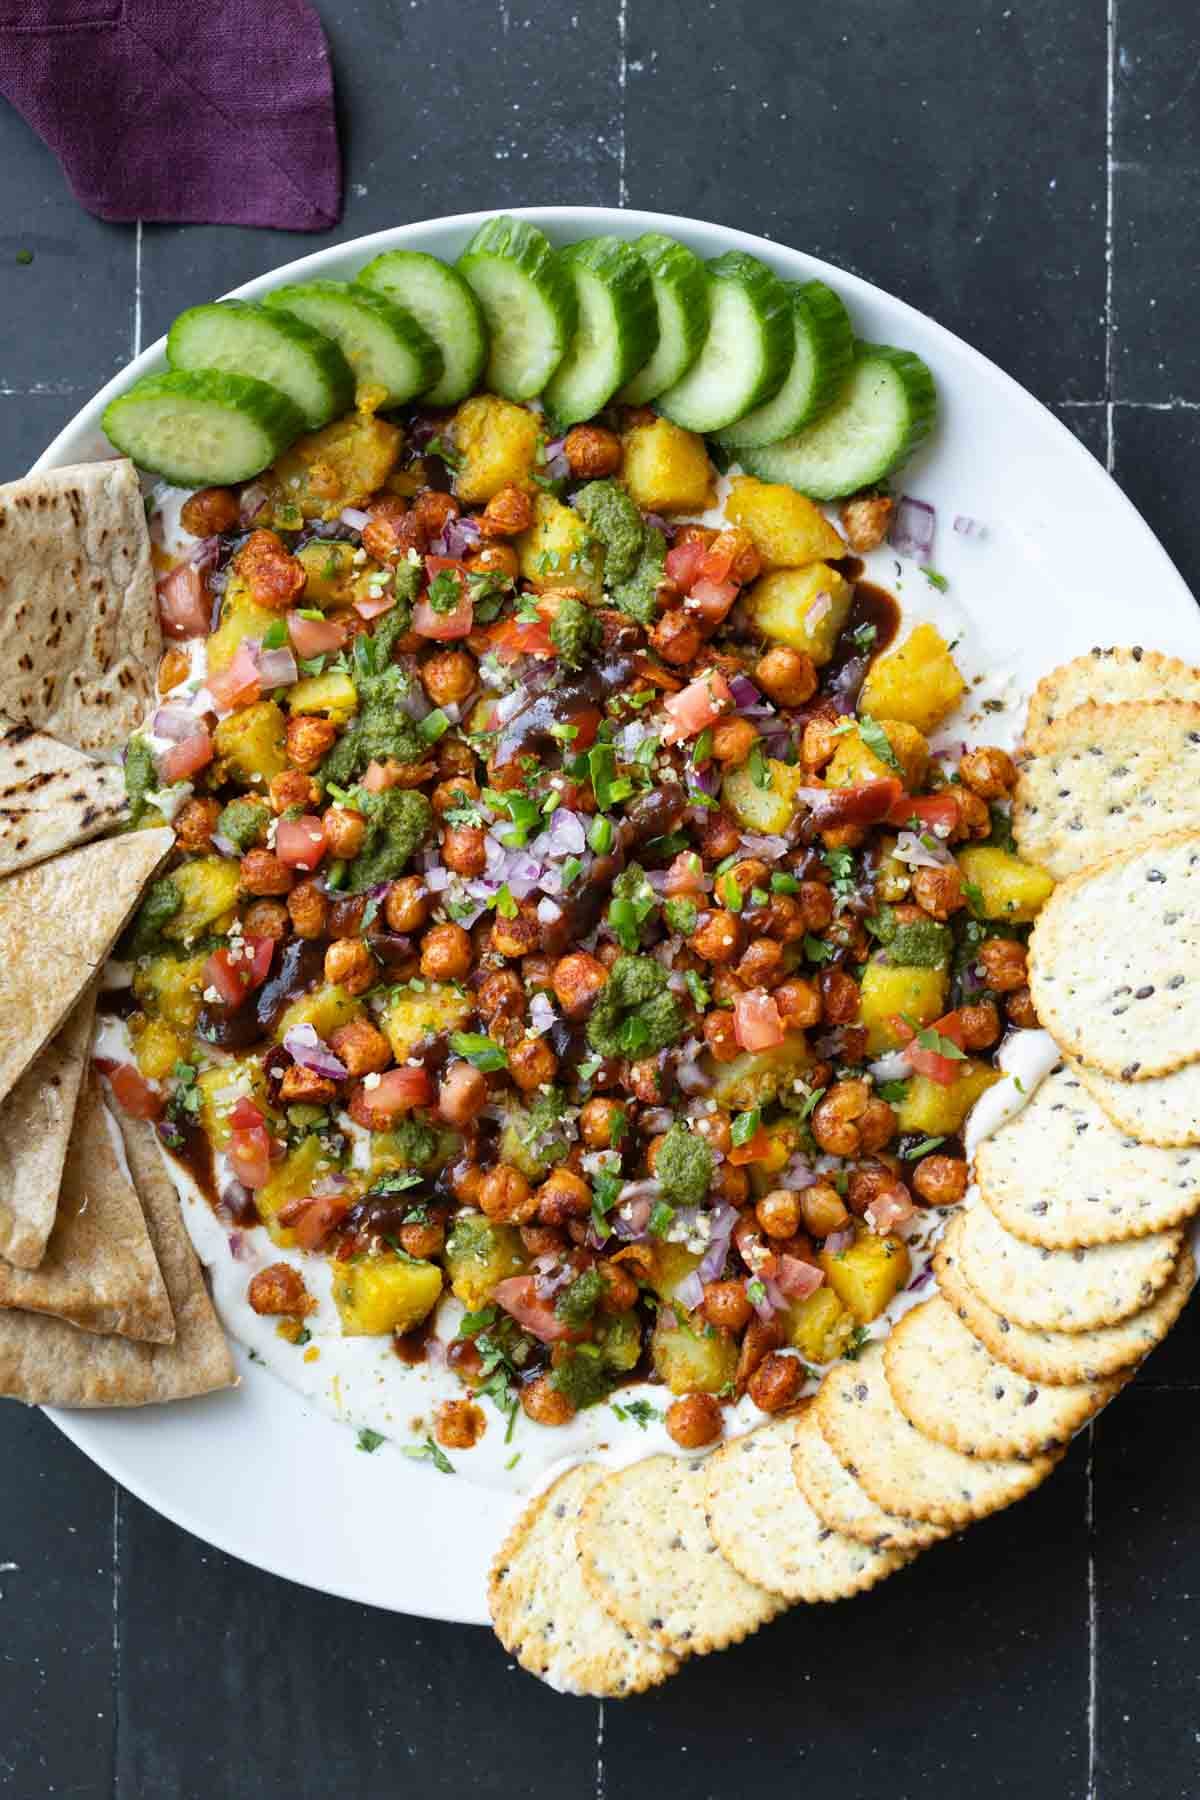
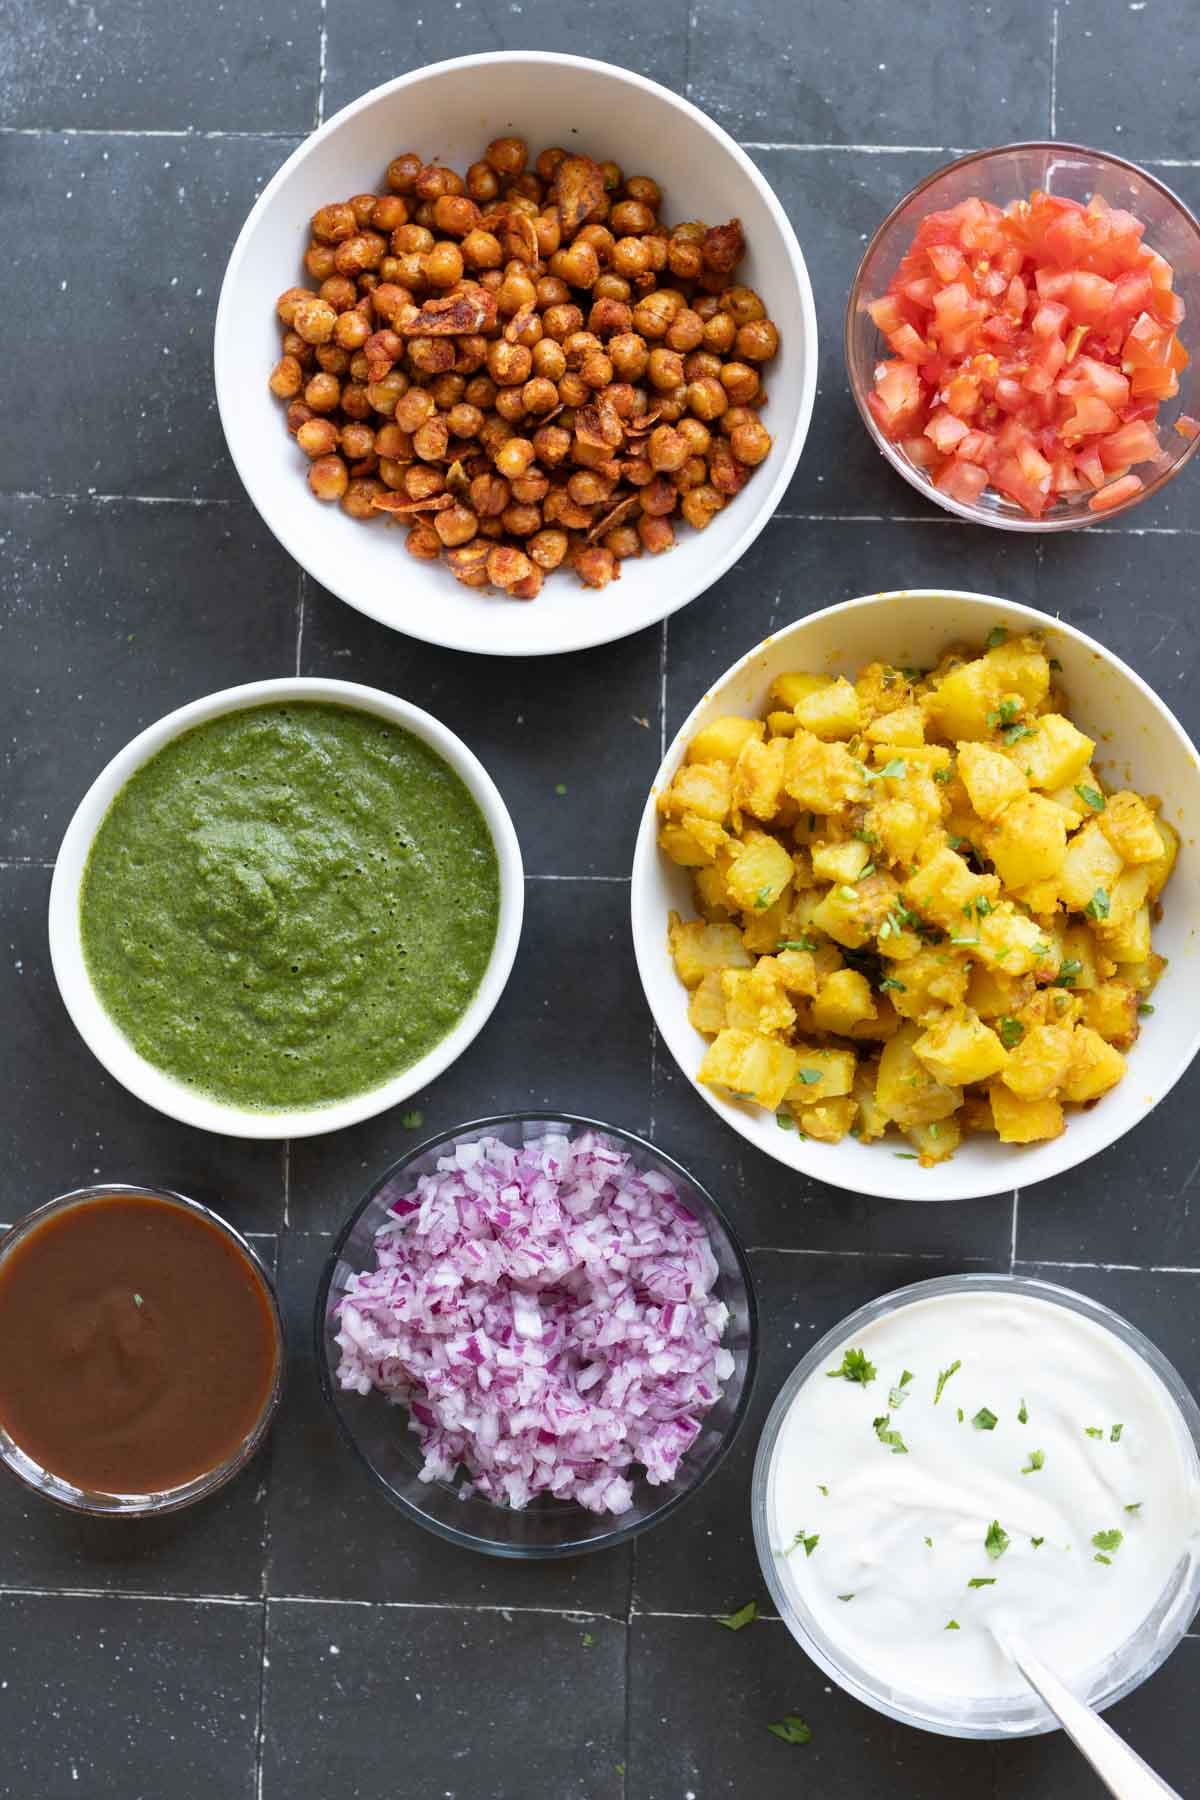
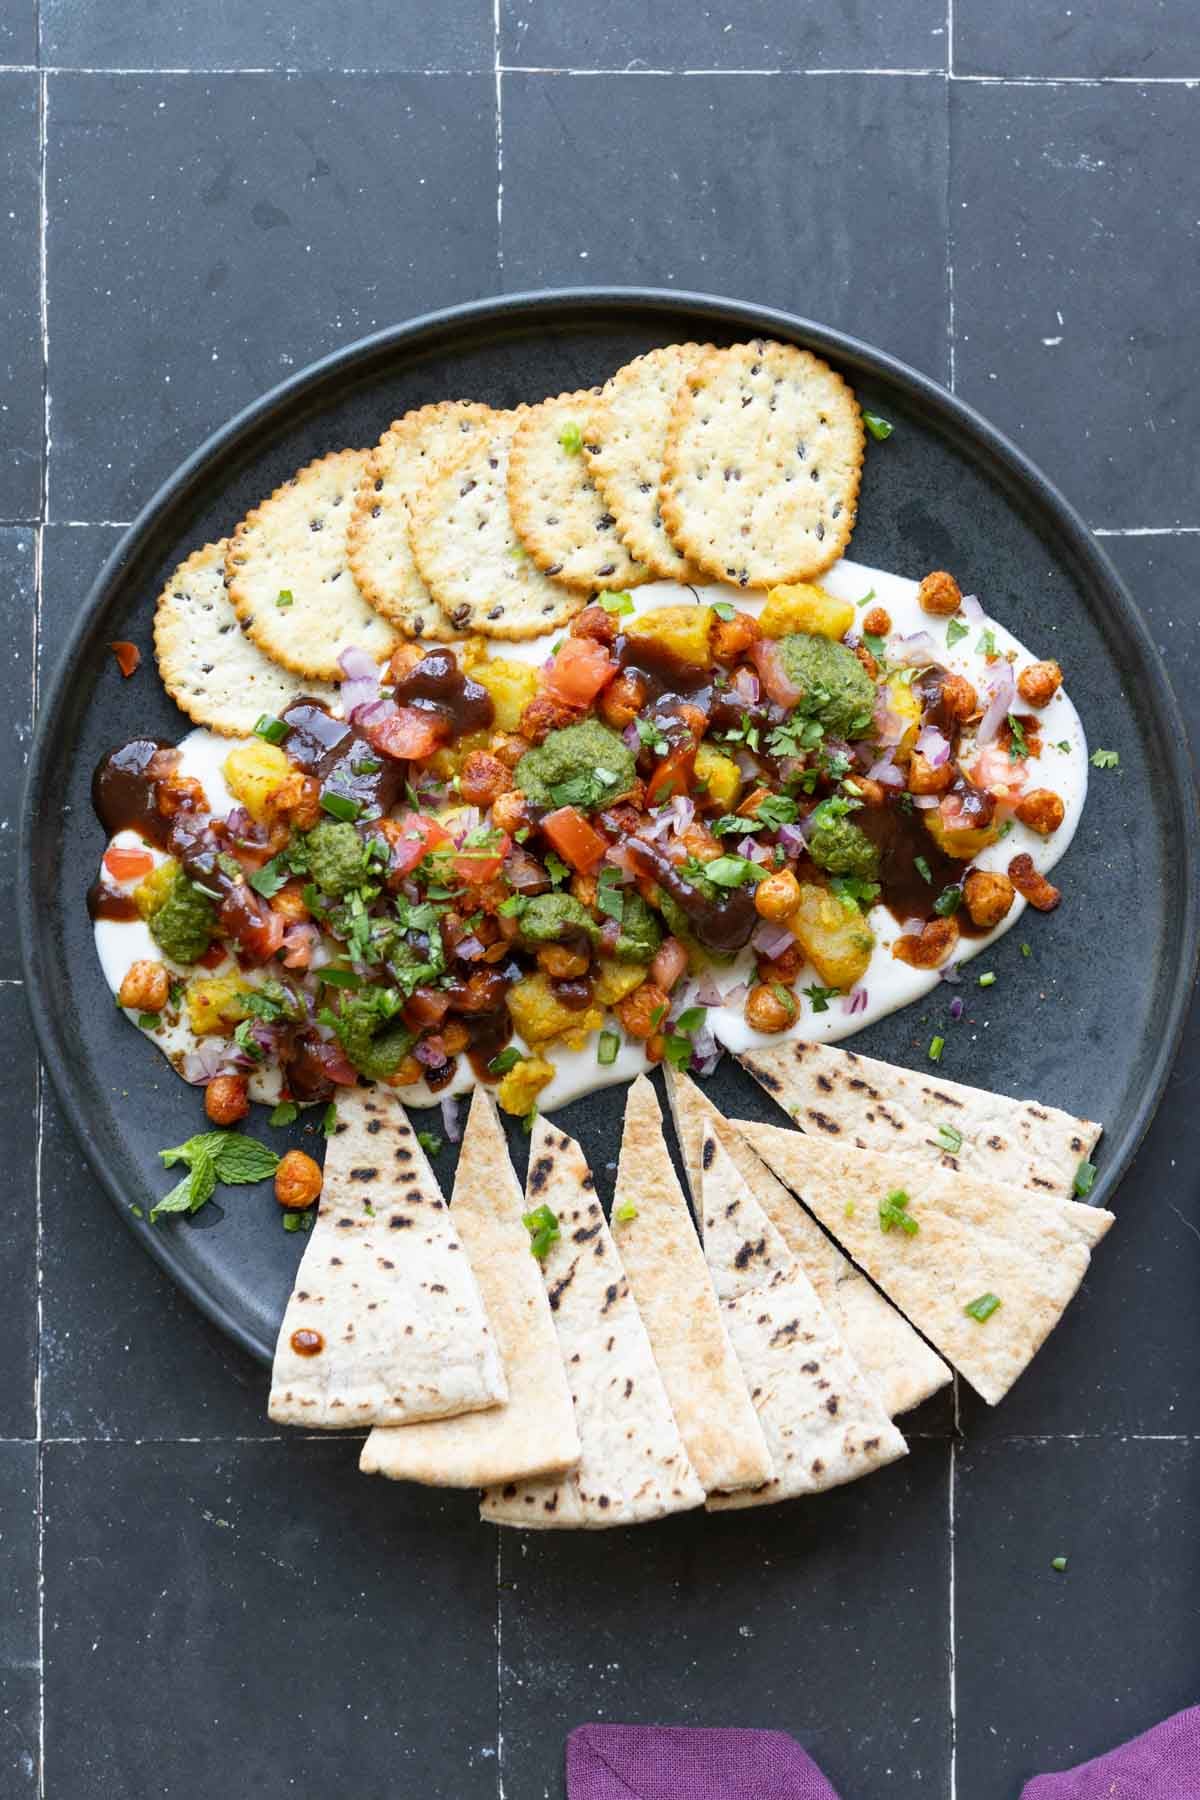
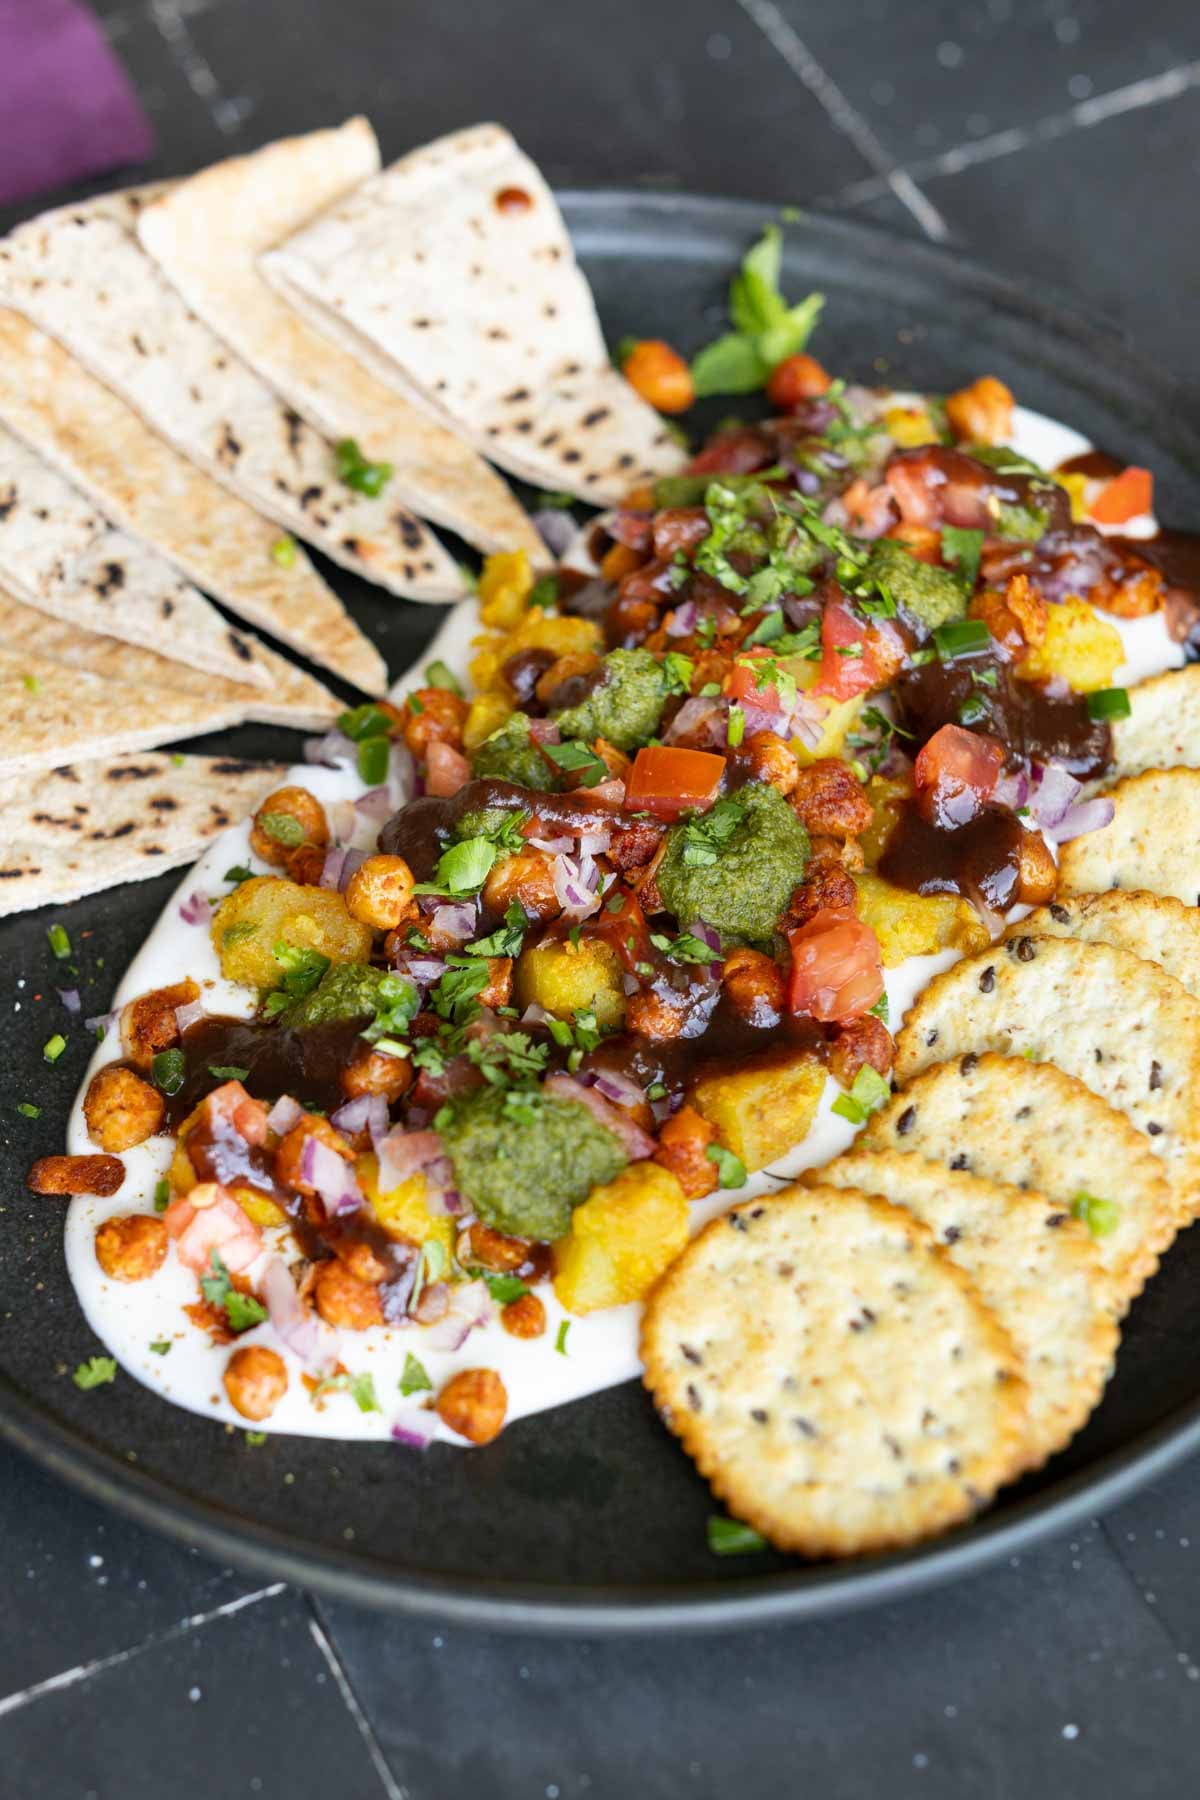
This Samosa Chaat Platter is the ultimate Party appetizer! It’s creamy, it’s spicy, tangy, crunchy and just so addictive. Samosa spiced Potatoes, crispy chickpeas, chutneys, yogurt and crunchy veg! (nut-free, gluten-free, soy-free. 13g protein and 10g fiber per serving!)
This samosa chaat platter is going to be the first thing that disappears at every dinner party. It has an incredible mix of flavors and textures! It looks festive, it’s easy, and perfect for the upcoming festive season. This samosa platter is also high in protein and fiber. with 13 grams protein and 10 grams fiber per serving. If you use multigrain or whole grain crackers or pita as a side, the numbers bump up by 3-5g. It also has this word that is going to get you to run to the kitchen to make it right now, which is SAMOSAS!
What are Samosas? If you don’t know what samosas are, they are these crispy, savory pastries stuffed with deliciously spiced potatoes. They’re a super popular Indian side and the star of this platter.
What is Chaat?
Chaat is a family of Indian street food snacks. They usually have tons of different textures and sauces and flavors built up. Chaat actually means to lick, basically, because the flavor and texture combination is so amazing that you really want to lick every last bit off of your plate.
For samosa chaat, ideally you use some pre-made samosas, break them apart, top them with yogurt, chutneys (like my cilantro-mint chutney or tamarind chutney), some other crispy bits, and fresh onion and tomato. But for an easier and healthier version, we’re just making the samosa potatoes and then layering it all up.
Traditionally, chaat comes with the crispy bits, such as the crispy crackers or the crispy samosas, right in it. And if you’re making it ahead, all of those crispy bits kind of get soggy. So to avoid that, we’re going to make this layered dip kind of situation and serve the crackers on the side, so that people can just scoop it directly from the platter. You get those same flavors and textures, but you never lose that crunch!
If you don’t want to make the whole platter, you can also just make these individual components and serve them all as a chaat spread, so that people can take whichever toppings they want and whichever chutneys and sauces they want. If they want just the chickpeas, they can use just the chickpeas with some sauces, or just the potatoes, or all of the above. Make all of these components, and then serve them however you like. They are absolutely delicious and amazing.
You can use store-bought tamarind chutney, but there is a recipe for a homemade tamarind chutney in the recipe notes, which comes from my first cookbook. If you don’t like tamarind or don’t have access to tamarind, you can also make the maple lime sauce that I’ll also put in the recipe notes.
You can serve this with crackers, crisp pita bread, papadum, cucumber, carrots, or tortilla chips as the crunchy element. Use what you have, and try this incredible samosa chaat platter!
Why You’ll Love This Samosa Platter
flavors and textures of samosa chaat, simplified
crunchy chickpeas, spiced potatoes, and flavorful chutneys
make for now or make ahead!
naturally gluten-free, soy-free, and nut-free
More Chaat-Inspired Dishes
For the Green Cilantro-Mint Chutney
For the Yogurt Layer and for Topping
Prevent your screen from going dark
Make the samosa potatoes.
Boil the potatoes, if you haven’t already. You can also microwave or bake them whole, and then slice them and cube them into small cubes. To boil them, heat a large pot of water. Poke holes in the potatoes and then add them to the pot. Boil them for 15 minutes or longer, until they are fork-tender. Then, remove them from the saucepan, let them cool for a bit, peel, and cube.
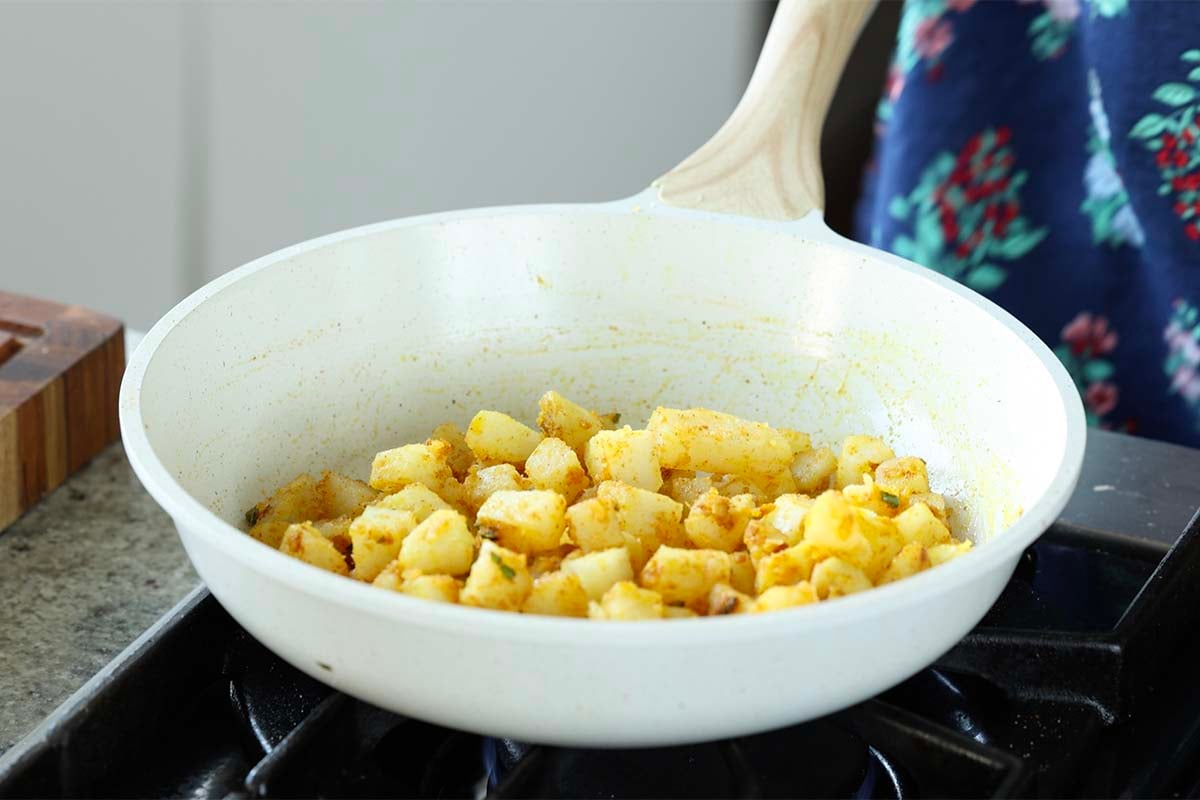
Heat a skillet over medium heat. Add the oil. Once the oil is hot, add in the ginger and green chili and mix for half a minute or so. Then add in all of the samosa potato spices and mix. Add in the cooked and cubed potatoes, and toss well to coat. Let the potatoes cook for 2 to 3 minutes to pick up some of the spices and flavors. Add a dash of lemon juice or lime juice and then remove the potatoes from the skillet.
Make the crispy chickpeas.
In the same skillet, add more oil. Once the oil is hot, add in the chickpeas and let them cook for about 8 to 10 minutes, until most of the chickpeas are starting to turn golden. Then, add in the garlic and mix. Continue to cook until the garlic is starting to get golden. Then, add in the chickpea spices and salt, and switch off the heat. Now your chickpeas are ready. Set them aside.
Make your green chutney.
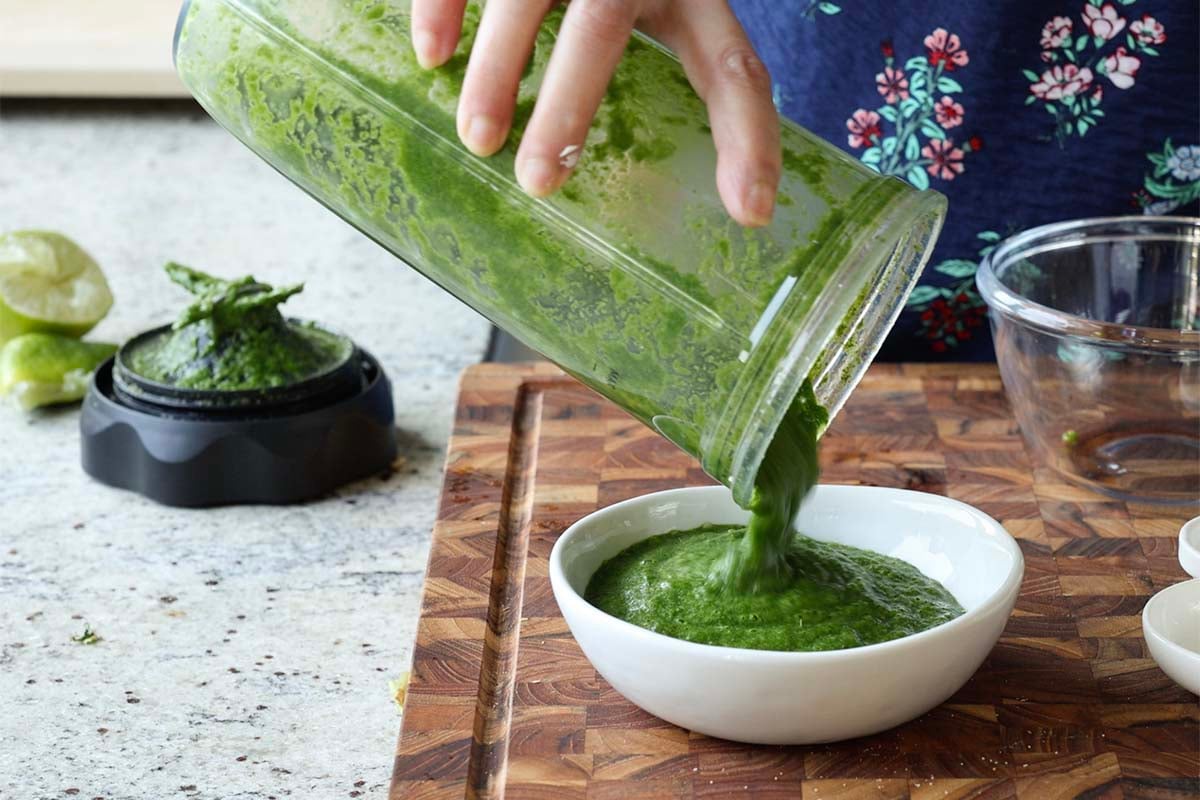
Add all of the green chutney ingredients to a blender. Add 2 tablespoons or so cold water, and then blend. Depending on your blender, you might have to shake the blender a little bit to blend. You don’t want to add too much water, because you want the chutney to be thick. Also, if you’re using a narrower blender, chop the cilantro and mint a little bit into half or quarter sizes, so that they can move around easily in a taller blender.
Taste the chutney. Add more salt, if needed, some more heat, such as more green chili or cayenne, if needed, or more lime juice for more tang. Then, blend again, and set that green chutney aside.
Assemble the samosa platter.
Make the tamarind chutney if you’re using my recipe in the recipe notes, or use a pre-made tamarind date chutney. Also chop up the onion, tomatoes, and cilantro for the yogurt layer, and set that aside.
Now, you’re ready to assemble your platter. I usually like to spread the yogurt at the bottom, sprinkle the yogurt layer spices and chutneys on top, add the potatoes, the chickpeas, and some more chutneys, cilantro, onion, and tomato. You can also put the potatoes and chickpeas at the bottom, add a drizzle of yogurt on top along with the chutneys, and then onion, tomato, cilantro, some of the chaat masala, and the roasted ground cumin. Either way you make it, put some crackers on the side, take scoops of this mixture, and enjoy!
Nutritional information does not include optional toppings or crunchy sides, since what you use may vary. To make roasted ground cumin: Toast some cumin seeds in a skillet over medium-low heat until they start to change color and smell fragrant, about 3 to 4 minutes or so. Then let them cool. Use a spice grinder to grind them into a powder and use that. To make the tamarind date chutney: tamarind chutney recipe here To make the maple lime sauce (instead of the tamarind chutney): Mix together 2 tablespoons maple syrup, 2 teaspoons lime juice, 1 tablespoon barbecue sauce, 1/8 teaspoon toasted ground cumin, and 1/2 teaspoon chaat masala. Mix that in and use that instead of the tamarind date chutney. You can also warm that up in a small pan on the stovetop, so that the flavors meld better. This samosa platter is naturally nut-free. It is gluten-free, if you use gluten-free tortilla chips and papadums and cucumber on the side. It is soy-free, if you use a soy-free non-dairy yogurt.
Nutrition information is automatically calculated, so should only be used as an approximation.
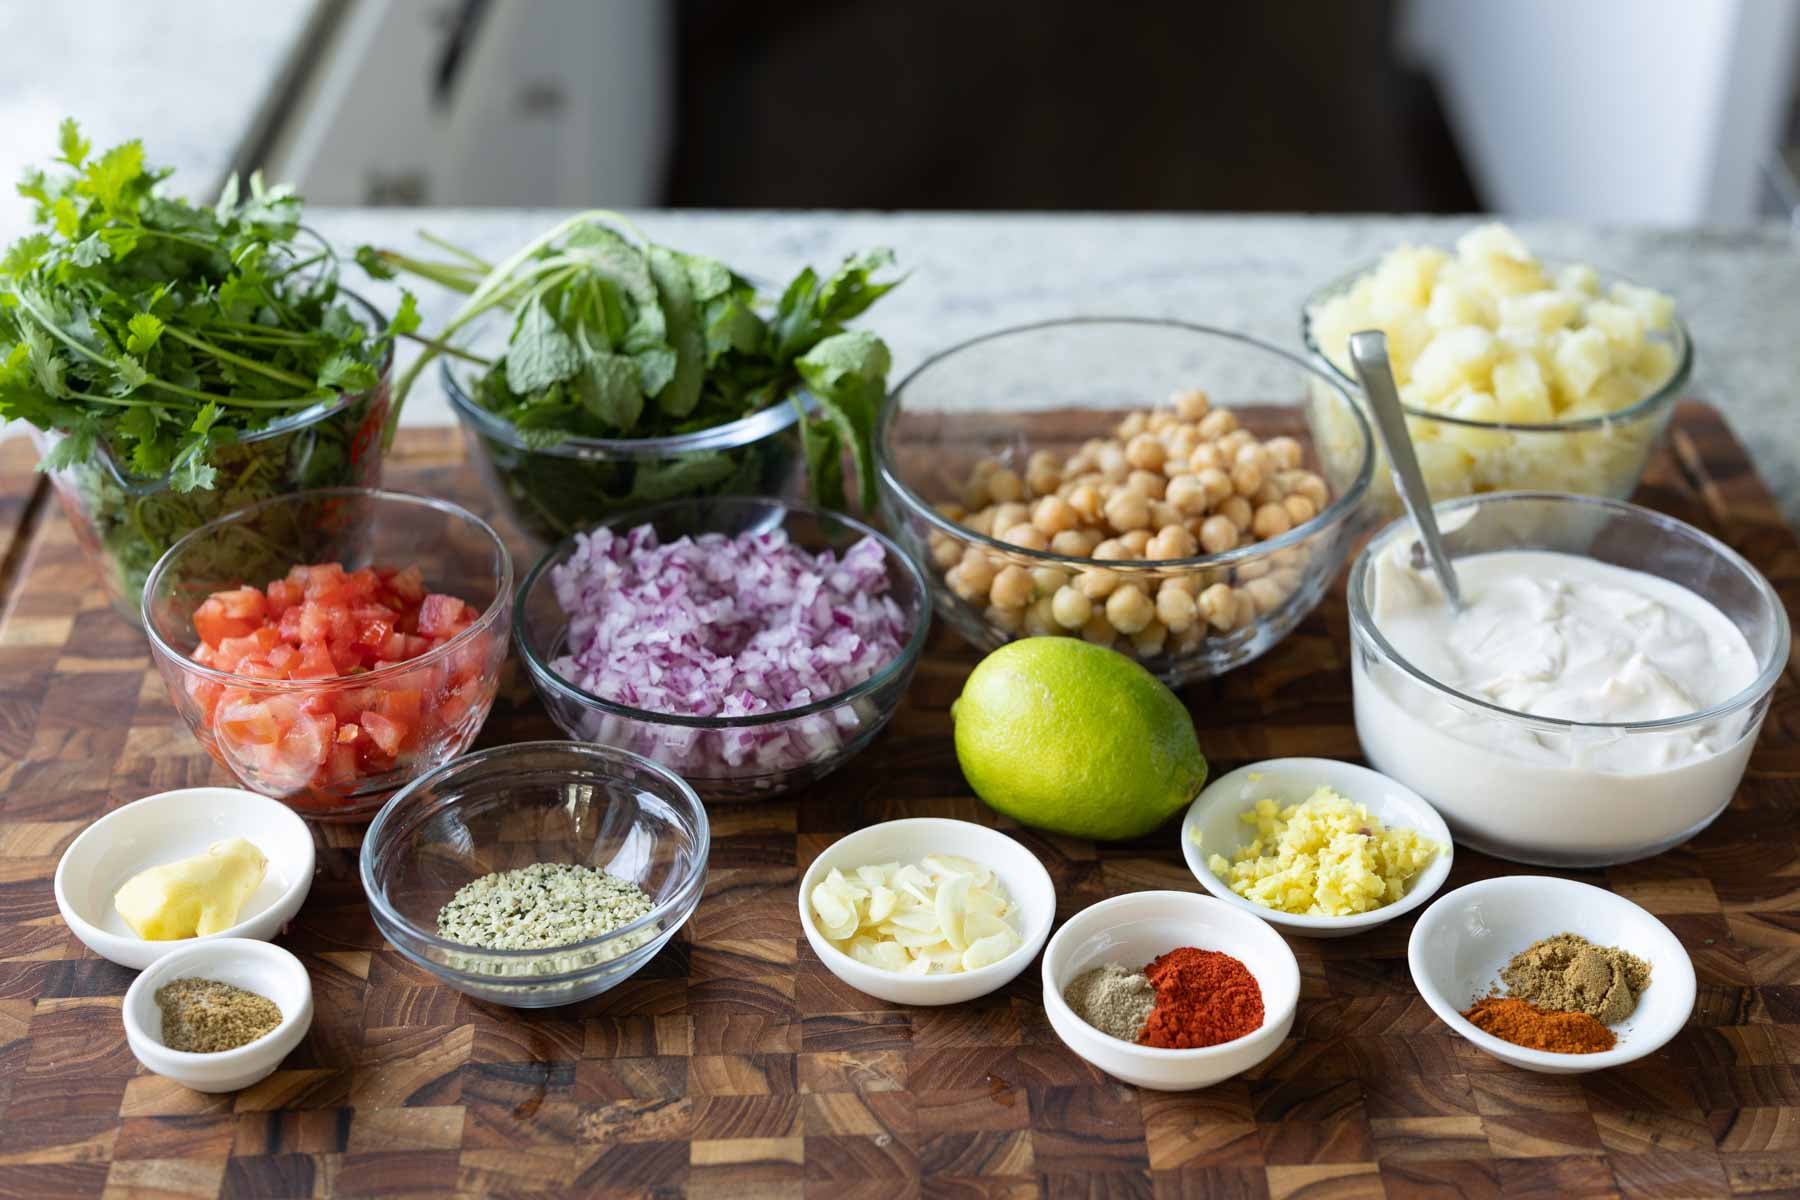
Ingredients
oil – To cook the potatoes and the chickpeas.
aromatics – For the potatoes and the green chutney, we need ginger and green chili. The crispy chickpeas get great flavor from garlic. We are also topping this with fresh chopped onion and green chili!
ground spices – The samosa potatoes use cumin, turmeric, and cayenne or Kashmiri chili powder. For the chickpeas, you need Kashmiri chili powder and chaat masala or lime zest. The green chutney has garlic powder, ground cumin, and chaat masala. And we are sprinkling roasted or regular ground cumin and some chaat masala on top for even more flavor!
potatoes – You need to boil and cube these for the samosa potatoes.
lemon and/or lime – Adds tang to the potatoes and green chutney.
chickpeas – To crisp up in the pan.
fresh herbs – Fresh mint and cilantro are the base for the green chutney. We are also topping the samosa platter with some chopped fresh cilantro.
non-dairy yogurt – A thick non-dairy yogurt serves as either the base for your samosa chaat or as a topping.
hemp seeds – Adds more protein to this platter!
crunch sides – Choose whatever crunchy elements you want to dip into your samosa chaat platter! Things like crackers, cucumber, crisped up pita bread, papadum, tortilla chips, or even garlic bread all work well.
💡Tips
While the potatoes and chickpeas cook on the stovetop, make the green chutney and prep the other toppings.
The green chutney is very thick, so it might be a little tough to blend. Just keep at it, scraping down the sides and/or shaking the blender until you get a smooth mixture.
How to Make Samosa Chaat Platter
Boil the potatoes, if you haven’t already. You can also microwave or bake them whole, and then slice them and cube them into small cubes. To boil them, heat a large pot of water. Poke holes in the potatoes and then add them to the pot. Boil them for 15 minutes or longer, until they are fork-tender. Then, remove them from the saucepan, let them cool for a bit, peel, and cube.
Heat a skillet over medium heat. Add the oil. Once the oil is hot, add in the ginger and green chili and mix for half a minute or so. Then add in all of the samosa potato spices and mix.
Add in the cooked and cubed potatoes, and toss well to coat. Let the potatoes cook for 2 to 3 minutes to pick up some of the spices and flavors.
Add a dash of lemon juice or lime juice and then remove the potatoes from the skillet.
In the same skillet, add more oil. Once the oil is hot, add in the chickpeas and let them cook for about 8 to 10 minutes, until most of the chickpeas are starting to turn golden. Then, add in the garlic and mix. Continue to cook until the garlic is starting to get golden.
Then, add in the chickpea spices and salt, and switch off the heat. Now your chickpeas are ready. Set them aside.
Add all of the green chutney(sauce) ingredients to a blender. Add 2 tablespoons or so cold water, and then blend. Depending on your blender, you might have to shake the blender a little bit to blend. You don’t want to add too much water, because you want the chutney to be thick. Also, if you’re using a narrower blender, chop the cilantro and mint a little bit into half or quarter sizes, so that they can move around easily in a taller blender.
Taste the chutney. Add more salt, if needed, some more heat, such as more green chili or cayenne, if needed, or more lime juice for more tang. Then, blend again, and set that green chutney aside.
Make the tamarind chutney if you’re using my recipe in the recipe notes, or use a pre-made tamarind date chutney. Also chop up the onion, tomatoes, and cilantro for the yogurt layer, and set that aside.
Now, you’re ready to assemble your platter. I usually like to spread the yogurt at the bottom, sprinkle the yogurt layer spices , then chutneys(sauces) on top. Sprinkle some hemp seeds.
Add the potatoes, the chickpeas, and some more chutneys, cilantro, onion, and tomato.
Either way you make it, put some crackers on the side, take scoops of this mixture, and enjoy!
Make-Ahead Directions
Store the elements for the samosa chaat separately for up to four days in closed containers in the refrigerator. It’s especially important that you store your crunchy elements separately, so they don’t get soggy as they sit.
Frequently Asked Questions
Is this recipe allergy friendly?
This samosa platter is naturally nut-free. It is gluten-free, if you use gluten-free tortilla chips and papadums and cucumber on the side. It is soy-free, if you use a soy-free non-dairy yogurt.
How do I make the roasted ground cumin?
Toast some cumin seeds in a skillet over medium-low heat until they start to change color and smell fragrant, about 3 to 4 minutes or so. Then let them cool. Use a spice grinder to grind them into a powder and use that.
While watching the news last night, I was astonished by a report that, so far in 2026 alone, seven million children have been given a drug that is still called experimental for a simple reason: it does not reliably prevent the disease it was made to counter. It has also been linked, in hearings and in published concern, to heart problems in young
people, and it is suspected of aggravating cancers. After it was given widely, some reports tied it to a sharp rise in stillbirths, including one claim of an 800 percent increase. In congressional hearings, records were presented suggesting a link to miscarriage and infertility. From phone recordings of the director of NIAID, it appears that in conversations with top scientists he was aware of those concerns, and still told pregnant women the shot was safe for them and their babies.
I am honestly in awe that so many mothers in this country have not been told the other side of this. Are they fully responsible for subjecting their children to a procedure with unanswered questions, or does most of the blame belong with the pharmaceutical companies, the people administering the shot, and the news outlets that will not cover bad news about
their advertisers?
Newsmax, one of the stations that does not take advertising from the makers of this vaccine, presented these cases during the evening news on September 30, 2026:
Joe Biden
received six COVID shots and was then diagnosed with stage 4 prostate cancer, Gleason score 9 out of 10, what some are calling a turbo cancer.
Jill Biden had five COVID shots and has had basal cell carcinoma.
King Charles had three COVID shots and is being treated for cancer.
Catherine, Princess of Wales, had two COVID shots and has also been treated for cancer.
Dolly
Parton had two COVID shots and died of cancer.
Lloyd Austin, in the Biden administration, received the required two COVID shots and has had prostate cancer.
O.J. Simpson had two COVID shots and
died of prostate cancer.
This does not prove anything. It does warrant investigation. Dr. Drew Pinsky, a guest on the program, said that calls for studies on anything related to spike proteins are dismissed almost at once.
The government committee that approves vaccines tried to make the COVID shot mandatory for schoolchildren. The Secretary of Health and Human Services dismissed that committee, appointed a new one, and that new committee, presented with the facts, rejected a mandate for an experimental vaccine, as they should have. The CDC director blocked the new committee’s decision, was overruled, and then left the post. The administration is now being sued by parts of the medical
profession.
I personally think no mandate is ever warranted. Newer comparative reports suggest unvaccinated children are healthier than vaccinated children. Those reports should be tested, not buried.
In conclusion, people should be allowed to choose for themselves. These guardians of children were not denied the right to vaccinate. It would be better if the studies were actually done, so all of us could be informed.
Be healthy, and remember: although mankind disrupts natural order, Nature Cures.
David Christopher is a Master Herbalist, director of The School of Natural Healing, and son of our beloved Dr. John R. Christopher. He is continually helping others improve their health and that of their family members. The School loves having him as the director.
Why don’t more big payors in health care embrace plant-based eating?
Many of the diseases “that cause a constant drain on health care budgets can be prevented by nutrition;” so, why aren’t the big payors getting involved? Even a 1% decline in excess body fat could alone save tens of billions in medical costs. You’d think at least the health insurance industry would try to get people to eat more healthfully to try to pay out less money. Well, one could say “the insurance industry benefits from high health care costs because these rising costs are simply passed on to both individuals and employers in terms of higher premiums and insurers take a fixed percentage of these premiums as increasing profits.” They get a piece of the pie; so, the bigger the pie—the unhealthier everyone is—the bigger their piece. “As such, insurers have not done as much as they could to help reduce health care costs because lower costs would hurt their bottom line.”
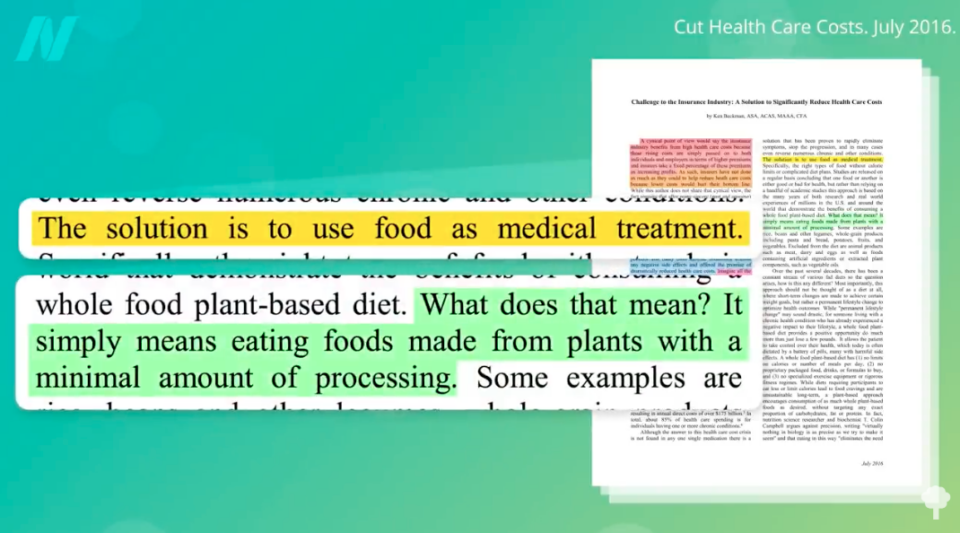
Could you imagine “there was a medication that could successfully treat and even reverse heart disease, type 2 diabetes, high blood pressure and many other chronic conditions without any negative side effects and offered the promise of dramatically reduced health care costs”? Imagine all the advertising that would be needed to promote it. Imagine how much drug companies would charge for a pill that could not just treat but cure diabetes and these other diseases? “Then what if you were told this medication exists today, is available to everyone in unlimited quantities at a low cost, but the vast majority of the American public has never heard about it.” You want a solution to significantly reduce health care costs? “The solution is to use food as medical treatment,” specifically, foods made from minimally processed plants, as shown below and at 1:58 in my video Why Don’t Health Insurers Encourage Healthier Eating?.
“One of the main barriers is simply the current widespread belief that once someone has a chronic condition, such as heart disease or type 2 diabetes, there is very little that can be done to actually reverse the disease and the best outcome possible is to maintain the condition so that it does not get any worse. The fact that a whole food plant-based approach provides a safe, effective, low-cost alternative to eliminate symptoms and potentially reverse the underlying condition without drugs or surgery is unknown to a vast majority of Americans. In contrast to the pharmaceutical industry that spends large sums to market new drugs…there are not big profits in promoting a plant-based diet.”
The politics surrounding health care are focused on who’s going to pay for it instead of what kind of health care is best. “The evidence is overwhelming that a whole food plant-based diet provides the best opportunity to not only reduce the growth in spending, but actually decrease total health care costs more than any drug, medical procedure, insurance reform, or provider payment model could hope to.”
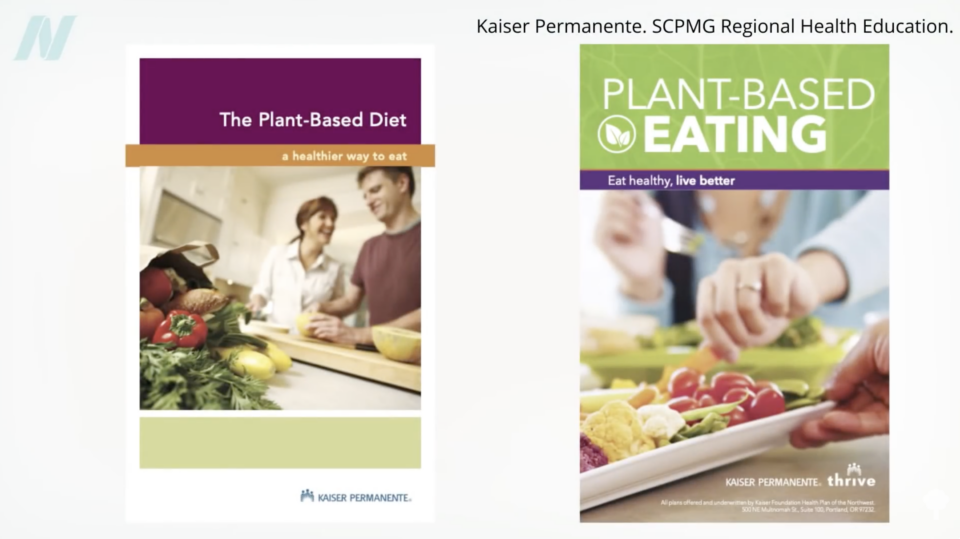
Thankfully, the word is spreading. A review of the evidence published in Kaiser Permanente’s journal concluded that doctors “should consider recommending a plant-based diet to all their patients, especially those with high blood pressure, diabetes, cardiovascular disease, or obesity.” Kaiser has followed up with user friendly guides (freely available online) for both physicians and patients explaining the benefits and practical aspects of implementing a plant-based diet,” as you can see below and at 3:24 in my video.
So, why aren’t all insurers sending out such information to all their members? Drug ads routinely tell viewers, “Ask your doctor if this drug is right for you.” Well, members could be prompted to ask their doctors about a plant-based diet’s ability to reverse disease and reduce or eliminate prescription drug use. “Of course these materials would also have to list all side effects such as increased energy, lower blood pressure, and improved digestion, all while eating unlimited quantities of satisfying food.” Ask your doctor if plants are right for you.
Doctor’s Note
For more on treating the underlying cause of lifestyle diseases, see:
For health in the workplace, check out A Workplace Wellness Program That Works.
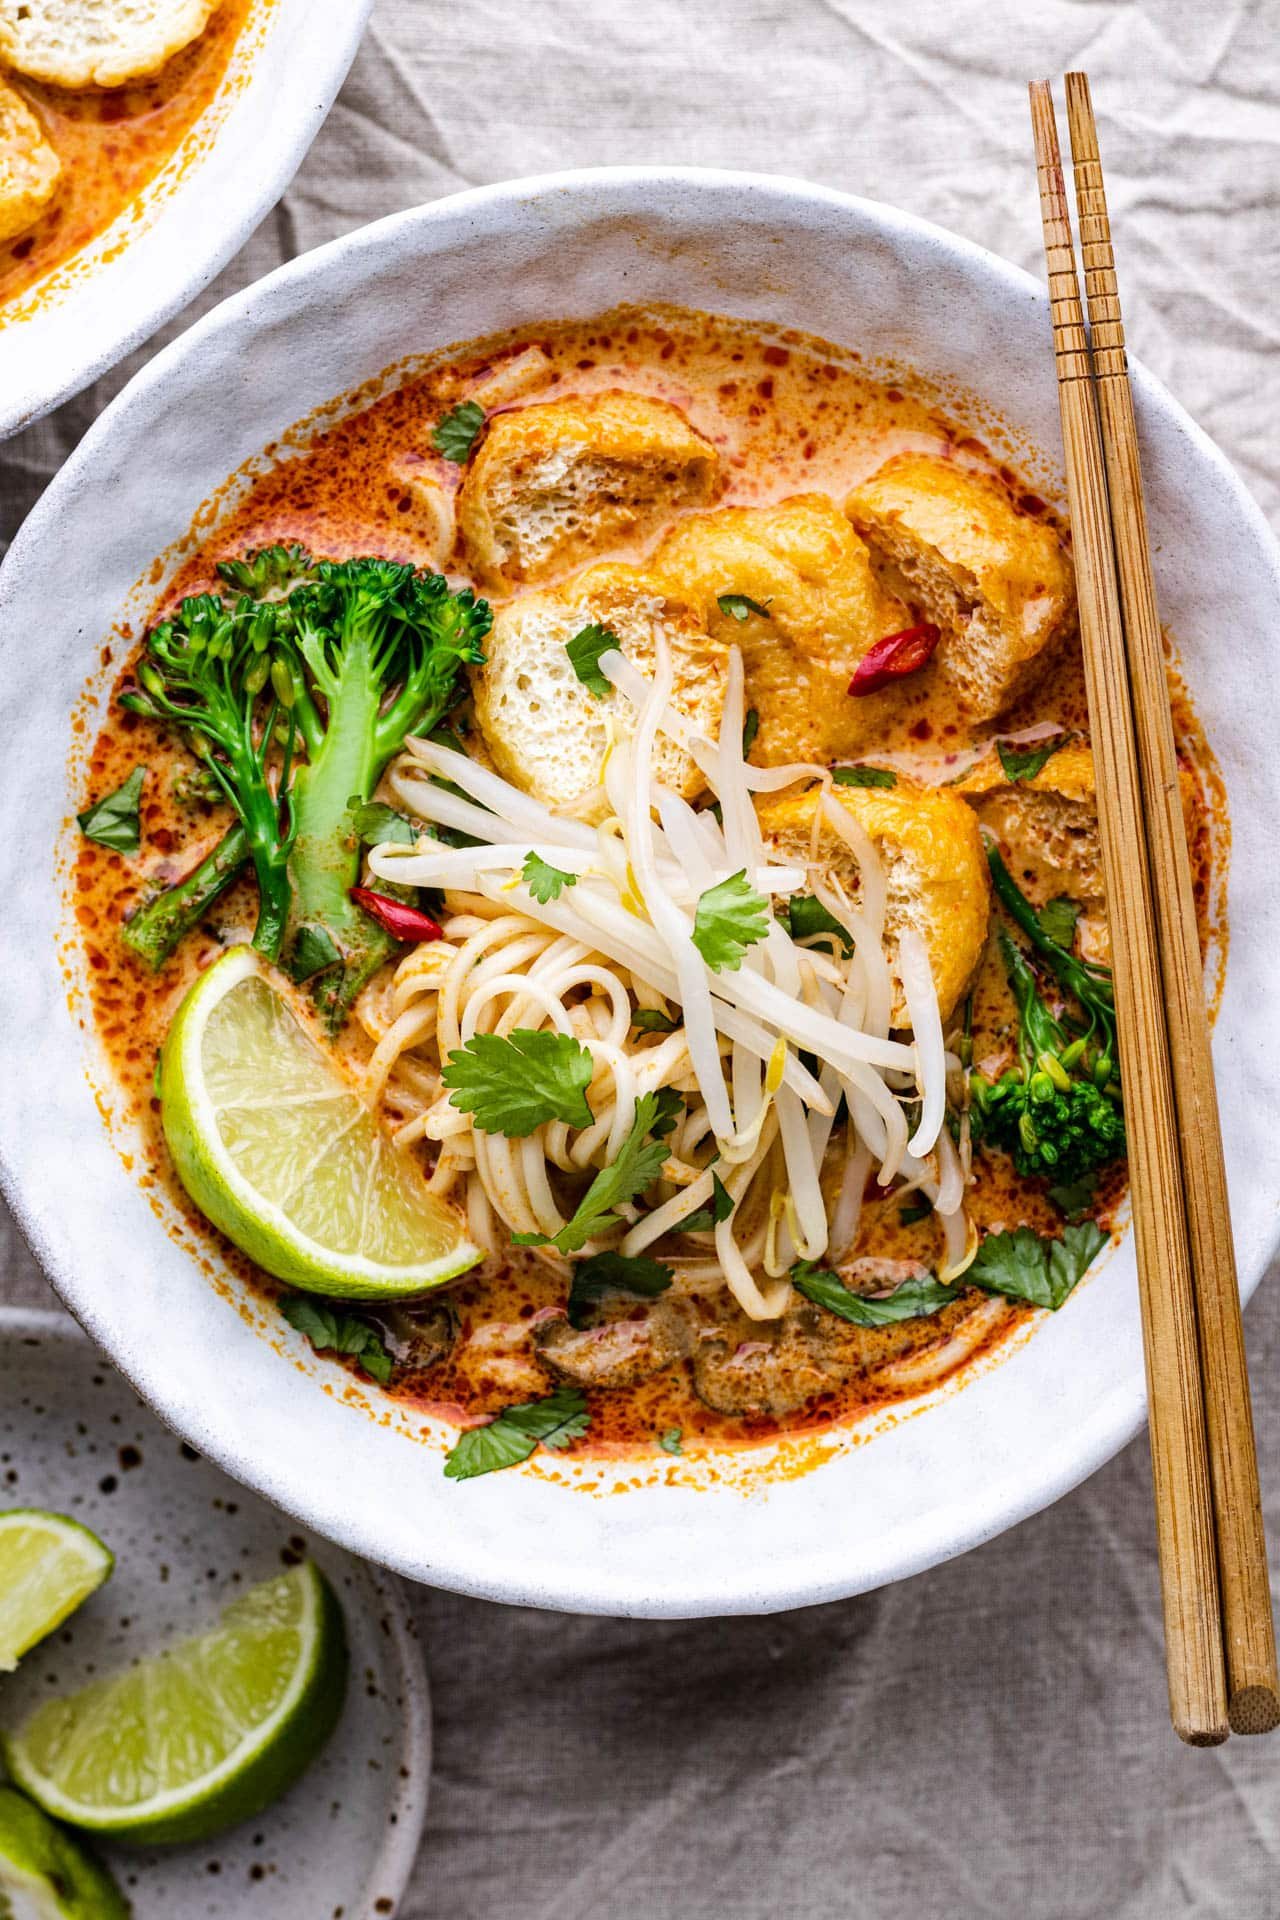
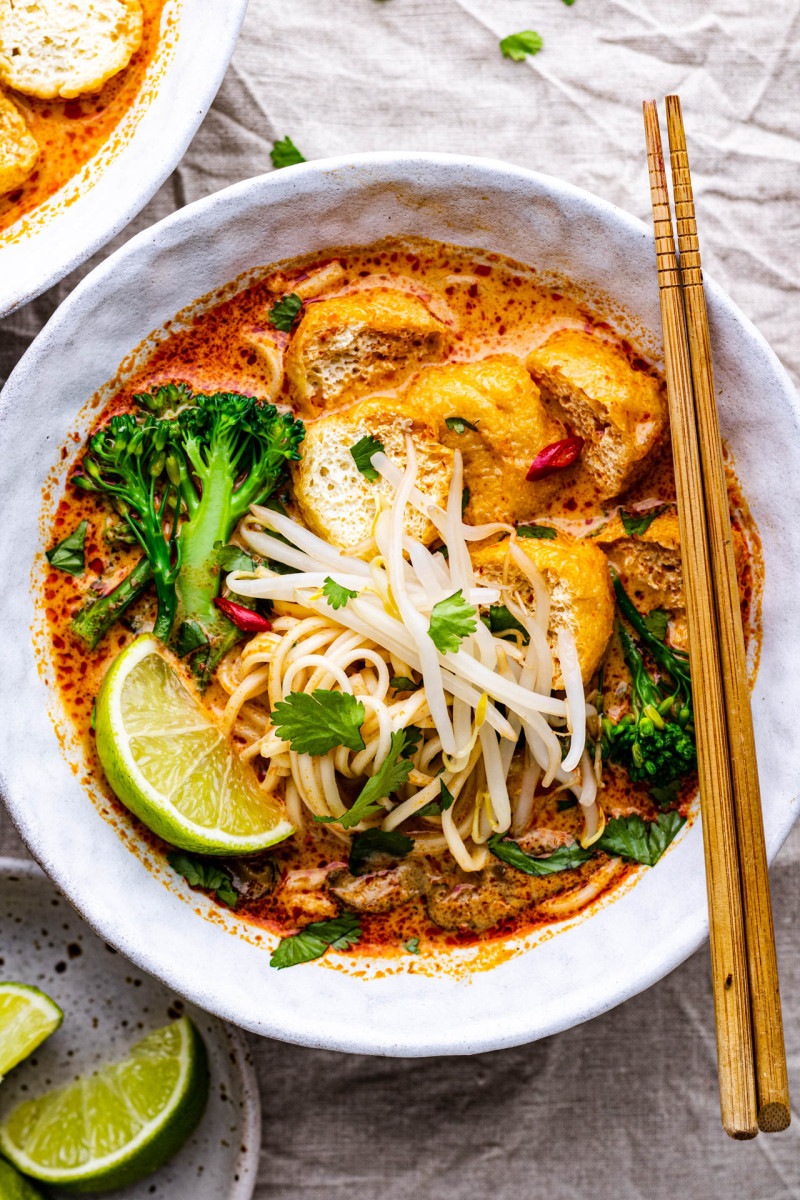
While the sunshine has been simply glorious over the past week, the forecast warns of colder days ahead. With that in mind, my today’s recipe is for a simple Thai red curry noodle soup or Thai-inspired red curry noodle soup, I should say.
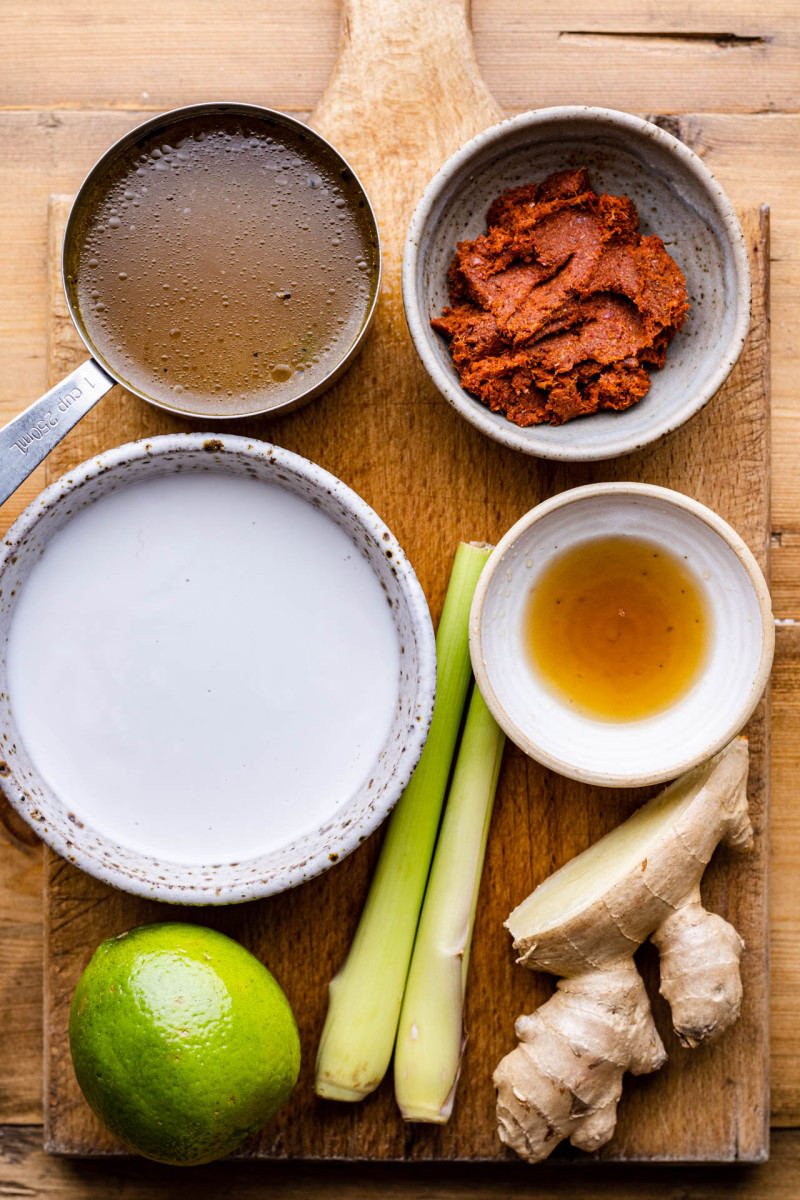
The inspiration behind this simple Thai red curry noodle soup was that I craving something warm and comforting yet still fairly light. I also wanted the dish to be easy and quick to make so instead of making my own curry paste, I bought one. Making a curry paste would involve making a special trip to an Asian supermarket to get hard to get ingredients and then processing them into a paste, I cheated and bought a commercial red curry paste instead. I did, however, add a bit of ginger and a stalk of lemongrass as those fresh citrusy flavours are often the ones that get muted in shop-bought curry pastes.
I was also going to buy my stock but I could only find chicken or beef stock and since I had a few off cuts in my fridge, I decided to make the stock for this soup but that’s totally optional. I had leftover carrots, coriander stalks, a wedge of white cabbage and some celery sticks I really wanted to get rid of so I made them into a stock. If you want me to share my stock recipe for this soup, let me know and I will do that in a separate post.
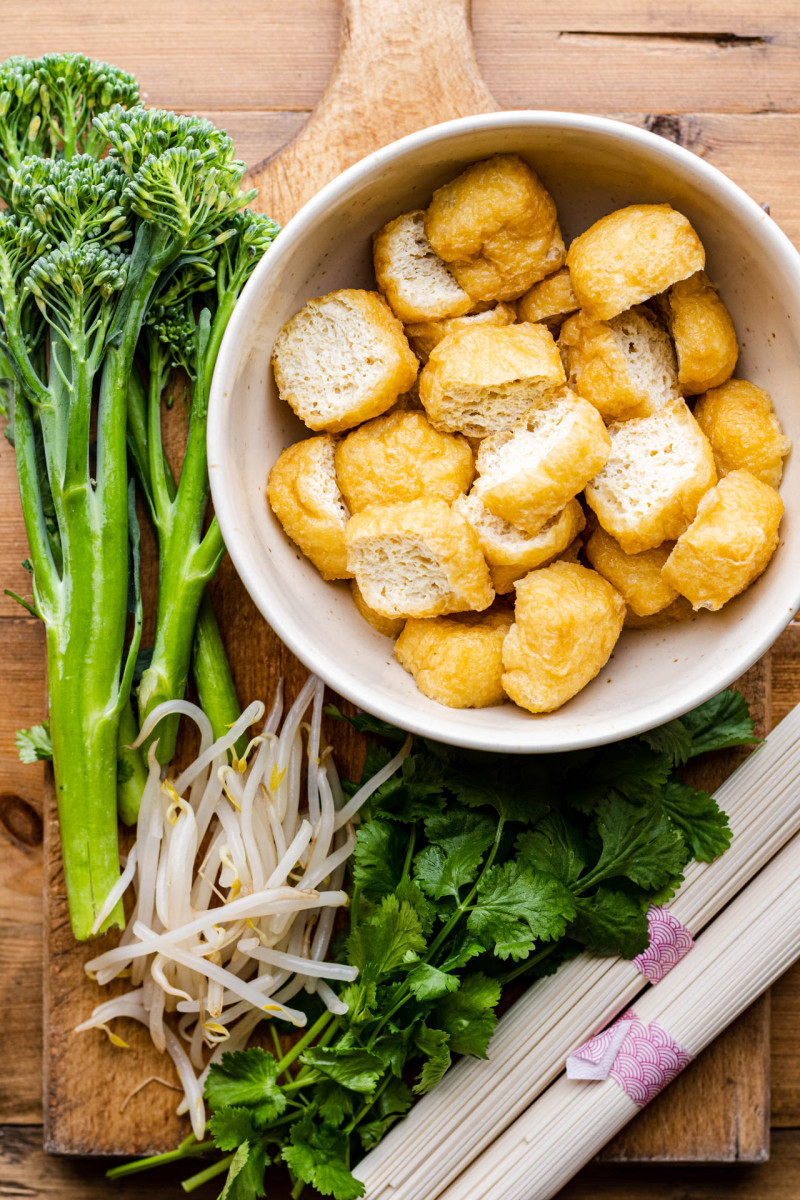
This Thai red curry noodle soup is fairly spicy but not overly so, it’s pleasantly spicy to me, but you can dial the level of spice up or down a bit depending on your personal preference and on how hot your curry paste is. This Thai red curry noodle soup is comforting and packed with things that would keep you full – your favourite noodles, vegetables – I used tenderstem broccoli but use whatever veggies sound good to you and some form of tofu. I used tofu puffs as they are sponge-like and very satisfying in a soup, but fried or baked tofu or tempeh would also work beautifully. We’ve been really enjoying this simple yet comforting soup and I hope that you’ll give this recipe a spin too!
MORE ABOUT THE INGREDIENTS
THAI RED CURRY PASTE – a good Thai red curry paste is the most important ingredient here. Sure you can make your own but it’s a lot of extra effort and if you are after a quick and tasty meal, it’s really no that necessary. Mae Ploy is a good Thai paste brand that comes in a regular version and in a vegetarian one too. Aroy-D is another good bran that offers shrimp-free paste.
OIL – while traditionally coconut milk can be used on its own to bloom the curry paste, it is easier to do with oil. Pick a neutral oil with a high smoke point like peanut (ground nut), rice bran or rapeseed.
FULL COCONUT MILK – coconut milk is another key ingredient here, I recommend using a full fat coconut milk that does not contain anything else other than coconut and water. A can of coconut milk that contains stabilizers makes it incredibly hard for you to know when the paste has been fried off enough and it does not split.
LEMONGRASS & GINGER – both lemongrass and ginger are totally optional, but I find that shop-bought curry pastes – no matter how good – lose some of their fresh, citrusy notes. This is why I add a stalk of bruised lemongrass to the soup and some julienned ginger too.
STOCK – a good stock is another ingredient that’s key to the soup’s flavour. I made my own using veggie off cuts, coriander stalks I had, shiitake and kombu but you can totally buy quality veggie stock these days.
LIME – a squeeze of lime is lovely to finish the soup off and balance its flavours. Don’t add the lime juice until the end though as its fresh flavour won’t survive, add it as a finishing touch.
NOODLES – use your favourite noodles to make the soup into a Thai red curry noodle soup. I would suggest 60-100 g (2-3.5 oz) per person, depending on appetite.
VEGGIES – tenderstem broccoli was my choice of veg to make this soup more nourishing and to add another texture but anything you like works – green beans, pak choi, sweet potato would all work really nicely too.
TOFU PUFFS – tofu puffs were a bit of an impulse by at an Asian supermarket. They are great in a soup as they soak up its flavours really well. Straight out of the packet they tend to be greasy so I cut them in half and blanch them in boiling water for 1 minute to get rid of excess grease.
CORIANDER – I am a coriander lover and its citrusy flavour works really well with Thai flavours. This is why I used fresh coriander to finish this soup before serving but if you are not a fan, you can, of course, skip it.
BEANSPROUTS – breansprouts are very easily accessible and make a great, crunchy and fresh topping for curry soups.
HOW TO MAKE IT?
1)Fry off curry paste
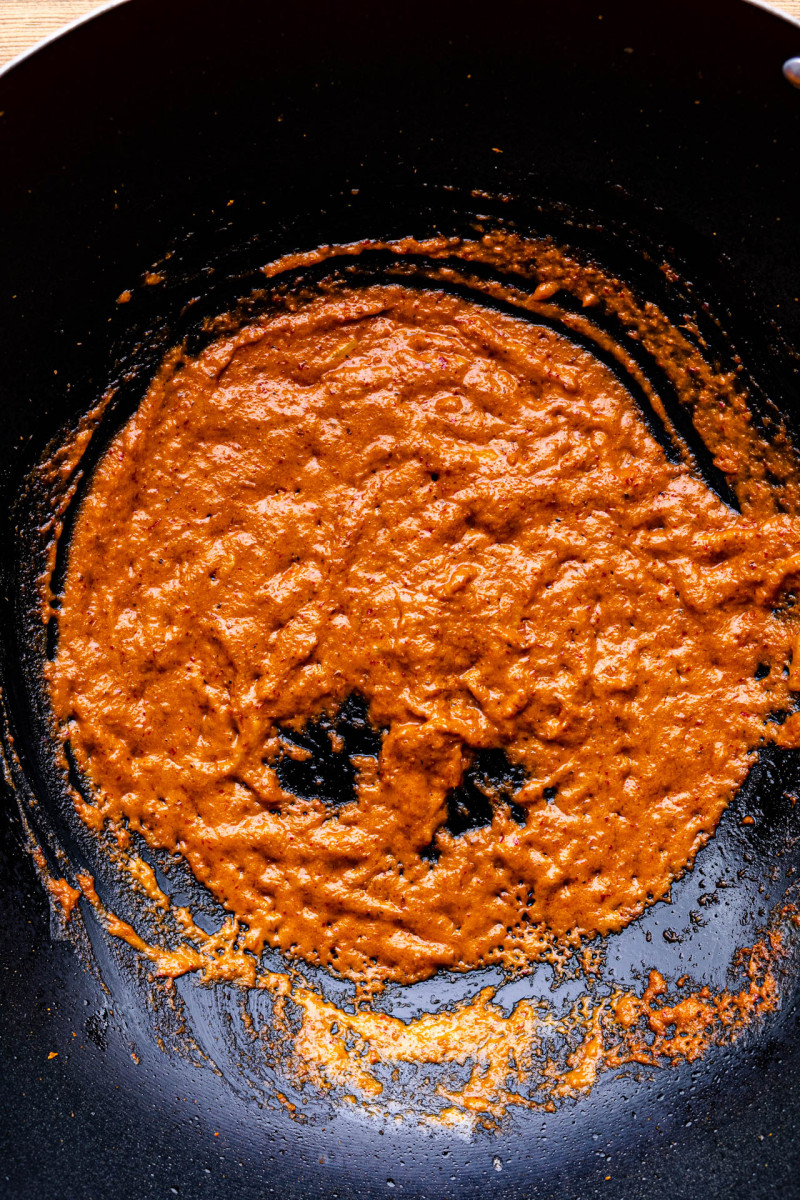
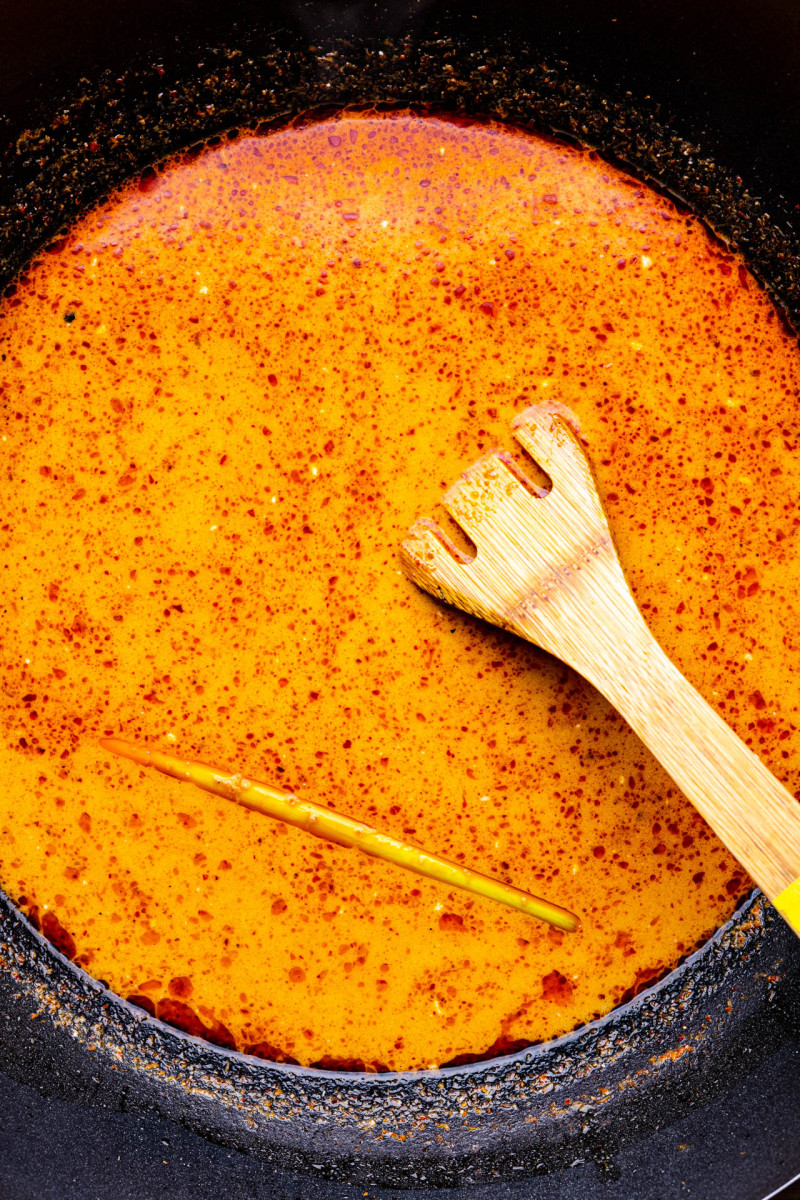
A good Thai curry relies on a good quality curry paste and on a proper technique. No matter how good the paste is, if it’s not handled properly your curry will not taste good. The curry needs to be bloomed in fat – full fat coconut milk (traditional) or oil to release natural aromas and to mellow out all the flavours. First you will see small pools of red oil separating from the rest of the mixture, once that happens the process of blooming the aromatics and spices in the paste has started and you want to carry on doing that for another 2-3 minutes. It’s important to keep the flame medium and if the paste looks dry at any point, you can add more coconut milk.
2)Add stock, season & simmer
Once the paste has been properly bloomed, you can add stock, more coconut milk if desired and adjust seasoning. Simmer the curry for about 5 minutes and only add lime juice at the very end as its fresh flavour is volatile and it gets lost during cooking. You can cook your noodles and veggies and tofu puffs in the curry, but I prefer doing that separately to have greater control. Tofu puffs are quite greasy, to get rid of extra grease, cut them in half and then blanch in boiling water for 1 minute before submerging in the soup.
THAI RED CURRY NOODLE SOUP
15 ml / 1 tbsp high smoke point oil, I use peanut
400 g / 14 oz full fat coconut milk (additive-free, see notes)
approx. 50 g / 2.5 tbsp Thai red curry paste (I used Mae Ploy vegetarian)
a chunk of ginger, julienned (optional)
1 lemongrass stalk, bruised (optional)
100 g / 3.5 oz tofu puffs (or 300 g/ 10.5 oz tempeh or pressed tofu)
240 g / 8.5 oz favourite noodles
200 g / 7 oz tenderstem broccoli, green beans or similar
1.25 l / 5 cups of veggie stock, shop-bought or homemade*
1-2 tsp sugar
vegan fish sauce, to taste
lime juice to taste, I used 1 tbsp
a handful of coriander, to serve
a handful of beansprouts, to serve
METHOD
Mix your curry paste with half a tin of full fat coconut milk, try to get rid of any lumps. If your coconut milk isn’t just water and coconut, skip this step and fry off the paste in 2 tbsp of oil instead.
Heat up a wok until lightly smoking add oil and paste mixed in with coconut milk.
Sauté the curry paste, stirring often, until the mixture starts to split – you’ll start to see little pinholes of red oil coming to the surface, here and there.
Once the oil starts to separate, continue to sauté for another 3-5 minutes to make sure the paste is cooked off properly before adding stock. If at any point the paste starts to look dry, add another splash of coconut milk to stop it from burning and make sure your heat isn’t on too high.
Take first layer of lemongrass leaves off, then use a rolling pin to bruise the stalk and add it to the soup along with julienned ginger.
Once you’ve fried the paste, slowly add the stock and more coconut milk if you want a creamier soup (I only used just over half a tin).
Taste and season with vegan fish sauce and sugar. Don’t add lime juice until the very end as its fresh flavour is volatile and it will be lost during prolonged simmering.
Bring the soup to a gentle simmer and simmer for about 5 minutes.
Cook your veggies, noodles and tofu separately for best results. For noodles, follow instructions on the packet. For broccoli, cut into bite-size pieces halving the stems lengthwise if thick and simmer for 3 minutes. Cut your tofu puffs in half, blanch in boiling water for a minute to get rid of excess grease.
Taste and season once again then divide between bowls. Top with cooked veggies, noodles and tofu puffs. Garnish with fresh coriander and beansprouts.
NOTES
*STOCK: if you want to know how I make my stock for a soup like this, let me know and I will publish my recipe for it soon.
*COCONUT MILK: it’s important that you use a can of coconut milk that does not contain stabilisers (I recommend Aroy-D, for example). If you cannot get hold of coconut milk without stabilisers, bloom the paste (i.e. sauté it in fat until the fat separates) in 1-2 tbsp of neutral (grapeseed, peanut, rice bran) oil instead of coconut milk and add coconut milk only after you’ve bloomed the curry paste.
Ever feel like you could sleep for eight hours, drink a massive cup of coffee, and still feel completely drained by lunchtime? You’re far from alone when it comes to chronic fatigue.
Energy has officially surpassed weight loss and gut health as the single biggest self-reported health concern among women, with recent studies showing up to 48% of women struggling with chronic low energy.
Gut health specialist Stacey Holland recently sat down with Biogen Face of Fitness winner Dr. Jalencke Coetzee, who is a general practitioner specialising in women’s health, weight management, and aesthetic medicine, to unpack the real, underlying reasons behind female fatigue.
READ MORE | Fuel your fire and fight fatigue with B complex vitamins
Fatigue is a signal
It turns out fatigue isn’t just one simple issue with a one-size-fits-all fix. It’s your body’s alarm system asking you to look closer.
Nutritional Gaps Beyond “Normal” Blood Work: Common deficiencies in iron, B12, vitamin D, and magnesium are frequent culprits behind constant tiredness. However, a standard lab test might label you “normal” even when your levels are far from optimal for thriving.
The Hidden Gut Connection: Even if you eat a clean diet, poor gut function can quietly block nutrient absorption, directly draining your energy reserves long before you notice digestive symptoms.
Stress & Cortisol (“Tired but Wired”): Chronic stress creates a distinct pattern of exhaustion. Learn how elevated cortisol disrupts your restorative sleep cycles and leaves you feeling wired at night and exhausted during the day.
Hormonal Dips vs. Myth: While perimenopause and monthly cycle shifts play a role in energy slumps, it is important to separate true hormonal fatigue from issues that just get unfairly blamed on hormones.
Under-Training & Improper Fuelling: Is exhaustion a sign to rest, or a signal to move? Under-training—or exercising without properly fuelling your body—is often a far bigger contributor to low energy than over-training.
READ MORE | Beat Year-End Burnout and Reset Your Energy Before the Holidays
Reclaim your energy
In her informative chat with Stacey, Dr. Jalencke shares a simple, practical self-assessment framework you can use right away to pinpoint which area of your health needs attention first.
Stop guessing why you’re tired and start getting real answers.
Author: Pedro van Gaalen
When he’s not writing about sport or health and fitness, Pedro is probably out training for his next marathon or ultra-marathon. He’s worked as a fitness professional and as a marketing and comms expert. He now combines his passions in his role as managing editor at Fitness magazine.
Curcumin is a supplement that holds many potential benefits for women as turmeric’s golden active compound has been studied for period discomfort, exercise recovery, hot flushes and joint comfort, which are all concerns that come up at different stages of a woman’s life.
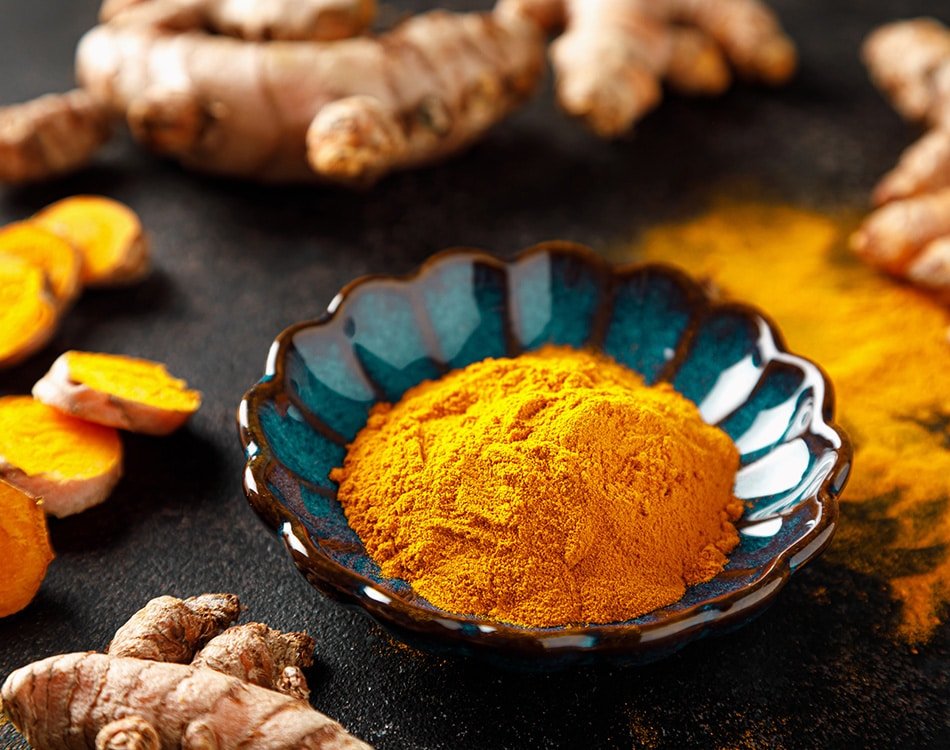
Curcumin is the main active compound inside turmeric, which is extracted from the root. It is a polyphenol that gives turmeric its colour and much of its antioxidant activity.
As turmeric root contains only around 3% curcuminoids, most women looking for a consistent intake, turn to a standardised curcumin supplement rather than the spice jar.
READ MORE | Study finds curcumin aids exercise performance and recovery
Why women should consider curcumin
A woman’s body goes through distinct phases: monthly cycles, pregnancy for some, perimenopause, menopause, and the gradual changes of later life. Each phase brings its own concerns about comfort, energy and mobility.
Curcumin has attracted research interest across several of these phases, mainly because of its role in the body’s inflammatory response and its antioxidant activity.
A widely cited review in Foods describes how curcumin interacts with multiple cellular signalling pathways, including those that regulate inflammation and oxidative stress. That broad mechanism is the reason it appears in such different areas of research.
READ MORE | Menopause and Your Microbiome: How Gut Health Shapes Weight, Mood and Hormones
Curcumin for women’s health
For many women, the days before a period bring cramping, bloating, irritability and low energy.
A randomised, double-blind, placebo-controlled trial published in Complementary Therapies in Medicine gave 70 women curcumin or a placebo for seven days before and three days after their periods.
The curcumin group reported a statistically significant reduction in the severity of their premenstrual mood, behavioural and physical symptoms across three cycles.
A follow-up analysis from the same research group linked this to changes in a brain signalling protein called BDNF. The results are encouraging, but they come from one research group and a small sample. Treat this as a promising area rather than a settled one.
READ MORE | New research strikes a nerve by revealing the power of polyphenols
The active years: recovery after training
Whether you’re training for the Two Oceans, lifting in the gym or keeping up with a weekly padel game, hard sessions produce temporary inflammation and oxidative stress. That is part of how the body adapts, but it also leaves you stiff and sore for a day or two afterwards.
A double-blind trial in the European Journal of Applied Physiology found that curcumin taken around eccentric exercise was likely to reduce delayed-onset muscle soreness (DOMS) compared with a placebo⁴.
The effects were moderate, and curcumin works best alongside the basics: sleep, protein and sensible training loads. It won’t replace any of them.
Perimenopause and beyond
Hot flushes are one of the most disruptive parts of the menopausal transition, and many women look for gentle, non-hormonal support.
A small triple-blind trial in postmenopausal women found that curcumin, taken alone or combined with vitamin E, was associated with a reduction in hot flush severity compared with a placebo. This is early, limited evidence from a single trial.
Curcumin is not a substitute for hormone therapy or any treatment your doctor has prescribed. If menopausal symptoms are affecting your quality of life, a conversation with your GP or gynaecologist is the right first step.
The later years
Joint comfort becomes a bigger concern for many women from their late 40s. The protective effect of oestrogen on joint and bone tissue gradually declines, and decades of movement add up.
Curcumin’s antioxidant and inflammatory-response activity has made it one of the most studied botanicals for joint support.
A systematic review and meta-analysis in the Journal of Medicinal Food pooled randomised trials and found that turmeric extracts and curcumin, taken over 8 to 12 weeks, were associated with reductions in joint pain scores compared with a placebo.
The authors noted that the trials were small and varied in quality, and called for larger studies. Any benefit builds gradually, so this calls for patience rather than a quick fix.
Everyday antioxidant support
Free radicals are unstable molecules produced by normal metabolism, stress, sun exposure and pollution. Over time they can damage cells.
Curcumin acts as a free radical scavenger, and research has documented its ability to reduce markers of oxidative stress in the body¹.
This underlying antioxidant activity helps explain the other areas above, and it’s the most general reason women take curcumin as part of a long-term wellness routine.
The absorption catch
Curcumin has one well-known weakness: on its own, the body absorbs very little of it. Much of it is broken down in the gut and liver before it reaches the bloodstream. This is why the formulation matters more than the milligrams on the front of the tub.
The best-known workaround is piperine, the active compound in black pepper. A classic human study published in Planta Medica found that combining curcumin with piperine increased its bioavailability by around 2,000%⁷.
BioPerine®, a black pepper extract standardised to 95% piperine, is the branded form used in many supplements. Lipid-bound (phytosome) forms of curcumin take a different approach to the same problem.
Biogen Curcumin Anti-Inflammatory combines Curcumin C3 Complex®, a patented extract standardised to 95% curcuminoids, with BioPerine® black pepper extract.
It also contains vitamin C, which contributes to normal collagen formation. The vitamin C is included because collagen is a key structural component of cartilage, skin and connective tissue.
If joint comfort is your main focus, you can combine it with other Biogen joint-support products, such as an omega-3 fish oil or glucosamine and chondroitin. If you take several supplements together, run the combination past your pharmacist.
As curcumin is fat-soluble, it is best to take it with a meal that contains some fat, such as avocado, olive oil, nuts or oily fish. This also helps reduce stomach upset. Morning or evening makes little difference, and daily consistency matters far more.
The bottom line
Curcumin is not a cure-all, and it isn’t a women’s health treatment. The evidence varies by area. It is most consistent for joint comfort and exercise recovery, promising but limited for period-related discomfort, and very early for hot flushes.
Choose a standardised extract with an absorption partner, take it with food and give it several weeks. Women with low iron, gallbladder issues or hormone-sensitive conditions, and anyone taking blood thinners, should get medical advice before starting.
Author: Pedro van Gaalen
When he’s not writing about sport or health and fitness, Pedro is probably out training for his next marathon or ultra-marathon. He’s worked as a fitness professional and as a marketing and comms expert. He now combines his passions in his role as managing editor at Fitness magazine.
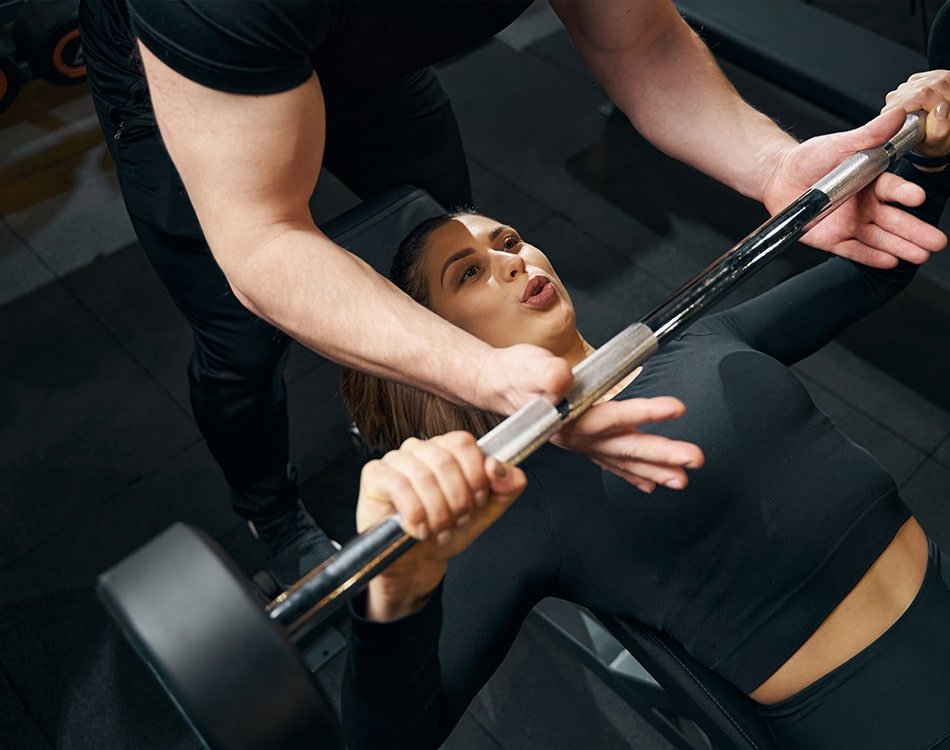
The bench press is generally considered the ultimate upper-body exercise in the gym, yet it remains one of the most underutilised movements in women’s training.
Walking into the free-weight section of a gym, you will usually see the bench press stations dominated by men, while women lean toward hip thrusts, squats, or light dumbbell work.
A persistent myth drives this divide: the fear that heavy upper-body pressing will create a broad, bulky chest.
Coupled with the intimidating culture that often surrounds the bench press area and a common misconception that chest training isn’t relevant to female aesthetic goals, many women skip the exercise entirely.
READ MORE | Looking for a more pec-tacular bust? Don’t skip these exercises
Claim your spot at the bench press
In reality, claiming your spot at the bench press station yields incredible physical and functional rewards:
Upper-body strength and functional power: The bench press is a primary compound exercise. It recruits your pectorals, anterior deltoids, and triceps all at once, building functional push strength that transfers directly to everyday movements like pushing heavy doors, carrying children, or hauling luggage.
Posture and shoulder balance: Balanced muscular development requires pairing pulling movements (like rows) with strong pushing movements. Bench pressing stabilizes the shoulder girdle and reinforces proper upper-back tightness, directly counteracting the rounded-shoulder slouch caused by desk jobs and screen time.
Core and total-body stability: A proper bench press involves your entire body. Engaging your core, maintaining leg drive through your feet, and setting your shoulder blades creates full-body tension that strengthens your midsection far more effectively than isolation exercises.
Preserve bone density: Heavy loading through your arms, shoulders, and spine stimulates bone remodelling. Compound weight-bearing exercises like the bench press play a critical role in increasing bone mineral density and mitigating the risk of osteoporosis later in life.
Sculpted tone without bulk: Women naturally produce a fraction of the testosterone men do, making significant muscular bulk exceptionally difficult to build without specialised hyper-calorie diets. Instead, bench pressing tones the upper chest and triceps, providing structural support that lifts and firms the chest area naturally.
Here’s how to navigate the bench press to reap the rewards of a stronger, more shapely upper body.
Common Mistakes
Elbow flare:Flaring your elbows out perpendicular to your torso might feel like it’s isolating the chest, but it’s a recipe for shoulder impingement and decreased power.
Floating feet:Lifting your feet off the floor or resting them on the bench is a trend that needs to end. Without your feet anchored, you lose the leg drive that stabilises your entire upper body.
Death grip:Using a thumbless grip or letting your wrists cock back at an angle puts the weight on your joints rather than your muscles. It’s precarious, inefficient, and limits muscle fibre recruitment.
Form Fixes
The 75-degree tuck:As you lower the bar, tuck your elbows slightly toward your ribs (aiming for roughly a 75-degree angle). This creates a natural arch in the movement that protects the rotator cuff and engages the triceps.
Anchor your feet:Plant your feet flat on the floor, directly under your knees to provide the tension that keeps your torso rock-solid during the press.
White-knuckle grip:Wrap your thumbs securely around the bar and keep your wrists stacked directly over your elbows. A crushed grip sends a signal to your brain to activate more muscle fibres, leading to an immediate boost in strength.
Author: Pedro van Gaalen
When he’s not writing about sport or health and fitness, Pedro is probably out training for his next marathon or ultra-marathon. He’s worked as a fitness professional and as a marketing and comms expert. He now combines his passions in his role as managing editor at Fitness magazine.