Author: [email protected]

  • New products give Biogen digestive health range a boost

    New products give Biogen digestive health range a boost

    The extensive Biogen Platinum range of supplements recently got a digestive health boost with the launch of numerous new products and a few updates, including a new probiotic for her.

    Visit your nearest Dis-Chem or shop online to give your gut what it needs for optimal digestion and absorption.

    READ MORE | All You Need To Know About Gut Health

    Biogen Supreme Probiotic for Her

    Biogen’s new Supreme Probiotic for Her contains bacteria strains that may help to improve feminine intimate health and overall feminine wellness.

    You can effectively restore vaginal flora by increasing lactobacilli levels in the gut with oral probiotic supplements. As such, probiotic lactobacilli could be a safe and natural means to balance and maintain healthy vaginal microbiota.

    When ingested on a regular basis, this oral probiotic improves and restores vaginal flora by increasing levels of Lactobacillus rhamnosus and Lactobacillus reuteri bacteria, which may help reduce the risk of vaginal infections.

    READ MORE | Gut Health Linked To Mental Well-Being — Study

    Biogen Supreme Probiotic 4-Strain

    Support your digestion by improving or normalising the microbial balance in your gut by taking Biogen Supreme Probiotic 4-Strain on a regular basis.

    The four probiotic strains included in this product are backed by science and supported by clinical research, which proves their ability to help restore and maintain a healthy balance of flora in the gut.

    This product may assist in the treatment and prevention of diarrhoea and constipation, and also offers immune support benefits.

    READ MORE | Get More From Every Mouthful With Digestive Enzymes

    Biogen Digesti Gast

    Use Biogen Digesti Gast Drops – a herbal tincture with 9 botanical extracts – to relieve symptoms related to gastric and abdominal discomfort, including abdominal pain and cramps, heartburn, flatulence, chronic constipation, nausea and irritable bowel syndrome (IBS).


    READ MORE | ‘Wheys’ To Beat The Bloat

    Biogen Travel-Biotic

    Don’t let tummy trouble ruin your vacation. Take Biogen Travel-Biotic 9-Strain Acute to improve or normalise the microbial imbalance that can occur when travelling and ease digestive problems like traveller’s diarrhoea.

    Biogen Travel-Biotic 9-Strain Acute contains a combination of probiotic strains that research suggests may help reduce the occurrence of traveller’s diarrhoea

    Additional benefits associated with the strains found in this product include immune modulation, digestive regularity and comfort, and support for conditions like diarrhoea and bloating, for fewer days with gut issues when travelling.

    Author: Pedro van Gaalen

    When he’s not writing about sport or health and fitness, Pedro is probably out training for his next marathon or ultra-marathon. He’s worked as a fitness professional and as a marketing and comms expert. He now combines his passions in his role as managing editor at Fitness magazine.


    Credit: Source link

  • Biogen develops Supreme Probiotic for Her

    Biogen develops Supreme Probiotic for Her

    Biogen’s new Supreme Probiotic for Her contains bacteria strains that may help to improve feminine intimate health and overall feminine wellness.

    You can effectively restore vaginal flora by increasing lactobacilli levels in the gut with oral probiotic supplements. As such, probiotic lactobacilli could be a safe and natural means to balance and maintain healthy vaginal microbiota.

    READ MORE | All You Need To Know About Gut Health

    When ingested on a regular basis, this oral probiotic improves and restores vaginal flora by increasing levels of Lactobacillus rhamnosus and Lactobacillus reuteri bacteria, which may help reduce the risk of vaginal infections.

    The post Biogen develops Supreme Probiotic for Her appeared first on Fitness Magazine.

    Credit: Source link

  • Feel The Rush With Under Armour’s Newest Performance Apparel

    Feel The Rush With Under Armour’s Newest Performance Apparel

    Get tough and achieve your 2023 fitness goals with Under Armour’s newest additions to its iconic RUSH apparel collection.

    This range is designed to keep athletes at the top of their game for a variety of sports activities at any level of training. This collection is available and in stores nationwide, now.

    READ MORE | Beat The Heat With The New Under Armour Summerized Collection

    Use your own energy

    Under Armour uses Infrared Technology in the garments, that uses your body’s energy to reduce muscle fatigue, meaning quicker replenishment and more time to put the work in.

    Anytime, anyplace, as long as your body is moving, RUSH technology will provide you with benefits similar to an infrared sauna.

    The Infrared Technology promotes increased performance and muscle recovery for athletes and sportsman.

    The versatile, stretchy and lightweight woven fabric of this collection means that whether you’re running, working out in the gym, at the Pilates or yoga studio, UA RUSH is the apparel for you!

    READ MORE | Under Armour Drops Its Most Versatile Training Shoe Yet!

    An extensive range

    The collection consists of classic designs with a range of fitted tees, long-sleeved shirts, tights and leggings, and sports bras.

    UA RUSH Apparel prices range from R1299 to R3999 and will be available in store and online at underarmour.co.za.

    Author: Pedro van Gaalen

    When he’s not writing about sport or health and fitness, Pedro is probably out training for his next marathon or ultra-marathon. He’s worked as a fitness professional and as a marketing and comms expert. He now combines his passions in his role as managing editor at Fitness magazine.


    Credit: Source link

  • Lipstick Contaminated with Lead? | NutritionFacts.org

    Lipstick Contaminated with Lead? | NutritionFacts.org

    Dozens of lipsticks and lip glosses are put to the test.

    “Over the past years, using cosmetic products has increased worldwide at an alarming rate due to unending pursuit for individual beautification…” There’s nothing necessarily wrong with that unless cosmetic products contain ingredients that may be linked to disease—ingredients such as toxic heavy metals like lead.

    As you can see at 0:28 in my video Flashback Friday: Is Lipstick Safe Given the Lead Contamination?, lead has been found in a wide range of cosmetic products, from eye shadow to skin cream, and foundation to blush. You may recall that I talked about lead in henna in my video Is Henna Safe?, but in looking at the data, “important warnings can be recognized”: the presence of lead in lipsticks. This is concerning because lipstick wearers may actually swallow a little bit of it. In fact, it has “been estimated that a woman inadvertently ingests 1.8 kg [about 4 lbs] of lipstick during her lifetime.” “Moreover, lipsticks can be used by pregnant women or women of child bearing age.” (I mean, obviously.) Yes, lead is highly toxic, but how much lead can there be in lipstick? Surely, it is “a very minor source….Nonetheless, one should not exclude the fact that lead accumulates in the body due to over time and repetitive lead-containing lipstick or hair dye application, which lead to significant exposure levels.” You don’t really know, though, until you put it to the test.

    Thirty-two lipsticks and lip glosses were tested, and lead was detected in 75 percent of the products, which “suggests potential public health concerns.” But how much lead did the researchers actually find? About half of the samples exceeded the FDA-recommended maximum level set for candy.

    That limit is set for something kids may eat every day, though. Kids are not going to eat tubes of lipstick each day. “Nevertheless, it is generally accepted that there is no safe level of Pb

    intake,” and, ideally, we should get contaminant levels down to zero. As a consumer group pointed out, a quarter of the lipsticks were lead-free, so we know it can be done. Maybe we should better regulate toxic metals in cosmetics to protect women’s health in the United States, as has already been done in Europe. Fair enough, but it wasn’t well-received.

    The billion-dollar lipstick industry wasn’t happy. In an article that tried to downplay the risks, the scientists-for-hire firm that once played villain in the real-life Erin Brockovich case concluded that, even though lipstick may contain lead, the concentrations are so low that they “are not expected to pose any health risks to adults or children.” Children’s blood lead levels are influenced more by background lead exposures, such as lead in the air, dust, water, and food, than by lipstick exposures, but just because our environment is so contaminated doesn’t mean we need to add to the problem. In fact, because there’s so much lead around anyway, maybe there’s that much more reason to cut down on additional exposures. But in that article, the scientists-for-hire calculated that an adult would need to apply lipstick more than 30 times a day to raise their blood lead level to even the most stringent limits and 695 times a day to get blood levels up to more concerning levels.

    However, as you can see at 3:13 in my video, this was based on an assumption that lipstick would only have about one part per million lead or, at the extreme end, maybe two or three parts per million (ppm). But by 2016, about ten times more lipsticks were tested, and they averaged nearly 500 ppm—with 10 percent exceeding 1,000 ppm—going all the way up to 10,000 ppm, with more than one out of five exceeding FDA and even Chinese safety limits on lead in cosmetics.

    As you can see in the graphs below and at 3:42 in my video, lip gloss was worse than lipstick; orange and pink colors had more lead than brown, red, or purple; and all of the really contaminated cosmetics were the cheaper ones, sold for less than five dollars each.

    Hold on. The highest concentration found was 10,185 mg/kg. That’s 10 grams per kilogram, which means the lipstick was 1 percent pure lead. That means a single application could expose a grown woman to perhaps 12 times the tolerable daily intake.

    And if a woman is interested in having children, that poses a “particular concern,” as lead accumulates in our bones and “may be released into the bloodstream during pregnancy,” where it can slip through the placenta or into breast milk.

    The good news is that the FDA is considering lowering the maximum allowable lead levels in lipstick from 20 ppm to 10 ppm, something Canada arrived at a decade ago. But without enforcement, it doesn’t matter. As you can see in the graph below and at 4:39 in my video, moving the legal limit from 20 ppm down to 10 ppm would just mean that instead of 23 percent of lip products exceeding legal levels, 27 percent would be exceeding legal levels. Right now, the limit’s 20 ppm, but what does it matter if there still may be products on store shelves that violate the legal limits?

    Is Henna Safe? is the video I mentioned.

    I think the only other cosmetic safety videos I have are Flashback Friday: Which Intestines for Food and Cosmetics? and Avoiding Adult Exposure to Phthalates.


    Credit: Source link

  • 3 Steps to Build The Resilience Needed To Accomplish Your Goals

    3 Steps to Build The Resilience Needed To Accomplish Your Goals

    Making the choice to take charge of your physical and mental health and lifestyle is a pursuit worth fighting for, but making and maintaining positive changes takes resilience.

    For some of us, taking the first step to a new way of life is the scariest. Others find that staying consistent and maintaining the desired outcome is harder.

    READ MORE | My Strength Is My Resilience

    Resilience is a skill

    Some of us are born with innate resilience, but it is also a trait you can build and strengthen. Without question, resilience is a skill set that you can learn and apply in your life.

    But your ability to build resilience is largely determined by your outlook and responses to hardship and challenges.

    Given that we all struggle with different types of stressors and challenges, resilience will look different for everyone.

    READ MORE | 5 Steps To Reboot Your Mindset

    Mind, body, spirit

    There are four main forms of resilience that you can build:

    1. Mental
    2. Emotional
    3. Physical
    4. Spiritual

    Each one comes with their own learning process and various skills. Building resilience is learned one challenge at a time, which is why it’s a learned skill.

    Not every challenge is the same, but we can repeat the way we handle hardship by learning a resilience process and then applying the skills.

    READ MORE | 5 Mental Habits For Success

    3 ways to strengthen your resilience

    If you’re just stepping into your resilience process or currently find yourself in the middle of a challenge that requires mental, physical, emotional or spiritual fortitude, here are three ways to develop or strengthen your resilience:

    1. How you think about yourself changes the way you feel about yourself

    Start nurturing a positive self-image by identifying one thing you love about yourself. This can be anything physical, mental, spiritual, or emotional.

    You are the only one who truly knows what you’re thinking and how you’re feeling but that means you have the choice to uplift yourself daily!

    2. Look for opportunities for self-discovery

    Even if life looks the same week after week, you need to find lesson to learn from this specific period or season in your life.

    Take some time during the day to journal what you feel you’re being taught in this season of life, whether it is an effortless or challenging phase. Use your notes section of your phone or in a physical journal and write down what are you choosing to learn.

    3. Avoid seeing crises as insurmountable problems

    Even if it feels like what you are going through isn’t getting easier, remind yourself that you’ve made it through every challenge thus far in life. You can and will get through the current one.

    Avoid all-or-nothing thinking, as this mindset often causes us to feel incapable. Build your mental resilience to connect the dots so that you see challenges as an obstacle with a solution that you can figure out along your path to accomplishing your goal.

    Positive changes hardly ever come easy but building resilience will help you accomplish, maintain or move through any challenge towards your goal. And developing this ability is a skill set that you will use for a lifetime! It is the best way to keep fighting for you.

    By Camee Adams

    About the author: Camee Adams is a professional MMA fighter, keynote speaker, certified personal trainer and yoga instructor. She has two daughters and is also certified in community suicide awareness and alertness. On her road to becoming a professional athlete, she faced numerous hardships and challenges. Her mission is inspiring, teaching and helping people through their resilience process to be TMRESILNT. Follow @cameeadams on IG or visit cameeadams.com.

    Author: Pedro van Gaalen

    When he’s not writing about sport or health and fitness, Pedro is probably out training for his next marathon or ultra-marathon. He’s worked as a fitness professional and as a marketing and comms expert. He now combines his passions in his role as managing editor at Fitness magazine.


    Credit: Source link

  • What Plant-Based Pros Buy at the Big Box Store

    What Plant-Based Pros Buy at the Big Box Store

    Following a whole-food, plant-based diet isn’t just good for your health; it’s also a smart move for your finances, with research showing that plant-based eaters tend to spend less on food than omnivores. Big-box stores offer a way to make plant-based diets even more affordable. With its wide array of fresh and frozen produce and shelf-stable staples, Costco is the budget-conscious home cook’s best friend. We tapped whole-food, plant-based pros for their favorite vegan Costco products and rounded up top recommendations from our Facebook followers, as well. Add these to your shopping list and you’ll be on your way to a well-stocked plant-based kitchen.

    Pro Picks

    Whole-food, plant-based pros share which products make their Costco memberships worth the spend.

    The Spring 2023 Issue
    is here!

    Our gorgeous “bookazine” features expert tips, inspiration, and 70 fresh and delicious recipes for Spring.

    Unsweetened Dried Cherries

    A bag of Montmorency Cherries from Costco

    “Costco has a great price for Cherry Bay Orchards No-Added-Sugar Dried Montmorency Cherries. They’re tasty in oatmeal, pancakes, and cookies or savory dishes like rice pilaf, rice salad, and whole grain bread stuffing. Or sprinkle them over some banana nice cream!” —Katie Simmons, Chicago-based personal chef and founder of Plants Rule

    Salt-Free Seasoning

    Kirkland salt-free seasoning from Costco

    “Kirkland Signature Organic No-Salt 21 Spice Blend Seasoning is my go-to sodium-free seasoning. I like that it has strong aromatics, such as onion and garlic flakes. It has just a hint of Italian herbs, so I find that I can use it in many different cuisines without it making a dish taste distinctly Italian.” —Darshana Thacker Wendel, whole-food, plant-based chef and author of Forks Over Knives: Flavor!

    Vitamin B12

    Vegan Kirkland vitamin b-12 from Costco

    “Costco has a few vegetarian-friendly B12 options, including Kirkland Signature B12 and Nature’s Bounty B12, and at least one is typically on sale.” —Cleodia Martinez, author of Ay Sus! Whole Food Plant-Based Global Filipino Cuisine

    Guacamole

    Kirkland chunky guacamole

    “Costco has individual containers of oil-free Kirkland Signature Organic Chunky Guacamole that they sell in bulk, so you can have a serving or two and then the rest doesn’t get brown. These are great with carrot sticks, baked chips, corn cakes, or rice cakes for a snack on the go.” —Matthew Lederman, MD, co-author of The Forks Over Knives Plan and co-founder of kinectin.com

    Heat-and-Eat Rice Cups

    Vegan Minsley rice cups from Costco

    “The Minsley Cooked Brown Rice microwavable cups are super expensive on Amazon and hard to find elsewhere, but they’re always cheap at Costco in LA. This one-ingredient wonder is great to keep at the office or take on a trip if you know you’ll have access to a microwave.” —Elizabeth Turner, editor in chief, Forks Over Knives

    Salad Greens

    “Costco is the only place to shop! It’s worth the price of a membership just for the Earthbound Farm Organic Power Greens, a blend of baby chard, baby spinach, and baby kale, which these days costs about $7 for 1.5 pounds. Baby greens are the most delicious, and I eat them in my daily huge salads.” —Chef AJ, culinary instructor and author of Unprocessed: How to Achieve Vibrant Health and Your Ideal Weight and The Secrets to Ultimate Weight Loss

    Dry Quinoa

    A bag of Kirkland Organic Quinoa from Costco

    “Costco sells quinoa for significantly cheaper than I’ve seen at other grocery stores, with 4.5-lb. bags of Kirkland Organic Quinoa for around $12.” —Del Sroufe, plant-based chef and author of Forks Over Knives—The Cookbook and The China Study Family Cookbook

    Crackers

    A box of Mary's Gone Crackers brand vegan crackers from Costco

    “I enjoy the whole grain and seed texture of Mary’s Gone Crackers Super Seed Crackers. They’re satisfying plain or with hummus or avocado.” —Melissa Mondala, MD, co-founder of Dr. Lifestyle

    Pitted Dates

    A bag of Deglet Noor Dates from Costco

    “The Made in Nature Organic Dates are a go-to. We use these plus walnuts to make delicious dessert truffles!” —Alona Pulde, MD, co-author of The Forks Over Knives Plan and co-founder of kinectin.com

    More Vegan Costco Favorites

    We also polled Forks Over Knives Facebook followers on their must-have vegan Costco products. These are the products that came up again and again.

    Frozen Foods

    • Flav-R-Pac Broccoli Florets
    • Imperial Garden Organic Edamame
    • Kirkland Signature Stir-Fry Vegetable Blend
    • Kirkland Signature Three Berry Blend

    Refrigerator

    • Del Monte Organic Cubed Fresh Butternut Squash
    • Earthbound Farm Organic Power Greens
    • HouseFoods Organic Tofu
    • Josie’s Organics Organic Baby Spinach
    • Kirkland Signature Organic Chunky Guacamole

    Nuts & Seeds

    • Carrington Farms Organic Milled Flax Seeds
    • Kirkland Signature Supreme Whole Almonds
    • Kirkland Signature Whole Fancy Unsalted Cashews
    • Nutiva Organic Black Chia Seeds
    • Rodelle Toasted Sesame Seeds
    • Yupik Organic Hulled Hemp Hearts

    Whole Grains

    • Bob’s Red Mill Quick-Cooking Steel-Cut Oats
    • Dave’s Killer Bread
    • Guerrero Corn Tortillas
    • Lundberg Organic Short-Grain Brown Rice
    • Minsley Cooked Brown Rice

    Pantry Basics

    • Heartland Dry Black Beans
    • Kirkland Signature Creamy Almond Butter
    • Kirkland Signature Organic No-Salt 21 Spice Blend Seasoning
    • Kirkland Signature Organic Peanut Butter
    • Kirkland Signature Organic Pure Maple Syrup (Grade A)
    • Kirkland Signature Organic Quinoa
    • Made in Nature Organic Dates
    • Mary’s Gone Crackers Super Seed Crackers
    • Organic Imagine Low-Sodium Vegetable Broth
    • Volupta Organic Unsweetened Cacao Powder

    To learn more about a whole-food, plant-based diet, visit our Plant-Based Primer. For meal-planning support, check out Forks Meal Planner, FOK’s easy weekly meal-planning tool to keep you on a healthy plant-based path.

    Credit: Source link

  • Tofu Stir Fry with Gochujang Sauce

    Tofu Stir Fry with Gochujang Sauce

    Crispy tofu and tender vegetables in sweet-and-spicy gochujang sauce make this tofu stir fry a go-to weeknight meal. With just a few ingredients, you can have this dish on the table in less than 20 minutes!

    gochujang tofu stir fry in the pan topped with sesame seeds and green onion
    Table of Contents

    This is a super quick, few-ingredient gochujang tofu stir fry that doesn’t skimp on flavor! You guys keep asking me for super quick stir fries or meals with fewer ingredients, so here is an almost five-ingredient, 15 to 20 minute stir fry that you can serve over rice or quinoa.

    This recipe is incredibly versatile. You can mix and match the veggies that you use as well as the sauces!

    gochujang tofu stir fry in a bowl topped with sesame seeds and green onion

    For the vegetables in this tofu stir fry recipe, choose your favorites like broccoli, green beans, snow peas, carrots, peppers. You can use fresh vegetables or save prep time by using frozen.

    If gochujang isn’t your sauce of choice, this recipe works well with other sauces, like hoisin, sambal oelek, teriyaki, or sweet and sour.

    gochujang tofu stir fry in a pan topped with sesame seeds and green onion

    Why You’ll Love this Gochujang Tofu Stir Fry

    • Just a handful of ingredients
    • Packed with veggies and flavor
    • Versatile — choose your favorite veggies and sauce!
    • Ready in 20 minutes
    gochujang tofu stir fry in a bowl topped with sesame seeds and green onion

    More Vegan Quick Vegan Dinner Recipes

    Recipe Card

    gochujang tofu stir fry in a pan topped with sesame seeds and green onion
    Print Recipe

    Gochujang Tofu Stir Fry

    Crispy tofu and tender vegetables in sweet-and-spicy gochujang sauce make this tofu stir fry a go-to weeknight meal. With just a few ingredients, you can have this dish on the table in less than 20 minutes!

    Prep Time5 mins

    Cook Time15 mins

    Total Time20 mins

    Course: Appetizer, Main Course

    Cuisine: Asian

    Keyword: gochujang tofu stir fry, tofu stir fry

    Servings: 3

    Calories: 184kcal

    Author: Vegan Richa

    Ingredients

    • 1 teaspoon oil
    • 7 ounces (198.45 g) firm or extra firm tofu pressed for at least 15 minutes, then sliced or cubed
    • 2 cloves garlic minced or use 1 tablespoon garlic paste or 1 tablespoon ginger garlic paste. I like to use a ginger garlic paste.
    • 3 tablespoons soy sauce or use tamari for gluten free
    • 2 tablespoons gochujang use less for less heat
    • 1 tablespoon maple syrup
    • 1 1/2 cups (273 g) of stir fry vegetables like broccoli, green beans, snow peas, carrots, peppers, etc. I use frozen ones because it reduces the time spent chopping.
    • 1/2 cup (118.29 ml) water plus 1 1/2 teaspoons cornstarch

    For Garnish:

    • sesame seeds, green onions, or toasted nuts of choice

    Instructions

    • Press and cube the tofu if you haven’t already. Heat a skillet over medium high heat and add the oil. Once the oil is hot, add the tofu and cook until it gets golden on some edges. Keep stirring occasionally and flip some of the pieces around. This will take anywhere from 4-6 minutes. Then, add in the minced garlic or the ginger-garlic paste and mix in.

    • Add in all of the sauces, then add in the stir fry vegetables and a generous pinch of salt. Cook, stirring, for 2-3 minutes depending on the vegetables you’re using and how crunchy you want to keep them. Whisk together the corn starch and water, and then add it to the skillet gradually. Bring the sauce to a boil, taste, adjust salt and flavor.

    • Check to see if the vegetables are done to preference, otherwise you can keep simmering them for another few minutes. Once the sauce is thickened to preference, switch off the heat. Garnish with sesame seeds and green onion and serve over rice or quinoa.

    Notes

    This is a gluten-free(ensure gluten-free gochujang) and nut-free recipe.
    To make this soy-free, use chickpea tofuand use my sweet and sour sauce instead of the sauces here.
    Variations :
    Use vegan hoisin sauce instead of the gochujang or a combination of gochujang and hoisin or a combination of sambal oelek and hoisin.
    Or you can use a combination of sambal oelek and rice vinegar. If you do this, use sesame oil to fry the tofu. Add in some spices, like black pepper or a Cajun blend. Yes! Cajun seasoning works really well with soy sauce and stir fry.  You can also use teriyaki sauce to make this tofu stir fry.

    Nutrition

    Nutrition Facts

    Gochujang Tofu Stir Fry

    Amount Per Serving

    Calories 184 Calories from Fat 45

    % Daily Value*

    Fat 5g8%

    Saturated Fat 1g6%

    Sodium 627mg27%

    Potassium 370mg11%

    Carbohydrates 27g9%

    Fiber 5g21%

    Sugar 5g6%

    Protein 12g24%

    Vitamin A 6028IU121%

    Vitamin C 15mg18%

    Calcium 130mg13%

    Iron 2mg11%

    * Percent Daily Values are based on a 2000 calorie diet.

    tofu and other stir fry ingredients in bowls on a kitchen counter

    Ingredients and Substitutions

    • tofu – Crisp, pan-fried tofu brings the protein and makes this tofu stir fry super satisfying. Use my chickpea flour tofu for a soy-free option.
    • garlic – You can use fresh garlic or garlic paste. For the best flavor, use ginger-garlic paste!
    • sauces – This tofu stir fry recipe is centered around gochujang sauce mixed with soy sauce, but you can use other sauces instead, if you prefer. Teriyaki, sweet and sour, or sambal oelek are delicious options!
    • maple syrup – Adds a little bit of sweet to offset the spicy in the gochujang.
    • stir fry vegetables – Use your favorites! You can use fresh vegetables or save time with a frozen stir fry vegetable mix.
    • cornstarch – This helps the stir fry sauce thicken and cling to the tofu and vegetables. You can use potato starch or arrowroot instead.

    Tips

    • This is a gluten-free(use gf gochujang) and nut-free recipe. To make this soy-free, use chickpea tofu and use my sweet and sour sauce instead of the sauces here.
    • Press the tofu while you prep the other ingredients. Pressing will give you the best texture!
    • When cooking the tofu, give it the extra few minutes to get golden on the edges. This will give it that restaurant-style texture you want!

    How to Make Gochujang Tofu Stir Fry

    Press and cube or slice your tofu while you prep the rest of the ingredients.

    Heat a skillet over medium high heat and add the oil. Once the oil is hot, add the tofu and cook until it gets golden on some edges.

    pan frying tofu in the pan

    Keep stirring occasionally and flip some of the pieces around. This will take anywhere from four to six minutes.

    Then, add in the minced garlic or the ginger-garlic paste and mix in.

    Add in all of the sauces. Then add in the stir fry vegetables and a good pinch of salt. Cook, stirring, for two to three more minutes depending on the vegetables you’re using and how crunchy you want to keep them.

    pan fried tofu with sauces added
    stir fry veggies added to the pan with the tofu, before cooking

    Whisk together the corn starch and water, and then add it to the skillet gradually. Bring the sauce to a boil, taste, and adjust the salt and flavor.

    stir fry veggies added to the pan with the tofu, after cooking and adding the cornstarch-water mix

    Check to see if the vegetables are done to your liking, otherwise you can keep simmering them for another few minutes. Once the sauce is thickened to your preference, switch off the heat and serve.

    Garnish with sesame seeds and green onion and serve over rice or quinoa.

    gochujang tofu stir fry in a bowl topped with sesame seeds and green onion

    Frequently Asked Questions

    What kind of tofu is best for stir fry?

    Firm or extra firm is the best tofu for a stir fry, because it can stand up to all of that mixing! Make sure you press the tofu before cooking for the best texture.

    Do you marinate tofu before or after frying?

    You can marinate your tofu, but in this recipe there is no need. The flavorful sauce will cling to the tofu, giving it plenty of flavor.

    Credit: Source link

  • Oregano

    Oregano

    The sun is finally out today, after a long winter, and one of the first things I see poking through the ground is oregano. Oregano is in the mint
    family and spreads itself to fill the space it is planted in. It is an easy to grow perenial and has both culinary benefits and medicinal virtues. It is a well known ingredient in spaghetti and pizza sauce, but it also offers its antioxidant properties to those who take it. 


    One of the ways I like to use oregano is for sinus issues. It has an affinity for the upper respiratory tract and helps with sinus infections, colds, coughs, asthma and fevers. Oregano has antibacterial, antiviral, and antibiotic properties making it something worth growing and collecting to be used during the cold and flu season. It can be
    used for headaches, sore throats and digestive issues as well. It can be beneficial in cases of colic and bloating due to gas in the GI tract. It will help expel the gas and relieve the cramping.


    The use of oregano originated in Greece and was used to flavor meat or fish. They would combine it with olive oil and lemon juice and use it in many of their food dishes. Greeks also crowned newlyweds with wreaths of the herb and placed it on the graves of the deceased to help bring peace to their spirits. Medicinally they used oregano to aid in the treatment of stomach and respiratory ailments, for bacterial skin
    infections and wounds, to treat and prevent food poisoning, and in creams used for aching muscles.


    According to Jethro Kloss in his book Back to Eden, the extracted juice is excellent for deafness or pain and noise in the ears. Drop a few
    drops in the ear whenever necessary. The oil dropped in the hollow of an aching tooth will stop the pain. 


    Early spring
    is a good time to get oregano started in the garden. It can be started indoors from seed and transplanted into the garden. You can also dig the root of an existing plant and replant it in another location. Be aware that it will spread, but it is worth having. Cut the stems throughout the growing season and dry them. The leaves can be stripped off the stem when dried. Several cuttings can be obtained each year. 


    Oregano has many benefits and is easy to grow in and
    outdoors. Start some today to
    use in flavorful dishes and as medicine. 


    Mother Earth Living, Jan/Feb
    2017 Pg. 69 Outstanding Oregano, Michelle Schoffro Cook

    Credit: Source link

  • Fiber: An Effective Anti-Inflammatory? | NutritionFacts.org

    Fiber: An Effective Anti-Inflammatory? | NutritionFacts.org

    Most Americans get less than half the recommended minimum daily fiber intake, which is problematic as the benefits of fiber go way beyond bowel regularity.

    “Hippocrates, the father of western medicine, believed that all disease begins in the gut.” Of course, he also thought women were hysterical because of their “wandering uterus.” So much for ancient medical wisdom.

    Even though a condition like constipation can have a “major impact…on physical, mental and social well-being,” it’s “often overlooked in health care.” This may be because poop-talk is “taboo,” but constipation can have “a severe influence on…everyday living,” both psychologically and physically. Constipation can literally hurt, causing “abdominal discomfort and pain, straining, hard stool, infrequent bowel movements, bloating and nausea.”

    No wonder “laxatives are among the most commonly used drugs…Most are quite safe when used judiciously, intermittently,” but because people use them so frequently, laxatives end up being one of the most common causes of adverse drug reactions. Perhaps treatment should instead address the underlying problem that causes constipation, such as lack of dietary fiber. You probably don’t need a meta-analysis to demonstrate that “dietary fiber can obviously increase stool frequency in patients with constipation.” I discuss this in my video Friday Favorites: Is Fiber an Effective Anti-Inflammatory?.

    “Populations in most Western countries must be considered on world standards to be almost universally constipated.” In the Western world, constipation is an epidemic among the elderly, but among those centering their diets around fiber-rich foods, it’s simply not a problem.

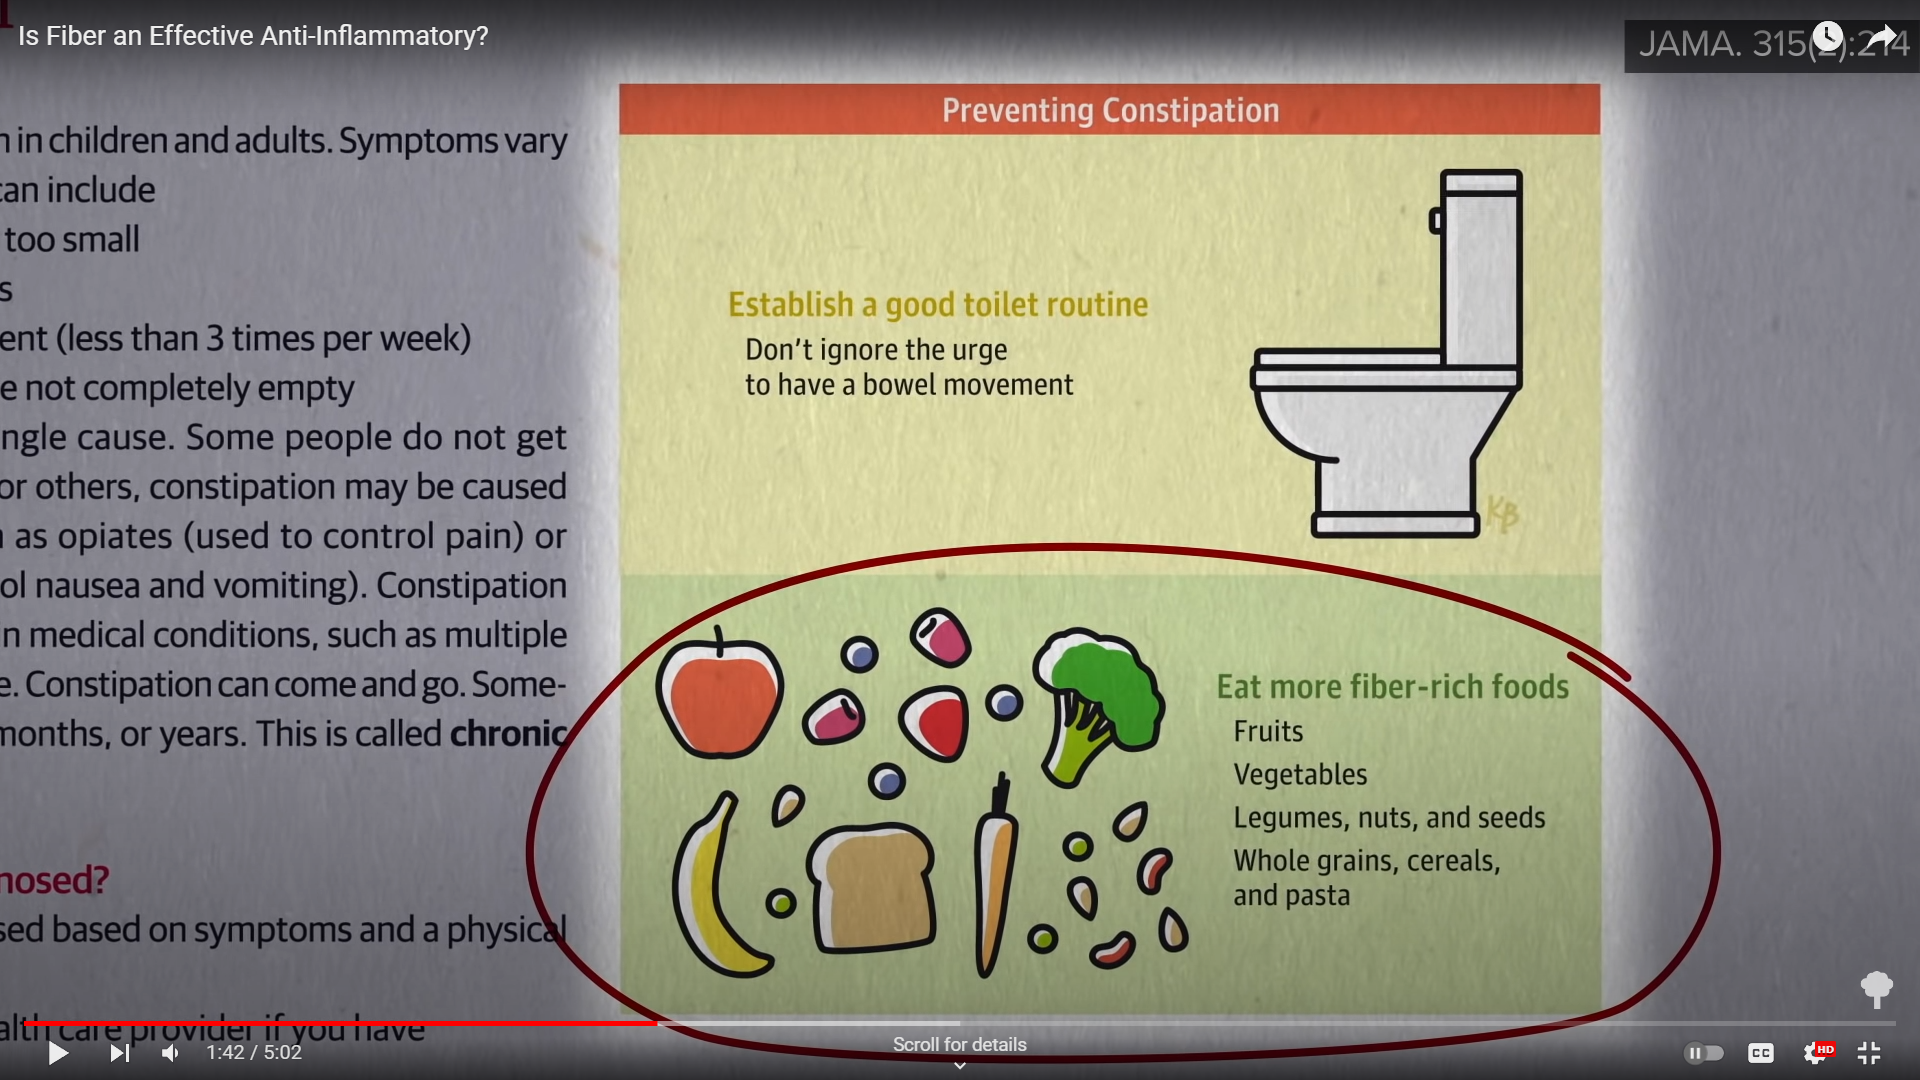
    Where is fiber found? As you can see at 1:37 in my video, a patient summary in the Journal of the American Medical Association sums it up with an illustration of whole, unrefined plant foods. For those of us who may be smug about our hearty intake of fruits and vegetables, we need to realize that “fruits and leafy vegetables are the poorest source of plant fiber.” Why? Because they’re 90 percent water. Root vegetables have more fiber, but the real superstars include legumes, such as beans, split peas, chickpeas, and lentils, and we can’t forget whole grains. What about fruits? Gram for gram, fiber from fruits does not seem to have the same effect. It may take 25 grams of fruit fiber to double stool output, something just 10 grams of whole-grain fiber or vegetable fiber can do, as you can see in the graph below and at 2:08 in my video.

    And that’s not all fiber can do. If you eat some whole-grain barley for supper, your good gut bacteria are having it for breakfast the next morning. This releases butyrate into our bloodstream, a compound that seems to “exert broad anti-inflammatory activities.” This could help explain why researchers found that “significant decreases in the prevalence of inflammation were associated with increasing dietary fiber intakes for all group.” As you can see at 2:44 in my video, the group with the highest fiber intake in the study had decreased inflammation—and that was with getting just the minimum recommended daily intake of fiber. So, if you have knee pain, for instance, should you eat more fiber-rich foods?

    “Dietary Fiber Intake in Relation to Knee Pain Trajectory” is a study that followed thousands of patients. Researchers found that a high intake of dietary fiber, which is to say just the minimum recommended intake, was “associated with a lower risk of developing moderate or severe knee pain over time.” What’s more, two Framingham studies found that higher fiber intake was related to a lower risk of having symptomatic osteoarthritis in the first place.

    Don’t a variety of diseases have an inflammatory component, though? How about “fiber consumption and all-cause, cardiovascular, and cancer mortalities”? Researchers found that, compared with those who consumed the least amount of fiber, those who consumed the most had 23 percent less cardiovascular disease mortality, a 17 percent lower risk of dying from cancer, and 23 percent lower mortality from all causes put together. “Unfortunately, most persons in the United States consume less than half of the recommended intake of dietary fiber daily.”

    Researchers suggest all sorts of potential mechanisms for which fiber could be life-saving, such as improving cholesterol, immune function, and blood sugar control, but it may also have more of a direct cause. If you ask people to bear down as if they’re straining on stool, they can experience a rapid increase in intracranial pressure—that is, pressure inside your skull. And, if you look at trigger factors for the rupture of intracranial aneurysms and ask hundreds of people who had strokes or bleeds within their brains, one of the biggest trigger factors noted was “straining for defecation,” multiplying your risk by seven-fold.

    This is one of the reasons legumes and whole grains are emphasized in my Daily Dozen checklist, which compiles all of the healthiest of healthy foods to ideally fit into your daily routine. It’s available (for free, of course!) as an app (Dr. Greger’s Daily Dozen) on [iPhone] and [Android], and you can learn all about it in my video Dr. Greger’s Daily Dozen Checklist.

    If you buy processed grain products, how do you know they contain enough fiber? Check out The Five-to-One Fiber Rule.


    Credit: Source link

  • Small Batch Peanut Butter Cookies in a Panini Press

    Small Batch Peanut Butter Cookies in a Panini Press

    When you want a cookie in a hurry and don’t want to heat up the whole house with the oven, these panini press cookies are the answer! These small batch peanut butter cookies are a great option for satisfying summer cookie cravings.

    close-up of peanut butter cookies with chocolate chips on a plate
    Jump to:

    It takes about 10 minutes to bake the cookies in your panini press, and you can use your fave peanut butter cookie recipe or make my small-batch peanut butter dough to make six cookies!

    These cookies are crisp on the outside, soft on the inside, and packed with peanut butter flavor and plenty of chocolate chips!

    You can easily make these vegan cookies gluten-free by using gluten-free flour.

    peanut butter cookies with chocolate chips on a plate

    When using a panini press to make small-batch cookies, the heat level as-is might be a little too much for the cookies. You want to protect the cookies from getting overly scorched at the bottom, so use folded up parchment paper. I use at least four to six folds of parchment, so there is a good base under the cookie. These cookies can be made anywhere where you can plug the panini press, they don’t the oven!

    You are going to love these small-batch peanut butter cookies!

    close-up of peanut butter cookies with chocolate chips on a plate, cookie is broken apart, so you can see the inside

    Why You’ll Love Panini Press Peanut Butter Cookies

    • Small batch, so you don’t have a ton of cookies hanging out in the kitchen
    • Easy to make
    • No Oven needed, no Heating up the whole big oven and the kitchen.
    • Perfect texture
    • Packed with peanut butter and chocolate!
    • Soy-free with gluten-free, peanut-free, and nut-free options
    peanut butter cookies with chocolate chips on a plate
    close-up of peanut butter cookies with chocolate chips on a plate
    Print Recipe

    Small Batch Peanut Butter Cookies in the Panini Press

    When you want a cookie in a hurry and don’t want to heat up the whole house with the oven, these panini press cookies are the answer! These small batch peanut butter cookies are a great option for satisfying summer cookie cravings. 

    Prep Time5 mins

    Cook Time10 mins

    Total Time15 mins

    Course: Cookie, Dessert

    Cuisine: American

    Keyword: panini press cookies, small batch peanut butter cookies

    Servings: 6

    Calories: 116kcal

    Author: Vegan Richa

    Ingredients

    For the wet ingredients:

    • 2 teaspoons oil
    • 2 tablespoons maple syrup
    • 2 teaspoons cane sugar or brown sugar
    • 3 tablespoons smooth peanut butter
    • a few drops of vanilla extract optional, but adds a great flavor

    For the dry ingredients:

    • 2 tablespoons all purpose flour , or use a gluten-free blend
    • 1/4 teaspoon baking powder
    • 2-4 tablespoons chocolate chips as needed

    Instructions

    • In a small bowl, add the oil, maple syrup, sugar, and peanut butter and heat in a microwave, or you can pre-heat them in a saucepan until warm so that they mix together really well.

    • In another small bowl, whisk together the flour and baking powder. Add the dry ingredients and the vanilla extract to the wet ingredients and mix really well until you get a smooth, sticky dough, then mix in 2 tablespoons of the chocolate chips. The dough will be very sticky at this point. You can add another 1-2 teaspoons of flour to make a sturdier, fatter cookie. This depends on the moisture content of your peanut butter. I am keeping it on the moist side to adjust

    • Chill the dough for at least 10 minutes or put it in the freezer for 5 minutes.

    • Preheat the your panini press. Find a setting on the toast or melt level where the sandwich maker top does not completely close and will not touch the top of the cookie dough. fold up your parchment paper to fit the panini press. Get at least four layers of parchment on the bottom so the cookies don’t scorch.

    • Take the cookie dough out of the fridge or the freezer, scoop it onto the parchment paper, and top with more chocolate chips and/or sprinkles. Keep at least two inches between the cookies, and then put them in the panini press. Let the cookies cook for about 7 minutes, then turn the parchment around for even heating and keep an eye on the cookies. You don’t want them to burn. When they’re ready, the edges will be set but centers will be soft, the bottoms will be browning and cookies will set on cooling. Be careful not to overcook them. Bake 9-12 minutes based on your panini press and cookie size.

    • Once the cookie bottoms are somewhat golden brown and the edges are starting to set, remove the parchment from the panini press and let the cookies sit and cool for 5 minutes or longer. Then, use a spatula to move them onto your cooling rack or plate.

    • Store on the counter covered for upto 4 days

    Notes

    Depending on your panini press, there might be areas where it is closer to the bottom. So when you’re placing the cookies, you want to be mindful of that. In my press the back right corner is the closest and it cooks the cookie fastest and hence that cookie browns more, so I don’t place a cookie there. 

    Nutrition

    Nutrition Facts

    Small Batch Peanut Butter Cookies in the Panini Press

    Amount Per Serving

    Calories 116 Calories from Fat 54

    % Daily Value*

    Fat 6g9%

    Saturated Fat 1g6%

    Sodium 53mg2%

    Potassium 95mg3%

    Carbohydrates 14g5%

    Fiber 1g4%

    Sugar 9g10%

    Protein 3g6%

    Vitamin A 11IU0%

    Vitamin C 0.03mg0%

    Calcium 24mg2%

    Iron 0.4mg2%

    * Percent Daily Values are based on a 2000 calorie diet.

    peanut butter, flour, and other cookie ingredients in small bowls on a kitchen counter

    Ingredients and Substitutions

    • oil, maple syrup, sugar, and vanilla – These, along with peanut butter, make up the wet ingredients. Use white or brown sugar: your choice! The vanilla extract is optional, but just a few drops does give these small batch peanut butter cookies an amazing flavor!
    • peanut butter – You can use almond butter instead of peanut butter for nut-free, just use an extra teaspoon or two of flour to get the dough to come together. You can also use sunflower seed butter and a few drops of lemon juice for a nut-free option.
    • flour – The recipe calls for all-purpose flour, but you can make this gluten-free with a mix of oat and almond flour and a little bit of tapioca starch.
    • baking powder – This helps the cookies rise. Do not omit or substitute.
    • chocolate chips – You will put half of the chocolate chips into the cookie batter and sprinkle the remainder on top of the cookies for maximum chocolatiness!

    Tips

    • Every sandwich press is different, so I recommend making a test batch of cookies to get an idea of the cooking time you’ll need.
    • For the gluten-free flour mix, combine 1 tablespoon oat flour, 1 tablespoon almond flour, and 2 teaspoons tapioca starch.
    • If you use almond butter, the batter will be runny as-is. Another teaspoon or two of flour will firm it right up.
    • If you use sunflower butter, please do use a few drops of lemon juice. Sunflower butter can react with the baking powder and turn your cookies an unpleasant green! The acid in the lemon juice prevents this from happening.
    • Make sure you fold your parchment paper several times to protect the cookie bottoms from scorching.
    • Make sure to rotate the parchment paper with the cookies on it at the 7-minute mark, so they’ll cook evenly.
    • Avoid putting a cookie on the part of the press, where the top and bottom of the press are closest. On mine, that’s the back right corner. This location can vary, depending on your press.

    How to Make Small Batch Peanut Butter Cookies in the Panini Press

    In a small bowl, add the oil, maple syrup, sugar, and peanut butter and heat in a microwave, or you can pre-heat them in a saucepan until warm so that they mix together really well. Whisk until well combined.

    oil, vanilla, and maple syrup mixed together in a small glass bowl
    peanut butter added to the bowl of wet ingredients
    sugar added to the bowl with the peanut butter
    small batch peanut butter cookie wet ingredients, after mixing

    In another small bowl, whisk together the dry ingredients: flour and baking powder.

    Add the dry ingredients and the vanilla extract to the wet ingredients and mix really well until you get a smooth, sticky dough, then mix in two tablespoons of the chocolate chips.

    adding dry ingredients to the wet ingredients
    adding chocolate chips to the cookie dough batter
    small batch peanut butter cookie dough after mixing in the chocolate chips

    The dough will be very sticky at this point. You can add another one to two teaspoons of flour to make a sturdier, fatter cookie. This depends on the moisture content of your peanut butter. I am keeping the batter a bit more moist, so that even the drier peanut butters will not make a dry cookie. 

    Chill the dough for at least 10 minutes or put it in the freezer for 5 minutes and preheat the your panini press.

    You do not want to press the cookies, so find a setting on the toast or melt level where the sandwich maker top does not completely close and stays in somewhat open position. Depending on your panini press, there might be areas where it is closer to the bottom. So when you’re placing the cookies, you want to be mindful of that. fold up your parchment paper to fit the panini press. Get at least four layers of parchment on the bottom. 

    panini press lined with folded up parchment paper

    Take the cookie dough out of the fridge or the freezer, scoop it onto the parchment paper, and top with more chocolate chips and/or sprinkles. Keep at least two inches between the cookies, and then put them in the panini press.

    scoops of cookie dough on the parchment paper in the panini press
    panini press, closed, with cookies inside

    Let the cookies cook for about seven minutes, then turn the parchment around for even heating and keep an eye on the cookies. they can scorch or overcook. Total cooking time can take anywhere from 9 to 12 minutes. 

    finished cookies on the panini press

    Once the cookie bottoms are somewhat golden brown and the edges are starting to set, remove the parchment from the panini press and let the cookies set and cool for five minutes or longer. They will be soft and fudgy and will continue to set as they cool.

    finished cookies cooling on parchment paper on the counter

    Then, use a spatula to move them onto your cooling rack or plate. Or just eat them, because who has time to wait for cookies? 

    close-up of peanut butter cookies with chocolate chips on a plate

    Frequently Asked Questions

    Why did my peanut butter cookies turn out hard?

    You may have overcooked the cookies. When making small batch peanut butter cookies in the panini press, you want to pull them out before they look fully done. The bottoms will be a bit browned, but the sides won’t look finished. If you wait until they look done inside the press, they will overcook and turn out hard.

    Why are my homemade peanut butter cookies falling apart?

    This can also be caused by overcooking. See the question above for details on how to make sure you don’t overcook.

    Should you chill peanut butter cookie dough before baking?

    Yes! Chilling the dough helps prevent the cookies from spreading out too much during baking. If you don’t chill the dough, you might end up with one, large, thin cookie.

    Is this recipe gluten-free?

    To make this gluten-free, use gluten-free flour, or you can use a mix of 1 tablespoons oat flour, 1 tablespoons almond flour, and 2 teaspoons of tapioca starch.

    Is this nut-free?

    To make this peanut free, you can also use smooth almond butter. You will need to add another one or two teaspoons of flour to the batter so that it’s not overly runny. You can also use cashew butter or other nut butter.

    For nut-free, use sunflower seed butter, but definitely add a few drops of lemon juice to the batter so that the cookies don’t turn green. Sun butter has this property of reacting with baking powder and becoming green after baking.

    Credit: Source link