Author: [email protected]

  • This is the best time to drink your protein shake for the best results

    This is the best time to drink your protein shake for the best results

    According to conventional (science-backed, mind you) advice, the two most important times of day to drink a protein shake for the best results are first thing in the morning and directly after training.

    However, more recent research suggests that protein supplement timing might be more nuanced than that, with your goals the ultimate determining factor in this answer.

    READ MORE | Why The Protein Blend Is On Trend

    Timing your protein intake

    There are various scientific rationales that support the different approaches to protein supplement timing.

    When drinking a protein supplement to build and repair muscle or improve body composition, it is generally best to consume a protein supplement between meals, particularly after weight training to support muscle repair and growth.

    A key reason for this is your heightened insulin sensitivity, which occurs in response to exercise, especially weight training.

    Exercising against resistance causes damage to muscle tissue, which makes cells more receptive to amino acids from the protein you eat and drink. Exercise also lowers circulating blood sugar levels.

    This combination of factors increases insulin sensitivity in your muscle cells as this powerful hormone is the key to unlocking access to your muscle cells for amino acids and glucose. Similarly, our bodies are highly insulin sensitive in the morning (this sensitivity declines as the day progresses).

    A potential third option

    However, a systematic review conducted by researchers from Purdue University delivered various interesting insights into the effectiveness of protein supplement timing.

    The researchers looked at the effects of protein supplements consumed with meals versus between meals on resistance training–induced body composition changes in adults. What they found may have profound implications for those looking to tone up and shed more body fat.

    READ MORE | Drinking Your Whey Shake With A Meal May Enhance Body Composition

    A shake with meals

    According to this research, the best time to sip on your favourite protein shake may depend on your goals. The research team found that supplement timing “differentially influenced body composition responses”.

    For instance, drinking a protein shake between meals may decrease compensatory eating behaviours, but this approach seems to increase your total energy intake and, therefore, could lead to weight gain.

    Conversely, consuming a protein supplement twice a day with meals seemed to help study participants who performed resistance training adjust their energy intake – what the researchers refer to as energy compensation.

    As a result, these participants consistently decreased body fat in the studies under review. They also showed a consistent increase in lean mass, which suggests they added muscle as well. In contrast, those who consumed protein supplements between meals in the studies under review had inconsistent effects on fat mass.

    The researchers suggested that “consuming protein supplements with meals may lead to partial meal replacement that would displace the energy that would be consumed otherwise.”

    As such, they concluded that: “Concurrently with resistance training, consuming protein supplements with meals, rather than between meals, may more effectively promote weight control and reduce fat mass without influencing improvements in lean mass.”

    Shake for a lean physique

    Ultimately, adding a protein shake to your daily diet regimen will help your body recover and add more muscle in response to weight training, regardless of when you drink it in relation to meals.

    The key message from this study is that you can achieve subtle differences in body composition by shifting the timing of your shakes.

    For those looking to improve their conditioning by adding lean muscle and reducing body fat, the research findings suggest that consuming your protein supplements with meals is the most effective approach.

    For those who have achieved their fat loss goals and want to support muscle growth and recovery, the conventional approach of a post-workout shake is still effective.

    Author: Pedro van Gaalen

    When he’s not writing about sport or health and fitness, Pedro is probably out training for his next marathon or ultra-marathon. He’s worked as a fitness professional and as a marketing and comms expert. He now combines his passions in his role as managing editor at Fitness magazine.


    Credit: Source link

  • Dr. Greger’s Top Takeaways on Brain Health, Erythritol, and Gluten-Free Diets

    Dr. Greger’s Top Takeaways on Brain Health, Erythritol, and Gluten-Free Diets

    Every month, we publish around eight new videos, four Friday Favorites, eight blogs, and four podcasts on NutritionFacts.org. We are bursting at the seams with all sorts of health and nutrition info that we don’t want you to miss, so we wanted to wrap up the juiciest bits into a nice, bite-sized blog as an end-of-month recap in case you missed anything or just want a refresher. So, what were some highlights from March?

    The Role of Endotoxins in Alzheimer’s and Dementia

    Assortment of seafood, meat, and eggsEndotoxins are highly pro-inflammatory components of bacteria like E. coli that can be absorbed through our gut wall and circulate in our bloodstream. Elevated endotoxin levels are associated with a host of health conditions, such as obesity, type 2 diabetes, depression, and heart disease. Researchers have found a higher abundance of endotoxins in the brains of patients with Alzheimer’s disease on autopsy. The highest levels of these components are found in foods like meat, perhaps helping to explain why those eating more plant-based may be as much as three times less likely to develop dementia.


    The Impacts of Plant-Based Diets on Breast Cancer and Prostate Cancer

    Round bowl of beans, greens, and other whole foods on a white surfaceWe know there appears to be a significant protective effect of a vegetarian diet for heart disease and all cancers combined, particularly for those eating vegan, but what about breast cancer and prostate cancer specifically? Studies have shown that more plant-based eating is associated with a significant reduction in breast cancer risk, and when it comes to prostate cancer, plant-based foods are associated with either decreased or neutral risk and animal foods are associated with either an increased or neutral risk. We shouldn’t only look at foods to avoid, like meat, eggs, and dairy products; we should also look at foods to embrace, such as vegetables, especially greens, and pulses, like beans, lentils, and chickpeas—foods that Dr. Greger includes in his Daily Dozen to encourage people to add to their meals each day.


    How Much Erythritol Sweetener Is Too Much?

    Wooden spoon with sweetenerErythritol, a sugar alcohol naturally found in small quantities in certain fruits and vegetables, is mass-produced commercially for use as a sweetener. It has a role in actively preventing tooth decay and has been reported to be “totally safe,” with almost no calories. It also has the highest digestive tolerance of all of the sugar alcohols and appears to have anti-oxidant properties and protective effects on the cells that line our arteries. Unfortunately, as I will detail on April 3 in the follow-up Update on Erythritol Sweetener: Are There Side Effects?, a new study published interventional data in mice and in vitro that suggests erythritol may be harmful, and so (*spoiler alert*) I urge everyone to stop consuming it until we know more.

    Is Light or Dark Roast Coffee Healthier? and Less Acid Reflux from Low-Acid Coffee?

    Coffee is more than just a drink to put some pep in your step. It may influence cholesterol, body weight, your blood sugars, and more, and light and dark roasts have different effects and their own pros and cons, depending on your own health priorities. One example is that dark roasting may destroy up to about 90 percent of chlorogenic acids, the antioxidant and anti-inflammatory phytonutrients thought to account for many of coffee’s benefits, so light roast would be better in this respect.

    Don’t be fooled by “low acid” coffee. It doesn’t help with the acid reflux, heartburn, or stomach upset that plagues some coffee drinkers. The low acid is a reference to low chlorogenic acid—which is exactly what we don’t want. Low-acid coffee producers use a slow roasting process that destroys the beneficial compounds. That’s like an orange juice company going out of its way to destroy the vitamin C and then branding its OJ as “low acid.” Technically true, since vitamin C is ascorbic acid, but the OJ maker would be bragging about destroying some of the nutrition, and that’s exactly what low-acid coffee companies are doing.

    This month included a bunch of coffee content! In addition to this pair of blogs, we also released a new video about coffee and iron absorption and a Friday Favorites video that asks, Do the Health Benefits of Coffee Apply to Everyone?.


    Fight Aging with Brain-Healthy Foods and Can Lutein Supplements Benefit Our Brain Function?

    Two major risk factors that impact brain aging are chronic, low-grade inflammation and oxidative and nitrosative stress, so antioxidant and anti-inflammatory foods may be helpful. Researchers investigated eight different dietary antioxidants, including vitamins A and E, and only lutein, the major carotenoid concentrated in the brain, was “significantly related to better cognition.”

    Dark green leafy vegetables are lutein superstars: A half cup of kale has 50 times more lutein than an egg, and adding just 60 grams of spinach a day for a month can significantly boost macular pigment for most. Based on lutein/zeaxanthin supplement trials, greens may improve visual processing speed in young healthy people and significantly improve cognitive function in young adults and seniors. The earlier we start loading up, the better. Eat your greens!

    Do You Need to Be Gluten-Free?

    You’re probably familiar with the buzz around “gluten-free diets,” but is going gluten-free safe and beneficial for everyone? Until recently, the scientific world largely maintained that the wheat protein gluten would provoke negative effects only in people with rare conditions, such as celiac disease. Now, an expert panel recognizes gluten sensitivity, which may affect about 1 percent of the population.

    There is no evidence to suggest that following a gluten-free diet has any significant benefit in the general population, however, and indeed  there is some evidence that a gluten-free diet may adversely affect gut health in those without celiac or gluten sensitivity. For the overwhelming majority of those who don’t have issues with gluten, whole grains—including the gluten grains of wheat, barley, and rye—are health-promoting and consumption is linked to the reduced risk of chronic disease. Dr. Greger includes two of these grains in his popular Basic BROL, which you can find on our recipes page.


    This has been a wrap-up of just a small sampling of our recent content. To see everything from the past month, be sure to check out the video, blog, and podcast pages.


    Credit: Source link

  • Baked Sticky Sesame Mushrooms – Vegan Richa

    Baked Sticky Sesame Mushrooms – Vegan Richa

    These Sticky Sesame Mushrooms are baked in the oven along with the most addictive sweet and salty sticky sesame sauce in 1 Pan! Serve these baked mushrooms with rice or quinoa and sprinkled with toasted sesame seeds for the ultimate vegan dinner. Glutenfree Nutfree recipe

    sticky sesame mushrooms served with rice and sprinkled with sesame seeds and green onions

    Sticky Baked Sesame Mushrooms – sweet salty and savory mushroom deliciousness! And all baked in a pan! No need to stand around sautéing and browning the mushroom! Mushrooms leak a lot of moisture and when sautéeing, they take a long while. When you bake them, the cooking is handsfree! The sauce is a fave sesame soy garlic sauce. The sesame oil adds a nice nutty taste to the sticky sauce, the toasted seeds add additional nutty toasty flavor and a bit of crunch to this mushroom dish.

    sticky sesame mushrooms served with rice and sprinkled with sesame seeds and green onions

    The mushrooms are first coated in cornstarch and sesame oil, then baked to give them a nice meaty texture. Then we add all ingredients for the sticky sesame sauce and return everything to the oven.

    I love me a one-casserole dish. Fewer dishes means more quality time with the family. This recipe is so simple. Bake, season to taste, and serve with rice or, quinoa or for a lower-carb meal, in lettuce wraps or over cauliflower rice.

    You can play around with the recipe, adding more maple syrup for additional sweetness and adapting the amount of sambal olek according to your personal heat tolerance.

    a casserole dish with baked sticky sesame mushrooms

    More mushrooms mains:

    Baked Vegan Mushroom Rice

    Instant Pot Garlic Mushrooms

    Ethiopian Inspired Mushroom Tibs Stir-Fry

     Stuffed Mushrooms

    Mushroom Patiala (Mushrooms in Spicy Yogurt Sauce)

    Print Recipe

    Sticky Sesame Mushrooms Baked

    These Sticky Sesame Mushrooms are baked in the oven and served with the most addictive sweet and salty sesame sauce in just 1 pan. Serve them with rice and sprinkled with toasted sesame seeds for the ultimate vegan dinner. Glutenfree Nutfree recipe

    Prep Time5 mins

    Cook Time35 mins

    Total Time40 mins

    Course: Main Course

    Cuisine: American

    Keyword: sticky sesame mushrooms

    Servings: 4

    Calories: 113kcal

    Author: Vegan Richa

    Ingredients

    For the mushrooms:

    • 14 ounces (400 g) mushrooms such as portobello, Oyster, white mushrooms or cremini mushrooms sliced into 1/4 inch thick slices
    • 2 teaspoons sesame oil
    • 1 tablespoon cornstarch or other starch such as arrowroot or tapioca

    For the sauce:

    • 1 teaspoon sesame oil
    • 2 teaspoons minced ginger
    • 3 cloves garlic minced
    • 3 tablespoons soy sauce , use tamari for gluten-free
    • 1/2 teaspoon black pepper
    • 3 tablespoons maple syrup , 1 tbsp more depending on how sweet you like your sauce
    • 1 1/2 tablespoons rice vinegar
    • 2 teaspoons sambal oelek less or more to your heat preference
    • 2 teaspoons cornstarch
    • 1/4 cup (60 ml) water
    • Sesame seeds and green onion for garnish

    Instructions

    • In a bowl or a baking dish(8.5 by 6 inch or larger stoneware or ceramic dish), add the mushrooms and add the sesame oil. Toss well to coat.

    • Then sprinkle the cornstarch all over. Toss well and then spread the mushrooms out in the baking dish so they don’t overlap too much.

    • Then bake at 400 degrees Fahrenheit(205c)  for 20 minutes until the mushrooms are starting to get golden and shrink a little.

    • Remove the dish from the oven . Some of the mushrooms might get stuck in the bottom. That’s fine, they will come off of the bottom when you add the sauce.

    • Add all of the sauce ingredients except the cornstarch and water to the baking dish. Then mix the cornstarch in the water and add that in. Mix really well. While you’re mixing the sauce, try to dislodge the mushrooms if any are stuck.

    • Then put it back in the oven to bake for 10-15 minutes or until the sauce is boiling and thickening.

    • Mix well and then remove the dish.

    • Taste and adjust salt and flavor carefully. Garnish with sesame seeds and green onions and serve with rice, quinoa or over noodles.

    Notes

    For additional protein, bake 7 oz pressed and cubed extra firm tofu along with the mushrooms. Add another 1 teaspoon of sesame oil and another 1 tablespoon of cornstarch and toss all those together and spread it out in a larger baking dish and then bake. *You want to use a smaller baking dish here because the mushrooms are going to shrink and you don’t want the sauce to just spread all over. I use 8.5 inch by 6 inches baking dish.

    Nutrition

    Nutrition Facts

    Sticky Sesame Mushrooms Baked

    Amount Per Serving

    Calories 113 Calories from Fat 27

    % Daily Value*

    Fat 3g5%

    Saturated Fat 0.5g3%

    Sodium 497mg22%

    Potassium 457mg13%

    Carbohydrates 18g6%

    Fiber 2g8%

    Sugar 12g13%

    Protein 3g6%

    Vitamin A 5IU0%

    Vitamin C 2mg2%

    Calcium 29mg3%

    Iron 1mg6%

    * Percent Daily Values are based on a 2000 calorie diet.

    Ingredients:

    • for this recipe, I recommend flavorful umami-rich mushrooms such as portobello, oyster, but white mushrooms or cremini mushrooms also work
    • before baking, we coat the mushrooms in sesame oil and cornstarch
    • for the sauce, we mix sesame oil with ginger, garlic, soy sauce, black pepper with maple syrup, rice vinegar and sambal oelek
    • a cornstarch slurry is added to thicken the sauce
    • sesame seeds and green onions are sprinkled over  for garnish

    Tips:

    • Make sure to not crowd the mushrooms in your baking dish after they have been coated. We want them to crisp up nicely while baking.
    • add more or less maple syrup, depending on how sweet you like your sauce
    • For additional protein, you can bake 7 ounces of pressed and cubed extra firm tofu along with the mushrooms. Add another 1 teaspoon of sesame oil and another 1 tablespoon of cornstarch and toss all those together and spread it out in a larger baking dish and then bake.
    • You want to use a smaller baking dish here because the mushrooms are going to shrink and you don’t want the sauce to just spread all over. I use 8.5 inch by 6 inches baking dish.
    • Glutenfree: use tamari

    ingredients needed for making sticky sesame mushrooms baked in the oven

    How to make Baked Sticky Sesame Mushrooms:

    sliced mushrooms tossed in cornstarch

    In a bowl or a baking dish, add the mushrooms and the sesame oil. Toss well to coat. Then sprinkle the cornstarch all over.

    cornstarch coated mushroom slices in a casserole dish

    Toss well and then spread the mushrooms out in the baking dish so they don’t overlap too much. Use a stoneware or a glass or ceramic baking dish that’s atleast 8.5 by 6 inch

    baked mushroom slices in a casserole dish

    Then bake at 400 degrees Fahrenheit(205c)  for 20 minutes until the mushrooms are starting to get golden and shrink a little.

    Remove the dish from the oven . Some of the mushrooms might get stuck in the bottom. That’s fine, they will come off of the bottom when you add the sauce.

    mushroom slices tossed in sweet and salty sauce in a casserole dish

    Add all of the sauce ingredients except the cornstarch and water. Then mix the cornstarch in the water and add that in. Mix really well. While you’re mixing the sauce, try to dislodge the mushrooms if any are stuck.

    a casserole dish with baked sticky sesame mushrooms

    Then put it back in the oven to bake for 10-15 minutes or until the sauce is boiling and thickening.

    casserole dish with sliced sticky seasme mushrooms

    Mix well and then remove the dish.

    sticky sesame mushrooms in a casserole dish

    Taste and adjust salt and flavor carefully. Garnish with green onions and serve with some rice, quinoa or over noodles

    sticky sesame mushrooms in a casserole dish sprinkled with sesame seeds and green onions

    Storage

    Store refrigerated for upto 3 days

    sticky sesame mushrooms served with rice and sprinkled with sesame seeds and green onions


    Credit: Source link

  • How to Use Radishes from Root to Leaf

    How to Use Radishes from Root to Leaf

    Radishes are a springtime favorite. Here’s everything you need to know to make the most of radish season, including what to expect from different varieties, how to select them at the farmers market, and ways to use the bulbous roots as well as the leafy greens—so you don’t waste a bite of these valuable root vegetables.

    Struggling to cook healthy meals at home?

    Forks Meal Planner is here to help.

    How to Select and Store Radishes

    Classic red radishes are available at supermarkets year-round, but check farmers markets in spring and early summer for a slew of vibrant varieties. Select very firm radishes with bright leaves; skip any with leaves already removed, which makes it trickier to gauge freshness. (If you really prefer bagged radishes that have already been trimmed, give them a gentle squeeze to be sure they are very firm.)

    Storage: Remove the leaves and clean the radishes as soon as you get them home. Left attached, the greens will continue to draw moisture from the root. Separated from their greens and stored loosely in a bag, radishes will keep for about a week in the fridge. (Don’t clean the delicate leaves until you’re ready to eat them, which you should do within a day or two of purchase. Keep reading for tips on how to use the greens.)

    Radish Varieties

    There are dozens of radish varieties. Here are a few favorites to experiment with in the kitchen.

    Table Radish

    Close up of table radishes

    North America’s iconic radish is easy to find, making it great for everyday snacking.

    French Breakfast

    A bundle of the French Breakfast variety of radish

    Slightly sweet and mild, the French Breakfast radish is a white-tipped oblong beauty that was first cultivated in the late 19th century.

    Easter Egg

    Easter Egg radishes - heirloom varieties in different colors

    Easter Eggs are small, round radishes that, appropriately, come in festive shades of red, pink, white, and purple.

    Watermelon Radish

    A watermelon radish cut open to reveal pink flesh inside

    The Watermelon Radish is an heirloom-variety beloved by chefs. It reveals its bold fuchsia flesh when sliced.

    How to Use Radish Greens


    intact radish leaves/greens next to a cup of blended radish leaves/greens

    Like radish roots, radish tops boast plenty of vitamin C and glucosinolates, compounds that may protect against cancer, so don’t toss them. Snip off the greens when you get home, and then either refrigerate or rinse well and prepare as you would kale or chard.

    Toss radish greens into veggie-packed pastas and stews, swap them for basil in plant-based pesto, or blend them into smoothies for added nutrients and zing.

    Prep Tips

    • For extra-crisp texture, drop raw radishes in an ice water bath before slicing and serving.
    • Use a mandoline to shave radishes into super thin rounds, and add them to salads or crudités platters for pretty presentation.
    • Not into the peppery bite of raw radishes? Try roasting, stir-frying, or sautéing and pureeing into velvety-smooth soups. Cooking radishes tames their heat while retaining some of their trademark crunch.

    Do You Need to Peel Radishes?

    No, you don’t need to remove the skin from radishes, but always give them a good scrub to remove dirt and any residue.

    Easy Quick-Pickled Radishes

    Just a handful of quick-pickled radishes will jazz up sandwiches, veggie burgers, tacos, and more. To make this simple yet flavor-packed DIY condiment, just soak radish slices in 1 cup vinegar and ¾ teaspoon sea salt (plus spices, if desired) for 1 hour, then drain.

    Radish Recipes

    Spinach Tabbouleh Salad with Watermelon Radish on green ceramic plates

    Ready to get cooking? Try one of these fresh and tasty radish recipes from Forks Over Knives!

    Learn more essential kitchen skills and become a plant-based home chef in 90 days with the Forks Over Knives Cooking Course!

    Credit: Source link

  • Use Your Resources

    Use Your Resources

    What do you do when you have an issue arise and don’t have your regular herb stash? With knowledge of how herbs work, you adjust and use the resources you do have access to.


    I was recently able to join my husband’s family on a cruise to celebrate his grandmother’s 90th birthday. It was wonderful to be with family to celebrate this special lady. 


    I packed my regular herbal first aid kit, but for some reason this time I removed my eyecup and eyewash. I usually keep an eyecup and eyewash in the kit in case of emergencies – you never know when something might happen and you’ll need it. I’m not sure why I removed the eyecup for this trip, but soon found that was a
    mistake.


    I started having some pain and tenderness in my lower eyelid. I didn’t think it was too much of an issue, but the pain increased, so I pulled down the eyelid and found a pustular bump inside the eyelid that looked like a stye
    – in medical terms it is called an internal hordeolum. 


    At this point we were on the ship with no ability to go to a store and purchase an eyecup or eyewash for my eye. 


    What now? The ship had packets of chamomile tea, so I made a cup of tea and took it back to my room. I used my hand to make a cup for the tea and blinked my eye in my hand. I kept doing this until the cup of tea was gone. Chamomile is soothing, so it didn’t sting. My eye started seeping
    pus afterwards and this continued throughout the day. 


    I kept thinking about what my eye needed and thought that it probably needed something to help with infection. I did have a bottle of X-Ceptic with me, so decided to make some
    eyewash out of that. I filled a cup with boiling water from the coffee station and added a full dropper of X-Ceptic. The boiling water dissipates the alcohol, making it safe to use in my eye. When it cooled, I used the same method and washed my eye with it. It stung! But in the morning the area was smooth instead of raised and clustered. The pain had also diminished. I kept washing my eye with “X-Ceptic tea” morning and evening. The white smooth bump faded, and the pain disappeared.


    Just another round of evidence that herbs work – even when everything isn’t perfect – they still work. I didn’t have distilled water, an eye cup, or my Dr. Christopher Herbal Eye tincture. However, I was able to use my knowledge, utilize what I did
    have, and it made a difference. 


    These experiences remind me how important education through the School of Natural Healing really is. Learning how herbs work gives us the information needed to take care of ourselves and the
    ability to be creative in our methods. Keep learning! 


    Tara Christopher Eyre is a Master Herbalist and Foot Zone Therapist and Instructor. She loves helping people find and continue their path toward
    health.

    Credit: Source link

  • What’s the best time of day to take vitamins?

    What’s the best time of day to take vitamins?

    Is timing really everything when it comes to taking multivitamins?

    If you’re taking a multivitamin supplement to improve your health, you might wonder, “Is there a perfect time of day to take vitamins?”

    The answer depends on the type of vitamins you take.

    Your body needs 13 vitamins to function effectively.1a Based on their solubility, these vitamins can be divided into fat-soluble vitamins and water-soluble vitamins. The former contains vitamins A, D, E and K, while the latter group includes the B-complex and C vitamins.1b

    While these nutrients are found in variable levels in food, some people require vitamin supplements to achieve their nutritional needs.

    When is the most appropriate time to take a multivitamin?

    To determine the best time to take your multivitamin, you must first understand the various types of nutrients in your multivitamin.

    Fat-soluble vitamins are better absorbed in your body when taken with higher-fat foods. Because multivitamins typically contain fat-soluble vitamins, including vitamins A, D, E, and K, the absorption of these vitamins is improved when they are taken in conjunction with a meal or snack that contains some fat.2

    Meanwhile, the water-soluble vitamins in your multi-vatimin (think vitamin C and those eight B vitamins) only require a small amount of liquid in order to be dissolved and absorbed and begin doing their jobs.3

    Should you take your multivitamin in the morning or at night? 

    It essentially comes down to personal preference. However, choosing the morning is considered a good option as you’re more likely to forget to take your multivitamin at the end of a busy day.  

    When should you avoid taking a multivitamin?

    Many believe taking a multivitamin on an empty stomach is a bad idea, especially if they have a sensitive system.

    Sometimes, taking a multivitamin without food can upset someone’s stomach. In particular, probiotics, calcium carbonate, iron, and omega-3 fatty acids might be difficult to digest in an empty GI system.4 This is why Bioplus developed our BIOPLUS® VIT-ALITY MULTI-VITAMIN, MINERAL & ANTIOXIDANT SUPPLEMENT5 with quality mineral forms to ensure they’re soft on your stomach and as effectively absorbed as possible.

    Another thing to consider is that if taken in excess, some vitamins, such as vitamin B12, might have a stimulating effect and potentially interfere with your sleep.6

    If you observe that taking your multivitamin later in the day causes you to stare at the ceiling at bedtime, try altering your regimen to the morning or midday.

    Start your sustained wellness journey today! 

    Not sure which supplements to take? Leading pharmaceutical company Adcock Ingram (Pty) Ltd have a daily vitamin and mineral supplement range, BIOPLUS® VIT-ALITY. For sustainable vitality, every product formulation is designed to give your body the micronutrient support it needs.

    Consider BIOPLUS® VIT-ALITY MULTI-VITAMIN, MINERAL & ANTIOXIDANT SUPPLEMENT5, which includes Vitamin B and Ginseng7, said to reduce fatigue and enhance stamina and endurance.  BIOPLUS® VIT-ALITY C 1000 MG8 contributes to the normal functioning of the immune system,  BIOPLUS® VIT-ALITY D39 contributes to the normal functioning of the immune system,  BIOPLUS® VIT-ALITY B6 + B1210 capsules with folic acid and zinc is a health supplement that reduces tiredness and fatigue,  while BIOPLUS® VIT-ALITY OMEGA 3 1000 MG11 contains essential fatty acids that support the brain function.

    Bioplus

    The BIOPLUS® VIT-ALITY range is available at selected Dis-Chem and Clicks stores, as well as selected independent pharmacies nationwide. For more information, visit: https://www.adcock.co.za/ProdVitamins/Bioplus and join the conversation on Facebook.

    – – – – – – –

    References: 

      1. Molecules: A Journal of Synthetic Chemistry and Natural Product Chemistry. A Review of the Extraction and Determination Methods of Thirteen Essential Vitamins to the Human Body: An Update from 2010. Available at: https://www.ncbi.nlm.nih.gov/pmc/articles/PMC6099991/. Last accessed September 2022.
      2. Medical News Today. What are fat-soluble vitamins? Available at: https://www.medicalnewstoday.com/articles/320310#_noHeaderPrefixedContent. Last accessed September 2022.
      3. Healthline. The Water-Soluble Vitamins: C and B Complex. Available at: https://www.healthline.com/nutrition/water-soluble-vitamins. Last accessed September 2022.
      4. The Upside. 10 Supplements to Avoid Taking on an Empty Stomach. Available at: https://www.vitacost.com/blog/taking-supplements-on-an-empty-stomach/. Last accessed September 2022.
      5. Bioplus® Vit-ality Multivitamin PI-PIL 0AI-PI024 package insert. Adcock Ingram. 02-2020
      6. Healthmatch. 5 Vitamins That May Be Causing Insomnia Or Affecting Your Sleep. Available at: https://healthmatch.io/insomnia/vitamins-that-cause-insomnia. Last accessed September 2022.
      7. Harvard Health Blog. Do ‘energy boosters’ work? Available at: https://www.health.harvard.edu/blog/do-energy-boosters-work-201311156878. Last accessed September 2022.  
      8. Bioplus® Vit-ality C 1000 mg effervescent tablets package insert. Adcock Ingram. 02-2020.
      9. Bioplus® Vit-ality D3 capsules package insert. Adcock Ingram.  03-2020.
      10. Bioplus® Vit-ality B6 + B12 capsules package insert. Adcock Ingram.  02-2020.   
      11. Bioplus® Vit-ality Omega 3 1000 mg softgel capsules package insert. Adcock Ingram.  03-2020.

    Author: Tanja Schmitz

    Founder and Editor of Fitness Magazine. You’ll find her behind her computer or on her bike, dreaming up new ways to improve or create content for you.


    Credit: Source link

  • The latest innovations in wearable health and fitness tech

    The latest innovations in wearable health and fitness tech

    On-going development in fitness and health devices, coupled with advances in data analytics continue to broaden the depth of information we get from our wearable tech and activity trackers.

    This innovation in wearable tech and data processing continues at a rapid pace. For instance, in 2019, wearable devices incorporated 4.1 sensors on average compared to 1.4 in 2013.

    Beyond the traditional accelerometers and GPS sensors, the latest generation of devices contain sensors that include thermometers, electrocardiogram (ECG), microelectronic mechanical (MEM) and electrodermal activity (EDA) monitors, to name a few, which all enable more advanced tracking capabilities.

    READ MORE | 4 Ways Wearable Tech Is Making You Fitter

    Heart-rate tracking

    But few sensors have had the same impact as the optical heart rate sensor, which is now included in a wide range of wearables, from entry level to the most advanced devices.

    This tracking capability changed the game for health and fitness tracking because it offered an unobtrusive means to measure your heart rate 24/7.

    While this is a great way to track and analyse daily activity and estimate total energy expenditure throughout the day, the ability to measure your heart rate when you are active and, perhaps more importantly, while you sleep, helps to deliver a treasure trove of health and fitness-related insights.

    With this data, our devices can make recommendations about the ideal intensity to train at or even suggest an extra rest day to improve recovery. Certain indicators like tracking our resting (or waking) heart rate over time can also help us pre-empt a possible infection or overtraining.

    Wearable devices can even identify a potential cardiovascular event like a heart attack – Fitbit released its Irregular Heart Rhythm Notifications feature on certain devices in April 2022 that uses sensor data to identify atrial fibrillation (AFib).

    READ MORE | 5 Gadgets That Will Help You Achieve Your Fitness Goals This Year

    Heart rate variability

    Heart rate variability (HRV) is a key metric that can deliver insights about your training and recovery, as well as your overall health and current stress levels.

    Heart rate sensors measure the variability in time between consecutive heartbeats (typically measured in milliseconds) because your heart does not beat with a perfect metronomic rhythm. While these variations in your heart rate are healthy and normal, low heart rate variability can indicate higher stress levels.

    As your heart rate activity is regulated by an involuntary part of your nervous system called the autonomic nervous system, any changes in your heart beat can offer insights into how well your system is regulating itself in response to stressors like exercise, psychological stress, environmental factors or situational demands like work.

    In general, higher HRV is associated with parasympathetic dominance within your autonomic nervous system, which is a sign that your body is balanced and in the relaxed ‘rest-and-digest’ mode. In this state, your heart rate decreases and your heart beats in response to your immediate needs. As such, HRV increases.

    On the other hand, a lower HRV is typically associated with elevated sympathetic activity within your autonomic nervous system, which may indicate high stress levels or that you are in high-alert ‘fight-or-flight’ mode. When your sympathetic nervous system is more active and dominant, your heart rate typically increases and it beats in a more regular rhythm, which means HRV decreases.

    Ideally, you want to create balance between the activity of these two branches of the autonomic nervous system. In many devices, HRV values are also used to calculate various physiological measurements such as stress score, lactate threshold, and Body Battery (available on select Garmin devices).

    Respiration rate

    Various devices from Fitbit, Garmin, Apple and Google (Android) track your respiration or breathing rate – a measurement of your average breaths per minute.

    This metric is another primary vital sign (along with heart rate, blood pressure, and body temperature) and can indicate exercise-induced fatigue, rising stress levels or even the onset of various health conditions such as potential adverse cardiac events or various respiratory conditions.

    A typical resting respiration rates is 12-20 breathes per minute and can rise to 40-50 times per minute during intense exercise or activity due to increased oxygen demands needed for energy production.

    Your breathing rate is also closely tied to HRV as the length of time between consecutive heartbeats shortens slightly as you inhale and lengthens as you exhale.

    READ MORE | Your Smart(Er) Fitness Companion

    SpO2 sensor

    Sp02 sensors send and receive a light beam through your skin and blood vessels to measure the oxygen saturation level in your blood. This information is generally shared via a companion app to provide insights about general wellness and fitness. A healthy oxygen saturation level ranges between 95-100%.

    For example, the Fitbit Charge 5 features a relative SpO2 sensor, which powers Fitbit’s Estimated Oxygen Variation Graph in the Fitbit app and may indicate variations in your breathing during sleep. Other brands that now include Sp02 sensors in select devices include Huawei, Apple, and Garmin.

    Your Sp02 level indicates how well the body distributes oxygen from the lungs to the cells, and may can serve as an important indication of your health cardiorespiratory health and overall fitness.

    A lower reading could indicate conditions like sleep apnea or hypoxemia, which is a potentially dangerous condition where the body has difficulty delivering oxygen to cells, tissues and organs.

    Real-time form feedback

    Smart clothing and apparel represent another frontier in the wearables game experiencing rapid innovation and technology-based advances.

    Embedded sensors in running shoes, like the Under Armour Flow Velociti Wind 2 and UA HOVR Phantom, among others, connect to the UA MAPMYRUN™ app to track and analyse your running metrics to help make you a better runner with form queues and recommendations.

    Similarly, Nadi smart exercise tights correct a wearer’s alignment using haptic feedback in the form of subtle vibrations determined from the sensors and the companion app to correct your body positions and form.

    Disease detection

    Numerous third party providers are developing apps that use data from common wearable devices like Android or Apple smartwatches and Garmin and Fitbit devices to gather and analyse key metrics and identify various health-related conditions.

    For example, an app called MyPHD analyses collected data and in a study published in Nature Medicine, was able to detect 80% of pre-symptomatic and asymptomatic infections.

    Fitbit also collaborated with The Scripps Research Institute and Stanford Medicine on research to determine if tracking changes in heart rate, activity, and sleep could help detect, track, and contain Covid-19.

    Author: Pedro van Gaalen

    When he’s not writing about sport or health and fitness, Pedro is probably out training for his next marathon or ultra-marathon. He’s worked as a fitness professional and as a marketing and comms expert. He now combines his passions in his role as managing editor at Fitness magazine.


    Credit: Source link

  • Is Dietary Cholesterol in a Relationship with Cancer?

    Is Dietary Cholesterol in a Relationship with Cancer?

    What is the relationship between the consumption of eggs and other cholesterol-rich foods and cancers of the colon, breast, endometrium, pancreas, and throat?

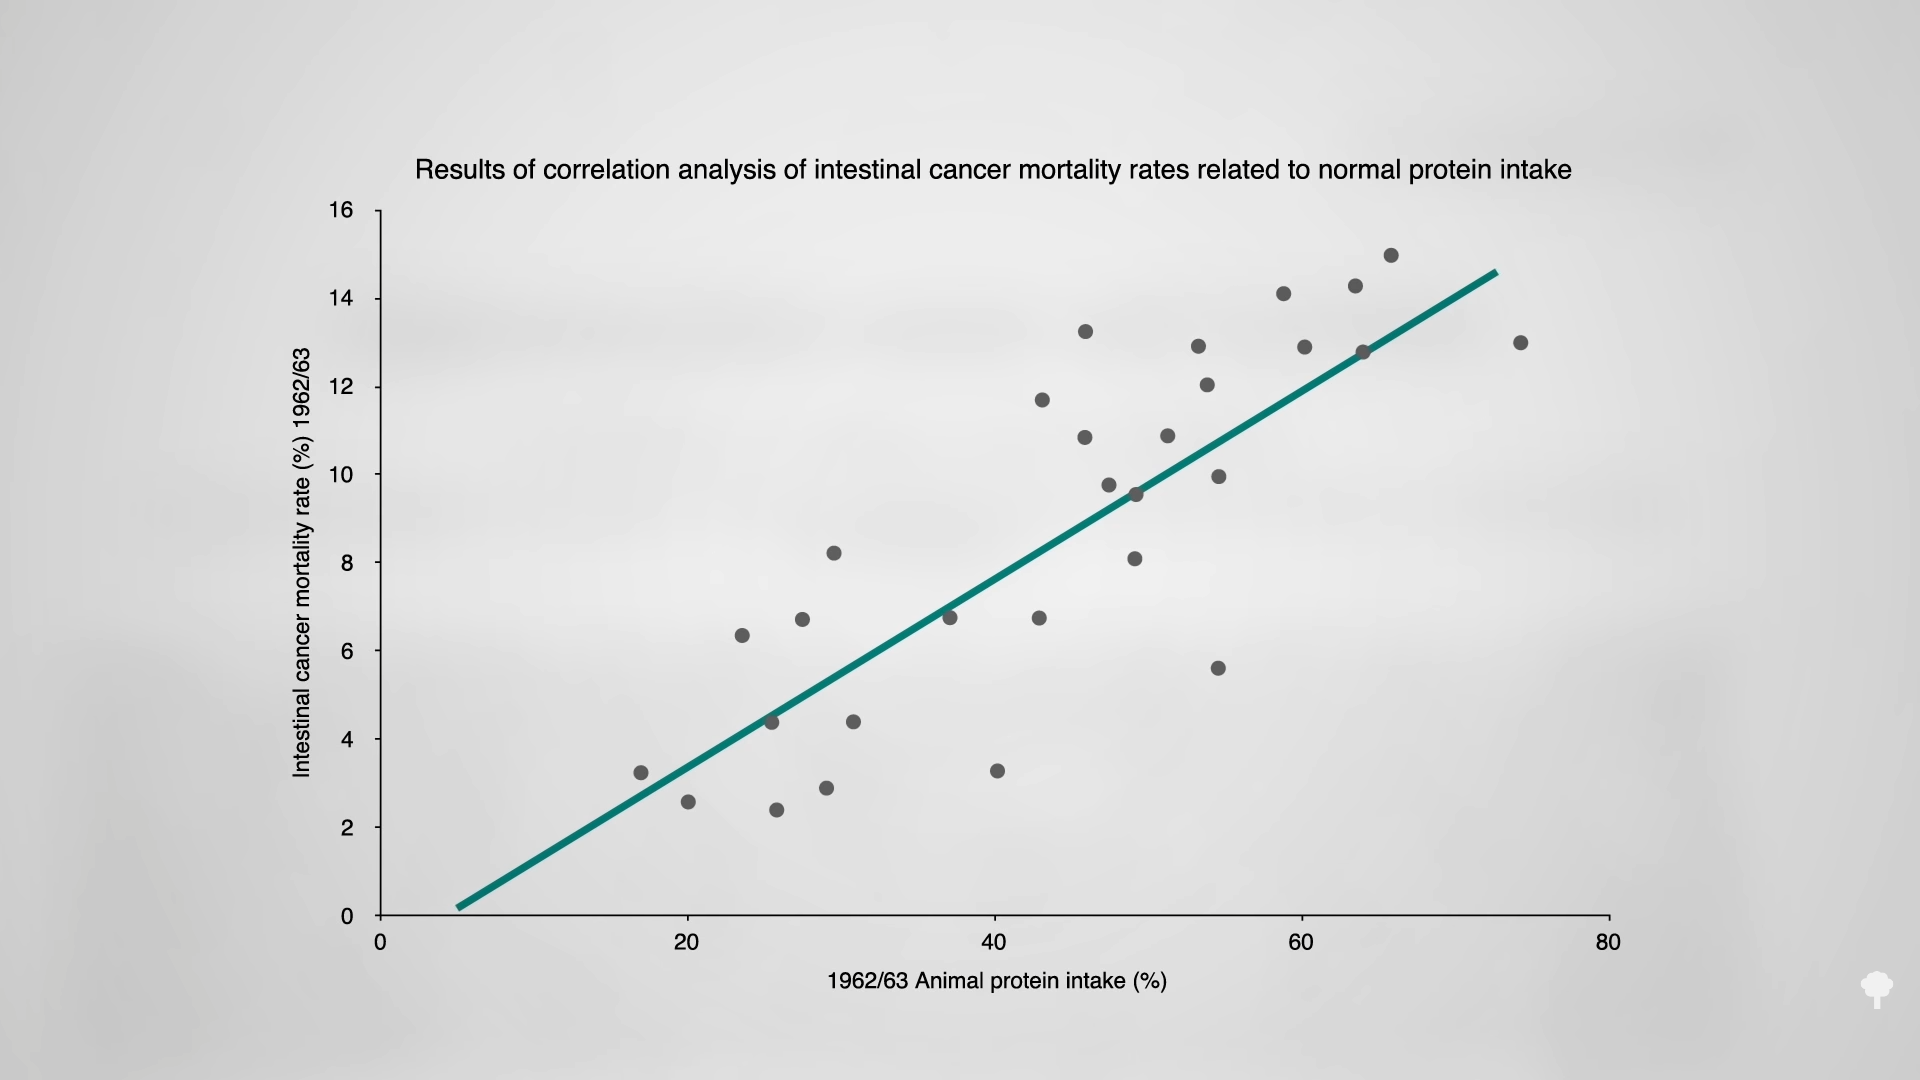
    In 1969, a correlation analysis was performed by a Dr. Gregor—no relation, and he spelled it wrong—and his colleagues. They found a rather tight correlation between animal protein intake and intestinal cancer mortality. You can see a graph of these results at 0:15 in my video Friday Favorites: Dietary Cholesterol and Cancer. In the 1970s, this relationship was extended to include breast cancer, too, and animal fat was implicated as well. Animal protein and dietary cholesterol kind of travel together in the same foods. So, it isn’t surprising that “there is significant correlation between high consumption of cholesterol-containing food items and the world-wide distribution of colon cancer.” A “large and highly significant” correlation exists, even after controlling for other dietary factors, such as animal fat and fiber, “supporting the possibility of a causal relationship between cholesterol intake and colon cancer.”

    So, is dietary cholesterol co-carcinogenic for human colon cancer? Researchers decided to try to find out by feeding some to rats. In one study, researchers injected rats with a carcinogen, and the cholesterol-eating rats got tumors in half the time and they all died, whereas most of the rats in the cholesterol-free group survived. But “the relevance of animal data to the human situation is debatable.” How would the cholesterol and cancer link even work?

    As humans, we don’t need to consume any cholesterol, since our body makes all that it needs. When we do consume extra cholesterol, there’s a limit to the amount our body can absorb. So, “where does the excess go?” Down to our colon. In this way, the cells lining our colon, where colon cancer arises, “are therefore constantly exposed to fecal cholesterol.” Should a cancerous or precancerous polyp arise, might all of that extra cholesterol help it grow faster? Indeed, the amount of cholesterol we eat “could thus be a factor determining the rate of development, growth, or spread of such a tumor.” Back in the 1970s, this was all just speculation, but the researchers realized that if it were true, that would be good news, since a low-cholesterol diet, cutting down on meat, dairy, eggs, and junk—the only foods that really have cholesterol—would be a “feasible, inexpensive, and without risk” way to help prevent and treat colon cancer. So, what’s the 40-year update?

    Country-by-country correlation can never do more than just inspire studies like this: “the largest nationwide population-based case-control study [to date] to assess the association between cholesterol intake and several types of cancer.” The researchers found that “dietary cholesterol intake was positively associated with risk of cancers of the stomach, colon, rectum, pancreas, lung, breast (mainly postmenopausal), kidney, bladder and NHL,” non-Hodgkin’s lymphoma, or bone marrow. The flipside? “A diet low in cholesterol may play a role in the prevention of several cancers.” This means cutting down on meat, dairy, and eggs, the very foods that may increase risk of cancer.

    “Thus, the findings of this study should essentially be viewed as an indication that a diet rich in meat, dairy products, eggs (and hence animal fat) is an unfavorable indicator of the risk of several common cancers…” Two cancers the study didn’t investigate, though, were endometrial cancer and throat cancer. When all of the studies on cholesterol consumption and the risk of endometrial cancer (cancer of the lining of the uterus) were put together, researchers found a dose-response, meaning more cholesterol consumption was associated with more cancer: 6 percent for every extra 100 mg of cholesterol each day. So, something like a daily omelet might increase endometrial cancer risk by about 20 percent. This may be because the extra cholesterol is converted into estrogen, or it may just be because the increased oxidative stress is reflected in higher levels of oxidized cholesterol. I talk about this in my video Oxidized Cholesterol as a Cause of Alzheimer’s Disease.

    There also appears to be a dose-response relationship with pancreatic cancer, “one of the most dismal malignancies.” A compilation of studies found the risk of pancreatic cancer increased by 8 percent for every 100 mg of cholesterol, so that would be about a 30 percent higher risk for a daily omelet.

    And throat cancer? Increased risk was observed by researchers for elevated cholesterol intake—about 85 percent higher odds, which is consistent with other studies. Yes, maybe it’s the oxidation, or maybe it’s the inflammation. We can’t, however, be sure the cholesterol itself is to blame. “Elevated cholesterol intake could be an indicator that a diet rich in meat, eggs, and dairy products may have unfavorable effects.”

    The optimal intake of cholesterol? Zero. See Trans Fat, Saturated Fat, and Cholesterol: Tolerable Upper Intake of Zero.


    Credit: Source link

  • [RECIPE] Banting Mushroom Pizza | Fitness Magazine

    [RECIPE] Banting Mushroom Pizza | Fitness Magazine

    Carb-conscious eating doesn’t mean you need to deny yourself the pleasure of pizza.

    Create this Banting pizza masterpiece with a mix of natural ingredients and no meat – it’s the ideal option for meat-free Monday!

    Ingredients for the dough

    • 90g almond flour / ground almonds
    • 125g mozzarella, grated (do not use pre-grated mozzarella – it gets tossed with starch to keep it from sticking together and will prevent it from melting homogeneously)
    • 2 tbsp cream cheese
    • 1 large egg

    Ingredients for the toppings

    • 125ml tomato purée
    • 1 tsp dried herbs
    • 1 tsp crushed garlic
    • 1 tbsp olive oil
    • 150g portabellini mushrooms, sliced
    • 100g mozzarella, grated
    • 1-2 tbsp pickled jalapeños
    • 1 tbsp baby capers
    • Salt and pepper, to taste
    • Handful fresh rocket, to serve

    Also known as baby Bella mushrooms and mini portobellos, portobellini mushrooms are the more mature stage of the white button mushroom and are the slightly immature version of the portabella mushroom.

    Method

    1. Preheat oven to 200˚C, with the fan on.
    2. Place the almond flour, mozzarella and cream cheese in a small saucepan over medium heat.
    3. Heat and keep stirring with a firm spatula or wooden spoon until melted and well combined.
    4. Remove from the heat and add the egg.
    5. Working quickly, stir until the egg has been incorporated and the dough is smooth.
    6. Place the dough between 2 large pieces of baking paper.
    7. Roll out thinly into a ± 30cm pizza base.
    8. Remove the top piece of baking paper and slide the dough onto a large baking tray.
    9. Prick the base all over with a fork.
    10. Bake for 8-9 minutes until golden.
    11. Carefully flip the base and bake for a further 2-3 minutes on the other side.
    12. While the base is cooking combine the tomato puree, dried herbs and garlic in a small
    13. saucepan. Bring to a simmer and reduce until thickened. Season to taste.
    14. Heat olive oil in a frying pan and cook the mushrooms until barely tender but not cooked
    15. through. Season lightly.
    16. Spread the tomato sauce over the pizza base.
    17. Sprinkle with mozzarella.
    18. Top with mushrooms, capers and jalapeños.
    19. Return to the oven and reduce the heat to 180˚C.
    20. Cook until the cheese melts and is lightly golden brown.
    21. Scatter with fresh rocket, black pepper and serve.

    Recipe supplied by the South African Mushroom Farmers’ Association

    Author: Pedro van Gaalen

    When he’s not writing about sport or health and fitness, Pedro is probably out training for his next marathon or ultra-marathon. He’s worked as a fitness professional and as a marketing and comms expert. He now combines his passions in his role as managing editor at Fitness magazine.


    Credit: Source link

  • Sheet Pan Pizza Quesadilla Vegan

    Sheet Pan Pizza Quesadilla Vegan

    Stuffed with fave Pizza toppings and made on a sheet pan! This sheet pan pepperoni pizza Quesadilla is kid approved and perfect weeknight fix! Options for gluten-free and Soyfree. Stuffed with tomato sauce, vegan cheese, and plant-based pepperoni, this meal is sure to be a hit with kids and adults alike.

    stack of vegan pizza quesadilla slices on a wooden cutting board
    Table of Contents

    Think of this meal as a pizza meets a crunch wrap. You get all of the textures and flavors of a piping hot pizza in a crispy, tortilla shell.

    baked vegan pizza quesadilla before slicing

    The stuffing is my chickpea flour pepperoni (it’s a gluten-free instant pot blend and pressure cook recipe, No kneading!). Along with fresh veggies, pizza sauce, and vegan cheese. Wrap the whole thing in a bunch of tortillas and bake until crispy and golden.

    cropped-Chickpea-Flour-Pepperoni-3077.jpg

    This kid-friendly, one-pan vegan dinner is sure to be a favorite!

    Why You’ll Love this Sheet Pan Quesadilla

    • Kid-friendly, plant-based recipe.
    • Fun and easy to make!
    • Stuffed with toothsome, vegan pepperoni, creamy vegan cheese, and veggies.
    • Gluten-free option.

    More Cheesy Vegan Recipes

    Read more

    Recipe Card

    stack of vegan pizza quesadilla slices on a wooden cutting board
    Print Recipe

    Sheet Pan Pepperoni Pizza Quesadilla 

    Crunchy on the outside, creamy on the inside sheet pan pepperoni quesadilla is a fun and craveable dinner! Stuffed with tomato sauce, vegan cheese, and plant-based pepperoni, this meal is sure to be a hit with kids and adults alike.

    Prep Time30 mins

    Cook Time20 mins

    Total Time50 mins

    Course: Main Course

    Cuisine: Italian, Mexican Inspired

    Keyword: sheet pan pizza quesadilla, sheet pan quesadilla

    Servings: 4

    Calories: 279kcal

    Author: Vegan Richa

    Ingredients

    • 6 to 8 tortillas or more as needed, depending on your sheet pan size and how big a quesadilla you’re planning to make
    • 6 to 8 ounces pizza sauce
    • 1 cup (182 g) veggies thinly sliced. Such as thinly sliced onion, mushroom, peppers. Use more, if you want!
    • 1 cup (112 g) vegan mozzarella cheese or a mix of mozzarella and cheddar or other cheeses that you like. I usually use a mix of cheeses from different brands. I use the Chao original, 365 mozzarella, and Daiya mozzarella or cheddar.
    • 1/2 recipe of chickpea pepperoni or 12 to 16 slices plant-based pepperoni
    • fresh basil or dried basil
    • pepper flakes

    Instructions

    • Assemble all of your ingredients and line a baking sheet with parchment paper.

    • Place your tortillas so that they overlap each other and that there is no space between them. If there is some space then put another tortilla at the bottom. I usually brush the edges with water where the tortillas are overlapping so that when they are baking they will stick with each other.

    • Spread the pizza sauce all over, making a rectangle or square. Leave 1/2 of the tortilla on edges uncovered. Top it with thinly sliced veggies and 1/2 of the vegan cheese then top it with pepperoni, fresh basil (if using) or use about 1/2 to 1 teaspoon of dry basil. Add pepper flakes as needed, then top it more with vegan cheese.

    • Fold over the tortillas to cover everything. If the center has space, place the tortilla in the centre first then fold the rest of the tortilla.

    • Place another baking sheet or another baking pan over the folded tortilla so that they stay in place and put this in the oven at 425° F to bake for 20 to 25 minutes or until golden brown on all edges. You can also brush the top of the tortillas with oil before putting in oven, so that they brown nicely and crisp up.

    • Once done remove the top baking sheet and remove the quesadilla baking sheet from oven. Slice with a sharp knife into preferred size of quesadilla pieces and serve.

    Notes

    Use gluten-free tortillas for gluten-free  

    Nutrition

    Nutrition Facts

    Sheet Pan Pepperoni Pizza Quesadilla 

    Amount Per Serving

    Calories 279 Calories from Fat 90

    % Daily Value*

    Fat 10g15%

    Saturated Fat 3g19%

    Sodium 689mg30%

    Potassium 279mg8%

    Carbohydrates 39g13%

    Fiber 5g21%

    Sugar 4g4%

    Protein 8g16%

    Vitamin A 2495IU50%

    Vitamin C 8mg10%

    Calcium 103mg10%

    Iron 3mg17%

    * Percent Daily Values are based on a 2000 calorie diet.

    vegan pepperoni, vegan cheese, pizza sauce, and veggies in bowls arranged on top of tortillas

    Ingredients

    • tortillas – Use any kind of tortillas you like for this recipe! White, wheat, gluten-free, spinach, etc. As long as it can fold without cracking, you’re all good.
    • pizza sauce – Make your own from scratch or use store-bought for a quicker meal.
    • veggies – Choose your favorite pizza toppings! Just make sure everything is sliced nice and thin, so it will cook through.
    • vegan cheese – Use mozzarella or a mix. Choose a vegan cheese that you like best.
    • vegan pepperoni – Like with the pizza sauce, you can make my chickpea pepperoni from scratch or use store-bought, depending on your time constraints.
    • basil and pepper flakes – Dried herbs add flavor to your pizza quesadilla!

    Tips

    • You can use gluten free tortillas to keep this gluten free. (The pictured tortillas are wheat based).
    • You can fold this on your own, but it’s easier if you have another person to help you, especially when it’s time to put the pan on top to weigh it down.
    • Use my homemade Vegan Pepperoni with Chickpea Flour or use store-bought, if you don’t have time to make your own.

    How to Make Sheet Pan Pepperoni Pizza Quesadilla

    Assemble all of your ingredients and line a baking sheet with parchment paper.

    Place your tortillas so that they overlap each other and that there is no space between them. If there is some space then put another tortilla at the bottom. I usually brush the edges with water where the tortillas are overlapping so that when they are baking they will stick with each other.

    Spread the pizza sauce all over, making rectangular or square. Leave half of the tortilla on the edges uncovered.

    pizza sauce spread onto the tortillas

    Top it with thinly sliced veggies and half of the vegan cheese.

    onions arranged on top of the pizza sauce
    adding the mushrooms to the tortillas
    topping the veggies with vegan cheese

    Then, top it with pepperoni and fresh basil or dried basil.

    pepperoni placed on top of the cheese

    Add pepper flakes as needed, then top it with the remaining vegan cheese.

    more vegan cheese sprinkled onto the pepperoni

    Fold over the tortillas into the middle to cover everything. If the center has an open space where the tortillas won’t overlap, place another tortilla in the center to cover the opening.

    Place another baking sheet or baking pan over the folded tortillas so that they stay in place and put the whole thing into the oven at 425° F to bake for 20 to 25 minutes or until golden brown on all edges. You can also brush the top of the tortillas with oil before putting in oven, so that it browns nicely and crisps up.

    baked vegan pizza quesadilla before slicing

    Once done, remove the baking sheet and remove the quesadilla baking sheet from oven. Slice with a sharp knife into preferred size of quesadilla pieces and serve.

    stack of vegan pizza quesadilla slices on a wooden cutting board

    Frequently Asked Questions

    Can I make this gluten-free?

    You can use gluten free tortillas to keep this recipe gluten free.

    Can I make this soy-free?

    Choose soy-free vegan cheese and vegan pepperoni to make this soy-free.

    Is this recipe nut-free?

    This recipe is naturally nut-free, as long as your vegan cheese doesn’t contain nuts.

    Credit: Source link