Author: [email protected]

  • Dairy free cheesecakes (no bake)

    Dairy free cheesecakes (no bake)

    dairy free cheesecakes cut

    Supposedly we are nearing the start of spring, but our weather pattern is not in agreement. Although it depends on the day, some days it’s sunny and warm, others snow (or sleet more like) makes an appearance and there is a piercing chill in the air. I was a little lost in figuring out what kind of recipe will be appropriate for right now – I kept on switching between a spring salad and a stew – but then I remembered that it is Mother’s Day here on Sunday so a decadent yet super easy to throw together dairy free cheesecakes adorned with beautifully pink roasted rhubarb seemed very appropriate.

    These cheesecakes are completely no bake and are super easy to make. They don’t require many or any niche ingredients either so I hope I have made them accessible to everyone. The only thing you may have trouble getting if you live outside of the UK is pink rhubarb. Its gorgeous colour is not necessary for the flavours to work (you can use regular rhubarb), but it sure makes a visual impact, doesn’t it? Instead of forced rhubarb – it’s called that as it’s forced to grow a little early and its gorgeous colour is achieved by means of growing it in complete darkness – use any other tangy fruit or fruit you enjoy. Raspberries (cooked from frozen outside of summer) would be an obvious replacement, but gooseberries, sour cherries and kiwi fruit to name just a few would also work beautifully.

    These cute dairy free cheesecakes are a doddle to make too, they do not require any baking skills at all. To make the base, all you need is a food processor or a pestle and mortar and some elbow grease. And to make the cheesecake mixture you need a blender. It does not have to be a very fancy blender either. I used to use an old Kenwood machine (which I now gave away) and now I used my Ninja smoothie maker for this it’s a small batch, it works a charm. I hope I have convinced you to give these a go – you won’t be disappointed, I promise.

    dairy free cheesecakes plate

    MORE ABOUT THE INGREDIENTS

    VEGAN GINGER BISCUITS: Ground up ginger biscuits bound with melted vegan butter are used to make bases for this simple cheesecake. I used regular ginger biscuits (called ginger snaps in the US I think) as they are accidentally vegan and their flavour works perfectly with the flavours of the cheesecake mixture. You could use any vegan biscuits you want instead or make your own bases using wholefood ingredients like here.

    VEGAN BUTTER: I used melted vegan butter (Violife brand) to bind crushed ginger biscuits together. You can also use refined (flavourless) or extra virgin coconut oil, but liquid oil won’t work – it needs to be the type of fat that firms up in cold temperatures.

    VEGAN WHITE CHOCOLATE: Dairy free white chocolate is one of the key ingredients here – it gives these cheesecakes beautiful flavour, makes this cheesecake decadently creamy and firms it up nicely too. I used vegan white chocolate from Aldi so it doesn’t break the bank either. If you cannot find vegan white chocolate, 50 g (1.75 oz) of cacao butter will have similar effect, but you’ll need to use more sugar.

    SILKEN TOFU: Silken tofu, the type that has custard-like texture and comes in a Tetra pack usually, is what I used here. You could use non-silken (known as cotton) type of tofu too I’m pretty sure but I have not tested this recipe with it.

    MAPLE SYRUP: Even though white chocolate contains sugar, I felt that the mixture needed more sweetness. I used maple syrup but any neutral tasting liquid sweetener will work the same – agave syrup, rice syrup, golden syrup or even stem ginger syrup if you use stem ginger instead of grated fresh ginger to flavour this cheesecake.

    CASHEWS: Cashews are used to make vegan cheesecakes and cheeses as they have a higher fat content than other nuts, which translates to a creamy mouthfeel of the finished product. If you live in Australia, macadamia nuts are a good replacement and if you are allergic to nuts, use sunflower seeds. All three need soaking on water first to soften and make blending easier. Soak in cold water for several hours or in boiling water for at least 30 minutes.

    VANILLA: Vanilla needs no introduction, it adds beautiful taste to these cheesecakes and there is hardly such thing as too much vanilla in my books – I used one and a half teaspoon of quality vanilla extract.

    LEMON: Lemon juice is used to give these cheesecakes their characteristic tang, which in the case of a dairy cheesecake is achieved by using cream cheese, sour cream or yoghurt. Lemon zest gives these cheesecakes even more flavour so be sure to add that it in.

    GINGER: I love the combination of white chocolate and ginger so I used a generous amount of grated ginger to flavour these cheesecakes. If you are not such a ginger fan, use less or don’t use at all. You could also use a couple of balls of stem ginger (UK baking aisle staple) or ground ginger to taste.

    RHUBARB: This beautifully pink forced rhubarb is a UK speciality – grown in the darkness, in Yorkshire – that my non-UK based readers will not be able to get easily. Fear not, any sour fruit or fruit compote works just as well. Raspberries or blackberries (cooked from frozen outside of season) would be an obvious replacement, but gooseberries, sour cherries and kiwi fruit to name just a few would also work beautifully.

    dairy free cheesecakes biscuit crumb

    I used accidentally vegan ginger nuts (called ginger snaps in the US, I think) to create biscuit crumb for the bases. You can use any hard biscuits / cookies you enjoy although ginger-flavoured ones are my recommendation for this dessert. The easiest way to create the crumb is to use a food processor, but you can also just use a pestle and mortar and some elbow grease (plus, it’s a great way to destress… )

    dairy free cheesecakes mixture

    Blend all of the cheeesecake mixture ingredients, apart from the chocolate, in a blender. A small blender, like my Ninja smoothie maker, works well for this amount.

    dairy free cheesecakes white chocolate

    Melt your chocolate slowly over a pot of gently simmering water and then add to the cheesecake mixture, blend again until smooth – you may need to use a spatula to help the blender as chocolate is heavy and it likes to gravitate towards the bottom.

    dairy free cheesecakes assembly

    Compact biscuit crumb at the bottom of each muffin hole, then top with cheesecake mixture – give it a stir every time you pour as melted white chocolate likes to sink to the bottom.

    dairy free cheesecakes topping

    Allow the cheesecakes to set in the fridge first and, once firm enough to pick up easily, in the freezer. Top with your sour fruit compote or fresh fruit of choice – I went for roasted rhubarb as it’s rhubarb season in the UK right now and it looks too pretty not too.

    dairy free cheesecakes top down

    FREQUENTLY ASKED QUESTIONS

    CAN I MAKE THESE CHEESECAKES WITHOUT NUTS

    You could use hulled sunflower seeds soaked in water first (to soften) instead of cashew nuts. Beware that they will make the colour a little less appealing but will work the same.

    HOW LONG DO THEY KEEP?

    They keep for up to 4 days in the fridge and in the freezer for a couple of months.

    CAN I FREEZE THESE CHEESECAKES?

    Yes, you can freeze them in moulds, then unmould and transfer to an air-tight food container. Do not freeze twice so once your cheesecakes have thawed, I would not recommend freezing the again.

    CAN I MAKE THESE CHEESECAKES GLUTEN-FREE?

    The only component of this recipe that contains gluten are the biscuits used for the base so you can easily make these dairy-free cheesecakes gluten-free by using your favourite gluten-free biscuits (hard cookies for the US audience). You could also make your own base from wholefood ingredients – I really like this one but it does require baking.

    HOW DO YOU GET THEM OUT WITHOUT SQUASHING?

    In order to get these out of the mould cleanly, I recommend using silicone muffin mould tray or individual cups. I also recommend placing them in the freezer (just to set) as that makes for a mess-free removal.

    WHAT VEGAN CHOCOLATE DO YOU USE AND WHAT CAN I USE INSTEAD?

    I used Blonde vegan white chocolate from Aldi, which is affordable and tastes pretty good too. There are many vegan white chocolate brands on the market so pick any that you enjoy. Alternatively, you could use 50 g (1.75 oz) raw cacao butter and a little more sweetener/sugar.

    WHAT CAN I USE INSTEAD OF GINGER?

    If you dislike ginger, you could safely skip it as it’s solely used for flavour. In terms of alternatives, I would suggest green cardamom (freshly ground from pods is best!) and orange zest alongside lemon zest.

    dairy free cheesecakes cross

    dairy free cheesecakes backlit

    CHEESECAKE BASE

    • 75 g / 2.6 oz vegan ginger biscuits (GF if needed)
    • 30 g / 1 oz (2 heaped tbsp) vegan butter or coconut oil, melted

    CHEESECAKE MIXTURE

    • 150 g / 5.3 oz vegan white chocolate
    • 150 g / 5.3 oz silken tofu
    • 60 ml / ¼ cup maple syrup* or sugar
    • 150 g / 1 heaped cup cashews, soaked*
    • 7 ml / 1½ tsp vanilla extract
    • 45 ml / 3 tbsp lemon juice + zest 1 lemon
    • 12 g / 2 packed tsp grated ginger*, to taste

    TOPPING

    METHOD

    1. PREP: Use a silicone muffin tray* (or cups) – it makes it easy to get these out cleanly. Otherwise line the bottoms and sides of regular muffin tray with circles and strips of baking paper stuck on with a little bit of vegan butter or coconut oil.

    CHEESECAKE BASES

    1. Grind ginger biscuits in a food processor until you get a fine crumb. Add melted vegan butter (or coconut oil) and pulse a few times, until the mixture resembles wet sand.
    2. Spoon the mixture between 6 (or 7 for lower cheesecakes) muffin holes, press it down well with the back of a spoon and refrigerate to set.

    CHEESECAKE MIXTURE

    1. Melt white chocolate gently over a water bath. Skip to the next step while you wait.
    2. Put drained silken tofu, maple syrup, drained cashews, vanilla, lemon juice, lemon zest and grated ginger in a blender (my small Ninja blender worked well). Process until silky smooth.
    3. Add melted white chocolate and blend until well combined with the rest of the mixture. Transfer to mixing bowl/a big jug and give the mixture a good stir at the start and before pouring each cheesecake as I found that melted chocolate likes to sink to the bottom.
    4. If using a silicone muffin tray, place it on a flat tray that fits in your fridge. Pour the cheesecake mixture over the bases and place in the fridge to firm up.
    5. Once the mixture is no longer runny, place the entire tray in the freezer for about 1 hr – this will make the removal easy. If using a standard muffin tray that won’t fit, keep it in the fridge overnight to set.
    6. Pop hardened cheesecakes out of the silicone tray or use a butter knife to go round each cheesecake and gently lift them out of a metal tray.
    7. Top with sour fruit or fruit compote of choice (I used roasted rhubarb). Keep refrigerated for up to 4 days or freeze for up to 2 months.

    NOTES

    *MAPLE SYRUP: You could use other liquid sweetener (like agave syrup) or icing sugar to sweeten and plant milk (45 ml / 3 tbsp) to get the right consistency. You may also not need as much sweetener – adjust to your taste.

    *GINGER: Instead of freshly grated ginger, I also like using 2-3 stem ginger balls (about 50 g / 1.75 oz) instead. You could also use stem ginger syrup (instead of maple syrup) to sweeten but if doing so make sure you taste the mixture before adding ginger balls or else the ginger flavour may end up too strong.

    *SILICONE MUFFIN TRAY: I recommend using silicone muffin tray as it makes removal of these way easier. The size of my muffin tray holes is 7.5 cm / 2.9″ diameter and 3 cm / 1.2″ height.

    Credit: Source link

  • 7 Vegan Resorts on Our Bucket List

    7 Vegan Resorts on Our Bucket List

    In need of a little R&R? These incredible vegan resorts from around the world will inspire the travel bug and tempt your taste buds. From luxurious tropical getaways to serene alpine retreats, you’ll feel nourished and renewed after spending time at these dream destinations.

    All our picks serve up delicious plant-based meals that can be made oil-free upon request, so feel free to indulge yourself as you kick back in paradise.

    Struggling to cook healthy meals at home?

    Forks Meal Planner is here to help.

    1. Stanford Inn by the Sea

    Mendocino, California

    Stanford Inn by the Sea exterior photo and photo of vegan eggs benedict on a white plate

    Overlooking the rugged green coastline of central California, this vegan boutique hotel is equal parts cozy and classy. Onsite organic gardens supply the kitchen with fresh produce while gorgeous indoor pools make it easy to unwind in between gourmet meals. Enjoy private wellness classes, breathtaking bike trails, and all the comforts of a high-end hotel that still manages to feel like home. From $350/night; stanfordinn.com

    2. Mother Earth Vegan Hotel

    Tamarindo, Costa Rica

    Mother Earth Vegan Hotel exterior shot and photo of avocado toast with fresh orange juice in a tall glass

    Relax in the lush surroundings of this tropical getaway nestled in a quiet neighborhood near Costa Rica’s pristine Tamarindo beaches. Created for conscious travelers, this chic hotel prides itself on sustainability by ensuring everything from its bed linens to its vibrant vegan meals are eco-friendly. A rooftop wellness studio offers yoga classes, Reiki, massages, sound baths, and plenty of other healing experiences to complement your poolside lounging. From $350/night; meveganhotel.com

    3. Dreamers

    Wilmington, North Carolina

    Dreamers hotel interior shot and photo of breakfast scone and cookies on a wooden board

    The whimsical interior design, thoughtful amenities, and close proximity to both a bustling downtown and beautiful beach are just a few of the reasons this pet-friendly vegan hotel made our bucket list. An onsite chef is available to prepare boxed lunches, happy hour hors d’oeuvres, and gourmet four-course meals to satiate all your vacation cravings. And while there’s plenty to do around town, the clawfoot tubs, private yoga classes, and spacious rooms may tempt you to stay on the property for your entire visit. From $180/night; dreamerswelcome.com

    4. Aro Ha

    Glenorchy, New Zealand

    Aro Ha retreat center and photo of a green smoothie bowl with fresh fruit

    Located in the stunning Southern Alps of New Zealand’s South Island, this holistic wellness retreat center offers five- to seven-night all-inclusive experiences that will replenish your mind, body, and spirit. Daily activities include yoga, hiking, massages, functional fitness classes, meditation, vegan cooking demonstrations, and sauna time. The gorgeous eco-friendly lodging and thoughtful programming are designed to transform your physical and emotional health so you leave the mountains feeling renewed. From $3,716 for a five-night retreat; aro-ha.com

    5. ahead burghotel

    Lenzen, Germany

    ahead burghotel exterior shot and photo of vegan pate with fresh herbs

    Live out your fairytale dreams in this gorgeous castle-turned-hotel in the German countryside. Spend your days wandering the castle gardens, relaxing in the Finnish sauna, taking mindfulness classes, and savoring the superb plant-based cooking. Striking the perfect balance between an outdoor escape and restful sanctuary, this budget-friendly vegan hotel will help you unwind from the hustle and bustle of daily life. From $77/night; aheadhotel.de

    6. Koukoumi

    Mykonos, Greece

    Koukoumi swimming pool and photo of fancy food being revealed under a glass dome by a chef

    Combining the iconic architecture of the Greek islands with the luxurious amenities of a high-end spa, this vegan hotel is devoted to your complete relaxation. Wake up in a spacious bohemian suite before lounging at the pool, enjoying a massage, or exploring the quaint village surrounding this five star experience. Visually stunning vegan dishes are available all day to delight your senses and leave you feeling nourished from the inside out. From $323/night; koukoumihotel.com

    7. Palmaïa

    Playa del Carmen, Mexico

    Palmaïa hotel room and photo of bao bun sandwiches

    Perched on a stunning white sand beach and surrounded by lush jungle, this all-inclusive luxury vegan resort serves up a truly transformative experience. Spend your days lounging in a seaside cabana or partaking in the consciously curated daily wellness activities that include yoga, meditation, sound healing, cacao ceremonies, and more. The six exquisite onsite restaurants provide decadent plant-based nourishment that feed both your stomach and your spirit. The thoughtful programming, attentive staff, and exciting wildlife make this tropical getaway a 10/10 experience. From $940/night, thehouseofaia.com

    Looking for More Vegan-Friendly Getaways?

    To discover plant-based hotels around the globe, visit vegan-welcome.com and veggie-hotels.com, two travel sites that let you search by country, vacation type, price range, and other important criteria (such as pet-friendly accommodations). Happy travels!

    Credit: Source link

  • Can Lutein Supplements Benefit Our Brain Function?

    Can Lutein Supplements Benefit Our Brain Function?

    Avocados, greens, and lutein and zeaxanthin supplements are put to the test for improving cognitive function.

    Dark green leafy vegetables are packed with a brain antioxidant called lutein, so increasing our greens intake “could be an important public health strategy for reducing the risk of visual or cognitive impairment.” Lutein is the dominant dietary pigment in the retina of the eye, as well as the brain. So, “it is not surprising that macular pigment density”—the concentration of lutein in the center of the eye called the macula—“was found to be significantly correlated with their levels in matched brain tissue.” This may explain the link between cognitive function and how much of these nutrients from greens you can see in the back of the eye. It’s assumed the neuroprotection is thanks to lutein being such a powerful antioxidant, but it has anti-inflammatory properties, too.

    “This relationship between lutein and zeaxanthin [another greens nutrient] and visual and cognitive health throughout the lifespan is compelling.” That statement, however, was based on observational studies, where you observe that higher lutein levels and brain function seem to go together.

    You don’t know if it’s actually cause and effect, though, until you put it to the test. As I discuss in my video Friday Favorites: Do Lutein Supplements Help with Brain Function?, “Could L [lutein] and Z [zeaxanthin] be supplemented as part of a lifestyle intervention to both improve central neural [brain] function and reduce the probability of progression through the various stages of dementia?” There’s a reason everyone is so excited about the possibility. Hopeful data from eye health studies have convinced many ophthalmologists to start recommending people to increase their intakes of lutein and zeaxanthin to prevent and treat macular degeneration, a leading cause of age-related vision loss. You don’t have to take pills, though. Adding as little as 60 grams of spinach a day for a month can significantly boost macular pigment in most individuals. That’s only about one-fifth of a ten-ounce package of frozen spinach.

    Greens aren’t good for just treating diseased eyes. A randomized, placebo-controlled study found that the goodies in greens can improve visual processing speed in young healthy people—like when you’re trying to hit a fastball and your body has to begin reacting even before you consciously register that the ball is coming towards you. There are also real-world benefits outside of the Major League, though, such as improving visual performance during driving.

    What about cognition? A randomized, double-blind, placebo-controlled trial gave adults with an average age of 73 the equivalent of either a daily half cup of cooked kale or a full cup of cooked spinach, and found significant improvements in cognitive function compared to those randomized to the placebo.

    It may even work in young adults averaging around age 21. In one study, daily supplementation with that same amount of lutein and zeaxanthin not only increased their macular pigment, but it resulted in significant improvements in brain function, including spatial memory, reasoning ability, and complex attention.

    Have researchers ever tried putting whole foods to the test? It’s hard to get Americans to eat greens every day, but not so hard to get them to eat green guacamole. A six-month, randomized, controlled trial tested the effects of the intake of avocado on cognition. What was the control? Study participants either ate a daily avocado, potato, or cup of chickpeas, and those in the avocado group had a significant improvement in cognitive function. But, to the Hass Avocado Board’s chagrin, so did the subjects in the potato and chickpea groups. That’s the problem with having healthy placebos! Maybe they should have used iceberg lettuce as the control.

    What about the impact on cognition of those who really need it, like Alzheimer’s disease patients? Researchers found that their vision got better, so that’s good, but their cognitive function didn’t change significantly. Now, it’s possible that eating whole foods, like dark leafy greens, might have worked better than just the pigments in pill form.

    Yes, “oxidation and inflammation appear to be key to both diseases [Alzheimer’s and macular degeneration], and neither seems particularly amenable to late-stage treatments.” That’s why prevention is critical. Reducing oxidation and inflammation in the earliest stages may be our most promising approach.


    Credit: Source link

  • Whole Herb

    Whole Herb

    Why do I like whole herb? Balance. We spend our lives trying to find balance in work and home life, school and sport, personal time, and family time. When it comes to healing our body, imbalances abound, but no one seems to notice.


    White willow contains a plant compound salicin. Salicin was harvested by the Bayer Company around 1890. It was used to make chemical called acetylsalicylic acid. The common name for acetylsalicylic acid is Aspirin. Aspirin does have pain and anti-inflammatory properties, but it is very hard on the stomach, liver, and kidneys. White Willow bark has the salicin, but
    also has flavonoids, which have powerful anti-inflammatory properties without the aggressive side effects of the pharmaceutical.


    There are thousands of dietary supplements, of various quality, to choose from. Some are pretty good, but most of them are capsules containing ground and purified rock, harsh acidic compounds, and cheap fillers. I have years of experience in the manufacture of these products and have found they all fall short of standards set by whole herbs. I can get vitamin C in a tasty gummy format. What are you really getting?  Gums, sugars, and ascorbic acid in various forms. Without the other vitamins and minerals your body requires to process this chemical the human body will just flush it out. When a client asks me about needing vitamin C, I tell them go eat an orange, find rose hips, perhaps grow some sorrel. With a whole food option you will get the most of all vitamins and minerals offered.


    Plant oils are very beneficial for the body. They can be very powerful, and harmful if not used correctly. I have had clients come to me with damage from using undiluted oils. One client suffered
    from constant fatigue because of oil overuse. Burns and sensory overload is a real thing, and you aren’t getting the benefit from the other chemicals in the plant that allowed it to grow and reproduce. Oils are useful but are out of balance as well.


    Homeopathies are super useful in conjunction with herbs. By themselves, you will find an imbalance. The way I explain it to people is that homeopathies are instructions the body uses to find its balance. The only issue is that it does not provide any of the vitamin and minerals the body requires. You have given the builder the blueprint,
    but no tools or materials. I have had people call me looking for help. They were instructed to do a homeopathic parasite cleanse, and it was pushing the body to hard. The homeopathic was doing its job, however, it was pushing a body that was not properly prepared and supported for the task. The result was some intense flu like symptoms for a number of days. I suspect people who receive these results will be loath to try this again.


    Whole herbs are perfectly balanced. Fresh, dried, and prepared in a variety of ways gives the human body all the vitamins, minerals, and plant chemicals it needs. If you give the body what it needs, it will do what it was
    created to do. 


    What about the instructions? 


    Can herbs be balanced, without the instructions that homeopathies can provide? 


    The question I ask is: Have you ever walked in a forest?  Have you left the busy city to go hiking or camping? Perhaps you enjoy gardening. People who do these things leave the experience feeling refreshed and renewed. Personally, I have a window full of plants every winter. Around January in Minnesota, I need a green fix. Living and growing plants continuously emit frequencies that we are exposed too. They are outside of our audible range, but they do exist. We are created to co-exist with plants. Enjoy the world of plants
    we have been provided and the balance they bring to our lives.


    That is why they are there.

    Credit: Source link

  • The Best Low-Fat, Low-Sugar Granola Recipe + 5 Flavor Variations

    The Best Low-Fat, Low-Sugar Granola Recipe + 5 Flavor Variations

    Most store-bought granolas are packed full of oil, sugar, and sodium, but our easy oil-free granola recipe transforms this breakfast staple from an unhealthy snack into a wholesome treat. The base recipe is endlessly flexible and can accommodate dozens of different add-ins depending on what flavor profile you’re feeling.

    Keep it simple with a dash of cinnamon and a handful of raisins, or take your taste buds on a trip to India with dried mango, cashews, and warming chai spice. Feel free to mix-and-match your favorite ingredients, and enjoy a scoop of this amazing granola over vegan yogurt or drizzled with plant-based milk.

    Struggling to cook healthy meals at home?

    Forks Meal Planner is here to help.

    Base Recipe: Oil-Free Granola

    45 minutes | Makes 4 cups

    Crunchy and clumpy with just a hint of sweetness from dried fruit, this basic granola recipe provides the foundation for the flavor variations that follow, or it can be tweaked to suit your personal preferences.


    1 cup pitted dates

    3 tablespoons binder of your choice (flaxseed meal, chia seeds, nut butter, or tahini)

    1 teaspoon pure vanilla extract

    ¼ teaspoon sea salt

    3 cups old-fashioned or thick-cut rolled oats

    ¾ cup coarsely chopped nuts and/or seeds

    ½ cup dried fruit


    1. Preheat oven to 300˚F. Line two baking sheets with silicone baking mats or parchment paper.

    2. Place dates, flaxseed meal, vanilla, and salt in a blender or food processor; pour 1 cup boiling water over top. Let stand 15 minutes to soften the dates, then blend until smooth.

    3. Transfer blended date mixture to a large bowl; add oats and nuts/seeds. Use your hands to combine the mixture (it will be sticky and doughlike).

    4. Spread mixture in an even layer on the prepared baking sheets. Bake 10 minutes. Stir with a spatula and break granola into small clumps. Bake 10 minutes more; stir again. Bake 5 to 10 minutes more, until the granola is crisp and evenly browned. Turn off oven; let granola cool in the oven.

    5. Stir dried fruit into cooled granola. Store in an airtight container up to 2 weeks.

    Healthy Granola: 5 Flavor Variations

    Ready to switch things up? Add a few extra ingredients to the base recipe to make your oil-free granola extra tasty. The sky’s the limit when it comes to the unique combinations of spices, dried fruits, and nuts you can create, but here are five of our favorite flavor variations that will make your morning meal super scrumptious.

    1. Chocolate-Cherry Granola

    Chocolate-Cherry Granola in a small white bowl

    Add ¼ cup unsweetened cocoa powder to the date mixture before blending. Use sliced almonds for the nuts/seeds and dried cherries for the dried fruit.

    2. Cinnamon-Raisin Granola

    Cinnamon-Raisin Granola in a small white bowl

    Add 1½ teaspoons ground cinnamon to the date mixture before blending. Use walnuts for the nuts/seeds and raisins for the dried fruit.

    3. Mango-Chai Granola

    Mango-Chai Granola in a small white bowl with a metal spoon

    Steep 2 chai tea bags in 1 cup boiling water 4 minutes. Remove tea bags and use the tea in place of the boiling water to soften the date mixture. Add ½ teaspoon Ground ginger to the date mixture before blending. Use chopped cashews for the nuts/seeds and dried mango for the dried fruit. Tip: If you prefer decaf tea, try rooibos chai.

    4. Pumpkin-Cranberry Granola

     Pumpkin-Cranberry Granola in a small white bowl

    Add 2 teaspoons pumpkin pie spice to the date mixture before blending. Use raw pepitas for the nuts/seeds and dried cranberries for the dried fruit.

    5. Peanut Butter-Blueberry Granola

    Peanut Butter-Blueberry Granola in a small white bowl with a metal spoon

    Use peanut butter for the binder in the date mixture. Use raw unsalted peanuts for the nuts/ seeds and dried blueberries for the dried fruit.

    Credit: Source link

  • Dhaba Style Rajma Instant Pot Kidney Bean Curry

    Dhaba Style Rajma Instant Pot Kidney Bean Curry

    Easy Dump and Done Dhaba Style Rajma Recipe. An Indian Kidney Bean Curry cooked in a fragrant tomato yogurt sauce. Made in the instant pot, no extra steps, just add to pot and done. Serve with a dollop of vegan butter and a side of rice.

    overhead shot of a plate of red kidney bean curry served with rice

    If you want to make a Punjabi fall in love with you, Make a ridiculously good Rajma(Kidney Bean Curry) ie this Dhaba Style Rajma!. The easiest and most hands-off way to whip a comforting bowl of rajma. We cook some kidney beans along with whole and ground spices then add some tomato puree and finish off with yogurt for some extra richness and creaminess. This is a dump and done recipe, ie no standing around for multiple steps! Just add to pot and pressure cook.

    To get that extra creaminess, we mash the kidney beans along into the sauce. With the whole spices this Rajma tastes especially amazing a few hours after cooking as the whole spices bloom with time.

    a plate of Dhaba Style Rajma with rice sprinkled with cilantro
    The cooked kidney beans absorb all of those much-loved spices and they are simply heartwarming served with a dollop of vegan butter!

    “rajma

    Just as much as any bean, the red kidney bean is a great source of protein so this makes for a nutrient-dense option when you need a power-packed lunch or dinner. If you don’t have any red kidney beans on hand, feel free to use pinto or black beans.

    a serving of Indian Dhaba Wake Rajma Curry served with a side of rice and topped with a dollop of butter

    More recipes with red kidney beans

    More Instant pot recipes

    Vegan Cheese Sauce (Instant Pot Potato Carrot Cheese Sauce)

    Instant Pot Dal Bukhara-Dump and Done Creamy Black lentils

    Vegan Instant Pot Coconut Chicken Curry with Soy curls

    Print Recipe

    Dhaba Rajma Masala Indian Kidney Bean Curry

    Easy Dhaba Style Rajma Masala Recipe. Punjabi Kidney Bean Curry cooked in a fragrant tomato yogurt sauce. Dump annd done in instant pot, no extra steps, just add to pot and done. Serve with a dollop of vegan butter and a side of rice. 

    Course: Main Course

    Cuisine: Indian

    Keyword: dhaba rajma, Indian kidney bean curry, punjabi rajma

    Servings: 4

    Calories: 98kcal

    Author: Vegan Richa

    Ingredients

    • 1 cup (177 g) dry dark red kidney beans soaked for 8 hours or overnight
    • 1/2 cup (80 g) chopped red onion
    • 1/2 inch ginger minced
    • 4 cloves garlic minced
    • 1 hot green chili minced or omit to keep it low heat
    • 2 black cardamoms slightly opened or you can use 1 black and 1 green cardamom,
    • 3 whole cloves
    • 1 teaspoon ground cumin
    • 1 teaspoon kashmiri chili powder or use 3/4 teaspoon paprika
    • 1 teaspoon ground coriander
    • 1-2 teaspoon garam masala or chole masala powder
    • 2 cups (475 ml) water

    To add later:

    • 4 ounces (115 g) tomato puree canned purée or use unseasoned tomato sauce/passata. see notes for using fresh tomato
    • 1/4 cup (60 g) non-dairy yogurt or blended silken tofu or thick cashew cream or coconut cream
    • 1 teaspoon salt
    • 1/2 teaspoon dried fenugreek leaves (Kasoori methi)
    • cilantro for garnish

    Instructions

    • Soak your beans if you haven’t already and let them sit soaking for overnight or 8 hours then drain.

    • To the inner pot of the instant pot, add a few drops of oil and spread at the bottom to avoid the beans sticking or scorching at the bottom .

    • Then add the drained kidney beans, ginger, garlic, onion, chili, cardamom, cloves, cumin, spices, and 2 cups of water.

    • Mix well. Close the lid and pressure cook on bean mode for 55 minutes to 1 hour. If your beans are old, then pressure cook for 1 hour.

    • Let the pressure release naturally for 10 mins then quick release carefully. then open the lid.

    • Press saute and add the tomato puree, yogurt, 3/4 teaspoon salt and fenugreek leaves and mix well.

    • Mash some of the beans using your spatula by mashing them on the sides of the instant pot.

    • Continue to cook until it comes to a good boil. Taste and adjust carefully to add or adjust salt and flavor. Add more heat if needed and salt if needed.

    • Then switch of saute. Let it sit for another few minutes then garnish with cilantro and serve with rice or flatbread. A bit of vegan butter works amazingly with the rajma.

    Notes

    • Sauté the aromatics: Alternatively, sauté the onion ginger garlic, and chile for 4-5 mins in 2 teaspoons an oil along with the whole spices and a pinch of salt. Then switch of sautéing. Add the rest of the ingredients and proceed.
    • Fresh tomatoes: If using fresh tomatoes, purée the tomatoes without any water in a blender then cook the purée over medium heat for 6-8 mins to thick then use.
    • To make in saucepan: Follow the steps in a large saucepan over medium heat. Add 1.5 cups more water, partially cover and cook for 65-75 minutes or until the beans are tender. Then mash some beans and proceed to add the tomato purée yogurt etc 
    • Oilfree: omit the oil and vegan butter 

    Nutrition

    Nutrition Facts

    Dhaba Rajma Masala Indian Kidney Bean Curry

    Amount Per Serving

    Calories 98 Calories from Fat 9

    % Daily Value*

    Fat 1g2%

    Saturated Fat 0.1g1%

    Sodium 647mg28%

    Potassium 369mg11%

    Carbohydrates 19g6%

    Fiber 5g21%

    Sugar 4g4%

    Protein 6g12%

    Vitamin A 302IU6%

    Vitamin C 9mg11%

    Calcium 58mg6%

    Iron 2mg11%

    * Percent Daily Values are based on a 2000 calorie diet.

    Ingredients:

    • Dark red kidney beans soaked for 8 hours or overnight
    • chopped red onion, ginger, and garlic are super important here along with hot green chili
    • whole spices: black cardamom pods,  whole cloves
    • ground spices: cumin, Kashmiri chili powder, paprika and coriander, garam masala or chole masala powder
    • tomato puree (canned purée) or use unseasoned tomato sauce lends fruitiness to the gravy
    • non-dairy yogurt makes this dish rich and creamy and mildens the heat of the chili. Use cashew cream or coconut cream or vegan cream cheese as a sub
    • salt and fenugreek leaves round out the salty and fragrant butter flavor profiles

    Tips:

    • Instead of yogurt, you can use blended silken tofu or thick cashew cream
    • If you are using fresh tomatoes, purée the tomatoes without any water in a blender then cook the purée over medium heat for 6-8 mins to thick then use.

    ingredients needed for making Indian Kidney Bean Curry

    How to make this Dhaba Style Rajma Recipe

    an Instant Pot with kidney beans

    Soak your beans if you haven’t already and let them sit soaking for overnight or 8 hours then drain. To the inner pot of the instant pot, add a few drops of oil and spread at the bottom yo reduce chances of sticking

    soaked red kidney beans with ginger, red onion and chili in an Instant Pot

    Then add the drained kidney beans, ginger, garlic, onion, chili, cardamom, cloves, cumin, spices, and 2 cups of water.

    Indian kidney bean curry with ginger and garlic in an Instant Pot

    Mix well. Close the lid and pressure cook on bean mode for 55 minutes to 1 hour. If your beans are old, then pressure cook for 1 hour.

    red kidney beans cooking with onion and tomato paste in an instant pot

    Let the pressure release naturally for 10 mins then carefully quick release and open the lid.

    Red Kidney Bean Curry cooked in an Instant Pot

    Press saute and add the tomato puree, yogurt, 3/4 teaspoon salt, and fenugreek leaves and mix well.

    dairyfree yogurt and tomato paste being stirred into a pot with kidney bean curry

    Mash some of the beans using your spatula by mashing them on the sides of the instant pot.

    Indian Kidney Bean Curry Dhaba Wale Rajma in an Instant Pot

    Continue to cook until it comes to a good boil. Taste and adjust carefully to adjust salt and flavor. Add more heat if needed and salt if needed.

    Then switch off saute. Let it sit for another few minutes then serve with rice or flatbread. Garnish with cilantro.

    Indian Kidney Bean Curry sprinkled with cilantro

    Alternatively, sauté the onion ginger garlic and chile for 4-5 mins in 2 teaspoon of oil along with the whole spices and a pinch of salt as the first step. Then switch off sauté. Add the rest of the ingredients and proceed to pressure cook

    To make in saucepan: Follow the steps in a large saucepan over medium heat. Add 1.5 cups more water, partially cover and cook for 65-75 minutes or until the beans are tender. Then mash some beans and proceed to add the tomato purée yogurt etc

    Indian Dhaba Wale Rajma served with rice sprinkled with cilantro
    Storage

    Store in a closed container in the refrigerator for upto 4 days. Freeze for upto 2 months.

    Reheat in a saucepan or microwave.


    Credit: Source link

  • Fight Aging with Brain-Healthy Foods

    Fight Aging with Brain-Healthy Foods

    What is the best source of lutein, the primary carotenoid antioxidant in the brain?

    “An extensive [scientific] literature describes the positive impact of dietary phytochemicals [plant compounds] on overall health and longevity…However, it is now becoming clear that the consumption of diets rich in phytochemicals can influence neuro-inflammation”—that is, brain inflammation—“and mediate the activation of signaling pathways, leading to the expression of cytoprotective [cell protective] and restorative proteins.” As I discuss in my video Friday Favorites: Brain-Healthy Foods to Fight Aging, just “over the last decade, remarkable progress has been made to realize that oxidative and nitrosative stress (O&NS) and chronic, low-grade inflammation are major risk factors underlying brain aging,” so it’s no wonder that antioxidant and anti-inflammatory foods may help.

    “The brain is especially vulnerable to free radical attack,” oxidative stress, due to its high fat content and cauldron of high metabolic activity. You don’t want your brains to go rancid. You’d think that one of the major fat-soluble dietary antioxidants would step in, like beta-carotene, but the major carotenoid concentrated in the brain is actually lutein. Our brain just preferentially sucks it up.

    For example, look at the “oldest old,” like in the Georgia centenarian study. Recognizing that “oxidative stress is involved in age-related cognitive decline,” researchers figured that “dietary antioxidants…may play a role in the prevention or delay in cognitive decline,” so they looked at eight different ones: vitamin A, vitamin E, and on down the list. Only lutein was “significantly related to better cognition.” Now, in this study, researchers looked at brain tissue on autopsy, but by then, it’s a little too late. How could you study the effects of diet on the brain while you’re still alive? If only there were a way we could physically look into the living brain with our own two eyes. There is. With our own two eyes.

    The retina, the back of our eyeball, is actually an extension of our central nervous system, an outpouching of the brain during development. And, as you can see at 2:02 in my video, there’s a spot right in the middle. That is what the doctor sees when looking into your eye with that bright light. That spot, called the macula, is our HD camera, where we get the highest resolution vision, and it’s packed with lutein.

    And, levels in the retina correspond to levels in the rest of our brain so our eyes can be a window into our brain. So, now we can finally do studies on living people to see if diet can affect lutein levels in the eyes, which reflects lutein levels in the brain, and find out if that correlates with improvements in cognitive function. And, indeed, significant correlations do exist between cognitive test scores and the amount of macular pigment, these plant pigments like lutein in your eye. You can demonstrate this on functional MRI scans, suggesting lutein and a related plant pigment called zeaxanthin “promote cognitive functioning in old age by enhancing neural efficiency”—that is, the efficiency by which our nerves communicate. Researchers conducted a fascinating study on white matter integrity using diffusion tensor imaging, which “provides unique insights into brain network connectivity,” allowing you to follow the nerve tracts throughout the brain. As you can see at 3:14 in my video, researchers were also able to show enhanced circuit integrity based on how much lutein and zeaxanthin they could see in people’s eyes; this is “further evidence of a meaningful relationship between diet and neural integrity” of our brains, “particularly in regions vulnerable to age-related decline.”

    So, do Alzheimer’s patients have less of this macular pigment? One study found significantly less lutein in their eyes, significantly less lutein in their blood, and a higher occurrence of macular degeneration, where this pigment layer gets destroyed. As you can see at 3:45 in my video, the thickness of this plant pigment layer in our eyes can be measured and may be a potential marker for the beginnings of Alzheimer’s. Let’s not wait that long, though. We know macular pigment density is related to cognitive function in older people, but what about during middle age?

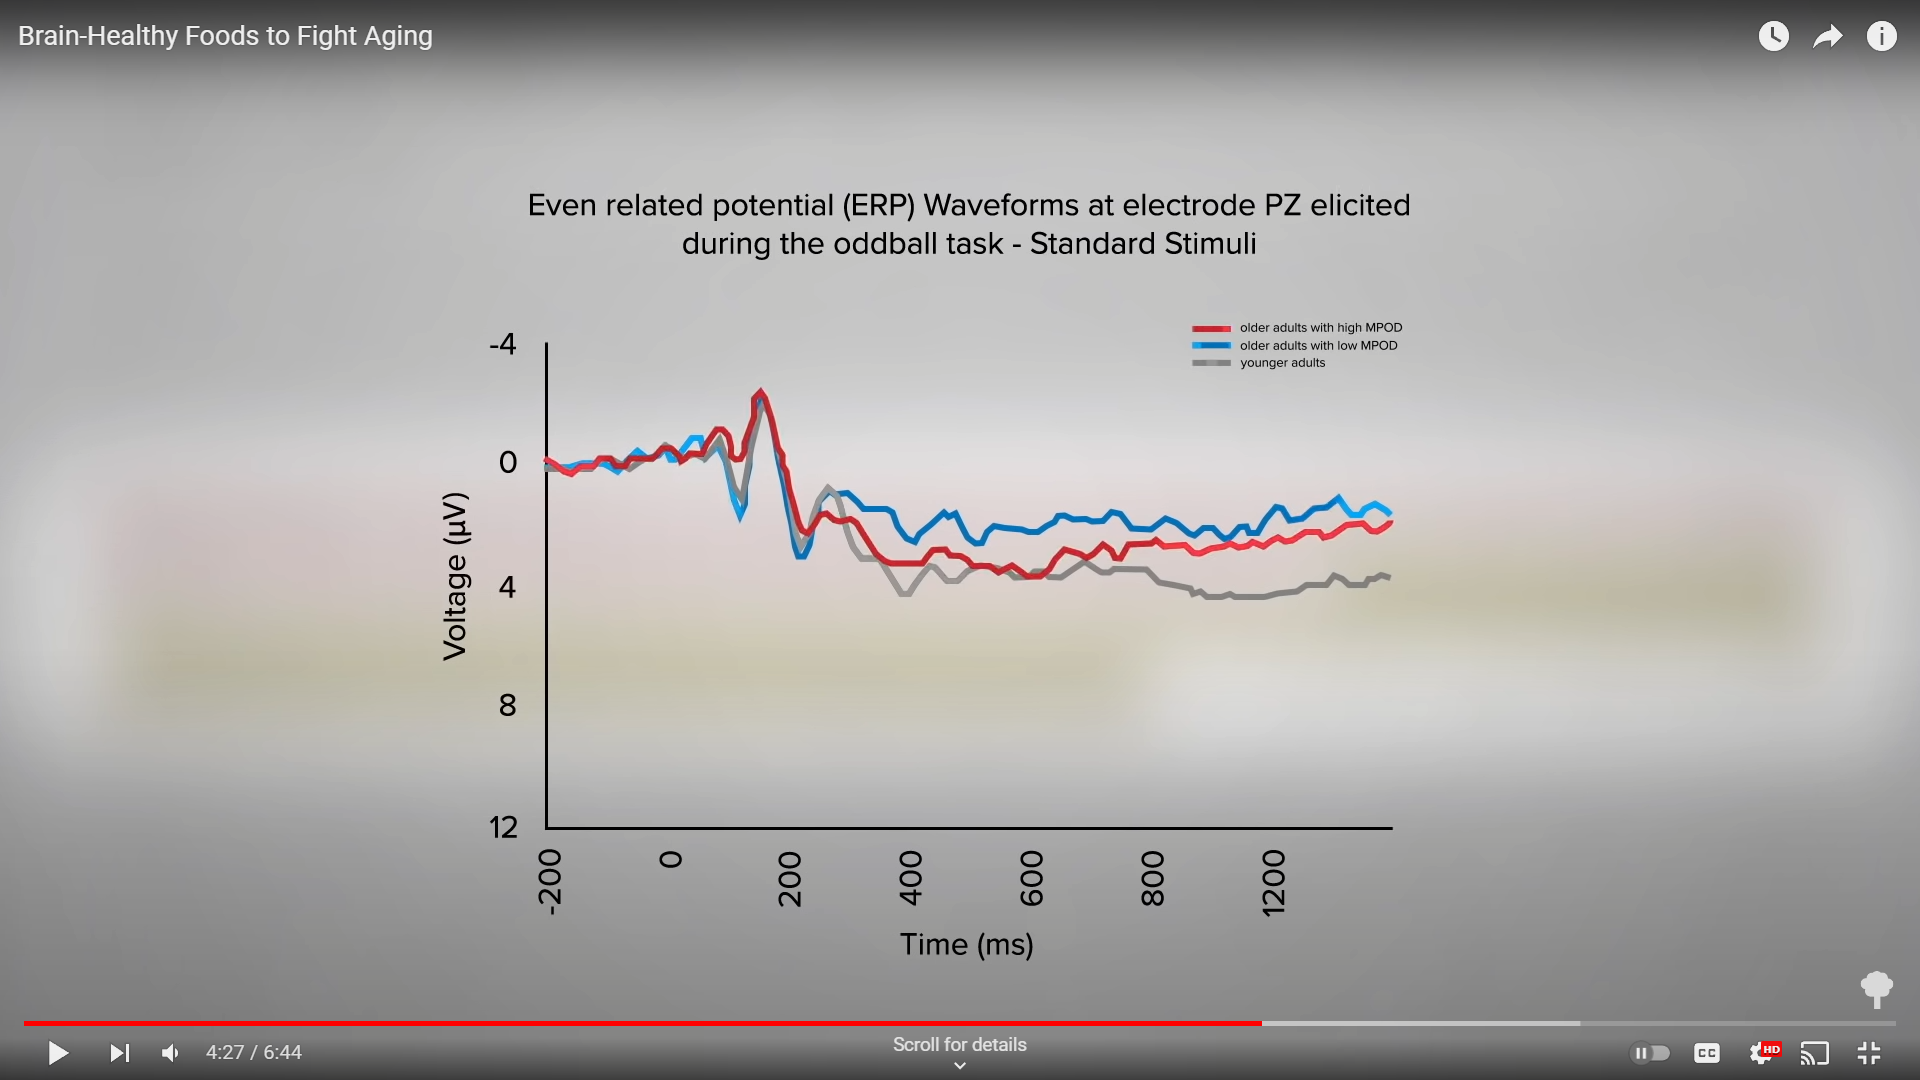
    “One apparent consequence of aging appears to be loss of some aspects of cognitive control,” which starts out early, in mid-adulthood, but not in everybody. This suggests that “it is possible that behavior, such as one’s diet, could drive some of these differences.” As you can see at 4:16 in my video, a measure of cognitive control showed that, on average, younger adults do better than older adults, but older adults who have high macular pigment, a lot of lutein in the back of their eyes, do significantly better. These results suggest that the “protective role of carotenoids” like lutein within the brain “may be evident during early and middle adulthood, decades prior to the onset of older age” and more apparent cognitive decline later in life.

    You can take 20-year-olds and show superior auditory function, or hearing, in those with more macular pigment in their eyes. “The auditory system, like the rest of the central nervous system, is ultimately constructed and maintained by diet and it is therefore, not surprisingly, sensitive to dietary intake throughout life”—all the way back to childhood.

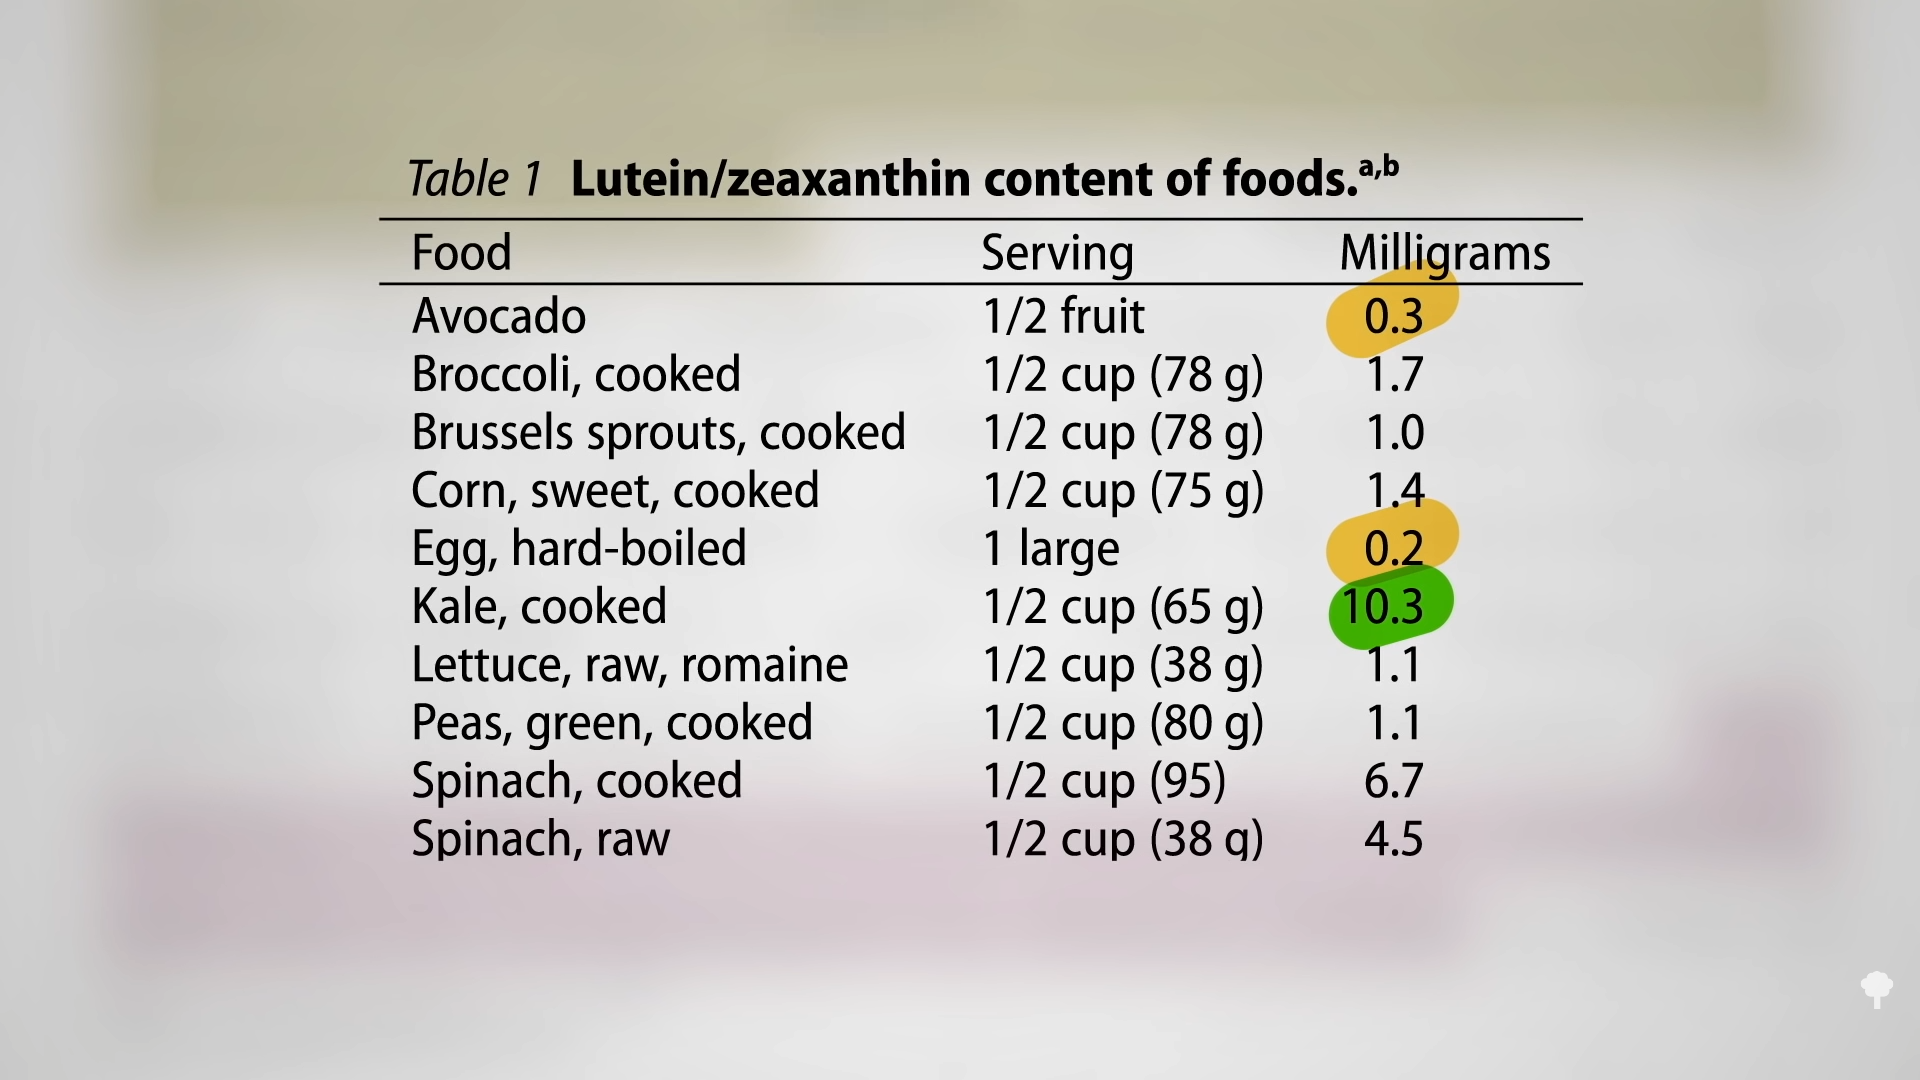
    Higher macular pigment is associated with higher academic achievement among schoolchildren. You can look into a kid’s eyes and get some sense of how well they may do in subjects like math and writing. “This finding is important because macular L [lutein] is modifiable and can be manipulated by dietary intake in most of the population.” And where is lutein found? The avocado and egg industries like to boast about how much of these macular pigments they have in their products, but the real superstars are dark green leafy vegetables. A half cup of kale has 50 times more lutein than an egg. So, a spinach salad or a 50-egg omelet? You can see a chart of lutein/zeaxanthin content of some common foods at 5:33 in my video.

    When should we start loading up on lutein? It seems the earlier, the better, and pregnant and breastfeeding women especially should definitely be checking off my Daily Dozen greens servings. But, it’s also apparently never too late to start. “While some age-related cognitive decline is to be expected in healthy aging…these effects may be less pronounced” among those eating more leafy greens, but you don’t know for sure until you put it to the test, which I explore in my next video Friday Favorites: Do Lutein Supplements Help with Brain Function?.

    What was that about my Daily Dozen? Check out Dr. Greger’s Daily Dozen Checklist.


    Credit: Source link

  • Vegan broccoli pasta with chick’n

    Vegan broccoli pasta with chick’n

    vegan broccoli pasta

    Sometimes all you are after at the end of a long day is a quick and comforting meal so I thought I would share one of my go to pastas with you. It never stays the same as it’s flexible and I have a tendency to tinker (I guess that’s why I ended up doing THIS for a living), but the gist of it is the same – vegan broccoli pasta in a simple creamy sauce with soy-based chick’n.

    I like to use small pasta shapes like orecchiette or conchiglie for this, alongside at least one green vegetable – tenderstem broccoli in this instance and some kind of meat substitute to add another texture and make it more satisfying. While I tend to follow wholefood plant based diet (beans, nuts, fruit and veg) and I’m not big on commercially available meat substitutes, I do make an exception for a couple of products we particularly enjoy. They add variety to our meals and are close enough to what we enjoyed eating as omnivores that we don’t feel like we are missing out at all.

    After you have not had meat for a long time (9 years in our case), you don’t really remember what it tasted like exactly so a close approximation of the texture and flavour you used to enjoy is good enough. And just to be clear – as I do know that some people cannot wrap their heads around the fact that some vegans seek foods imitating meat, dairy or eggs – many vegans, myself including, don’t go vegan because they dislike meat, they go vegan because they don’t want to be the cause of animal suffering.

    MORE ABOUT THE INGREDIENTS

    vegan broccoli pasta main ingredients

    PASTA: I made this dish with all kinds of pasta but small shapes like orecchiette or conchiglie are my favourites. I often use wholewheat pasta instead of plain for added satiety and nutrition.

    BROCCOLI: I love broccoli, especially tenderstem broccoli (known as broccolini in some parts of the world) and we eat it several times a week in pastas, stir-fries, simple veggie bowls. Tenderstem broccoli is a cross between regular broccoli and Chinese broccoli and as the name suggests it takes much less time to cook. You can use regular broccoli divided into small florets too, of course. The key is not to overcook them be vigilant. You want them cooked but still retaining a little bit of crunch (texture), not turning into mash in your mouth.

    VEGAN CHICK’N: I like using soy-based vegan chick’n in this dish. My favourite brand so far is What the Cluck by The Vegetarian Butcher although I like to go an extra mile and coat it my chick’n seasoning after frying. If chicken substitutes are not your thing or you simply haven’t found one you like, use firm smoked tofu instead. I explain how below. I also sometimes make this dish with vegan bacon (like in this recipe except it needs baking for 5-10 minutes longer)

    VEGAN CREAM: There are a lot of good vegan creams on the market, based on oats, soy and almond – to name just a few. I used Oatly single cream. If shop-bought cream isn’t available, create your own by blitzing 130 g / 1 cup of raw cashews (or hulled sunflower seeds for nut-free option) with 180 ml (¾ cup) of water and use that instead.

    GARLIC: Finely diced garlic pan-fried gently in olive oil is what infuses the sauce with a lot of flavour. Take your time with this step and keep the flame low as you don’t want the garlic to brown – it will make your dish taste bitter.

    LEMON: Most creamy pastas, cream dishes in general, cry out for a splash of acid to cut through the richness. I like to add a good squeeze of lemon juice to the sauce and some lemon zest too to reinforce fresh lemony flavour.

    CHICK’N SPICE: While some chicken substitutes come seasoned and you could use them straight from a packet, I like to add my own seasoning. This simple spice mix, comes together in seconds and I adds a lot of flavour in my opinion – it also makes for tasty pan-grits (Duncan’s favourite bit). Below is a visual to show you what you’ll need at a glance.

    vegan broccoli pasta chicken spicemix

    vegan broccoli pasta chicken

    Pan-fry your chick’n until golden brown and crispy first, then turn the heat off and toss it around in my spice mix to infuse it with more flavour.

    vegan broccoli pasta pasta broccoli

    I like to use small pasta shapes for this dish, like orecchiette and tenderstem broccoli. To save on washing up, I cook broccoli in the same water I cook pasta. You could cook them both at the same time by adding broccoli to cooking pasta for the last few minutes of cooking time, but I prefer to first cook the broccoli and then pasta in the same cooking water. This gives me more control over the doneness of each element as overcooked broccoli or pasta is something I want to avoid.

    FREQUENTLY ASKED QUESTIONS

    What can I use instead of chicken substitute?

    If you don’t get on with chicken substitutes, you can use firm tofu instead. I recommend smoked tofu! I press it, marinate in 20 ml / 4 tsp of soy sauce (or tamari for GF option), coat in cornstarch and pan-fry as per the recipe, coating it with my spice mix at the very end.

    Alternatively, you could go for almond bacon as I’ve done in this recipe before or tofu bacon as in that one (although you’ll need to bake it for 5-10 minutes longer to get it crispy)

    What can I use instead of vegan cream?

    Create plant-based cream at home by blitzing 130 g / 1 cup of raw cashews (or hulled sunflower seeds for nut-free option) with 180 ml (¾ cup) of water and use that instead. Be sure to soak your cashews in boiling water for at least 20 minutes before blending – soaking helps to soften them and produces better texture. If you want to keep it budget friendly or nut-free, use hulled sunflower seeds in exactly the same way.

    vegan broccoli pasta seasoning

    vegan broccoli pasta side

    vegan broccoli pasta close

    CHICK’N

    • 160 g / 5.6 oz vegan chick’n (I like What the Cluck) or firm tofu
    • 2 tsp nutritional yeast
    • ½ tsp sweet smoked paprika
    • heaped ¼ tsp dried oregano
    • heaped ¼ tsp rubbed sage
    • ¼ tsp garlic powder
    • 1/8 tsp fine salt and pepper
    • 10 ml / 2 tsp olive oil

    REMAINING INGREDIENTS

    • 150 g / 5.29 oz tenderstem (or regular) broccoli
    • 200 g / 7 oz oz orecchiette pasta (or conchiglie/shells)
    • 20 ml / 4 tsp olive oil
    • 2 tbsp nutritional yeast
    • 3 garlic cloves, finely diced
    • a couple sprigs of thyme, leaves picked
    • 120 ml / ½ cup vegan cream (I used Oatly*)
    • zest ½ small lemon + 15 ml / 1 tbsp juice
    • salt and pepper, to taste
    • toasted breadcrumbs, to finish (optional)
    • fine chilli flakes, to finish (optional)

    METHOD

    ‘CHICKEN’

    1. Create ‘chick’n’ seasoning by combining nutritional yeast, smoked paprika, garlic powder, salt, pepper and dried sage and oregano (crushed with your fingers) in a small bowl. Set aside.
    2. While your pasta is cooking, heat up a heavy bottom pan (I use a cast iron skillet). Once hot, add oil making sure the entire pan is covered – start off with 10 ml (2 tsp) and add more if need.
    3. Add vegan chick’n (or marinated tofu, see NOTES) and coat it in the warm oil. Once coated in oil, leave it for a few minutes on a low-medium heat so that it has a chance to brown nicely. Stir from time to time until browed on all sides.
    4. Once browned, switch the heat off. Sprinkle with ‘chick’n’ seasoning and stir immediately to coat.

    PASTA

    1. Prep tenderstem broccoli by dividing it into bite-size pieces and cutting thicker stems in half lengthwise. If using regular broccoli, cut into small, same size, florets.
    2. Boil a medium pot of salted water. Add prepped broccoli and allow it to simmer until just cooked but still retaining a bit of a bite (tenderstem broccoli took 2 minutes). Use a wire strainer to fish cooked broccoli out, rinse under cold tap and set aside. Bring the water to the boil again.
    3. Cook pasta in the broccoli water until just al dente. Reserve ¼ cup (60 ml) of pasta cooking water just before you drain it.
    4. While the pasta is cooking, heat up olive oil in a large frying pan. Add diced garlic and sautee on low heat until softened and fragrant, stirring frequently.
    5. Once garlic is ready, stir in vegan cream, thyme leaves, nutritional yeast, lemon zest, lemon juice and a small splash (2 tbsp to start with) of pasta cooking water if needed. Season and allow the sauce to bubble for a few seconds.
    6. Toss cooked pasta and broccoli in the creamy sauce, allow to heat up for a few seconds before diving between bowls. Top with vegan chick’n, pan-grits and some toasted breadcrumbs and fine chilli flakes if using.

    NOTES

    *’CHICK’N’ – I used What the Cluck by The Vegetarian Butcher, but feel free to use any brand you enjoy. I also often make this with 200 g / 7 oz smoked TOFU instead – see FAQ section for details.

    *VEGAN CREAM – there are a lot of good vegan creams on the market, based on oats, soy and almond – to name just a few. I used Oatly single cream. If shop-bought cream isn’t available, create your own by blitzing 130 g / 1 cup of raw cashews (or hulled sunflower seeds for nut-free option) with 180 ml (¾ cup) of water and use that instead.

    Credit: Source link

  • Qigong For Beginners: How an Ancient Chinese Practice Can Improve Your Health

    Qigong For Beginners: How an Ancient Chinese Practice Can Improve Your Health

    Curious about cultivating a mindfulness practice that isn’t quite as rigorous as yoga? Qigong (pronounced “chee-gong”) may be the modality for you. This ancient Chinese art combines intentional breath, gentle movement, and meditation to focus the mind, promote relaxation, and improve mobility.

    While qigong’s origins are deeply rooted in traditional Chinese medicine—which also encompasses acupuncture and herbal remedies for ailments—its popularity has grown far outside the medical field. Today, qigong is practiced by people of all backgrounds around the world and is particularly popular among elderly populations due to its reputation for improving balance, mobility, and mood.

    The Spring 2023 Issue
    is here!

    Our gorgeous “bookazine” features expert tips, inspiration, and 70 fresh and delicious recipes for Spring.

    This guide to qigong for beginner’s gives you a thorough look at what it’s like to practice qigong, an overview of its philosophical and spiritual underpinnings, and a science-backed examination of how it can boost your health.

    Table of Contents:

    What Are the Origins of Qigong?

    The primary intent of a qigong practice is quite literally expressed in the two Chinese characters that make up the word: “Qi” translates to “lifeforce energy,” while “gong” means “to skillfully cultivate.” Together, qigong is the practice of cultivating and honing your lifeforce energy. If you’re a yoga practitioner, qi is similar to the concept of prana, which is seen as the spiritual energetic current that flows through all things. Both traditions use specific breathing and movement techniques to encourage a strong “flow” of energy to support a healthy body, mind, and heart.

    Qigong originated in China around 2146 B.C. and was heavily influenced by Daoist philosophy, particularly the concept that harmony with nature is of the utmost importance. The first physical manifestation of qigong began as a series of exercises that imitated the movements of animals. These exercises connected people to their environment, honored the natural world, and helped ease an aching body after a long day of work.

    “Nature influences and informs a lot of the qigong practices,” explains Martha Blane, a Zhineng qigong teacher at Qigong For Life, who’s studied the practice for 20 years. “In one exercise you may be moving like a bird, so your focus will be completely enveloped in embodying this image of the bird’s wings and feeling that lightness in your body.”

    Qigong later incorporated an understanding of the body’s energy meridians used in acupuncture to help stimulate certain organs or release stagnant energy that was believed to cause sickness. As qigong evolved over the centuries, it underwent hundreds of different iterations that have led to the many different styles practiced today. While nuances abound in qigong, most practices fall into one of three categories: medical qigong (which focuses on improving your overall health and removing disease, typically only done by a medical professional ), martial qigong (which focuses on developing strength and agility, such as tai chi), and spiritual qigong (which focuses on cultivating inner awareness).

    Traditional Chinese medicine holds that a person is most healthy when their qi, or lifeforce energy, is abundant and flowing. Qi can be impaired by unhealthy foods, emotional distress, a bad home or work environment, or overworking/underworking the body. The combination of intentional breathing, movement, and mediation in qigong is meant to restore homeostasis to your qi.

    “As you practice more and more you end up living in a qigong state, which is the state of feeling connected, centered, and grounded,” says Blane. “It’s like you’re floating down the middle of a river, not being drawn to one side or the other. Your emotions stay more balanced and harmonized.”

    What Are the Main Components of a Qigong Practice?

    Blane explains that there are four main elements that function as the building blocks of most qigong practices. Together, they allow the body and mind to drop into the present moment and cultivate a more compassionate, connected, and conscious relationship with the self.

    1. Intention

    To reap the full benefits of qigong, it’s important to clear the mind of distractions before you start moving and breathing. It’s normal for the mind to stray throughout your practice, but continually and gently bringing your focus back to the sensations in your body and quality of your energy will turn each session into a moving meditation.

    1. Breath

    Deep, diaphragmatic breaths are a crucial component of all qigong exercises. Many exercises encourage a pattern of slow inhales through the nose and elongated exhales through the mouth. This breath pattern helps activate the parasympathetic nervous system, which calms the mind and relaxes the body. Actively engaging your breath is believed to help circulate qi through the energetic meridians of your body and help open up blockages or stagnation that are preventing balance.

    1. Dantian (energy centers)

    In qigong philosophy, the body holds three primary energy centers called dantian. They are believed to hold concentrated amounts of qi, which can be honed and strengthened by bringing sustained attention, movement, and breath to each energy center.

    • The lower dantian is located below the belly button and is said to hold jing, a type of qi that is believed to be a person’s genetic essence, the energy source from which our bodies grow and develop from the time of conception.
    • The middle dantian is located in the center of the chest and is considered the home of qi, which nourishes and supports the organs through all the things we consume, such as food and media.
    • The upper dantian is related to the third eye and corresponds to a universal spiritual energy called shen, which is said to help us think clearly, make wise decisions, and act justly.Many qigong practices focus on cultivating strength in all three energy centers, starting from the bottom and moving upward, to create a healthy flow of energy from the bottom up.

    Many qigong practices focus on cultivating strength in all three energy centers, starting from the bottom and moving upward, to create a healthy flow of energy from the bottom up.

    1. Movement

    Qigong can be both a singular exercise and a connected pattern of movements. If you only have five minutes in the morning, you can repeat a single technique several times and still feel the benefits. If you take a full class, you’ll learn many different movements that are often purposely interlinked to encourage a specific physical or energetic benefit.

    While this might sound complicated, all these foundational concepts are intended to move you toward one goal: a state of greater calm and clarity. “The main two concepts I teach are ‘relax’ and ‘expand your mind,’” says Blane. “We work on relaxing the body, heart, and mind to let go of all the chatter. We don’t aim for an empty mind but instead a state of being where you can just watch your thoughts without becoming them. As you relax, then you can expand your awareness outward and see things clearly. That’s the qigong state—being simultaneously relaxed and expansive.”

    Qigong vs.Tai Chi: What Is the Difference?

    Qigong is the precursor to tai chi and can be seen as the great-grandmother of all other practices that work with cultivating qi, or lifeforce energy. Tai chi is included under the larger umbrella of qigong because it mixes traditional energy control techniques with martial arts. More recently, tai chi has evolved to be less about defensive skills and more of a fluid movement practice that develops flexibility, balance, stamina, and control in the pursuit of better health. Qigong is often more static than tai chi in the sense that the exercises don’t necessarily flow into a sequence of repetitive movements. But the largest difference lies in the original purpose: While tai chi is traditionally structured as a protective martial art, qigong does not emphasize combat.

    Is Qigong Safe to Practice?

    Qigong is a very gentle exercise that is safe to practice and has very few contraindications. However, people who have trouble balancing or are at risk of falling may want to practice a seated version of the exercises, since a moderate level of coordination and muscle engagement are required to move through the postures. As always, you should consult your doctor before starting any new exercise routine.

    “There is only one type of person who should not do qigong,” says Blane. “And that’s a person who isn’t open to the experience. If they’re going to walk into class with a critical mind, they shouldn’t be there. It won’t do any harm of course, but they likely won’t see the benefits.”

    What Are the Health Benefits of Qigong?

    Since its inception more than two millennia ago, practitioners have credited qigong with aiding many different physical and mental ailments, but only recently has modern science looked at the claims. While there is still more research to be done, a significant number of peer-reviewed studies show positive health outcomes among people who regularly practice it. Let’s take a look at some of the most common health conditions it’s been shown to improve.

    Stress, Anxiety, and Depression

    Several research reviews, including a 2021 meta-analysis of the psychological impact of qigong on adolescents, have found correlations between a regular qigong practice and improved mental health, although researchers emphasize the need for larger and more methodologically rigorous studies. A review of 15 studies from 2013 concluded that depression and overall quality of life were the two strongest areas of improvement, and a 2011 randomized controlled trial found qigong to be comparable with cognitive behavioral therapy for reducing symptoms of clinical depression. Additionally, a 2020 study found patients with a history of drug abuse reported a significant decrease in anxiety symptoms after engaging in a qigong practice, and it was found to be as effective as their standard treatment for depression.

    Sleep

    In a 2016 randomized controlled trial, qigong improved sleep duration, sleep efficiency, and mental health among a group of cognitively impaired older adults who struggled with insomnia. The experimental group participated in two months of regular qigong classes, and researchers found that the positive impacts on sleep persisted even four months after participants stopped practicing qigong. A 2018 study found that Baduanjin qigong (one of the most common branches of qigong) relieved musculoskeletal pain in adults with chronic illness, which in turn lessened their insomnia symptoms.

    Parkinson’s Disease

    A 2020 meta-analysis found that a consistent qigong practice significantly improved the motor symptoms, walking ability, and balance of people with Parkinson’s when compared with a control group of Parkinson’s patients who did not partake in qigong. A study from 2022 found that qigong helped increase the range of motion in patients’ lower limbs and may be indicated as a non-pharmacological intervention for Parkinson’s.

    Pain Relief

    A 2018 study found qigong to be effective for relieving chronic neck pain, although not necessarily more effective than traditional exercise therapies. The researchers noted that the low cost and relative ease of practicing qigong at home make it a good option for those managing chronic pain. A 2020 analysis reported that qigong offered significant improvements in pain, stiffness, and physical function for patients dealing with knee osteoarthritis, although the study authors noted that further research is needed to fully assess the impact.

    Balance and Coordination

    A 2020 study monitored a 12-week qigong class for a group of nearly 100 older adults and saw significant improvement in their balance and gait at the conclusion of the course, especially among participants in their 60s and 70s.

    Cardiovascular Health

    A 2020 analysis of several randomized control trials of patients managing chronic heart failure found that tai chi and qigong practices provided superior improvements in recovery and rehabilitation compared with patients who only practiced general exercise. Researchers concluded that qigong is a promising supplemental therapy to improve heart health.

    Hypertension

    A 2021 review looked at data from more than 350 patients and discovered that their blood pressure reduced significantly after a qigong practice compared with a control group that did not engage in qigong. Another 2021 study showed that compared with no exercise, qigong had significant positive effects on both systolic and diastolic blood pressure, and the researchers posited that it would have an even greater effect if the practice was kept up for longer periods of time.

    Immune System

    Qigong helps reduce psychological and physical stress, which in turn reduces strain on the immune system. A 2020 meta-analysis found that practicing qigong had beneficial physiological effects on the immune system by reducing inflammation and stimulating immune cell responses.

    What Is It Like to Practice Qigong?

    The concept of strengthening your lifeforce energy can easily sound abstract, so I took two virtual classes with Blane to feel it in my own body. While I’d never tried qigong before, I’m a yoga teacher and was able to pick up on the similarities (and differences) between the two practices. Here’s what it was like to practice qigong as a total beginner.

    Class 1: Breath As Medicine

    Blane’s first class emphasized qigong breathing techniques, much like pranayama exercises you might explore in a yoga class. Before focusing on our breath we warmed up the body and started moving our qi by lightly tapping up and down our limbs, twisting our torsos side-to-side, and moving our arms in a circular motion that felt like choreography from a kung fu movie. After this gentle awakening of the physical body, we sat down to focus on different breathing techniques. One involved alternate-nostril breathing to promote calm, while another included short and sharp bursts of inhales and exhales to increase our alertness. In between each breathwork round I was instructed to massage my head with sweeping motions that started at my eyebrows and moved up and over my scalp. (This looked like when a cat or a rabbit cleans its head with its paws.)

    Breathing deeply from my diaphragm for nearly 40 minutes was incredibly calming, and my prior knowledge of yogic pranayama practices helped me stay focused. My mind and body felt clear and mellow after class, and my brain, which can often be full of racing thoughts, was much calmer for a few hours after the practice.

    Class 2: Finding Balance

    The second class was much more movement-based and focused on the theme of balance. Blane guided us through a seated opening meditation that left my entire body feeling pliable and wiggly. It was mid-February, and Blane spoke to us about the changing of the seasons from winter to spring. She talked about how the continual cycles of nature teach us to cultivate the balance and flexibility to flow from one chapter of life to the next.

    After grounding into our bodies with a meditation, we stood up to open the energy meridians in our bodies by tapping on different acupressure points. This left me feeling energized and alert, and I could feel a tingling sensation beneath my skin that is similar to how I feel after a few sun salutations in a yoga class. We then moved onto more circular, flowing exercises that closely linked breath to movement. One exercise, called Crane Neck, helped relieve tension in the neck and shoulders that can often build up from working a desk job. Two other exercises engaged our sense of balance by challenging us to stand on one leg as we circled the floating ankle or by transferring our weight onto our tiptoes while our arms moved in choreographed patterns.

    Class ended with a standing meditation that involved holding static upright postures for a minute or so each. We then bowed to each other, and the practice was over. I felt ready to jump into a full day of work as soon as it was done. The tightness that can often creep into my body after a night of restless sleep was much alleviated, and any brain fog I woke up with was nonexistent. While I didn’t feel as physically stretched out as I do after a yoga class, I knew the goal was to enliven my energy more so than to move my muscles, and Blane’s class delivered exactly that.

    How Do I Start a Qigong Practice?

    Curious to give qigong a try but not ready to invest in a class? Follow along with bite-sized routines through YouTube videos. We’ve curated a few of our favorite videos that demonstrate qigong for beginners to get you on the right track:

    1. How to Feel Great In 10 Minutes – Beginner Qigong Routine

    1. 7 Minute Qigong Routine – Easy Beginner Practice to Invigorate the Qi

    1. 3 Best Qi Gong Exercises for Beginners

    If you decide this is a practice you enjoy, the next step is finding a teacher you can consistently practice with and learn from, so start by Googling qigong classes near you. Daoist temples or organizations often host free or cheap classes, and there are plenty of teachers who provide virtual offerings so you can learn in the comfort of your own home. Be sure to always check a teacher’s credentials to see where they studied, who has influenced their practice, and what style of qigong they specialize in. The only thing left to do then is maintain a steady practice, and observe how qigong changes your life!

    Credit: Source link

  • Vegan Cajun Dirty Rice

    Vegan Cajun Dirty Rice

    This vegan Cajun Dirty Rice is an easy one-pot dish that can be enjoyed as a main or side and can be made days in advance. Gluten-free Nutfree Recipe soyfree option

    a plate of vegan cajun dirty rice with a golden fork on the side

    Here’s a super easy one-pot rice dish with amazing flavor payoff! This delicious Cajun Dirty Rice is bursting with flavor thanks to fried veggie crumbles and a delcious Cajun spice blend.

    This is the type of dish that you can have as a main or as a side dish.

    a frying pan with Cajun dirty rice topped with chopped cilantro

    What is Dirty Rice?

    Dirty rice is generally cooked with meat. As a result, the rice looks “dirty” as the fried meat adds some darkness.

    Here we cook everything in one pot and we start by sauteeing the veggie crumbles, which are our vegan substitute for meat.

    a plate of vegan cajun dirty rice sprinkled with chopped cilantro

    More rice dishes:

    Baked Mushroom Rice

    Tex Mex Rice Casserole

    Baked Kitchari Casserole (Spiced Lentil Rice Casserole)

     Baked Chana Pulao: Spiced Chickpea Rice Casserole

    Print Recipe

    1 Pan Cajun Dirty Rice

    This vegan Cajun Dirty Rice is an easy one-pot dish that can be enjoyed as a main or side and can be made days in advance.  Gluten-free Nutfree recipe. Soyfree option

    Prep Time15 mins

    Cook Time30 mins

    Total Time45 mins

    Course: Main Course

    Cuisine: American

    Keyword: cajun rice, vegan cajun rice

    Servings: 4

    Calories: 245kcal

    Author: Vegan Richa

    Ingredients

    • 2 teaspoons oil
    • 1-1.5 cups (80 g) veggie crumbles , crumbles veggie burger, TVP, or crumbled veggie sausage, 7 oz
    • 3/4 cup chopped onion
    • 1 bell pepper chopped (or 1 cup chopped mix of colored pepper red green orange )
    • 3/4 cup chopped celery
    • 1 cup (185 g) white rice, I use basmati
    • 2 teaspoons paprika
    • 1/2 teaspoon thyme
    • 1/2 teaspoon oregano
    • 1 teaspoon garlic powder
    • 1/4 teaspoon onion powder
    • 1 tablespoon or more cajun seasoning
    • 1/2 teaspoon salt
    • 1/2 teaspoon black pepper
    • 2 bay leaves
    • 2 cups (500 ml) water or broth
    • Parsley and lime juice for garnish

    Instructions

    • Heat a large skillet over medium heat and add the oil and the veggie crumbles / crumbled veggie sausage and cook for 3-5 minutes or until golden on some of the edges.

    • Then add the onion, bell pepper, celery, and a good pinch of salt and stir. Continue to cook for another 3-5 minutes. Then add in the rice and mix in. Cook for another 2-3 minutes to toast the rice nicely.

    • Add in all the spices and salt and mix in. Add the water or broth and the bay leaves if using and mix in. Cover the skillet with the lid, reduce the heat to medium-low and cook for 13-17 minutes, depending on your stove and the thickness and depth of your skillet.

    • Once all the water is absorbed, check if the rice is cooked to your preference, if not close the lid again and continue to cook for a few more minutes.

    • As soon as the rice is cooked, switch off the heat. Let the rice sit for 2 minutes and open the lid. Fluff the rice really well and serve topped with parsley and lime juice. Serve the rice as it is or top it with some cajun-rubbed crispy baked tofu.

    Notes

    Store: refrigerate in a closed container for upto 3 days.
    • Soyfree: Use lentils instead of veggie crumbles. Add the cooked lentils in the first step and cook for 3-5 minutes. Add 1/4 teaspoon of fennel seeds, 1/4 teaspoon of onion powder, and 1/4 teaspoon of smoked paprika alongside the lentils.

    Nutrition

    Nutrition Facts

    1 Pan Cajun Dirty Rice

    Amount Per Serving

    Calories 245 Calories from Fat 36

    % Daily Value*

    Fat 4g6%

    Saturated Fat 0.4g3%

    Sodium 405mg18%

    Potassium 289mg8%

    Carbohydrates 45g15%

    Fiber 4g17%

    Sugar 3g3%

    Protein 8g16%

    Vitamin A 1530IU31%

    Vitamin C 41mg50%

    Calcium 43mg4%

    Iron 2mg11%

    * Percent Daily Values are based on a 2000 calorie diet.

    a plate of cajun dirty rice topped with cilantro

    Ingredients:

    • I made this dish with storebought veggie crumbles, but you could also use TVP, or crumbled veggie sausage
    • fresh veggies: add chopped onion, bell pepper, and celery
    • white rice, I like to use basmati rice for this recipe
    • for seasoning this dish, I like a blend of paprika, thyme, oregano, garlic powder, onion powder, cajun seasoning, salt, black pepper, bay leaves

    Tips:

    • Soyfree: Use lentils instead of veggie crumbles. Add the cooked lentils in the first step and cook for 3-5 minutes. Add 1/4 teaspoon of fennel seeds, 1/4 teaspoon of onion powder, and 1/4 teaspoon of smoked paprika alongside the lentils.
    • You can serve this topped with Cajun-rubbed crispy baked tofu.


    How to make Vegan Cajun Dirty Rice:

    veggie crumbles being fried in a sauteeing pan

    Heat a large skillet over medium heat and add the oil and the veggies crumbles / crumbled veggie sausage. Mix and cook for 3-5 minutes until golden on some of the edges.

    veggie crumbles being sauteed in a frying pan with a wooden spoon

    Then add the onion, bell pepper, celery, and a good pinch of salt and stir. Continue to cook for another 3-5 minutes.

    chopped veggies being added to a frying pan with veggie crumbles

    Then add in the rice and mix in. Cook for another 2-3 minutes to toast the rice nicely.

    a frying pan with Cajun Dirty Rice with a wooden spoon

    Add in all the spices and salt and mix in. Add the water or broth and the bay leaves if using and mix in.

    Cover the skillet with the lid, reduce the heat to medium-low, and cook for 13-17 minutes, depending on your stove and the thickness and depth of your skillet.

    a frying pan with veggies and rice with a wooden spoon on the side

    Once all the water is absorbed, check if the rice is cooked to your preference, if not close the lid again and continue to cook for a few more minutes.

    a sauteeing pan with veggies veggie crumbles and added broth on a stovetop

    As soon as the rice is cooked, switch off the heat. Let the rice sit for 2 minutes and open the lid. Fluff the rice really well and serve topped with parsley and lime juice.

    Serve the rice as it is or top it with some cajun-rubbed crispy baked tofu.

    a pan with vegan cajun rice topped with cilantro

    Storage:

    Refrigerate this dish in a closed container for up to 3 days. You can freeze leftover rice in an airtight container or freezer bag for up to 3 months.

    Reheating:

    For reheating, pop the rice in the microwave and cover it loosely with a lid  in a microwave-safe container.  Microwave for 2-3 minutes. Then remove the bowl and break up the rice chunks with a fork. Return everything to the microwave for 1-2 minutes or more.

    side view of a plate with vegan dirty Cajun rice topped with chopped cilantro leaves

    overhead shot of a plate with vegan dirty rice topped with chopped cilantro leaves


    .

    Credit: Source link