Author: [email protected]

  • Vegan kanelbullar – Swedish cinnamon buns

    Vegan kanelbullar – Swedish cinnamon buns

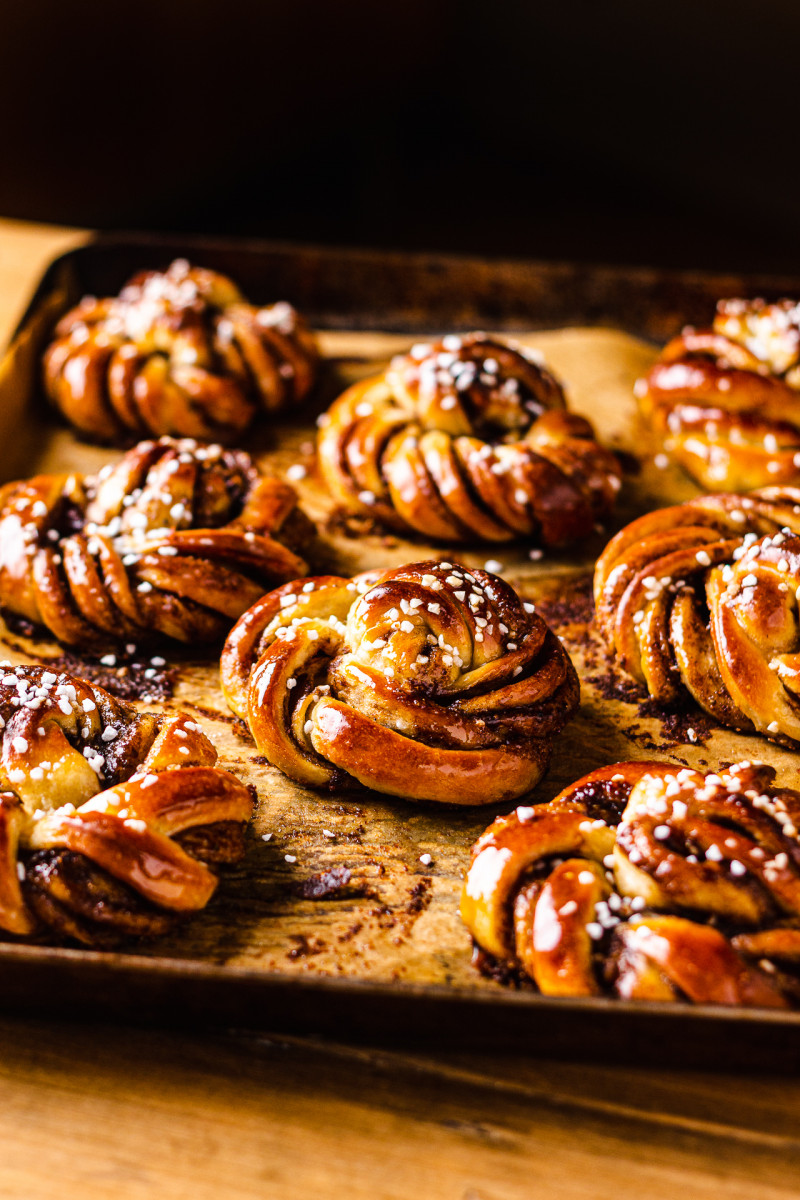
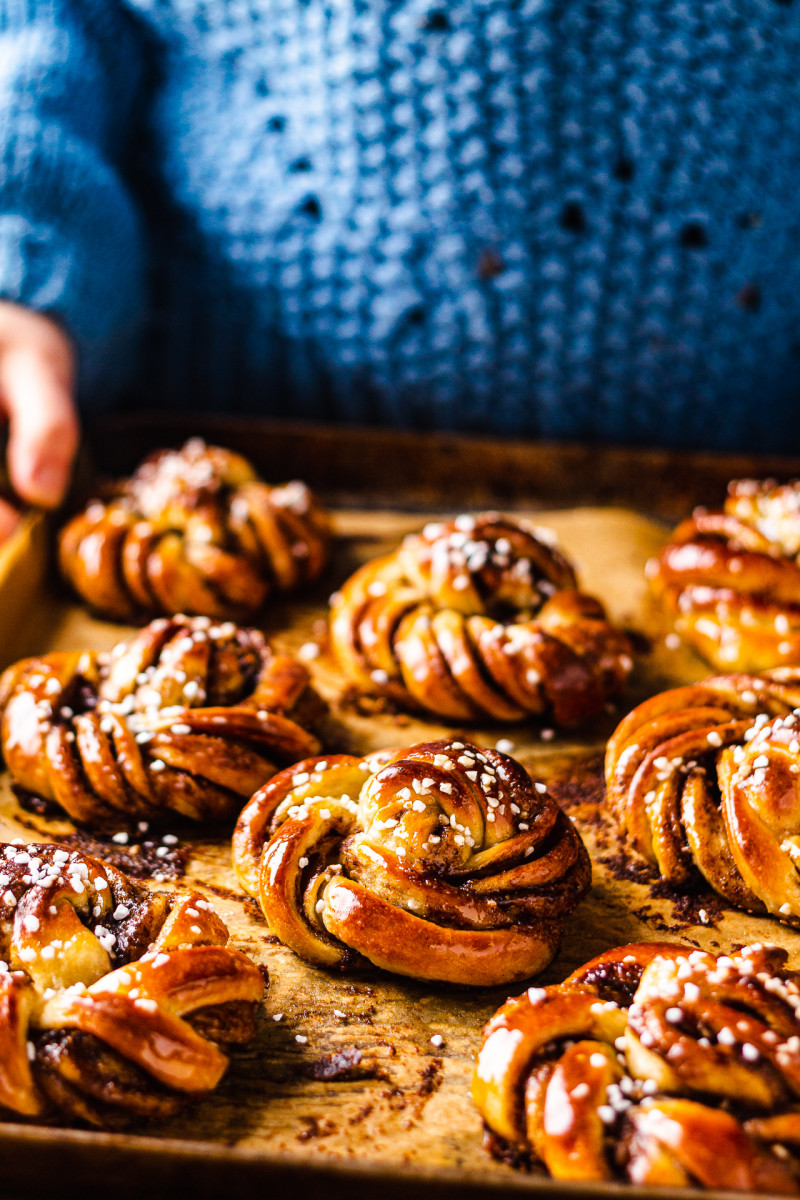
    vegan kanelbullar tray

    We’ve recently come back from a short trip to Stockholm and I promised myself to make their famous cinnamon buns at home, I loved them so much. I mean it’s hard not to, unless you don’t like cinnamon or cardamom, which even the cinnamon buns are heavily laced with. I love them both so I was in heaven. I wasn’t too worried about making the dough as they are made out of enriched dough – something I’ve had experience with before, but the folding part looked tricky – spoiler alert: it’s really not.

    I set to work and probably about 10-12 tray of buns later I am ready to share the recipe. I started off loving them but now I really need a break from cinnamon baked goods for a while. Even my poor neighbours who initially welcomed them with open arms, started dreading me making another batch, I am pretty sure.

    Initially, I spend all my energy on learning about all the different ways to fold them and obsessing over which one I like best. Then, as I was ready to make them for the blog something went wrong with my dough and I could not figure out what it was. I did everything the same way I thought…except that I switched from making them by hand to using a food processor because I was tired.

    I don’t own a standing mixer yet, but I finally bought a new food processor, which is supposedly quite good at dough kneading. Since I was tired of making these buns by hand, I decided to rope it in and here is where my trouble started. It took me a few tries and a lot of Googling to find out where I’ve gone wrong. Food processor is okay when making simple – flour, yeast, water – kind of dough, but it turns out that it’s not that great at handling heavily enriched dough like this one. This dough has 20% fat added to it and it takes a lot of time for that fat to get incorporated into the dough, which produces lots of friction and therefore heat.

    By the time my dough was silky smooth, it was nearly 40° C / 104° F whereas it should be about 25-26° C / 77-79° F (I found this video very helpful). High dough temperature causes it to ferment really quickly, which meant that by the time I was shaping the buns the dough was tearing due to the fact that it was already overfermented. Now that I look back it all seems so easy, but I was really stumped about the whole thing. I then made another attempt by chilling my flour in the freezer, using fridge-cold plant milk and cold butter flattened into thin shards with a rolling pin and it worked a treat. If you own a standing mixer, which is more of a specialist dough making machine, I am sure that you won’t have as much of a problem with your dough getting too hot, but I would still suggest using cold ingredients and chilling your dough hook and metal bowl ahead of starting as it takes a long time for all that butter to be absorbed by the flour.

    If you are up for making them by hand, that’s totally doable – especially a small batch like this. I invite you to really immerse yourself in the process – make it your mindfulness exercise – and you’ll be rewarded with a tray of beautiful sweet treats by the end. Below, you’ll find detailed, step-by-step photos of the process to guide you through the steps and put your mind at ease when things don’t look like they are coming together – they will! First, though, let’s quickly run through the ingredients’ list to clear up any confusion.

    MORE ABOUT THE INGREDIENTS

    FLOUR: I used bread flour (also known as strong flour) to make these buns. Since the dough contains as much as 20% of fat, which hinders gluten development and softens the dough, I decided to use bread flour for its higher gluten content (bread flour tends to have between 12-16g of protein, while all purpose flour only 8-10 g). Higher gluten content helps with the rise, it produces fluffier crumb and a crispier shell. You could use all purpose flour, but you’ll probably need to spend more time kneading to develop gluten before adding fat.

    SUGAR: I used caster sugar (superfine sugar) to sweeten the dough, to make the filling and to glaze these buns. I also use light muscovado sugar (50%) for the filling to intensify its flavour. I only sweetened the dough a touch (2 tbsp) as I find that the filling an sugar glaze bring a ton of sweetness and no more sugar was needed. Before these buns go into the oven, they get a sprinkling of pearl sugar – hard sugar that does not melt easily. It makes them look pretty and adds a bit of crunch. I got mine while on holidays in Sweden as I knew I would be making these buns once I get home, but if you cannot get it where you live, simply skip it, it’s not essential. You could top them with flaked almonds, for example, if you want them to look prettier.

    YEAST: Yeast is what gives this bread rise and a lovely, fluffy texture. It is important to use the correct type of yeast and to activate it correctly. I tend to use instant yeast, which is a type of powdered yeast that can be added directly into the flour and does not require any prior activation. If you were to use what is labelled as active dry yeast or fresh, you need to activate it in a portion of the liquid allocated for this recipe first, before adding to the dry ingredients. The amount of fresh yeast is roughly double in grams so for this recipe, you would need 10 g (0.35 oz) of fresh yeast.

    VEGAN BUTTER: Kanelbullar dough is a type of enriched dough, meaning it has a relatively (you can go higher than that for sure) high percentage of fat. Traditionally these buns are made with butter so I simply used vegan butter block instead. Naturli is my favourite, but since it’s not sold locally, I’ve used Violife, which is also good. If making these by hand, use softened butter. If, however, you are making these using a machine, I suggest using cold butter flattened with a rolling pin (between two sheets of baking paper). Maintaining correct dough temperature is a challenge when making these in a food processor, for example, and using cold ingredients minimises this. Vegan butter is also used for the filling and for this application the butter should be soft.

    CINNAMON: Cinnamon is the key spice in these so make sure you use good quality cinnamon and a generous amount.

    CARDAMOM: Cardamom isn’t what you typically associate with cinnamon buns, but Swedes are obsessed with this spice and so they use it both in their cinnamon and cardamom buns, although in different amounts. I really love the combination of cinnamon and cardamom and so if you haven’t already tried adding this spice to your cinnamon buns/rolls, I strongly encourage to try. It really pays off to grind your cardamom seeds (you want to buy green cardamom pods for this) fresh – they add so much more flavour and perfume to these buns. I added cardamom to the filling, but if you love it you can also add it to the dough itself – that’s what Swedes often seem to do. I wanted a prominent taste of cinnamon with just an underscore of cardamom so I used a teaspoon of freshly ground cardamom (use more if using ground cardamom as it’s less potent) and a heaped tablespoon of cinnamon and I love the balance.
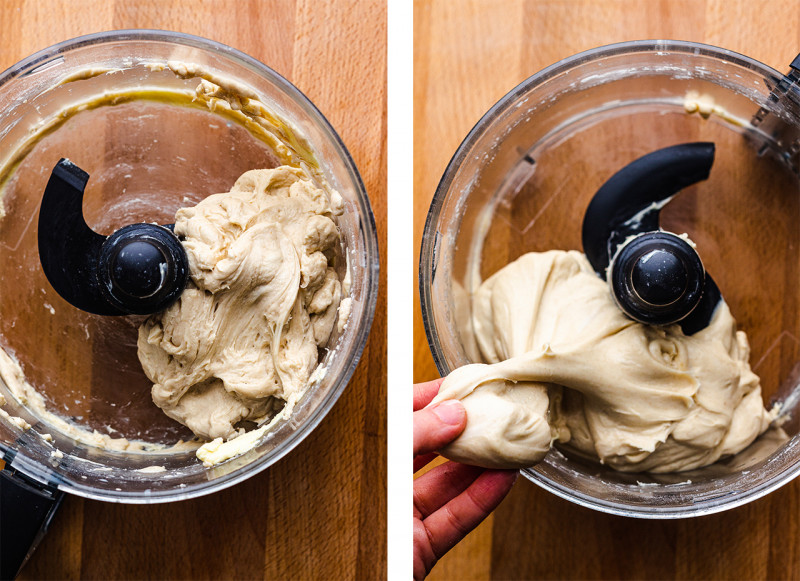
    vegan kanelbullar food processor

    I don’t have a standing mixer but I do have a food processor with a dough kneading function and that’s what I used to make this dough. I ran into some problems at first when the dough was proofing too fast – this was due to the dough getting too hot in the food processor as I later realised with the help of this video. The way to remedy this is chill all your key ingredients (flour, plant milk, butter) and a bowl/dough hook if you have a standing mixer before you start. The picture on the left is what the dough looks like after you start adding butter, the picture on the right is what the dough looks like after all of the butter has been incorporated – the dough is supple, shiny and smooth and it comes away from the bowl easily.
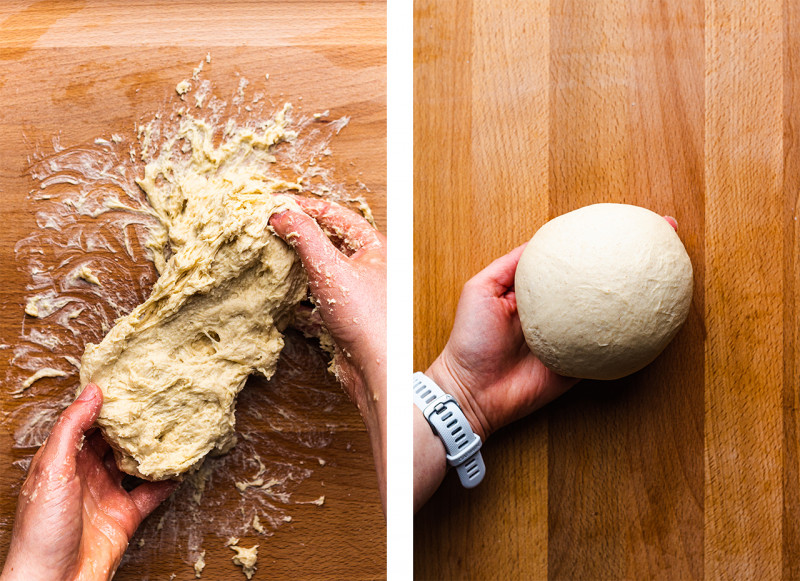
    vegan kanelbullar hand kneading

    It is perfectly possible to make this dough by hand, especially this small 6 bun batch. All you need is a clean (ideally stone) worktop and about 20 minutes of your time. Before you undertake this I wanted to make sure you know what to expect. So the first 8-10 minutes of kneading is a piece of cake – the dough is easy to handle. Once you add the butter, the dough turns into a greasy mess (see picture on the left), BUT after 10 minutes (I counted several times!!) of consistent handling (I would not quite call it kneading…), it transforms into a smooth and satiny dough ball, see the picture on the right. It is now ready for the first proof, known as bulk fermentation/rise.
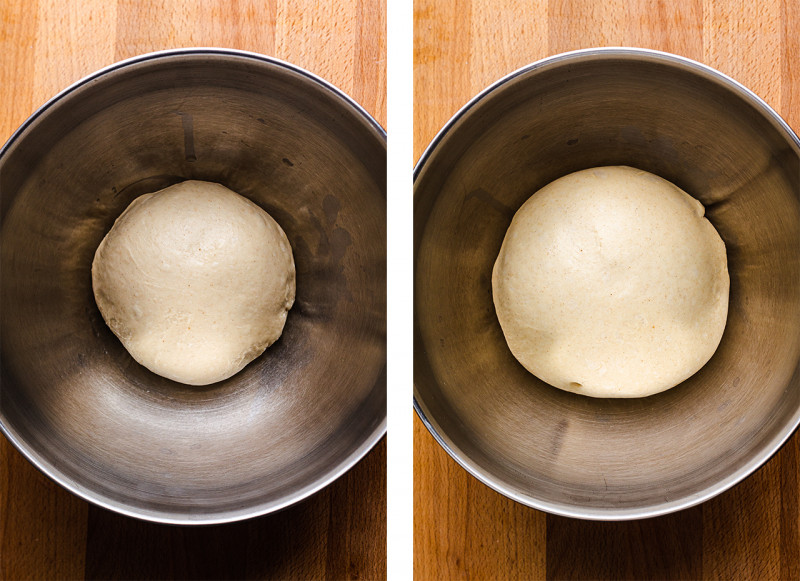
    vegan kanelbullar proofing

    Once your dough is smooth and shiny, oil it very lightly and place in a bowl covered with a kitchen towel to allow it to rise/proof (this is called bulk rise). You can either proof it at room temperature until it becomes puffy and nearly doubles in size or you can stick it in the fridge and allow it to proof slowly overnight. The latter, known as cold fermentation, means better flavour.
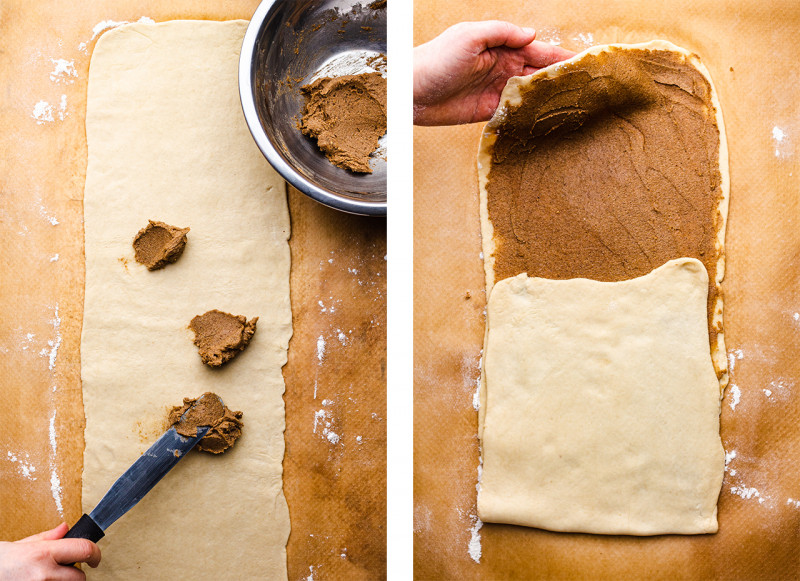
    vegan kanelbullar filing

    Once your dough has proofed, deflate it and then roll it out into a thin and very long rectangle – try using as little flour for dusting as you can get away. If your dough is tense and difficult to roll out, rest it for 10 minutes and try again. Once you roll it out, spread room temperature filling on top, go all the way to the edges. Next, triple fold the dough as in the picture on the right.
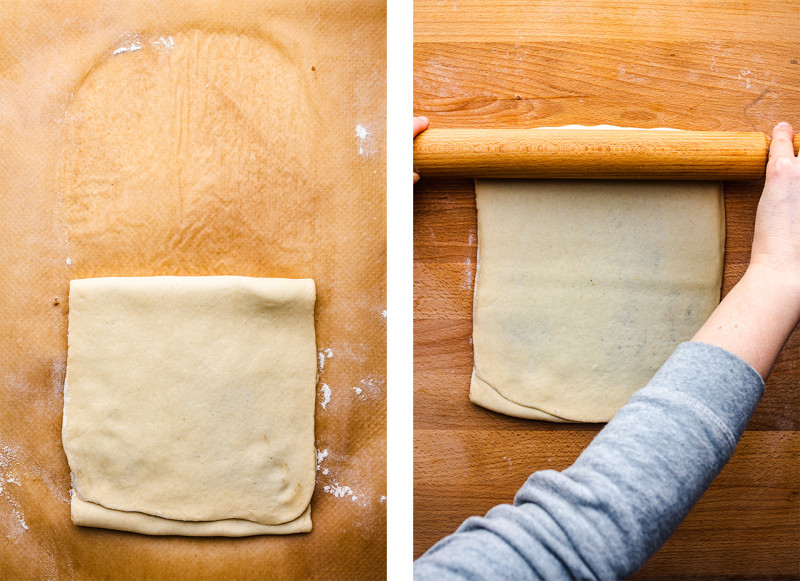
    vegan kanelbullar flattening

    Roll the dough out a little more applying very gentle, even pressure so that the resulting rectangle is about 30 cm / 12 inches in length and 18 cm / 7 inches across.
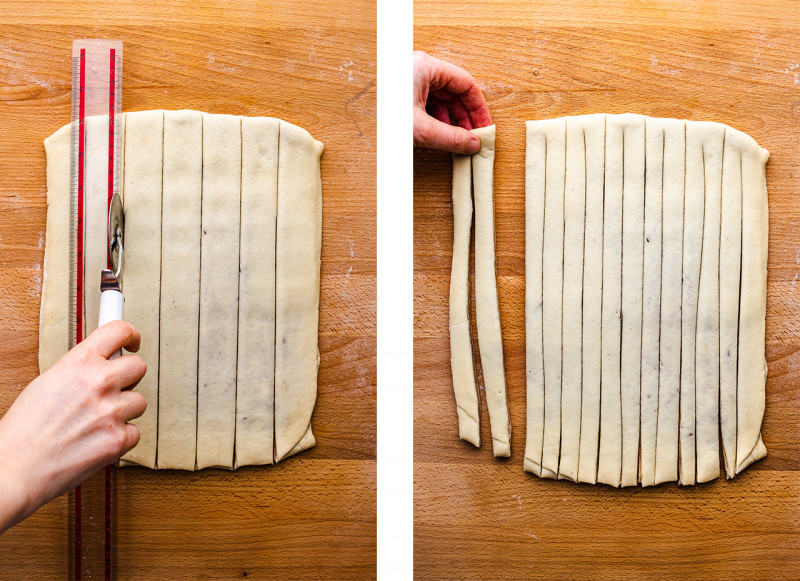
    vegan kanelbullar cutting

    Using a pizze wheel or a sharp knife and a ruler, cut the dough into 6 even strips lengthwise (each piece is 3 cm / just over 2 inches). Cut each strip in half stopping about 2.5 cm / 1 inch before you reach the end.
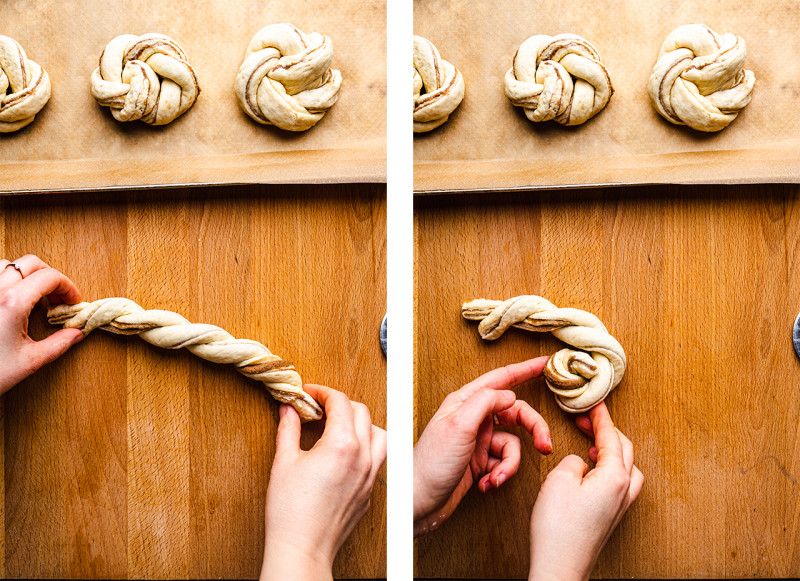
    vegan kanelbullar twirling

    To shape, hold one end in each hand and twirl the two strands around each other. Next, coil the two twirled strands into a snail shape around the joint, tuck the ends under the bun.
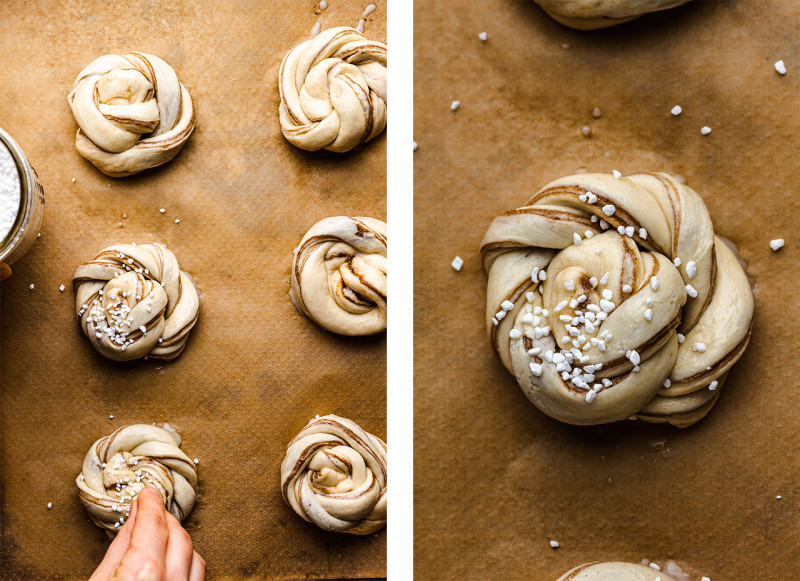
    vegan kanelbullar before baking

    Brush the buns with soy (or other plant) milk and sprinkle with pearl sugar if using. Bake in a hot oven until shades of gold and brown. Glaze in sugar syrup and let them cool before eating.
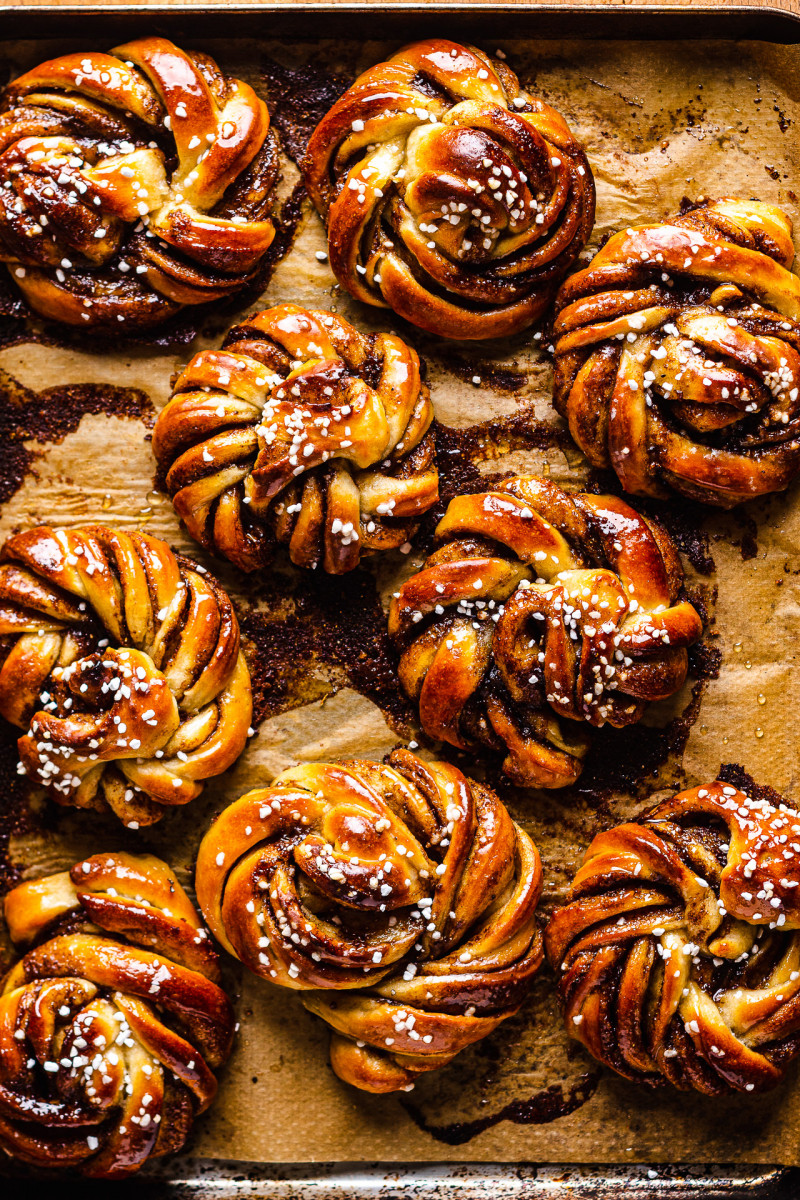
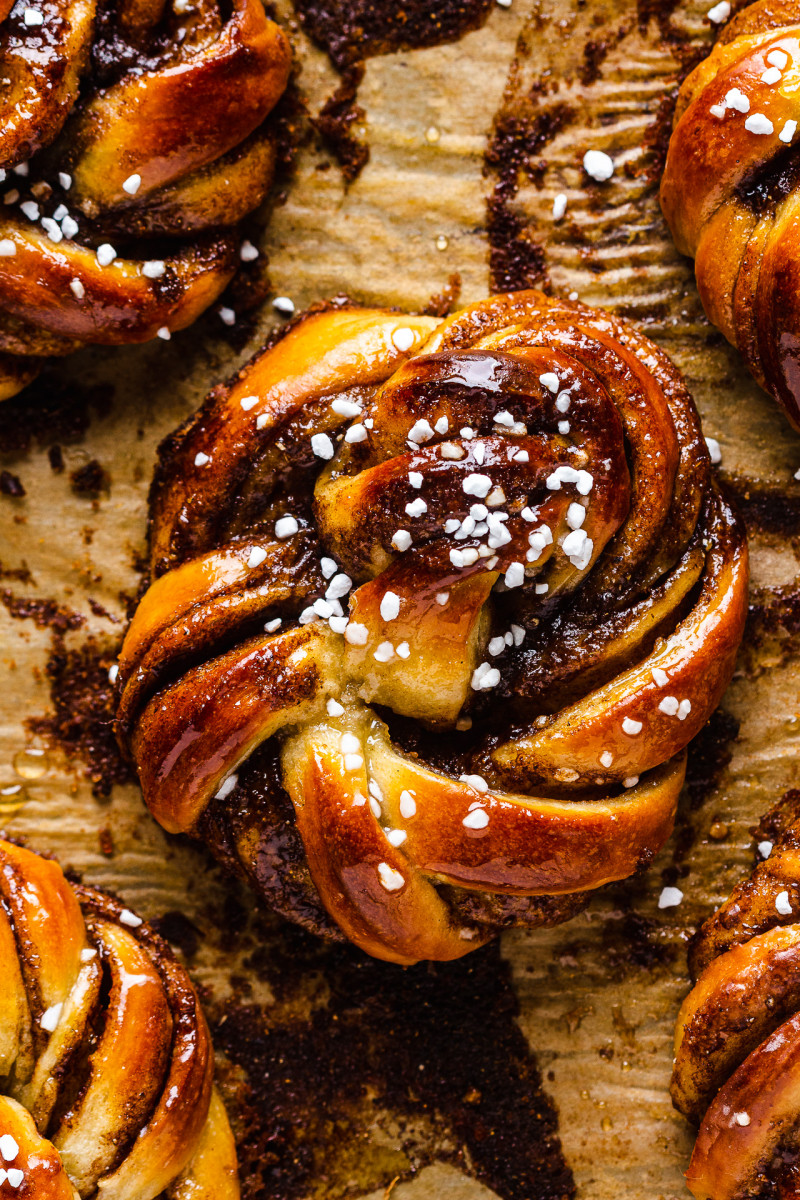
    vegan kanelbullar baked

    vegan kanelbullar close up

    vegan kanelbullar side

    • 250 g / 2 cups bread flour*
    • 2.5 g / ½ tsp fine salt
    • 25 g / 2 tbsp caster (superfine) sugar
    • 5 g / 1½ tsp instant dried yeast*
    • 160 ml / 2/3 cup cold plant milk (I used soy)
    • 50 g / ¼ cup vegan butter (I used Violife)*

    FILLING

    • 75 g / 6 tbsp vegan butter (I used Violife), at room temp.
    • 75 g / 1/3 cup sugar (I used a mixture of caster and light muscovado sugar)
    • 10 g / 1 heaped tbsp cinnamon
    • 3 g / 1 tsp cardamom (freshly ground ideally)

    GLAZE

    • 30 ml / 2 tbsp soy (or other) milk to brush
    • 25 g / 2 tbsp caster (superfine) sugar
    • 30 ml / 2 tbsp water
    • 25 g / 2 tbsp pearl sugar, (optional)

    METHOD

    1. If using a food processor or another machine (which tends to get hot), refrigerate your plant milk, chill the flour and metal bowl/dough hook in the freezer ahead of mixing the dough. Place cold butter between two sheets of baking paper, whack it with a rolling pin until flattened, refrigerate until ready to use.
    2. Place flour, salt, sugar and instant yeast in a large mixing bowl, a suitable food processor or a standing mixer.
    3. Add 160 ml (2/3 cup) of cold plant milk and mix well. If using a food processor, add milk gradually while running on the lowest speed, until the dough comes together.
    4. Knead the dough until enough gluten develops to make the dough elastic and smooth – about 8-10 minutes BY HAND or for 3-5 minutes on a medium setting if using A FOOD PROCESSOR/MIXER. If it’s not coming together, rest it for 10 minutes and try again.
    5. If kneading BY HAND, form the dough into a flat disc and pile softened butter on top of it, close the dough over the butter. If using A FOOD PROCESSOR/MIXER, add pieces of cold butter gradually while processing on the lowest speed. Occasionally, you may need to scrape the bowl and reposition the dough.
    6. If kneading BY HAND, knead the dough until all of the butter gets absorbed (about 10 minutes). If using a FOOD PROCESSOR/MIXER, about 3-5 minutes – you want the dough to be supple, smooth, satiny and only just tiny bit tacky. It should come away from the sides of the bowl cleanly.
    7. Form the dough into a ball, oil it lightly and place in a bowl, cover with cling film and let it proof until puffy and almost double in size. You can do leave it on the kitchen counter or do an overnight proof in the fridge. The time this takes depends on the internal dough temperature (if you used a machine, it’s likely to proof quicker) and the ambient temperature, between 1-3 hrs on average.
    8. Make the filling by mashing together room temperature vegan butter with sugar and spices, until the mixture is homogenous. Make sure it’s at room temperature before using.
    9. Roll the dough out until you have a long large rectangle measuring approximately 75 cm / 29.5 inches by 16 cm / 6.25 inches (if making a double-batch, 75 cm / 29.5 inches by 32 cm / 12.5 inches). Try to use as little dusting flour as possible.
    10. Using a flexible spatula or a palette knife, spread the filling on the rolled out dough going all the way to the edges.
    11. Divide the dough into 3 roughly equal pieces in your head. Fold the third of dough over the middle piece, then the remaining piece on top. You could also just fold it in half if you prefer.
    12. Gently, applying even pressure, roll out the dough so that it reaches about 18 cm / 7 inches across and 30 cm / 12 inches in length.
    13. Using a pizza cutter (or a sharp knife), divide the dough into 6 equal pieces lengthwise – 3 cm / 1.2 inches wide each. Cut each strip in half stopping about 2.5 cm / 1 inch before you reach the end.
    14. Grab each piece at both ends, tap it very gently against the counter to stretch just a little and then twirl the two strands of dough around each other. Coil twirled strands around the joint like a snail, tucking two loose ends underneath.
    15. Place the buns on a paper lined baking tray. Heat up the oven to 210° C / 410° F (190° C / 375° F with fan on).
    16. Cover the buns with a kitchen towel and allow them to proof until they look puffy and the dough springs back some of the way (not fully) after you gently poke it with your finger.
    17. Brush with soy milk and sprinkle with pearl sugar. Bake for about 12-13 minutes, or until browned.
    18. Once out of the oven, immediately glaze it with sugar syrup. Allow to cool off completely before eating. Store in an air-tight container for about 2 days.

    SUGAR GLAZE

    1. Combine sugar and water in a small pot. Place on a low heat and stir constantly until sugars dissolves completely, simmer gently for a couple of minutes. Apply to hot buns with a pastry brush.

    NOTES

    *FLOUR: you can use all purpose flour if you prefer but it contains less gluten, which means that you will need to knead it for longer for the sufficient amount of gluten to develop.

    *YEAST: make sure to use the correct type of yeast and to activate it properly (if needed). I use instant yeast, which requires no prior activation and is added directly into the flour. If using active dry yeast, you need to activate it in liquid (use portion of the liquid allocated to the recipe) BEFORE adding to the dry ingredients. Read instructions on the packet to be sure. If using active dry yeast, use 25% more by weight so 6.25 g / 0.22 oz. If using fresh yeast, use 50% more so 10 g / 0.35 oz.

    Credit: Source link

  • Does Smoking Cannabis Cause Lung Cancer?

    Does Smoking Cannabis Cause Lung Cancer?

    On a puff-by-puff basis, cannabis smoke deposits four times more tar in the lungs than tobacco, but does that translate into increased cancer risk?

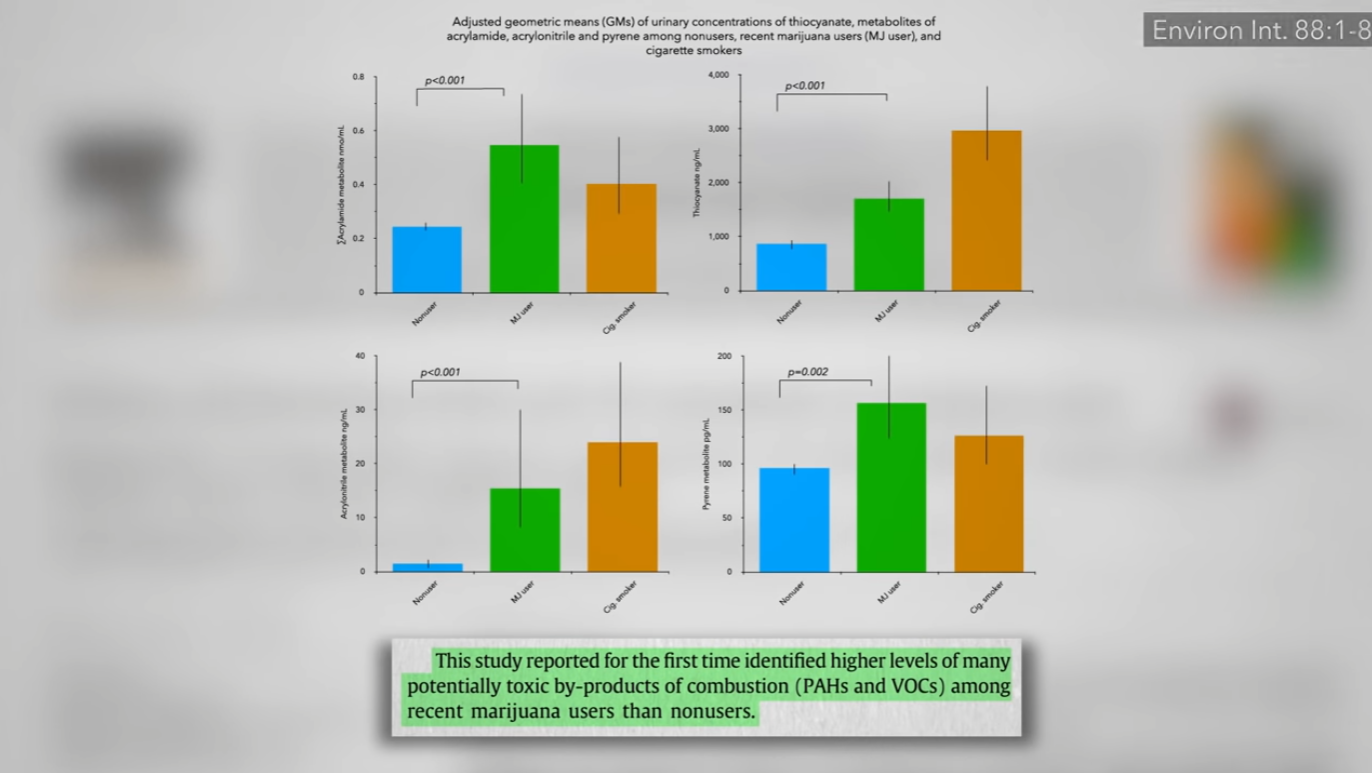
    Does Marijuana Cause Lung Cancer? As I discuss in my video, “there are at least 33 carcinogens in marijuana smoke,” including polycyclic aromatic hydrocarbons, which are products of combustion. They are found in grilled meat and flow through the bodies of those who smoke marijuana, similar to what flows through the bodies of cigarette smokers, which is really remarkable, as you can see in the graph and at 0:17 in my video. Most tobacco users typically inhale much more smoke into their lungs over the course of a day than do cannabis users, so, on a puff-by-puff basis, is marijuana smoke really that much worse? 

    Compared to unfiltered cigarette smoke, cannabis smoke does seem to contain more benzopyrene and benzanthracene, which are polycyclic aromatic hydrocarbon procarcinogens. However, cannabis users may just inhale more deeply and then hold in the smoke longer, which can end up depositing four times more tar in the lungs, “amplifying exposure of the lung to the carcinogens within the smoke.” What about bubbling the smoke through water, like in a bong? That does not appear to reduce the risks of tar buildup.

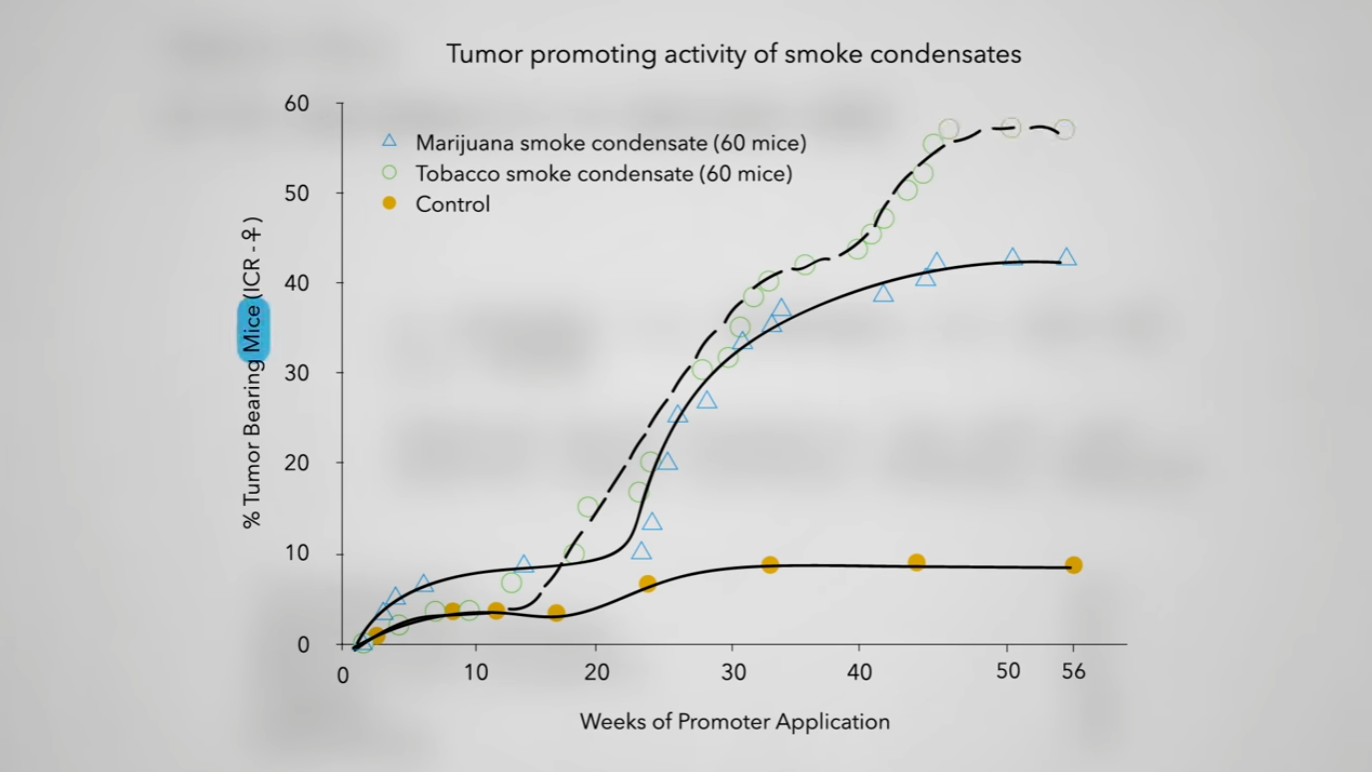
    As you can see in the graph and at 1:11 in my video, the tar in marijuana smoke may have similar tumor-promoting effects as cigarette smoke—in mice. But what about in people?

    Long-time marijuana users do have more cancers—more lung cancer, oral cancer, and voicebox cancer—but it seems that’s only because they also tend to be more likely to smoke tobacco, too. After cigarettes were taken out of the equation, no increased cancer risk was found.

    The same holds for head and neck cancer. One study found increased risk, but five studies reported no association and one study even found decreased risk. “Regular use of marijuana causes airway injury leading to symptoms of chronic bronchitis in some smokers but no…evidence of emphysema,” long-term lung damage. And, despite the carcinogenic components in marijuana smoke, there is no apparent increased risk of lung cancer either. However, “evidence is mixed regarding the risk of heavy, long-term use”—and that may be the crux.

    In terms of smoke exposure, smoking a joint every single day for ten years may only translate to six months of pack-a-day cigarette smoking. In most studies on tobacco smoke and lung cancer, six months in a lifetime might even classify you as “a never smoker.” It may take a couple of years of cigarette smoking to significantly bump up lung cancer risk, so that would be like smoking a joint every day of your adult life. It’s no wonder we can’t find a lung cancer link with casual marijuana use. There is also an alternative explanation: Maybe the anti-tumor effects of the cannabis plant counteract the tumor-promoting effects of the carcinogens in the smoke. Anti-tumor effects?

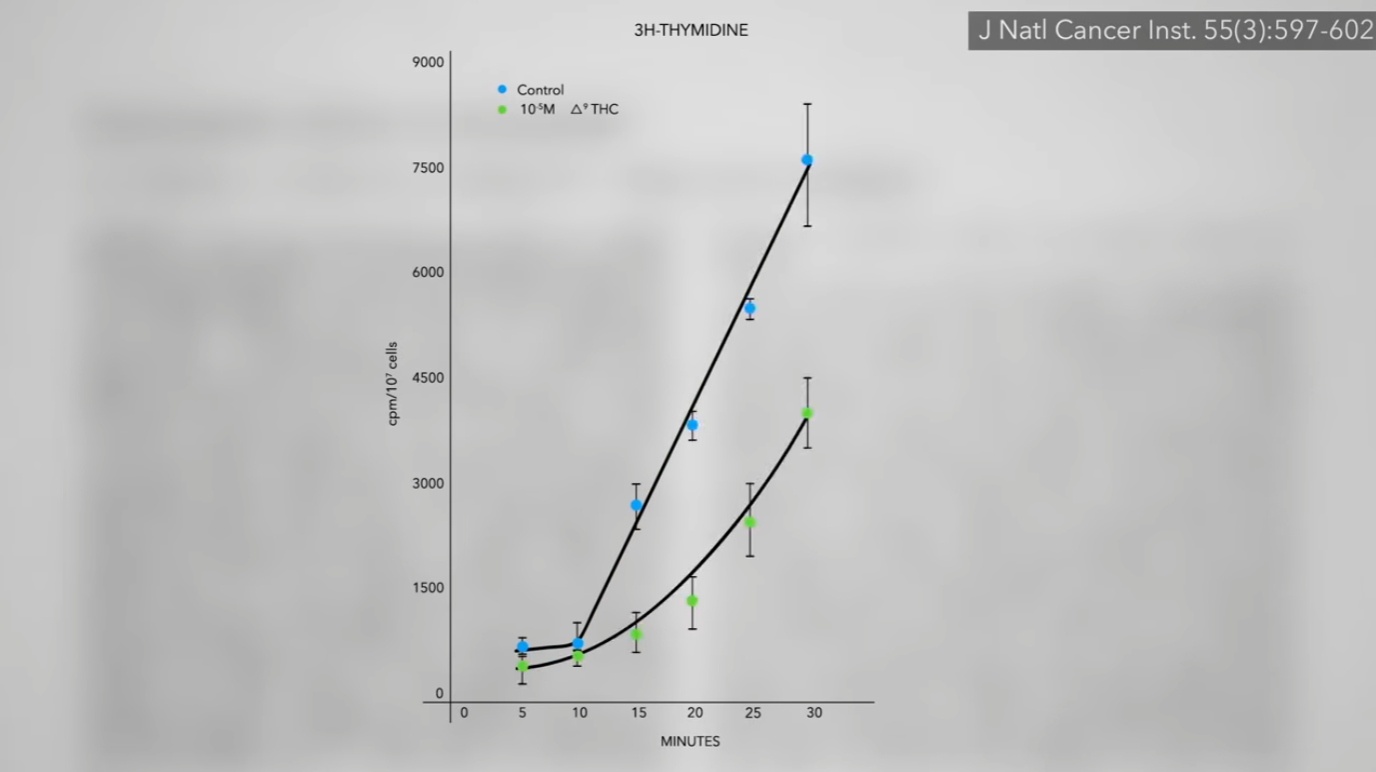
    Indeed, the original demonstration of an anticancer effect, dating back to 1975, showed that THC can suppress the growth of lung cancer cells in a petri dish, as you can see in the graph and at 3:10 in my video. These kinds of data have led to wild claims of cancer cures on the internet, “extrapolating the results of preclinical work” (such as in petri dishes and test tubes) “to humans without any basis in fact.” Reportedly, cannabis has not been studied clinically as a treatment for malignancy in people—but that isn’t entirely accurate. A pilot study was performed on terminal brain cancer patients. Find out what they found in Can Cannabis Cure Cancer?.

    Doctor’s Note:

    Check out Can Cannabis Cure Cancer?, as well as a whole treasure chest of videos on cannabis that I’ve put together. If you want to see them all now, I put them onto a digital DVD.


    Credit: Source link

  • Is Cannabis a Cancer Cure?

    Is Cannabis a Cancer Cure?

    Some studies on mice show that cannabis makes cancer better, while others show it makes cancer worse. What did the one and only human clinical trial to date find?

    “Cannabis and cancer: reality or pipe dream quackery?” I tackle that question in my video Can Cannabis Cure Cancer?. “Among alternative cancer treatments, cannabis inhabits a peculiarly politicised position, hailed as a suppressed panacea by some, denounced as a psychosis-inducing and illegal drug by others….At the far end of the spectrum are those who insist cannabis…has helped cure their cancer.” “The promise, and even the hype, can reach hysterical proportions, with claims of cannabis cancer cures circulating in cyberspace at a furious pace.”

    Sometimes, a patient will have a cancer that is curable with conventional therapies, such as surgically removing it before it spreads, but chooses to forgo that treatment in favor a purported cure that has a “large number of online testimonials.”

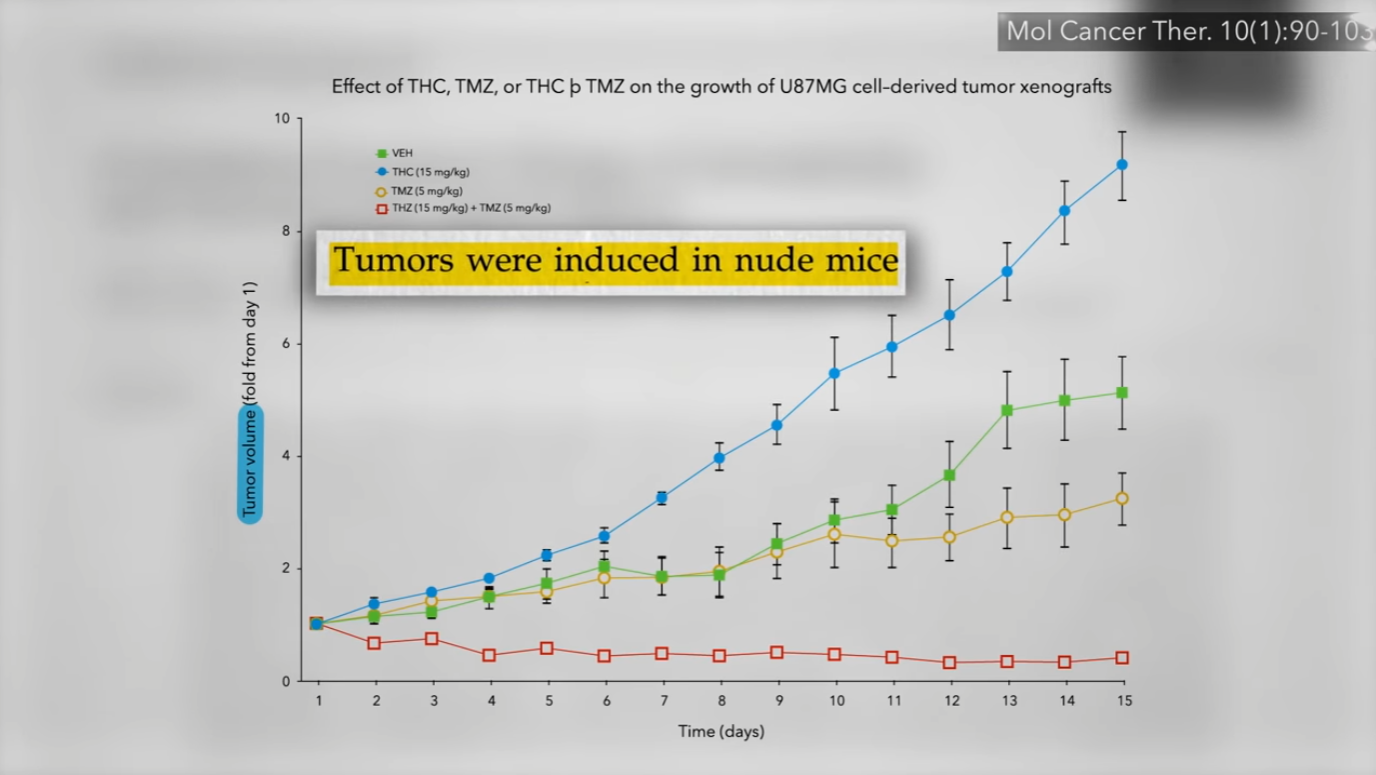
    Yes, as you can see in the graph and at 0:54 in my video, cannabis compounds like THC can reduce brain tumor volume in mice or suppress cancer cell growth in a petri dish, but “mice and rats are not people, and what is observed in vitro does not necessarily translate into human clinical medicine.” Does it hurt to just give it a try, though? Well, there is other evidence that cannabis compounds “may encourage cancer cell growth.” Indeed, research indicates that THC may inhibit antitumor immunity or induce cancer cell proliferation, as well as enhance breast cancer growth and metastasis by suppression of the antitumor immune response—at least in mouse mammary tumors. You don’t know what happens in people…until you put it to the test. But, due to legal reasons, few human studies have been done. Thankfully, “after years of deep freeze on cannabis-related research, funding, and materials, a thaw is starting.” But, where do you even start?

    Well, if cannabis compounds—cannabinoids—“are postulated to have a potential anticancer effect working through the CB1 [cannabinoid] receptors, it would follow that the brain—where the CB1 receptor is the most densely populated…receptor—would be a good place to start the investigation.”

    “One of the most devastating forms of cancer is glioblastoma,” a fast-growing type of malignant brain tumor, and that’s the first cancer that was put to the test.

    Cannabis compounds sometimes inhibit tumor growth in lab animals, but their anti-tumor effects hadn’t been tested in humans until recently. Finally, the first clinical study on cancer was conducted—a pilot study of nine patients with recurrent glioblastoma, meaning they had had their tumors cut out and then received radiation treatments, but their cancer returned and was growing. The researchers administered THC straight into their tumors. The study participants went back into surgery, had a scoop carved out of the center of their tumors. A catheter was inserted into the middle and the other end stuck out of their heads, and researchers dripped THC directly into the tumor with a syringe. THC had already been tested on biopsy specimens and showed it was able to kill off some of the cancer cells in a petri dish. What happened when it was tried on the patients themselves? The patients all died in a matter of months.

    As you can see in the graph and at 3:39 in my video, in a few subjects, it seemed THC may have worked for a few weeks, but then their tumors began growing again despite repeated treatments. The patient with the most dramatic result was a 35-year-old man. At four weeks, his tumor had shrunk dramatically, but then it came back with a vengeance and, despite more infusions, his condition worsened and then he was gone. With no control group, the effect of the treatment on overall survival is unclear.

    That was both the first clinical trial on cancer and the only clinical trial on cancer, and it was published more than a decade ago. There is some good news, though: There are more than 15 trials currently underway. The most exciting one may be a phase-two trial in Israel, once again looking at “advanced cancers that have progressed through all standard treatments.” In the meanwhile, if you are undergoing a standard treatment like chemotherapy, at least we know that cannabis may help with some of the side effects.

    Doctor’s Note:

    In case you missed it, check out my previous video, Does Marijuana Cause Lung Cancer?.


    Credit: Source link

  • What Is the Best Food for Gingivitis and Periodontal Disease?

    What Is the Best Food for Gingivitis and Periodontal Disease?

    What would happen if you stopped brushing your teeth but ate more healthfully?

     Experimentally, when study participants stop brushing their teeth, plaque starts to build up and, within a few days, their gums start to get inflamed. Though nothing may be visible just yet, if you take a biopsy at the gum line, you can see the inflammation beginning to spread. Within a few weeks, overt gingivitis becomes apparent with gums that can get red and swollen and bleed easily. If you don’t do anything about it, you can develop periodontal disease, where the inflammation creeps down into the supporting structures of the tooth—the bone and ligaments—setting you up for tooth loss.

    How did we get along for millions of years without brushing our teeth? “Dental disease is almost universal” these days, but skulls from thousands of years before the invention of the toothbrush have perfect teeth. Admittedly, that was also thousands of years before the invention of candy bars. Does food play a role? You don’t know…until you put it to the test, as I discuss in my video Best Food for Periodontal Disease and Gingivitis.

    How do you get people to stop brushing their teeth and also stop eating processed junk? Researchers designed a study where participants were forced to live under Stone Age conditions without “toothbrushes, toothpaste, dental floss, toothpicks, or other oral hygiene products” for a month, and “security guards ensured that all subjects maintained the appropriate lifestyle for Stone Age humans.” They could use a twig or other natural material to try to clean their teeth, but were pretty much on their own. (The participants didn’t get any candy bars either.) The researchers were attempting to replicate the diet from about 4000 BCE, so the subjects got a lot of whole grains with supplemental “salt, herbs, honey, milk, and meat from domestic animals (goats and hens),” and were allowed to pick berries or see what they could catch. What happened?

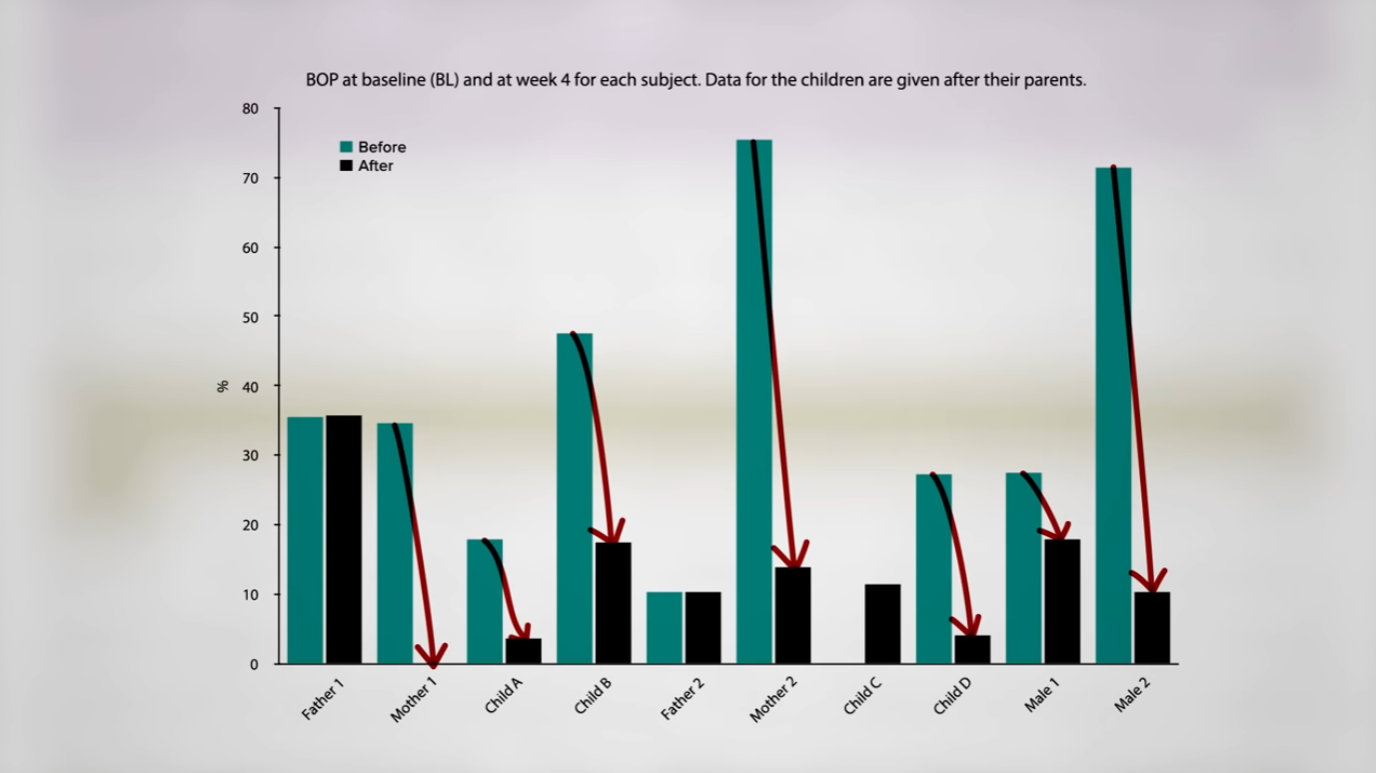
    With no oral hygiene, their plaque built up, as you can see in the graph below and at 1:53 in my video, but their gums got healthier, as measured by bleeding on probing. (Gums bleeding when poked with a dental tool is a measure of gingivitis.) In almost every case, the participants’ gum health improved. How is it possible that their gums were actually healthier despite buildup of plaque? Many of the more disease-causing bacteria seemed to have disappeared from their mouths. The researchers suggested this could be from the lack of refined sugars, but the participants were eating honey, so they weren’t on a sugar-free diet. They were, however, eating a lot of whole grains and berries rich in antioxidant phytonutrients with anti-inflammatory properties. So, maybe it was restricted sugar intake combined with the intake of really healthy foods. Thus, all of those experimental studies where people stop brushing their teeth and their gums inevitably get inflamed “may only be applicable if the subjects maintain a Western diet rich in sugar and low in anti-inflammatory foods,” such as whole plant foods.

    What about the role of nutrition in periodontal health? Gingivitis can lead to periodontitis, an inflammatory disease of the supporting tissues of the teeth, which, if left untreated, can lead to the progressive loss of the bone that holds our teeth in place. Part of the development of periodontal disease may involve oxidative stress, so not only do we need to reduce our intake of pro-inflammatory foods, such as refined carbohydrates and saturated fats, but it may also help if we seek out foods that are antioxidant-rich.

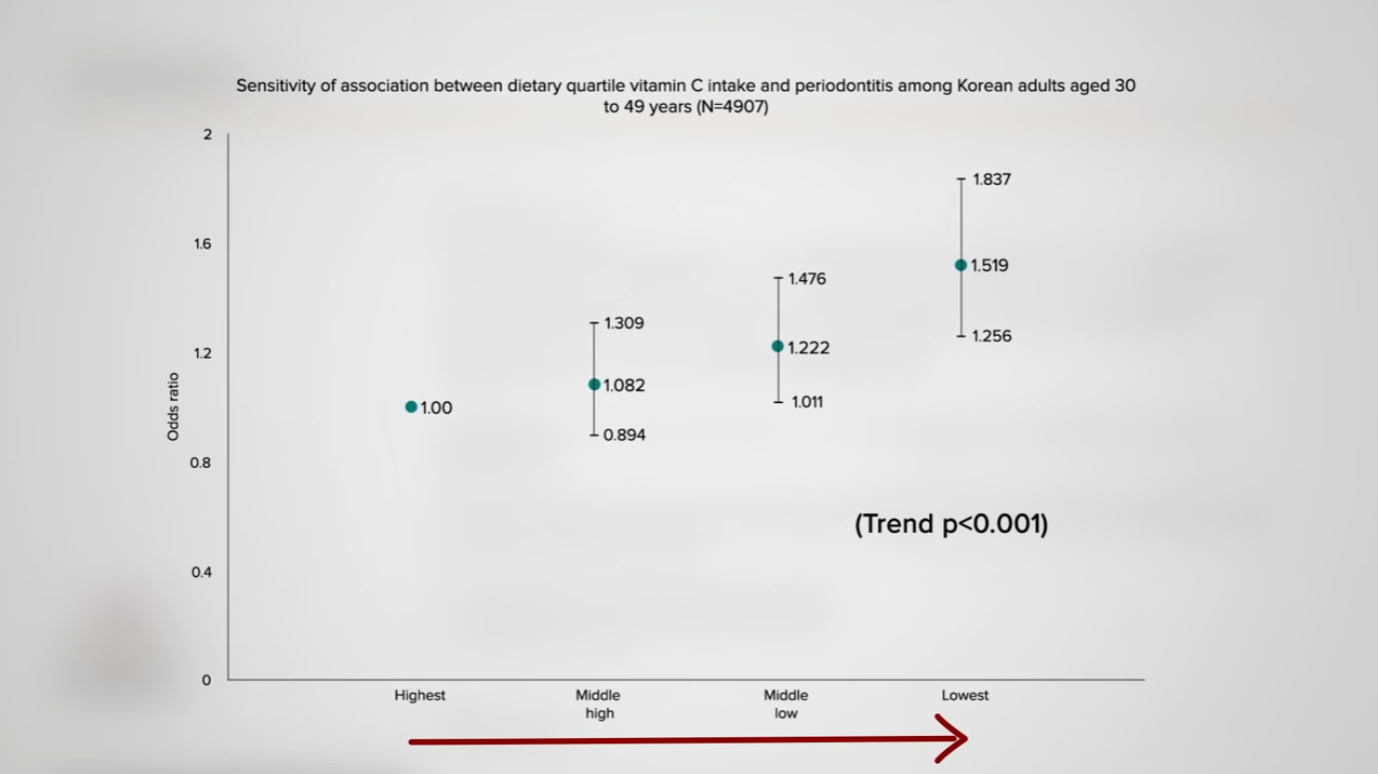
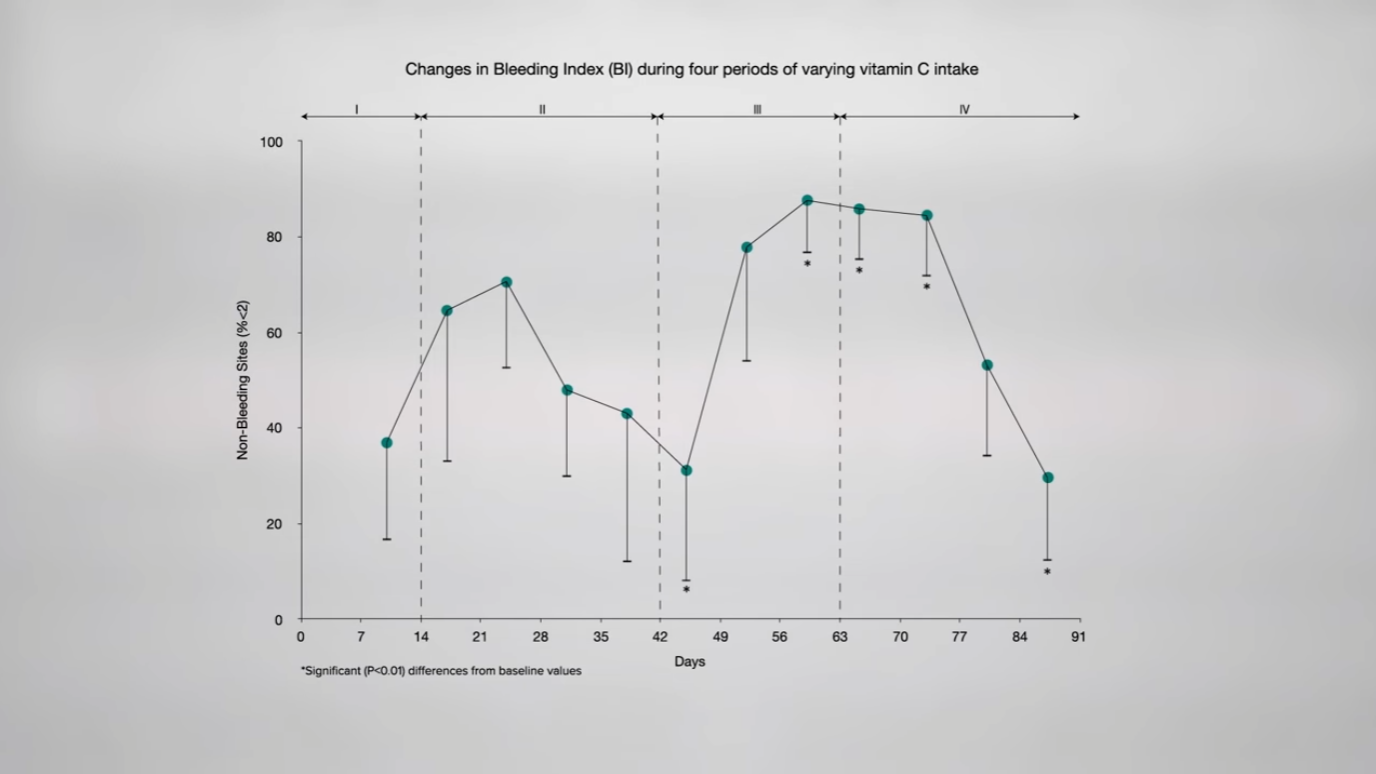
    Is there an association between periodontitis and dietary vitamin C intake? Apparently so, as you can see in the graph below and at 3:34 in my video. Increased risk of periodontitis has been associated with lower levels of vitamin C intake. What effect might vitamin C depletion and supplementation have on periodontal health? Researchers provided controlled amounts of vitamin C to study participants for three months and found that measures of gum inflammation were directly related to the subjects’ vitamin C status. On about one orange’s worth of vitamin C a day, their gums improved; down around only 5 mg a day, though, their gums got worse. On ten oranges’ worth of vitamin C a day, they got better and then worse once again when the vitamin C level dropped down to five oranges’ worth, as you can see  in the graph below and at 4:01 in my video. The study was pretty convincing, though 5 mg a day is down at scurvy level. We know our gums start bleeding and our teeth can fall out if we have scurvy, but that doesn’t mean taking extra vitamin C helps.


    Indeed, 1,500 mg of vitamin C a day did not seem to help prevent gingivitis and even 2,000 mg a day failed to help periodontitis sufferers. Is it possible that vitamin C is just too weak an antioxidant? What about lycopene, the powerful antioxidant pigment that makes tomatoes red? Lycopene worked! But that was from injecting it directly into the gum pocket with a syringe. Does it still work if you simply eat it?

    A randomized, placebo-controlled, clinical trial investigated the efficacy of lycopene in the treatment of gingivitis. After two weeks of standard dental treatment with either a single daily tomato’s worth of lycopene or placebo, the placebo group had a 10 to 20 percent reduction in gingivitis, but the lycopene group had a nearly 30 percent improvement within just one week. How much lycopene? The amount found in just one and a half teaspoons of tomato paste a day. So, tomatoes may help with gingivitis, but what about periodontitis?

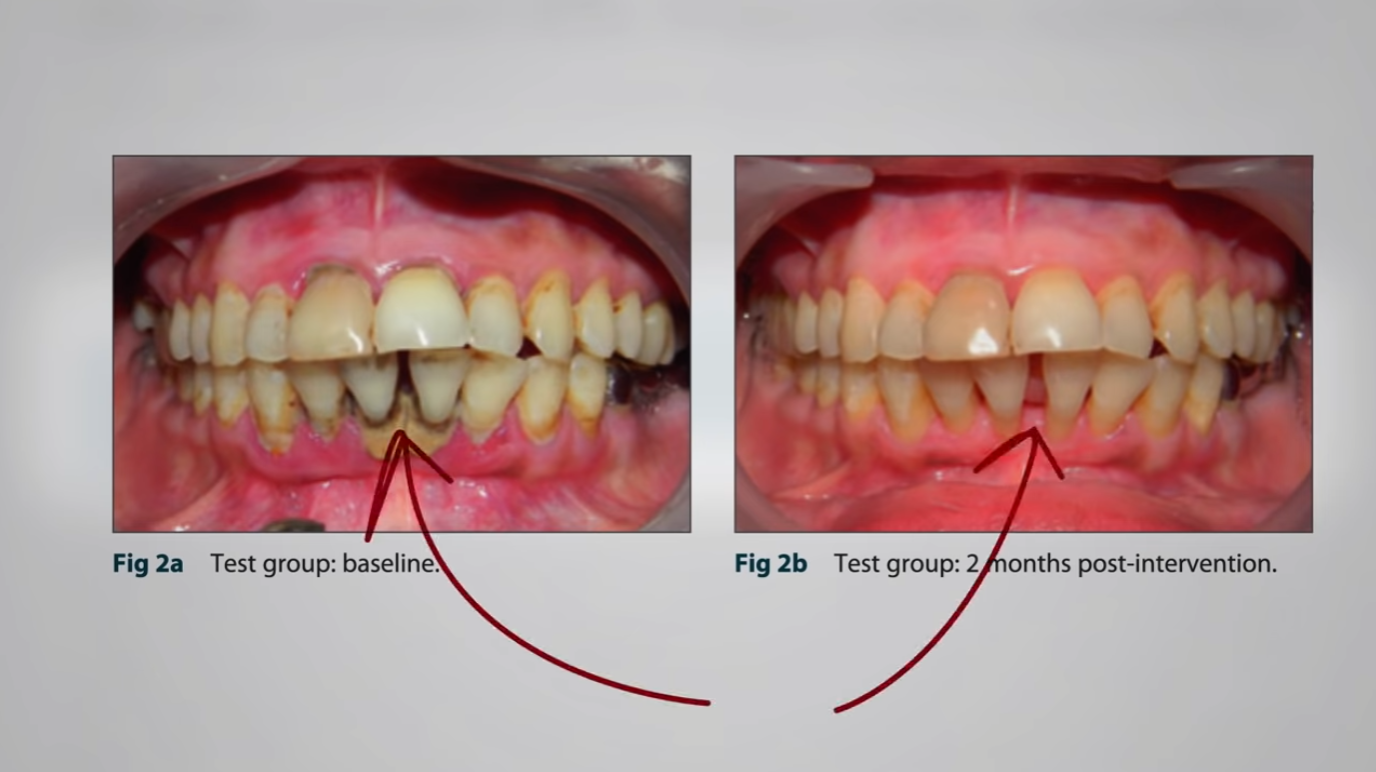
    Another randomized, double-blind, placebo-controlled trial again treated subjects with a typical dental cleaning plus either one daily tomato’s worth of lycopene or a placebo for two months. Researchers found significant improvements in the lycopene group in plaque, gingivitis, and bleeding, though not probe pocket depth and clinical attachment. You can see the difference in how much better their gums looked as you can see below and at 5:59 in my video. The researchers concluded that “supplementation with lycopene seems to have augmented the healing sequence of inflamed gingival tissues,” but that was with a whole tomato’s worth a day. How about half a tomato’s worth or just three quarters of a teaspoon of tomato paste’s worth of lycopene a day? Neither worked. There was no difference. It looks like you have to go the whole tomato.

    It should come as no surprise that healthy foods can benefit all parts of the body, but I still love to see the data!

    I talk more about the red pigment in tomatoes in Lycopene Supplements vs. Prostate Cancer and Tomato Sauce vs. Prostate Cancer.


    Credit: Source link

  • Our Black Friday Sale Is on Now!

    Our Black Friday Sale Is on Now!

    Add some green to your Black Friday with 20 percent off all merchandise on DrGreger.org. The sale is site-wide, so it includes all clothing, video downloads, outreach materials, and more. If you’re heading into winter, cozy up with our sweatpants (back by popular demand!), hoodies, or a crewneck sweatshirt. Sale ends November 28. All proceeds go to keeping NutritionFacts.org running! 


    Key Takeaways: Walnuts

    The Global Burden of Disease Study calculated that not eating enough nuts and seeds was the third-leading dietary risk factor for death and disability in the world. That is why I recommend a daily serving of at least ¼ cup nuts or seeds or 2 tablespoons of nut or seed butter in my Daily Dozen checklist. So, which nut is healthiest? Walnuts really seem to take the lead due to their high antioxidant and omega-3 levels, and they beat out other nuts in vitro in suppressing cancer cell growth. And, of all the nuts studied in PREDIMED, the largest dietary intervention trial to assess the effects of a Mediterranean-type diet on cardiovascular disease prevention, the researchers found the greatest benefits associated with walnuts, particularly for potentially preventing cancer deaths. Check out all of my videos on walnuts on the topic page. 


    Recipe: Baked Apples with Walnuts and Goji Berries

    After reading about the benefits of walnuts, I bet you’re ready to snack on some! Here’s a delicious fall treat from The How Not to Diet Cookbook that tastes like apple pie, but without all of the sugar and butter. And as a bonus, it will make your house smell divine while it bakes! Check out the recipe, and watch a video on how it’s made on our Instagram.


    Volume 60 Is Out Now

    I’m excited to release my 60th volume of videos! Sixty! I’ve created more than 2,000 videos in the lifetime of NutritionFacts.org and have no plans of slowing down anytime soon! This new volume includes a series on tongue scraping, the controversy around cholesterol, whether vegans suffer more bone fractures, my popular webinar video on vitamin K2, and more. 

    Each video in this new volume will be released online over the next few months, available for free, of course, but if you don’t want to wait, you can stream all of them right now. 

    If you are a $15+ monthly supporter and opted in to our donor rewards, you’re likely an expert on these new topics by now, since you already received a complimentary link to the new download. If you’d like early access to new videos before they’re available to the public, please consider becoming a monthly supporter. Without your generosity, we wouldn’t be able to continue our work. Thank you!

    And, remember, if you watch the videos on NutritionFacts.org or YouTube, you can access captions in several different languages. To find yours, click on the settings wheel in the lower-right corner of the video and then “Subtitles/CC.” (You can also watch our new video about changing your settings.) Happy viewing!


    Volunteer Spotlight: Laura McClanathan

    I love everything about volunteering for Dr. Greger! I’m a part of the wonderful Article Retrieval Team where I help track down articles he needs for his books and videos. It’s incredibly fun detective work that really appeals to me as a reference librarian. What is most satisfying about it is that I feel I am making a tangible contribution to the body of evidence-based information about the incredible—and positive—power of plant-based eating. And it’s an honor to give back to someone who has helped me learn so much.

    My favorite recipe is Dr. Greger’s ranch dressing. It is so delicious and versatile—cashews, unsweetened soy milk, a tasty spice blend, lemon, vinegar, red onion, dates, white miso, parsley, and dill.


    Top Three Videos

    Lighting incense in a holderThe Side Effects of Burning Incense 

    Burning incense has been found to generate about four times the particulate matter as burning cigarettes.


    Spoon of fenugreek seeds on wooden tableThe Benefits of Fenugreek for Preventing and Treating Diabetes

    The spice fenugreek contains 4-hydroxyisoleucine, a peculiar amino acid that may explain its benefits for controlling blood sugar.


    Woman smelling basket of vegetablesFoods That Cause and Help Halitosis (Bad Breath)

    Most bad breath is due to the decay of sulfur-containing proteins.


    Thank you so much for the wonderful birthday messages and donations last month. My 50th felt truly special thanks to your kindness and your support. I enjoyed celebrating with the NutritionFacts.org team at our annual staff retreat this year! If you missed my live Q&A last week, you can watch the recording by going to our Live Q&A page. And I recently did a fun interview with Tami of Nutmeg Notebook. Check it out!


    Credit: Source link

  • Why Should (or Shouldn’t) We Eat a Macrobiotic Diet?

    Why Should (or Shouldn’t) We Eat a Macrobiotic Diet?

    What happens when you put diabetics on a diet composed largely of whole grains, vegetables, and beans?

    The American Medical Association has described macrobiotic diets as “one of the most dangerous dietary regimens, posing not only serious hazards to the health of the individual but even to life itself.” Macrobiotic diets “are predominantly vegetarian with great emphasis being placed on the inclusion of whole-grain cereals.” What’s wrong with that? Well, they also used to tell people that “fluids are to be avoided as much as possible,” which isn’t good, and to avoid fruit so much so that it resulted in modern-day cases of scurvy.

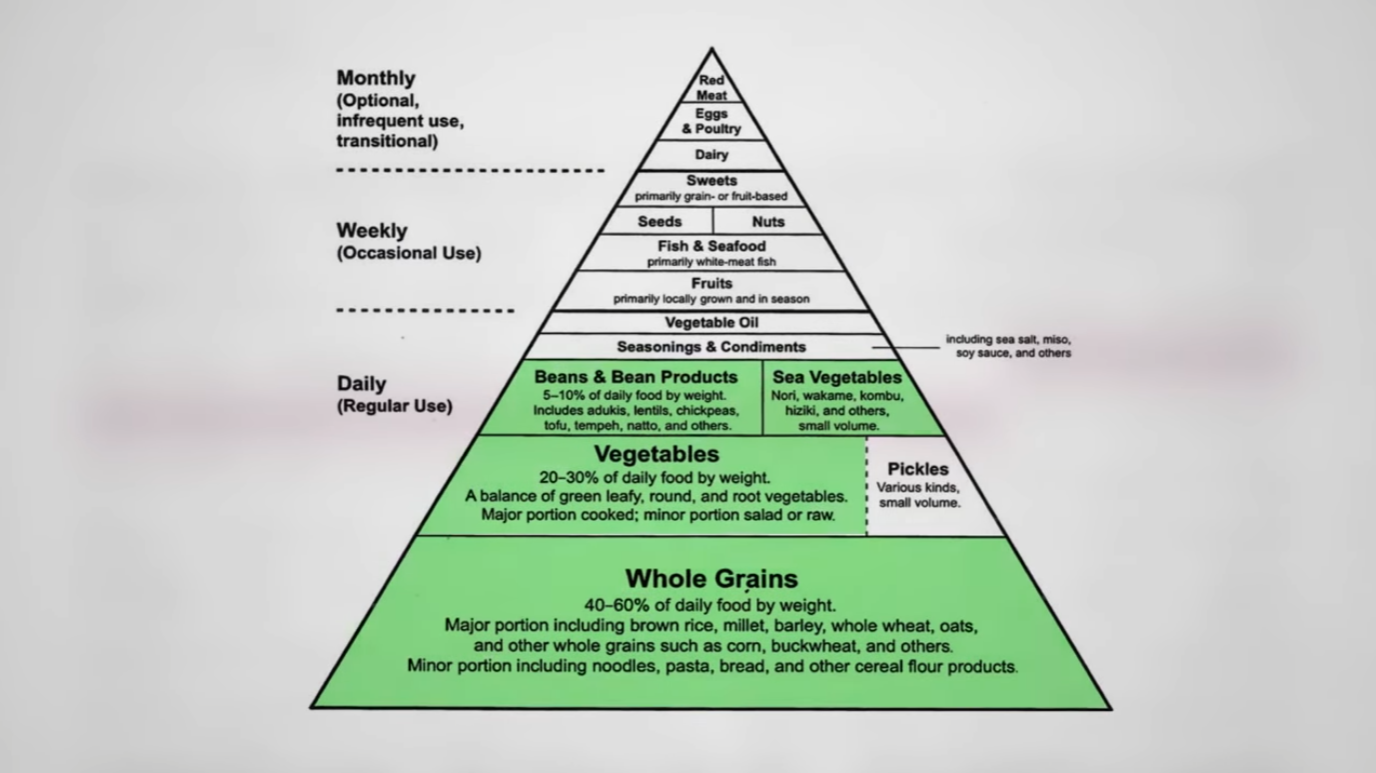
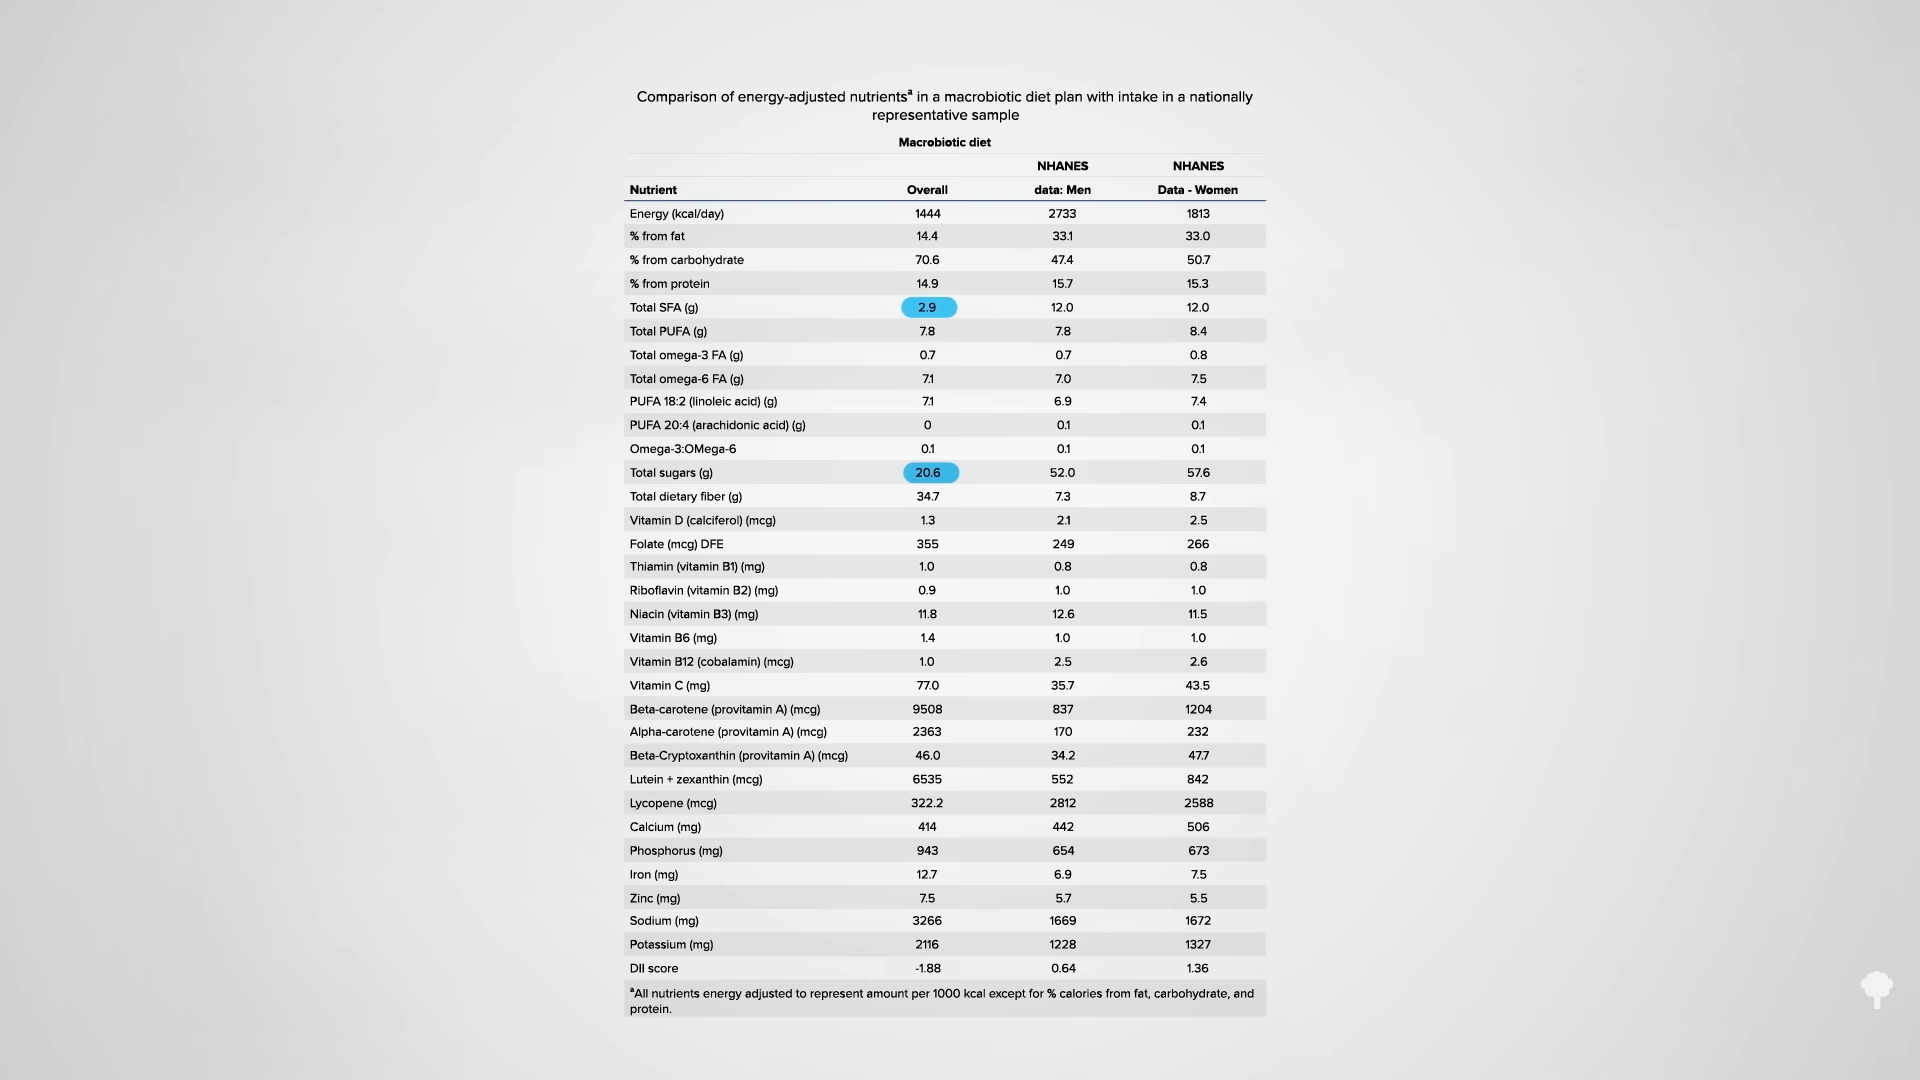
    Thankfully, as I discuss in my video Flashback Friday: Pros and Cons of a Macrobiotic Diet, “the macrobiotic diet has evolved over the past 30 years.” As you can see below and at 0:46 in my video, the more contemporary version emphasizes whole grains, vegetables, and beans, and minimizes most meat, eggs, and dairy. I don’t like that it restricts fruits and I don’t like all of the added salt, but compared with the standard American diet, it has a lot going for it, as you can see below and at 1:04 in my video: It has only a quarter of the saturated fat intake, less than half of the sugar intake, and a respectable fiber intake—two and a half times the national average. However, it includes more sodium. It also has a negative Dietary Inflammatory Index score, as opposed to the pro-inflammatory typical American diet. Some of the most anti-inflammatory foods are herbs and spices, so instead of adding sea salt and soy sauce, the macrobiotic diet, which is already anti-inflammatory, could be improved by using natural seasonings instead.

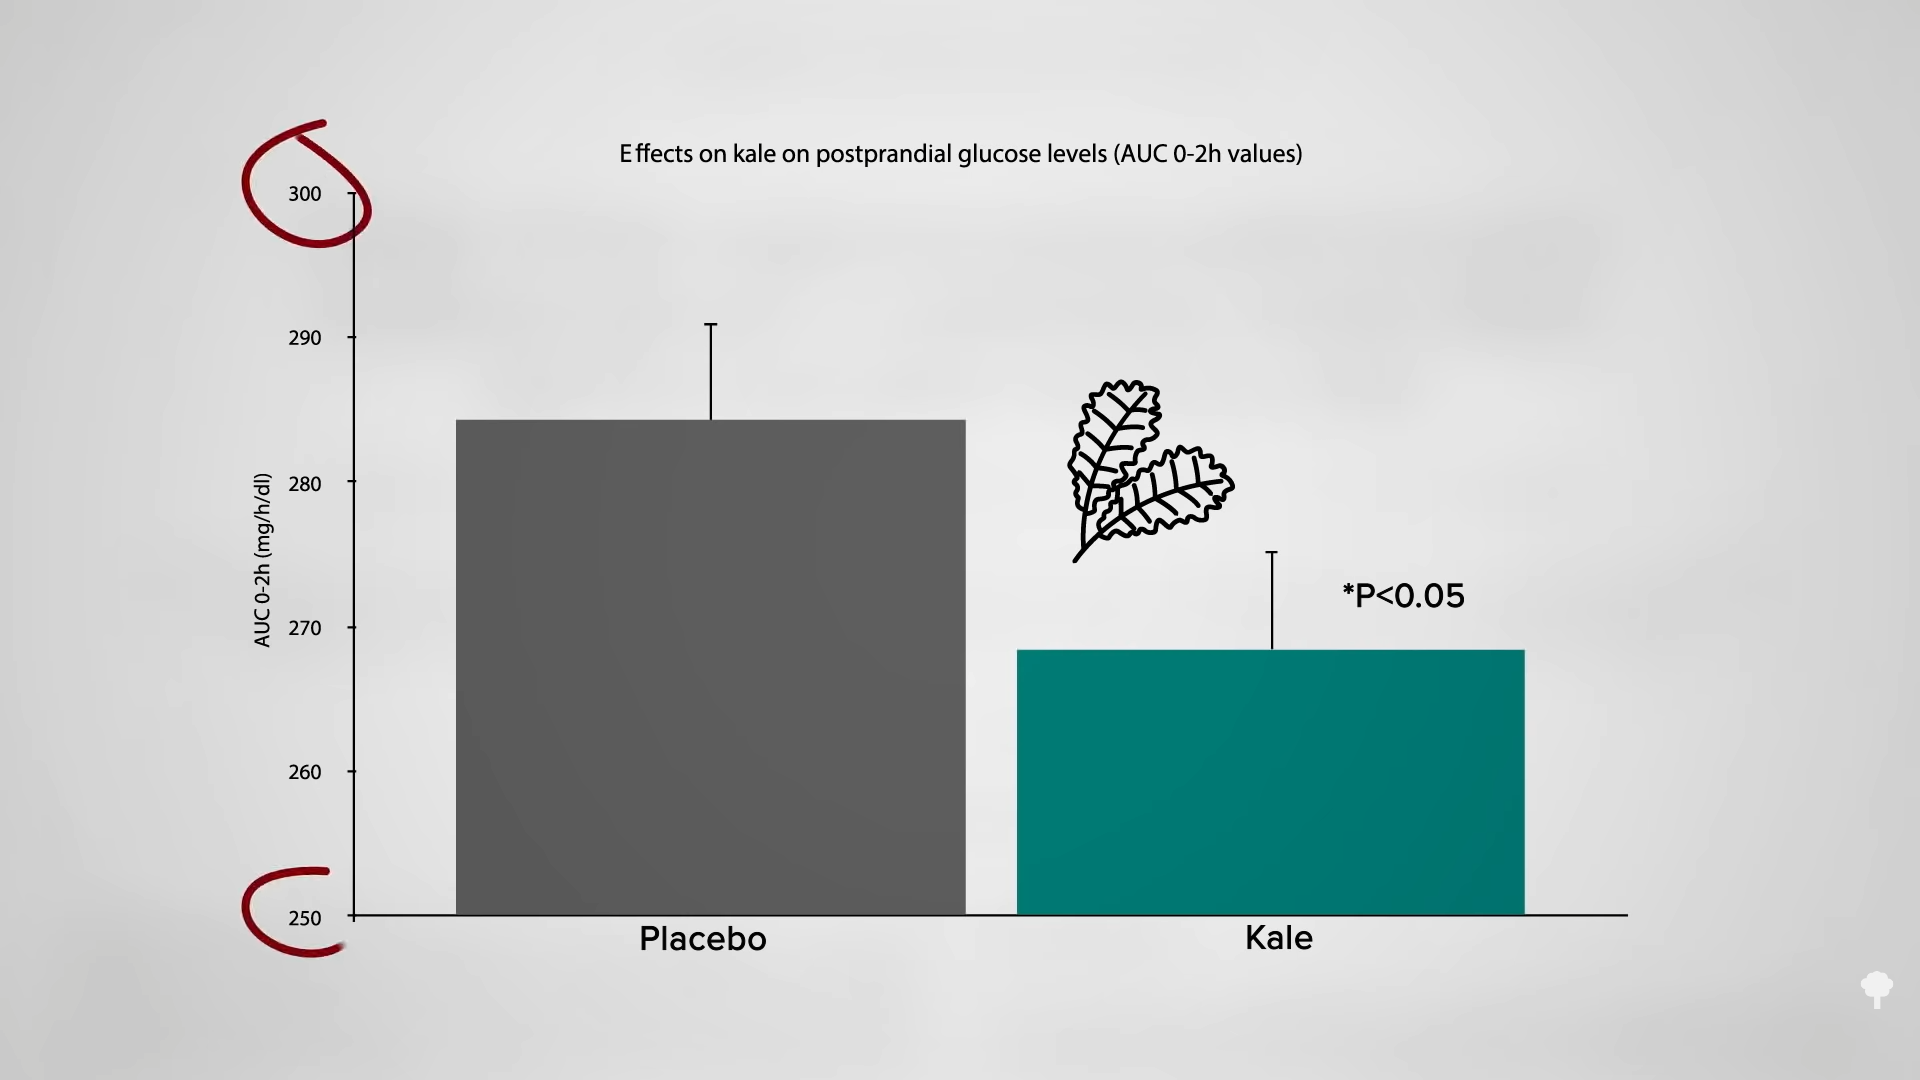
    Has the macrobiotic diet ever been put to the test? Yes, it has been for diabetes. Higher plain water consumption is associated with lower risk of type 2 diabetes, yet the macrobiotic diet restricts drinking water. Part of the beneficial link may be because people on a macrobiotic diet drink less soda, though. What about the restriction on fruit intake? That probably isn’t helpful either because “higher fruit or green leafy vegetables intake is associated with a significantly reduced risk of type 2 diabetes.” But, green leafy vegetables is where the macrobiotic diet can really shine: It includes a lot of greens. A randomized, double-blind, placebo-controlled, crossover study of kale show that it suppresses the after-meal increase in blood sugars. As you can see in the graph below and at 2:19 in my video, eating a meal of white rice, chicken, and eggs produces a big spike in blood sugar, though it is significantly less when just a tablespoon of dried kale powder is added to the meal, as opposed to a placebo powder.

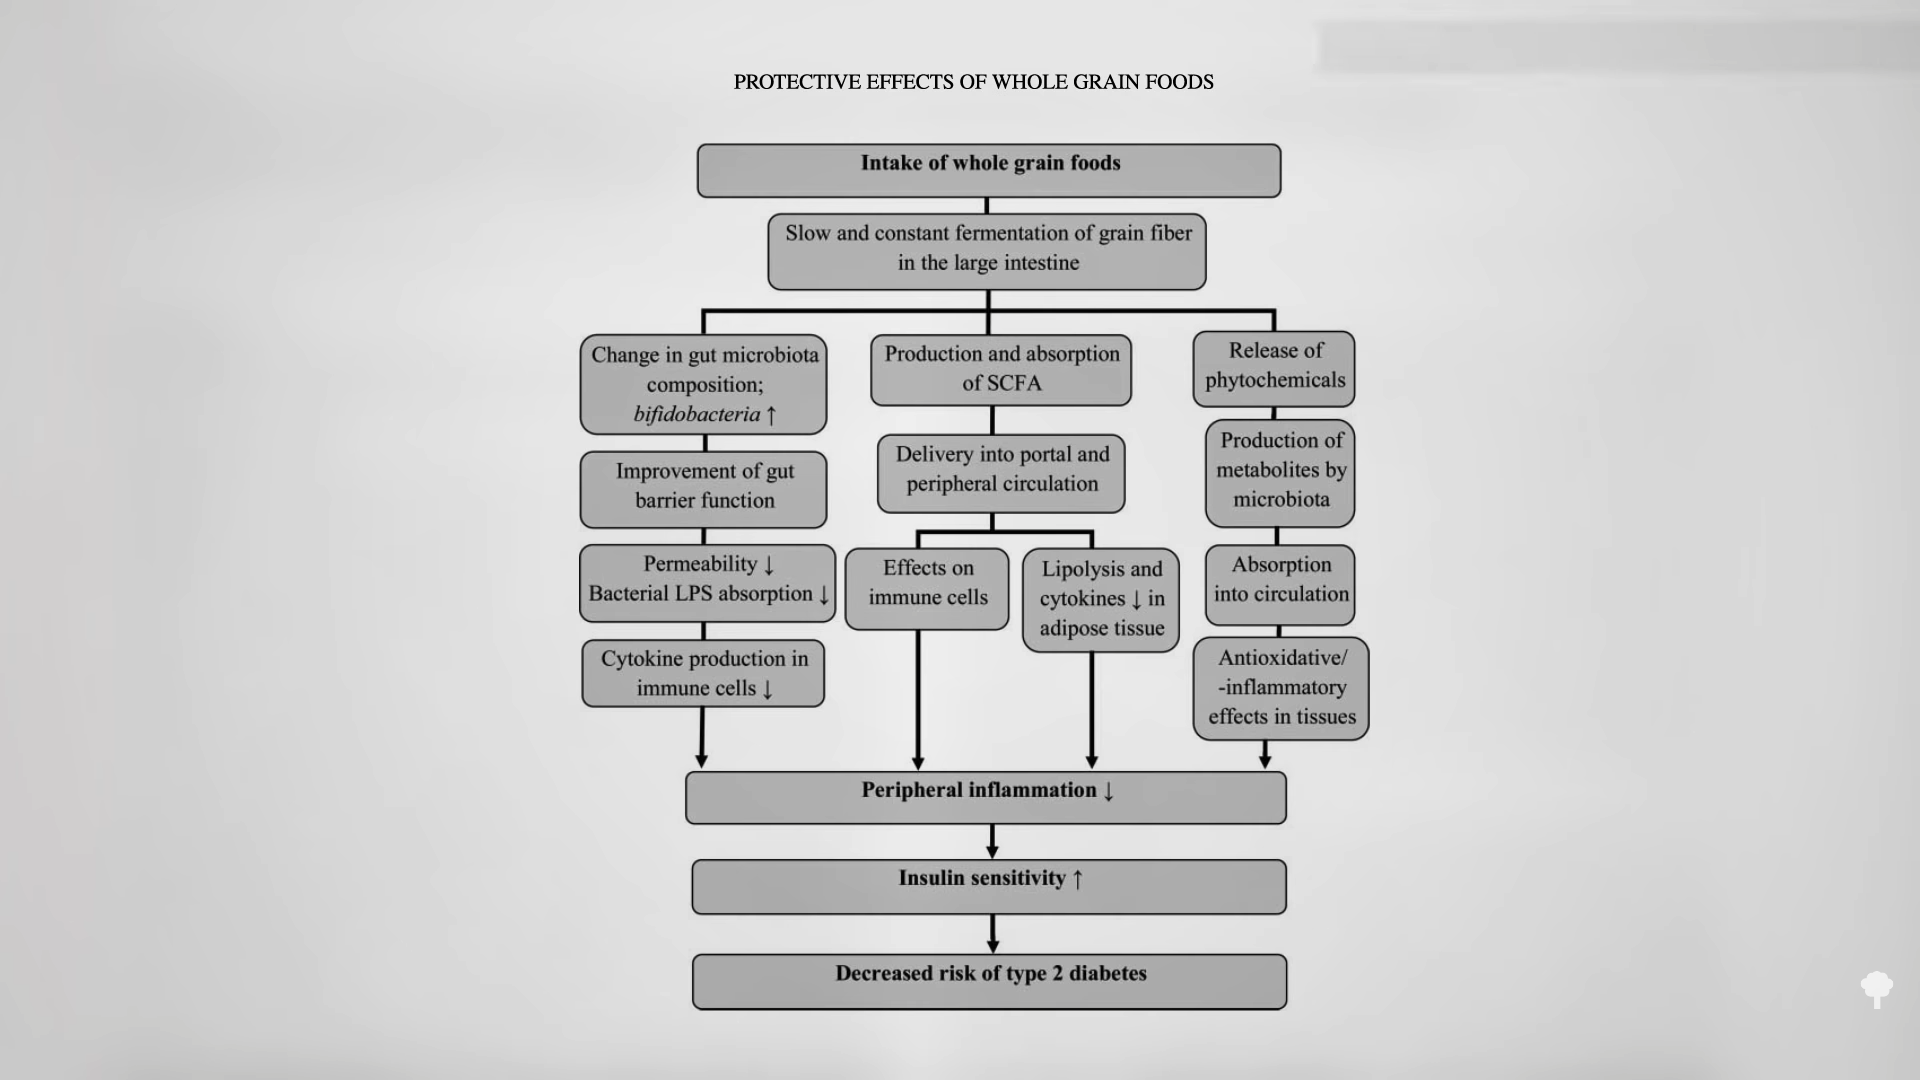
    Macrobiotic diets also include whole grains, which can significantly improve insulin sensitivity compared with refined grains, possibly due in part to all of the wonderful things fiber can do to help our good gut bacteria thrive, potentially lowering inflammation and decreasing diabetes risk, as you can see below and at 2:43 in my video. You don’t know, of course, until you put it to the test.

    After only three weeks on a strictly plant-based diet composed mostly of whole grains, vegetables, and beans, participants got about a 10 percent drop in blood pressure, a whopping 35 percent drop in bad LDL cholesterol, and a 38 percent drop in fasting blood sugars. Were these changes statistically significant? Yes, the changes were significant in every possible way.

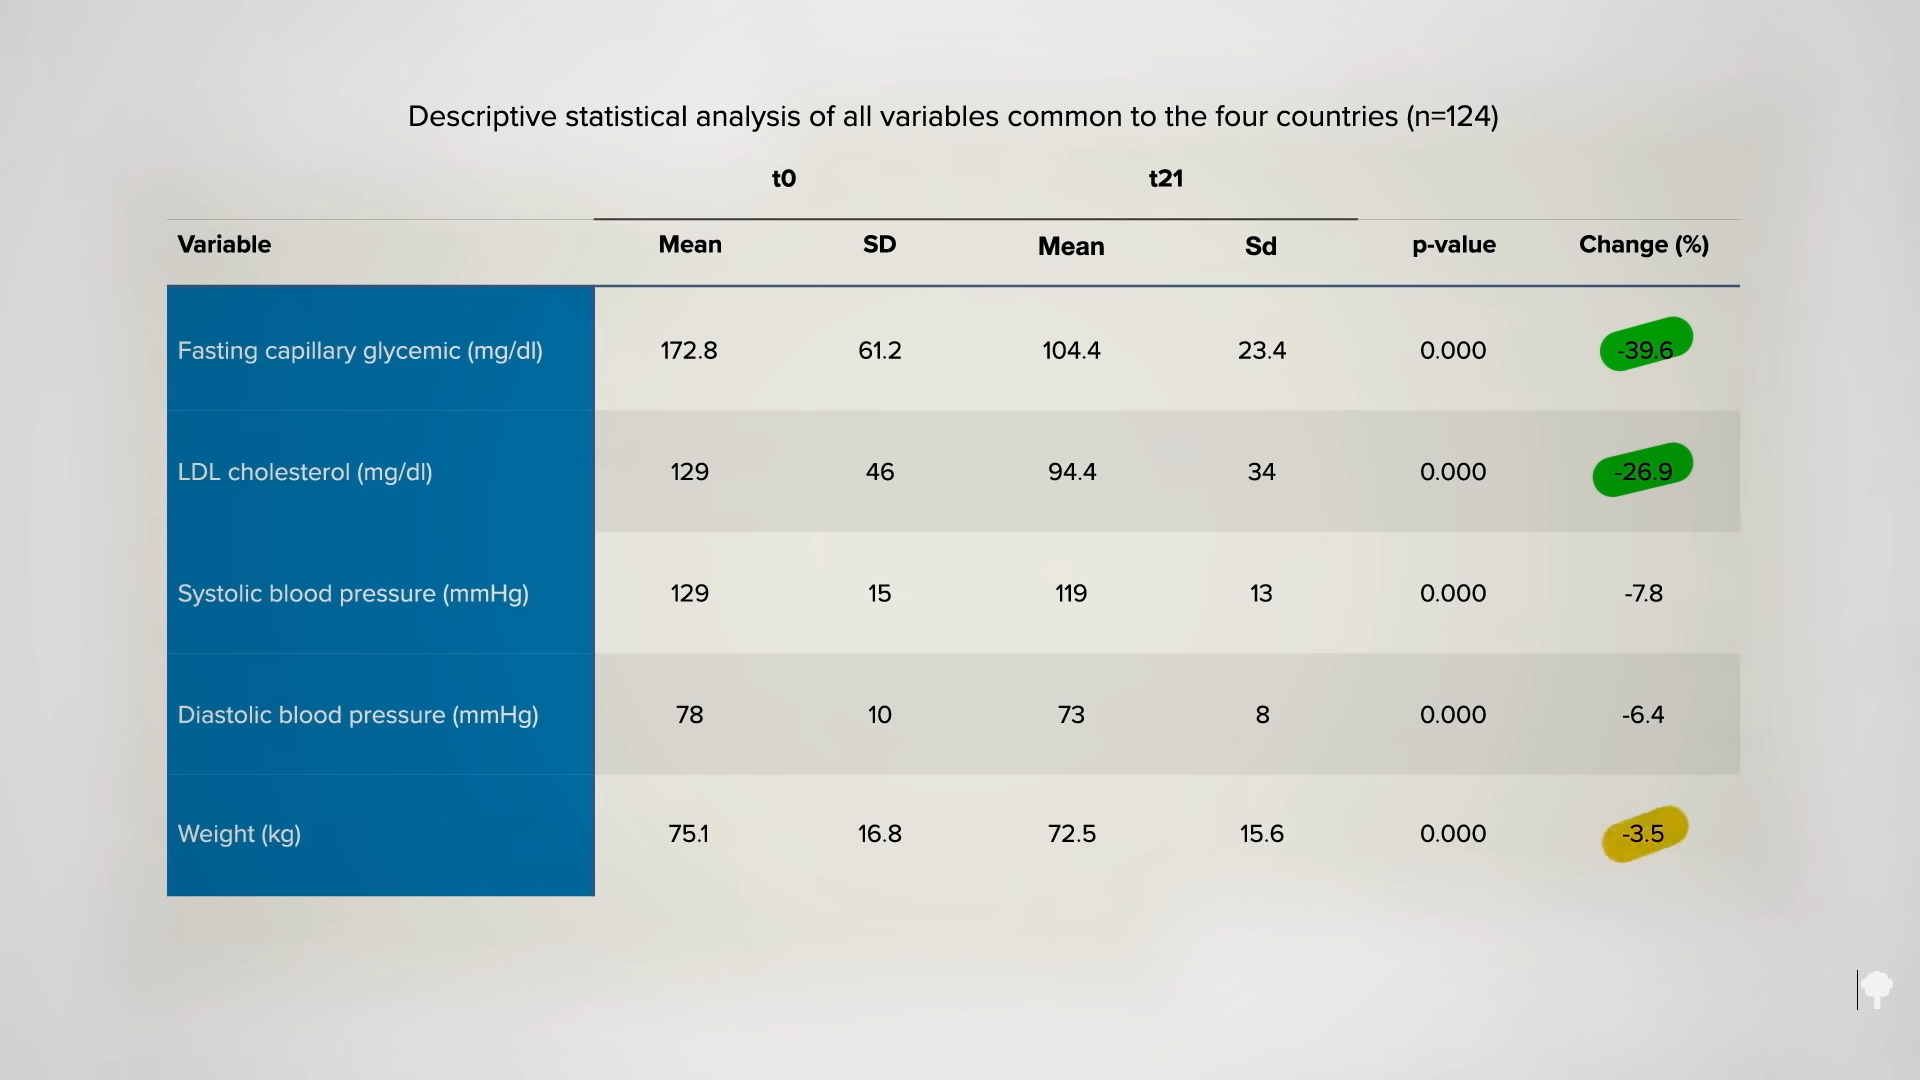
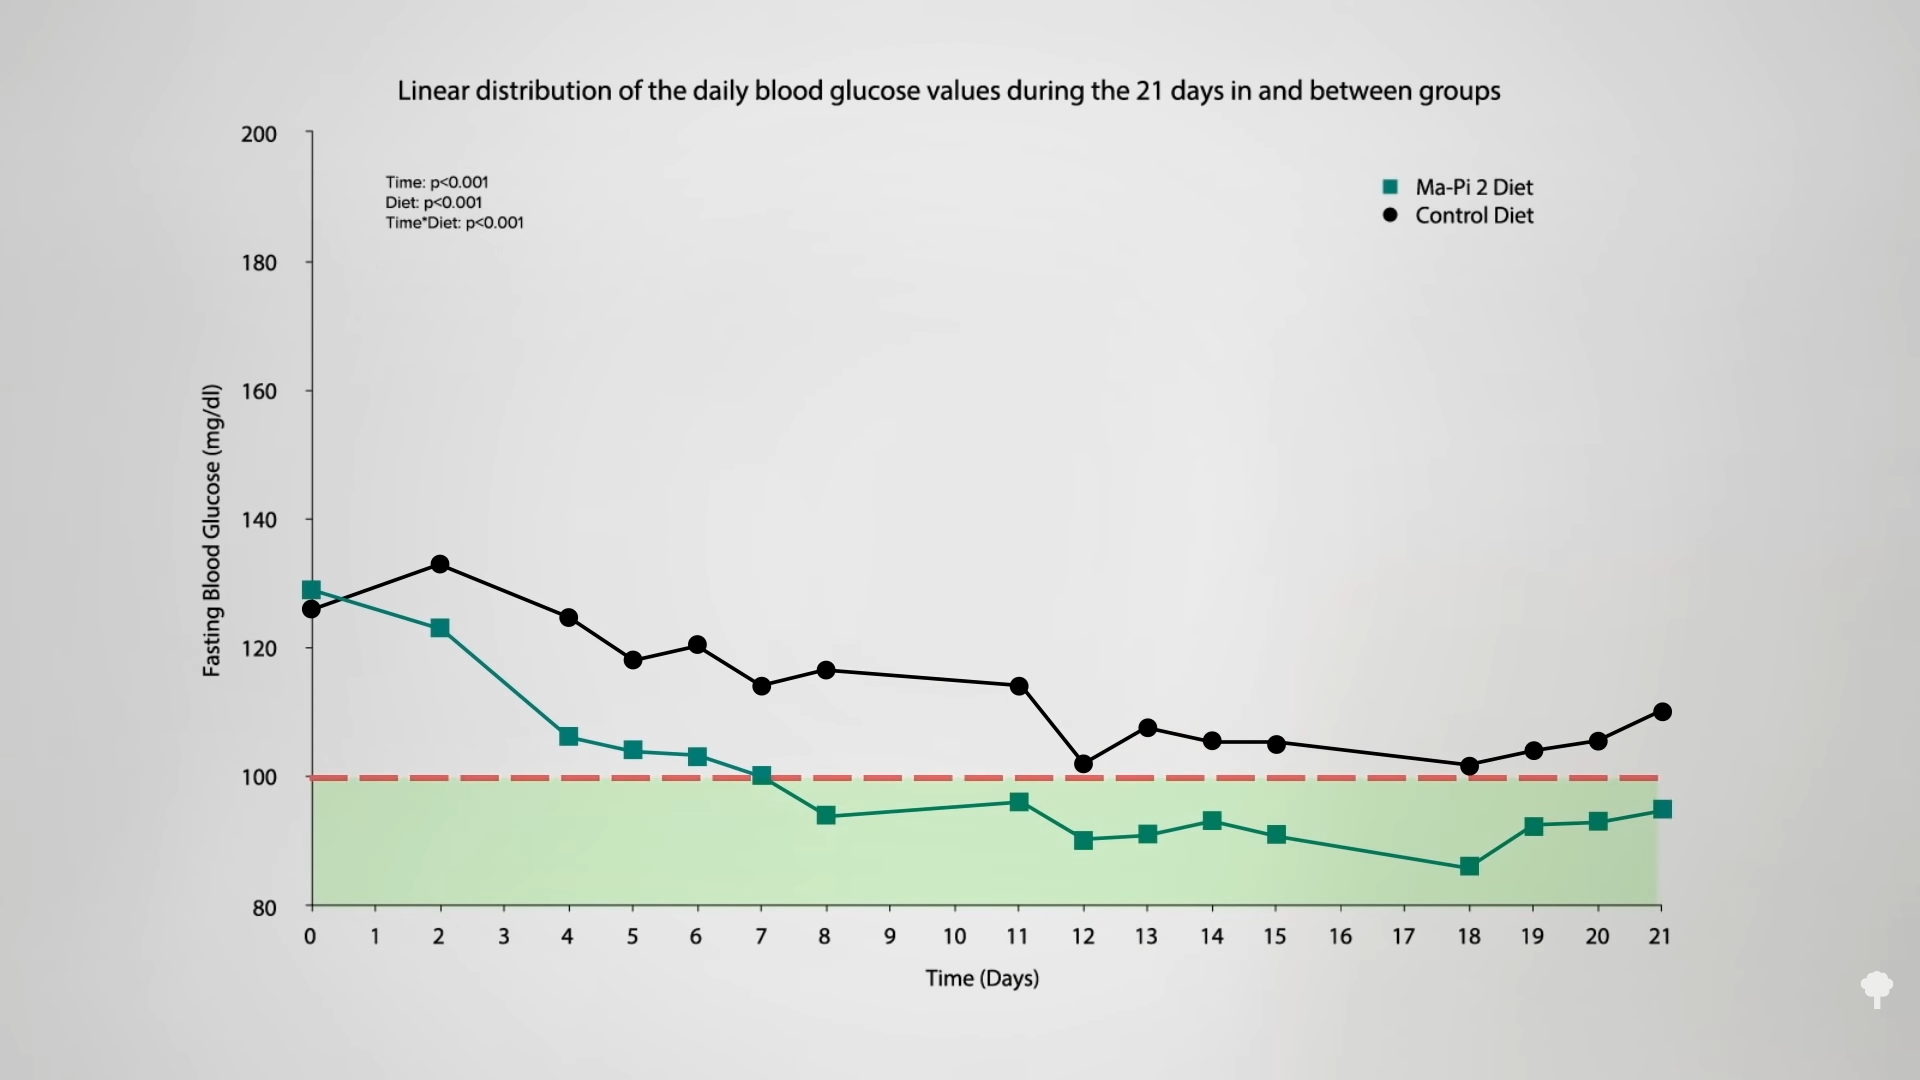
    Similarly, short-term interventional studies of people with diabetes on these so-called Ma-Pi 2 macrobiotic diets have been performed across four continents. “Ma-Pi,” named after the person who came up with the diet, Mario Pianesi, is a strictly plant-based diet of mostly whole grains and vegetables, with legumes, some seeds, and decaffeinated green tea as the preferred beverage. As you can see below and at 3:54 in my video, participants in one of these studies had a nearly 40 percent drop in fasting blood sugars and almost a 27 percent drop in LDL cholesterol in just 21 days. The study subjects did lose weight—a few pounds a week—but those kinds of results were much more than one would expect with weight loss. What’s more, that 40 percent drop in blood sugars was after cutting their insulin in half! So, those numbers greatly underestimate the effects. Better results, on fewer drugs—that’s the power of plants. All we need now is a randomized, controlled clinical trial to really seal the deal, which I cover in my next video, Flashback Friday: Benefits of a Macrobiotic Diet for Diabetes.

    These pros and cons remind me of a video I did on Flashback Friday: Improving on the Mediterranean Diet & Do Flexitarians Live Longer?

    I’ve got dozens of other videos on preventing and treating diabetes with diet. How Not to Die from Diabetes is a good place to start.


    Credit: Source link

  • Does a Macrobiotic Diet Help with Diabetes?

    Does a Macrobiotic Diet Help with Diabetes?

    What happens when you add massive amounts of carbohydrates in the form of whole grains to the daily diet of people with type 2 diabetes?

    Why are macrobiotic diets apparently so effective at reducing blood sugar levels in diabetics within just a few weeks’ time? The diet is centered around whole grains—brown rice, barley, and millet—so might the high fiber intake improve the gut microbiome, the friendly flora in our colon, which then leads to a reduction in insulin resistance? Or, perhaps it’s because the diet is also rich in vegetables, so that corrects some kind of low-grade acidosis from the high levels of animal protein in their regular (non-macrobiotic) diets. Regardless of the reason, researchers found a significant difference after just 21 days. Can macrobiotic diets also help with longer term blood sugar control? I examine this in my video Flashback Friday: Benefits of a Macrobiotic Diet for Diabetes.

    How about a six-month dietary intervention with wildly out-of-control blood sugars? As you can see at 0:51 in my video, hemoglobin A1c offers a sense of one’s average blood sugars over the previous few months. An A1c level of 5, for example, would mean that your blood sugars have been in the double digits most of the time over the last few months, indicating that your sugars have been at a normal, healthy, non diabetic level. But, an A1c of 6 is prediabetes territory and 6.5 can be a sign of full-blown diabetes; an A1c under 7 is considered controlled diabetes—what diabetics are striving towards with pills and insulin injections—and a level over 7 is considered out-of-control diabetes. In the macrobiotic diet study, the average A1c level started out off-the-charts at 12.6. The subjects had been averaging blood sugars in the 300s for months, despite all having been on insulin injections.

    What happened when the study participants were placed on the so-called Ma-Pi 2 diet, a strictly plant-based macrobiotic-style diet centered around whole grains, vegetables, and beans, with some sesame seeds and green tea? After just six months on the diet, their A1c levels dropped from a wildly out-of-control diabetic 12.6 to averaging a non diabetic 5.7. What’s more, although the subjects were getting daily insulin injections when their A1c was an astronomical 12.6, they achieved non diabetic 5.7 on the diet after they had all been able to eliminate their insulin. Within only six months, 100 percent of the study participants started out on insulin with out-of-control diabetes and ended with 0 percent on insulin and averaging non diabetic blood sugars. That’s the power of plants. Also within those six months, three-quarters were off all of their diabetes medications completely. Any side effects? Their bad LDL cholesterol dropped by 20 percent and their triglycerides dropped by nearly 40 percent. (And, of course, let’s not forget that anyone starting a strictly plant-based diet must ensure a regular, reliable source of vitamin B12.)

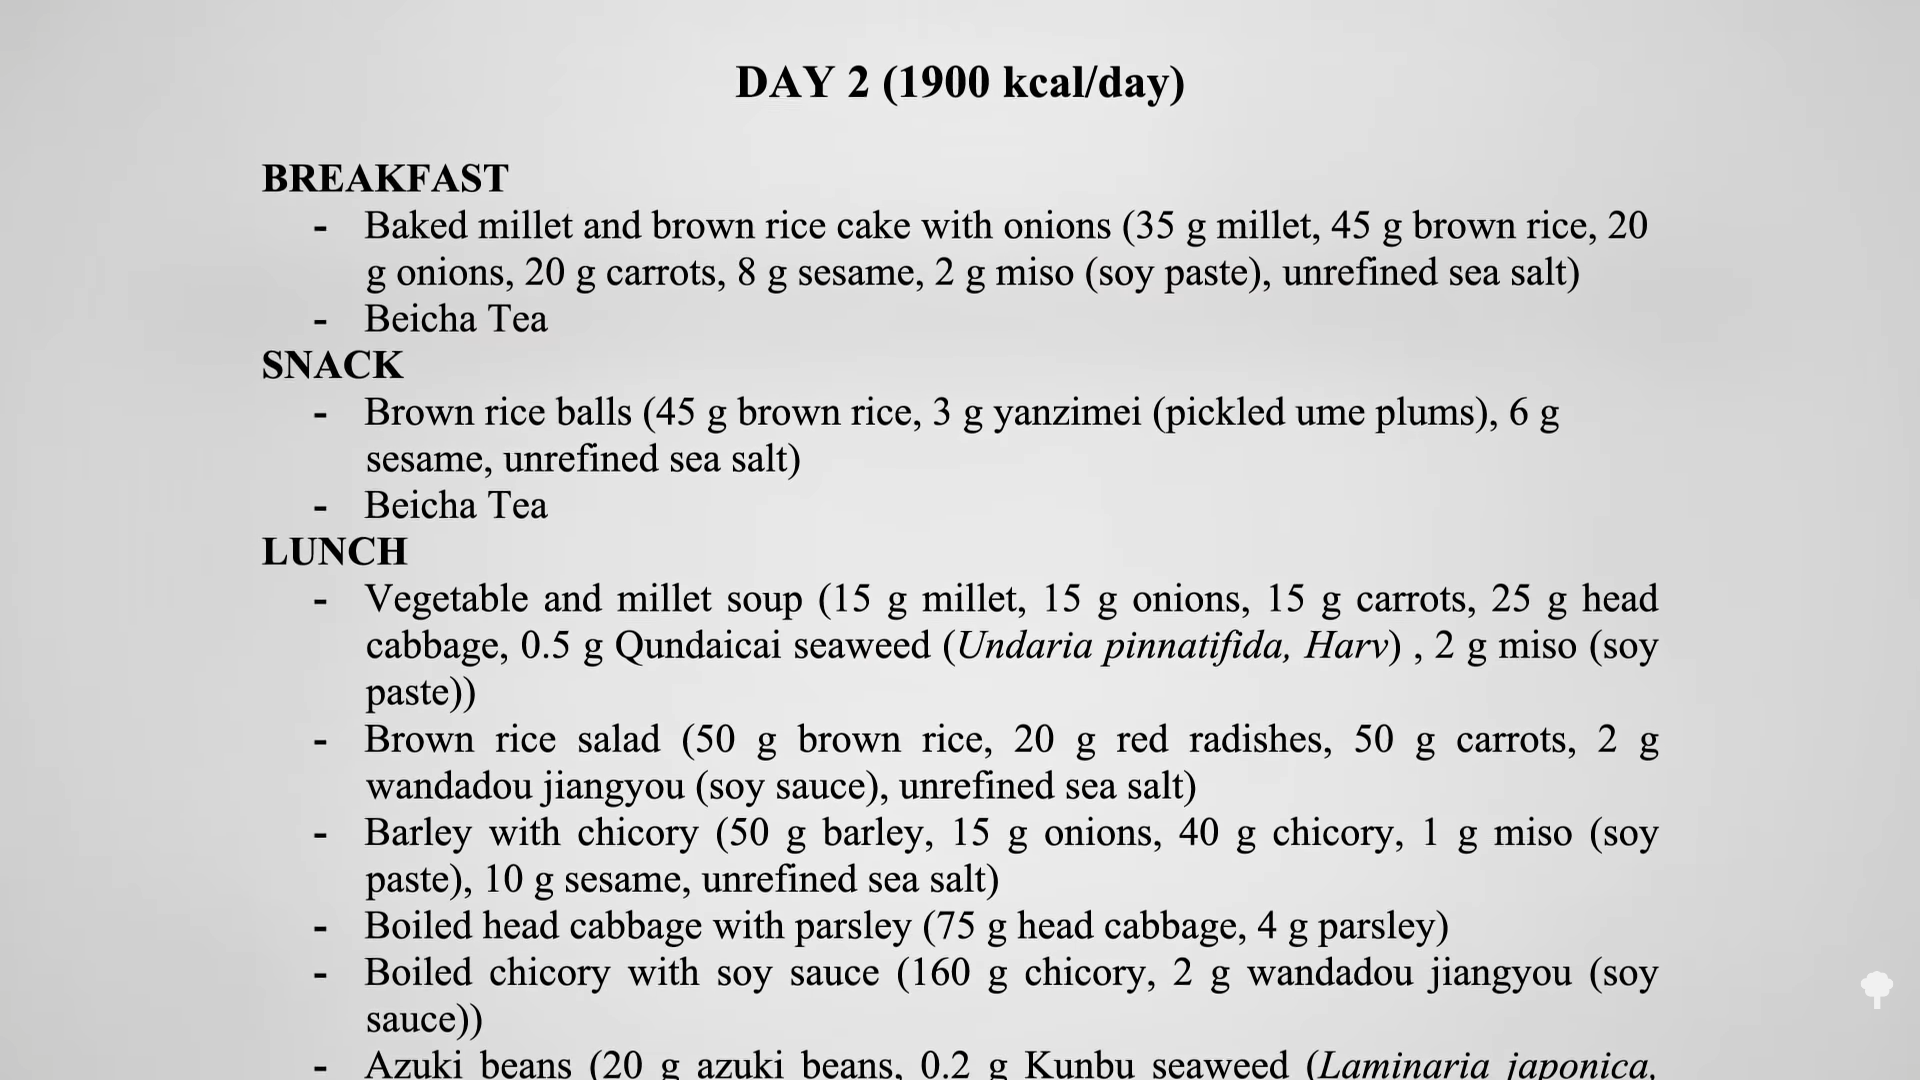
    All we needed was a randomized, controlled trial, and we got one: Type 2 diabetics were randomized to the macrobiotic diet versus the recommended American Diabetes Association-type diet. You can see an example of a typical day on the macrobiotic diet below and at 2:59 in my video, which includes a savory whole-grain cake for breakfast; brown rice sesame balls for a snack; a vegetable millet soup with a brown rice salad, a lot of vegetable sides, and adzuki beans for lunch; more whole grain snacks; and, similar to lunch, a dinner of vegetable barley soup with a lot of vegetables and chickpeas; and green tea throughout the day. On the more standard diabetic diet, participants might have low-fat milk and whole-wheat bread for breakfast; a Mediterranean lunch with vegetables and beans; fruit for a snack; and a bean and vegetable soup, whole-grain bread, agretti (a green leafy vegetable), and baked fish for dinner. I have to say, that’s a pretty healthy control diet. The researchers could have compared the macrobiotic diet to a trashy one, but they wanted to stack it up against the diet diabetes groups recommend. So, what happened?

    The macrobiotic diet won out on every measure of blood sugar control. You can view the numbers in the graph below and at 4:00 in my video. At the start of the study, participants had fasting blood sugars in the 120s. That’s bad, but they were diabetics, after all. Normal fasting blood sugars, like when you wake up in the morning before having breakfast, should be at least in the double digits and under 100. When subjects were put on the relatively healthy, more standard diabetic diet, their blood sugars got better over the three-week study, dropping from the 120s down into the 110s. (That’s the best the American Diabetes Association-type diet can do.) Compare that to an isocaloric macrobiotic diet, meaning with the same number of calories. On the macrobiotic diet, subjects improved within days and achieved normal fasting blood sugars within a week. A full 100 percent of those on the macrobiotic diet got their fasting blood sugars under 110, whereas less than half of those on the diabetes diet did. And, that was achieved while on fewer drugs. In the control group, one participant was able to reduce their oral hypoglycemic medications, whereas five of the seven on such drugs in the macrobiotic group had to stop taking them. Otherwise, if they had continued taking the drugs, their blood sugars would have fallen too low. So, the macrobiotic diet gave better results on fewer drugs. That’s the power of a really healthy diet.

    As an aside, what a poke in the eye with a sharp stick this study was to the low-carb crowd! Researchers took diabetics and put them on a 73 percent carbohydrate diet, adding 100 grams of carbs—in the form of grains, no less—to their daily diet. And what happened? Did their blood sugars skyrocket out of control? No, they got significantly better in a matter of days, with average fasting blood sugars starting out at 129 and falling to 95. And, in just three weeks, their bad LDL cholesterol plummeted down to 62, a nearly 48 percent drop.

    Is the macrobiotic diet perfect? No, but I offer some suggestions for improving it in my video Flashback Friday: Pros and Cons of a Macrobiotic Diet.


    Credit: Source link

  • SUPER GOOD HOT CHOCO with TURMERIC OIL {VEGAN}

    SUPER GOOD HOT CHOCO with TURMERIC OIL {VEGAN}

    Hello, hello! I’m back, back, back again. A relatively large amount of time as passed since I last posted on the blog. I recognize this, I apologize. Today I am divulging a little about what’s been up with my mental health lately, and sharing a deliiiiicious recipe for vegan hot chocolate that I’ve been making almost every morning. The recipe is creamy, sweet, and a decadent treat whenever I put it together. I include some adaptogens (mood boosters!) as well as powerful turmeric oil (great for the whole bod!) If you came for pure and simple hot cocoa, though, feel free to leave those ingredients out. The drink would be great served cold too, or with a banana blended in for extra creaminess and flavour. Scroll down for the recipe! Or, stick with me while I talk about mental stuff for a minute.

    I don’t bring up my mental health all the time because I want pity or attention. I do so because I wish I had been able to access honest accounts of what the experience of living with mental problems is like when I was younger. Those accounts were certainly out there, but I didn’t know (where) to look. So I figure: the more, the better. I’m trying to be the person I needed many years ago, in hopes that I can provide rawness and transparency which might help others feel they’re not so alone. One of the most difficult parts of dealing with mental health issues is feeling that I am alone, unlovable, or fundamentally misunderstood. (NOT TRUE, for any of us!)

    Life has been excessively demanding this year. While my coping skills and capacity for self-compassion are at all-time highs, the disabling effects of my anxiety and depression are unfortunately competing very well. I am taking anti-depressants again, and attempting to maintain other habits which help my mood and keep me ‘above water.’ These include meditation, nature walks, spending time with friends, working on creative projects (songs, drawings, poetry) and balancing productive time with rest time. I know to many people I appear to ‘have it together,’ but this speaks more to my ability to perform an illusion, than my actual state. What movements and choices may seem effortless and unquestionable for some folks are endless challenges for me: the best and most immediate example being getting out of bed every. single. morning. I lose motivation for everything that used to bring me joy and energy. I feel numb to the activities which used to excite me. I feel as though I am merely going through the motions of another version of myself, apathetic to the outcomes of what I do. This is scary, and seems hopeless much of the time.

    I know I will be okay, but at the moment: shit is rough. THAT’S OKAY. This is all part of my particular human experience, part of my journey in this bizarre thing called Life. I will continue getting out of bed every day, even if some days all I can manage is to avoid people, go for a walk, feed myself, write a song or draw something, and get back into bed. All this being said, I remain filled with gratitude: for friends, family, home, my Spotify account, rainy lake trails, houseplants, Daiya grilled cheese sandwiches, SSRIs, meditation, my body, and my brain. While my time here is full of never-ending challenges, I see these moments as opportunities for learning, spiritual lessons for development, and open windows into my own being. Thank you for sticking with me! Talk soon, kay? Enjoy the recipeee!

    with love,
    em

    //

    SUPER GOOD HOT CHOCO with TURMERIC OIL
    Serves one or two.
    Print the recipe!

    1 1/2 cups almond milk
    1-2 tablespoons agave syrup
    1 tablespoon cocoa powder
    1 tablespoon almond butter
    1/2-1 teaspoon your fave adaptogen powder (ex. chaga, ashwagandha, maca…)*
    1/4 teaspoon vanilla extract
    1/4 teaspoon SUPERGOOD turmeric oil**
    Pinch sea salt

    Heat up the milk on a stove or in a microwave. Add the hot milk to a blender and blend with all the other ingredients until smooth and creamy. Add sweetener according to your own preferences. Sometimes I like it super sweet, sometimes I want it to more bitter and cocoa-y.

    *I love Harmonic Arts’ 14 Mushroom Powder.
    **I’m not being sponsored or paid by SUPERGOOD for this post, I just love the product.

    Credit: Source link

  • What Is the Best Food for the End of Pregnancy?

    What Is the Best Food for the End of Pregnancy?

    Dates, edible sweet fruits, are put to the test in a randomized, controlled trial for cervical ripening.

    In the 19th chapter of the Koran, Mary is giving birth to Jesus. I didn’t even know Jesus was in the Koran. The things they don’t teach you in Hebrew school. “And the pains of childbirth drove her to the trunk of a palm tree.” She cries out and is answered by Gabriel, an Archangel and, evidently, an obstetrician. Who knew? Shake the tree, he says, and “it will drop upon you ripe, fresh dates” and you’ll be all better—no epidural necessary.

    Do dates really help with labor and delivery? As I explain in my video Best Food for Late Pregnancy, it took a little over 2,000 years, but researchers finally put it to the test. They had some anecdotal evidence that dates might be helpful, but they wanted to know for sure “whether the addition of date fruit for the last few weeks of pregnancy would reduce the need for [labor] induction or augmentation,” which is when drugs are administered to induce uterine contractions to either initiate or accelerate labor. It’s one of the most commonly performed obstetrical procedures in the United States and has increased dramatically over the last few decades—from less than 10 percent of deliveries to now nearly a quarter. There are certainly legitimate medical indications, but they are often done just for “convenience”—and not necessarily the convenience of the patient. The provider may also have perverse financial incentives and other reasons to want to speed things along. Dates might not help with those factors, but might they help foster a normal, spontaneous delivery?

    In a prospective study, women either ate six dates a day during their last month of pregnancy or none at all. Those who consumed the fruit had significantly better cervical dilation compared with the non-date subjects and a significantly higher proportion of intact membranes, which is a good thing. And, with significantly fewer drugs administered, “spontaneous labour occurred in 96% of those who consumed dates, compared with 79% women in the non-date fruit consumers.” What’s more, labor for those in the date group was also shorter—about seven hours shorter overall. Therefore, “it is concluded that the consumption of date fruit in the last 4 weeks [of pregnancy] before labour significantly reduced the need for induction and augmentation of labour….The results warrant a randomized controlled trial.” Hold on. The women weren’t randomized? Indeed. In fact, the researchers even commented on how difficult it was to find women who would agree not to eat dates because consuming them “is a part of the cultural beliefs of the population under study.” You can imagine how there may be a variety of differences between the women who ate the dates and those who agreed to go without them that could account for the findings. Maybe the date eaters were more religious, of a higher socio-economic status, or something else completely. Who knows? You could argue you might as well give dates a try since there doesn’t seem to be a downside, but that isn’t good enough for me. I want to know if they actually work, but we didn’t get a randomized, controlled trial until three years later.

    Researchers studied the effect of late-pregnancy consumption of date fruit on so-called cervical ripening in first-time mothers. In the last few weeks of pregnancy, hormonal changes cause the cervix, the opening to the uterus, to start to ripen, to soften, so it can more easily dilate open when contractions start. “At this stage, the cervix loses its integrated structure, and therefore, it becomes soft and dilated as soon as strong contractions begin.” Through a ripe cervix, you can push out a baby with about 20 pounds of pressure per square inch. If the cervix isn’t there yet, it can require more like 200 pounds of pressure. So, “cervical ripening before the onset of labor is an important factor” if you want a normal vaginal delivery. “The search for a safe, inexpensive, and easy method of [facilitating] cervical ripening is of great significance.” What happened when a couple hundred women were randomized to eat either six or so dates a day or none at all from around the 37th week of pregnancy until their first contraction?

    Cervical ripening is rated with a Bishop score. Normally, a score of 5 or less “indicates an unfavorable cervix,” whereas you’re good to go with a score of 8 or more. The average Bishop score in the women randomized to the date group was significantly higher, closer to 8, whereas the date-free group scored down around 5. And, for those in the date group, their cervix was more dilated, too. The researchers concluded that since date fruit is healthy anyway, “full of energy and nutrients, it is recommended for pregnant women to help with cervical ripening, particularly in the last weeks” of their pregnancy.

    What about the effects of dates on spontaneous delivery, premature delivery, labor time, and postpartum bleeding? I cover all of that in my video Best Food for Labor and Delivery.

    I love to eat dates as snacks, but I also use them in recipes. Here are two from my How Not to Die Cookbook: Date Syrup and a Balsamic Date Glaze. And, as always, all of my proceeds from book sales are donated to charity.


    Credit: Source link

  • THE ULTIMATE VEGAN GRILLED CHEESE SANDWICH

    THE ULTIMATE VEGAN GRILLED CHEESE SANDWICH

    Greetings, greetings. How are you, darling? 

    I recognize a greasy grilled cheese sandwich, albeit vegan, seems to have nothing to do with a so-called Rawsome Vegan Life. Grilled cheese is not even “healthy,” right!? Let alone raw. What’s goin’ on here? Well, if you’ve been reading any of my recent posts on Instagram and Facebook you may have picked up on my new concepts about food. I say “new,” but I know I’ve actually been meditating on these ideas for years. It’s just in the last year or two I’ve really begun actively practicing better policies in regards to my own relationship with food. I am finally and truly recovering from over a decade of disordered eating. This is a long story and many of you have asked if I could share more about it, which I plan to do. For now, I will keep it short and say: healing from disordered eating looks different for everyone, and for me it looks like eating a lot of rich and refined foods. These foods are literally nourishing and life-giving for me. They include all-dressed potato chips, chocolate cake, white pasta, all the olive oil I want, ice cream in bed, pizza on the dance floor, and so much more. I am in love with Intuitive Eating and the liberation it has given me. I don’t restrict food anymore and therefore I do not binge anymore. I listen to what my body tells me it wants. Lately, it’s been a lot of grilled cheese. Nothing could be healthier for me right now.


    This recipe is a major fave. I’ve been making it almost daily whenever I crave a rich, salty, savoury meal. If you want some colour, you can add veggies, but keepin’ it pure (vegaaaan) cheese is damn good and classic. The short history of this recipe began a couple weeks ago when my two wonderful best friends made us sandwiches in the kitchen of a stranger’s house. I was blown away because while I was expecting it to be yummy, I didn’t realize it would be essentially the SAME as memories of grilled dairy cheese sandwiches I ate when I was a kid. Since then I have been evolving my own recipe and experimenting with different ingredient and techniques. I now bring you this sandwich, which I think nails all the categories I want in grilled cheese: crusty golden brown bread, gooey melted cheese, and a smidgen of colour and extra texture from some veggies.

    I use two different kinds of cheese (Daiya and Toffuti) for a variety of texture and flavour. If you aren’t keen on those brands because of their flavour, you actually can’t discern their taste that much because it kinda blends with everything else. If you have any fancy (or non-fancy) vegan cheeses around, feel free to throw those in too / instead of. I’ve heard Chau works well for grilled cheese.

    Personal updates for folks who care: I’ve had a magical weekend of delicious dancing, food, friends, family, forests and art work. I am positively overflowing with gratitude for the spirits and materials in this life of mine. Currently listening nostalgically to Neko Case (Fox Confessor Brings The Flood) and marinating in the flavours remaining on my tongue of a perfect Nanaimo bar I ate a few minutes ago (thank you, Aislin!): leftovers from a potluck I hosted last night. My anti-depressants are making me LOOPY with temporary side effects as my body adjusts to them (insomnia, heart flutters, head aches, anxiousness, agitation and nausea wooo), but I am dealing with the experience fairly well thanks to hard-learned coping skills and vital emotional support. YES! We can all get through this thing! I believe in you and I believe in me, whatever than means. 

    THE ULTIMATE VEGAN GRILLED CHEESE SANDWICH
    Serves one or two; Print the recipe here!

    1-2 tablespoons olive oil
    1 tablespoon vegan garlic butter (optional)
    2 large slices sourdough bread
    1/4 cup Daiya cheddar pepperjack shreds
    2-3 slices Toffuti cheddar slices
    1 tomato, sliced
    1 cup spinach leaves, more as less as desired
    1/4 teaspoon cracked black pepper
    Ketchup and/or hot sauce, to serve (optional)

    Heat a large non-stick pan over medium-high heat, then bring down to medium-low and add the oil until it’s warmed. Add the slices of bread, and spread butter on the inner sides if you like. On one of the slices of bread: add the Daiya shreds, then top with tomato slices, spinach, and Toffuti cheddar slices. Place the other slice of bread on top of all of this and press down.

    Cook the sandwich for 2-3 minutes, then carefully flip the whole thing over. Cook for another 2-3 minutes or until all the cheese has started to melt and the bread is getting brown and crispy. Be careful it doesn’t burn, though! My technique to keep everything from burning, but still getting the cheese nice and melty, is to turn off the heat once the bread is browned, then put a lid on the pan and take it off the burner. This essentially steams the whole thing so it finished melting the cheese but doesn’t burn the bread. I leave this for 2-3 minutes, then it’s ready! (Another option is to simply throw the sandwich in the microwave.) Serve with ketchup, hot sauce, or whatever you like. Enjooooy!

    Credit: Source link