My family dog has a pretty interesting story, starting with being a wild island dog for the first year of her life before she was rescued and adopted by my family in the much colder Midwest. She has also been my herbal patient many times over the years it seems. Thankfully, she never complains when
I give her herbs and is the most compliant patient I have ever worked with.
This past summer brought another herbal episode for her. She woke up one morning with a mild limp. She had gone to bed the night before without any issue, so I wasn’t sure what was going on. Her paw didn’t seem sensitive to
the touch, so I decided to wait and see what would happen while also watching for potential signs of Lyme disease, as joint problems are a common symptom.
A day or two had passed, and she had gotten worse to the point that she was no longer putting any weight on her paw and it was clearly swollen.
Now I knew that I needed to act. The first thing that came to mind was Dr. Christopher’s Complete Tissue & Bone formula because of how well it works to repair damaged tissue. I didn’t have capsules on hand, but I did have the syrup. I also knew that I wanted to get her some comfrey since the compounds in comfrey would work synergistically with the Complete Tissue & Bone formula to work on the repair her body needed even faster.. As I got her usual food ready for the evening, I added a large dose of Complete Tissue & Bone syrup and one to two tablespoons of dried comfrey root. Since this was an acute issue, I had no
concern over using larger doses. I mixed this all together, and she happily ate all of it. There is definitely a benefit to knowing how to get your dog to take herbs in various forms.
After she finished her dinner, I grabbed a homemade herbal salve that I had created with comfrey, calendula,
plantain, and yarrow. I often use this salve when my kids get owies. I gently rubbed a very generous amount of the salve over the area of her paw that was swollen, and I didn’t bother stopping her when she ended up licking much of it off. The next morning I followed the same protocol when I gave her breakfast. By the early afternoon she was completely better, running and playing as if nothing had happened, and it was no longer swollen at all. I did give her a smaller dose of the protocol with
her dinner for good measure, but really it only took 2 doses for the issue to clear up. She has had no recurrence of the issue.
Thinking back over the whole situation, it really shines a light on the need to act quickly when it comes to acute issues instead of letting them fester. The quicker that
we start working on the problem, the faster that we see results. It is also helpful to have a compliant client who willingly takes their full dose of herbs without complaint.
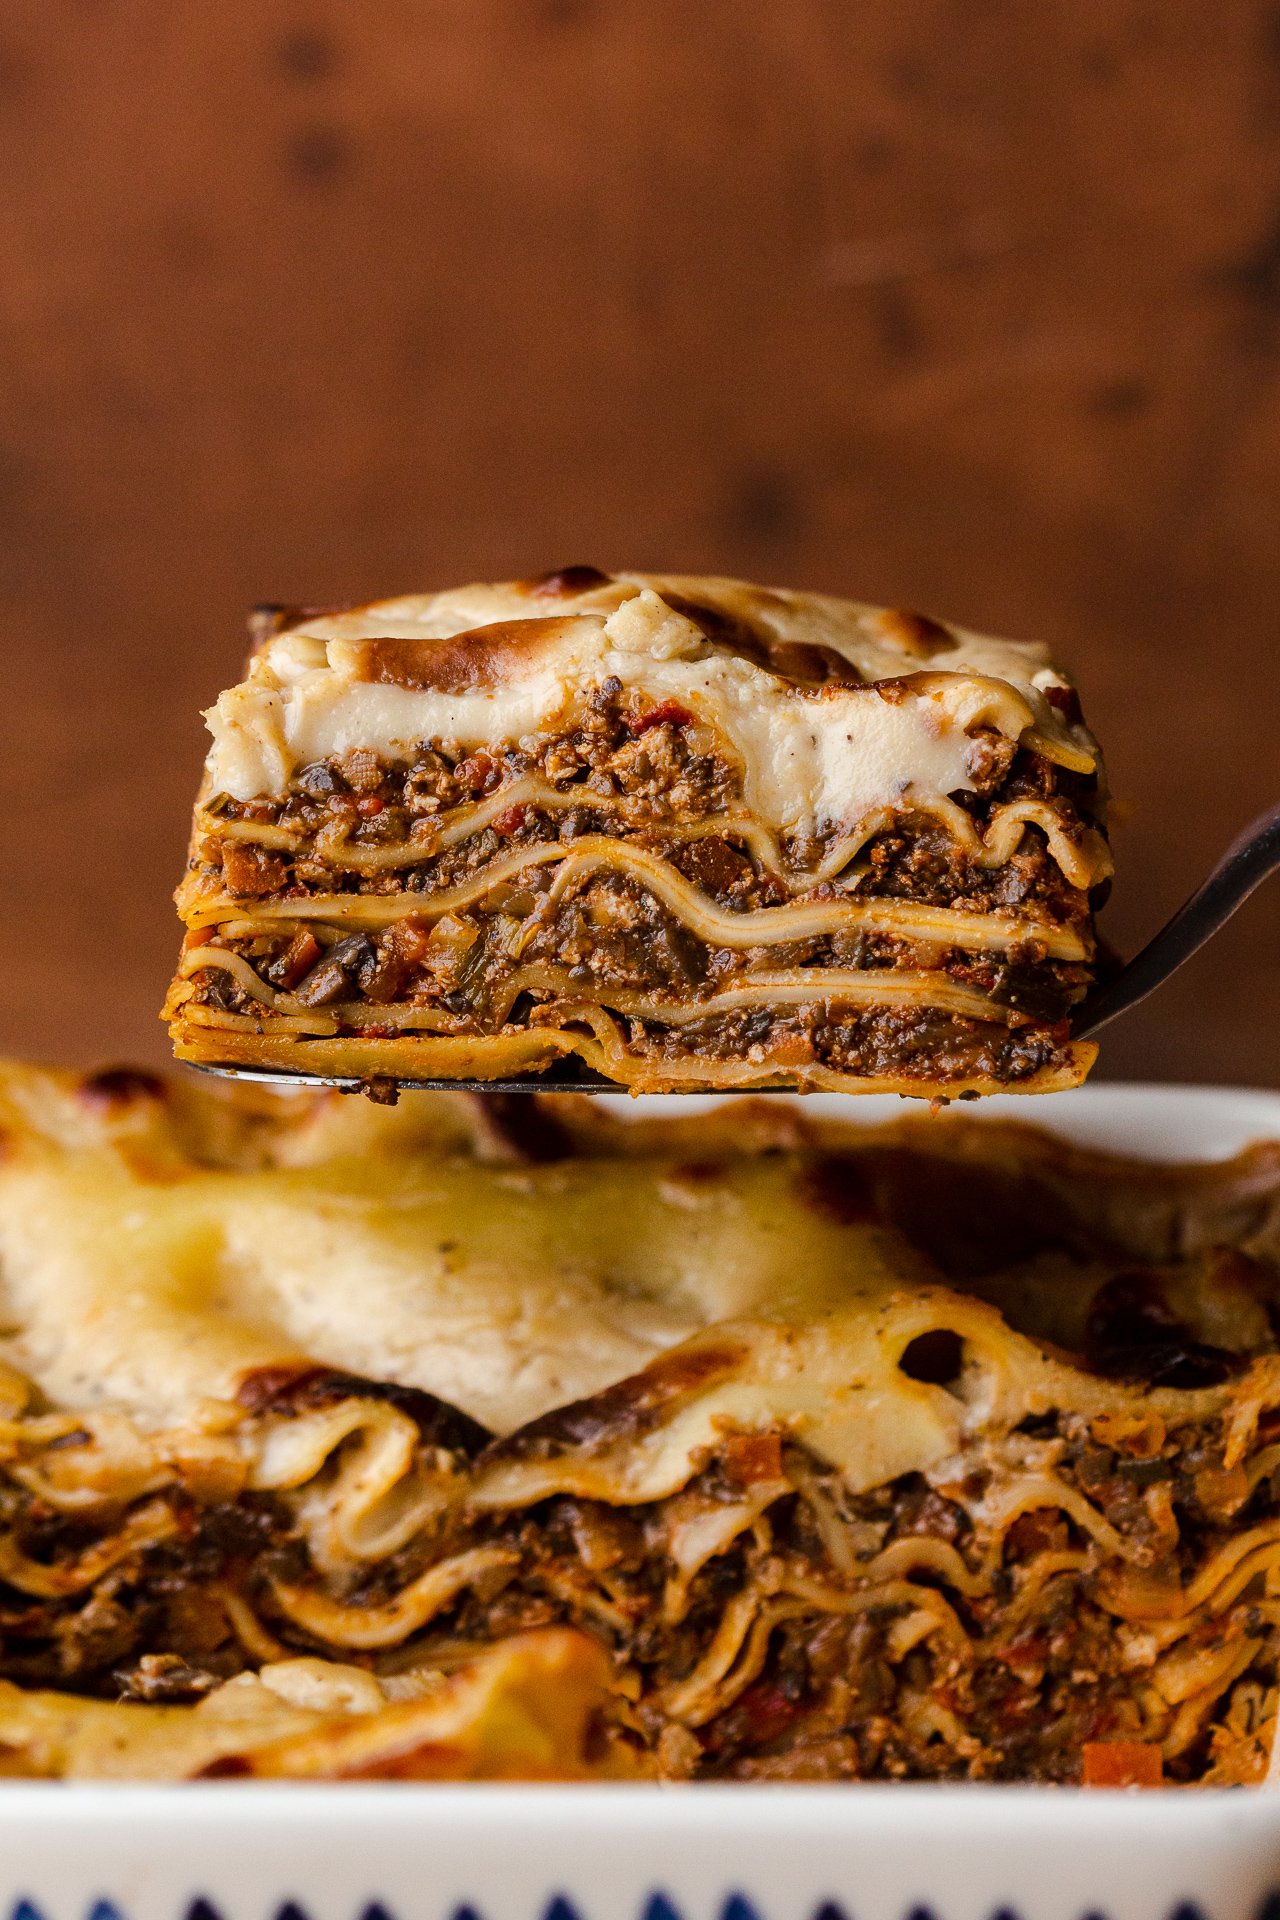
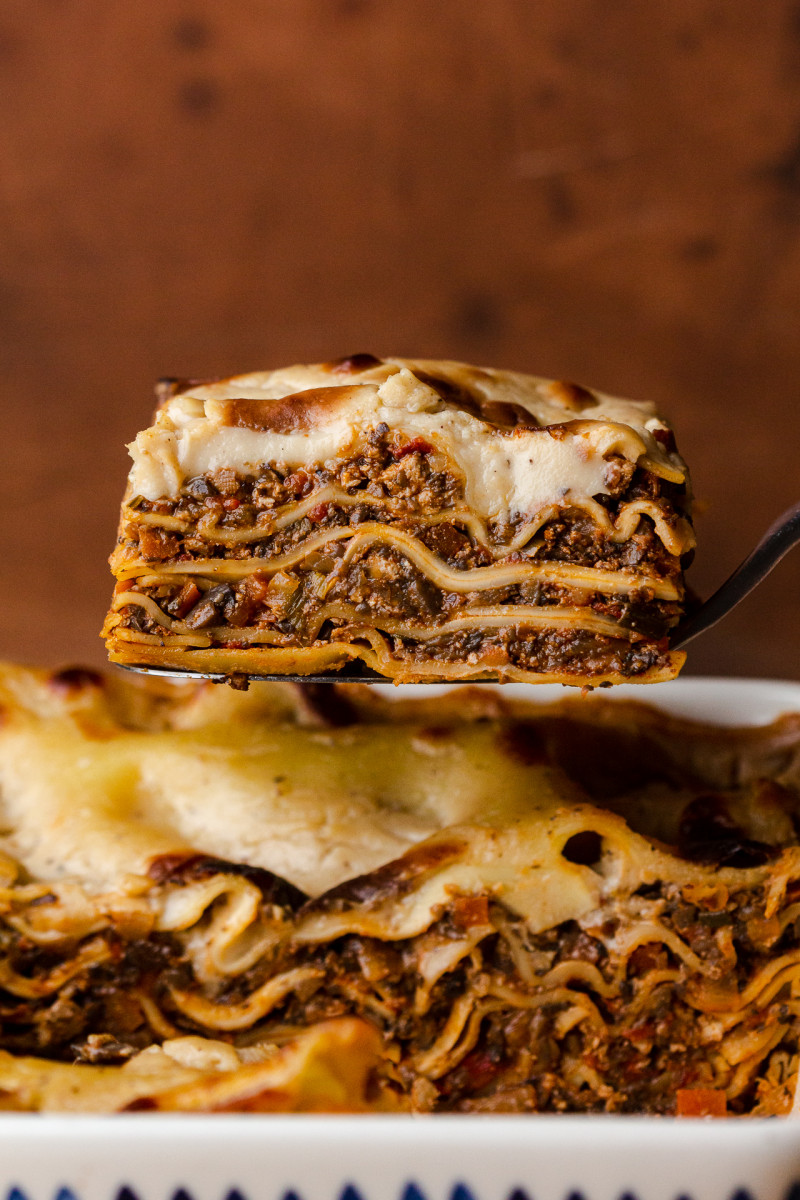
This winter is kicking me hard and I guess I am not alone. The weather has been grim, it’s been raining on and on and on over here in Bristol. We’ve been thrown a few cold yet sunny days here and there, which make a massive difference to my and my cat’s mood, but these are few and far between and dark clouds and the sound of raindrops hitting our chimney have been pretty much non stop otherwise. This kind of weather calls for some comfort food in my books so today’s recipe is exactly that – vegan lasagne bolognese. It’s delicious, full of umami, not hard to put together – if a bit time consuming – and so comforting.
Vegan lasagne, like any dish of this kind, benefits from being made in advance. This gives the flavours a chance to develop and mingle and makes the finished dish so much more satisfying. I recommend making bolognese sauce and the béchamel at least a day in advance although a couple of days is even better. Below, I will walk you through the individual components and the process of making a dish like this so that you can nail even if you are new to cooking from scratch.
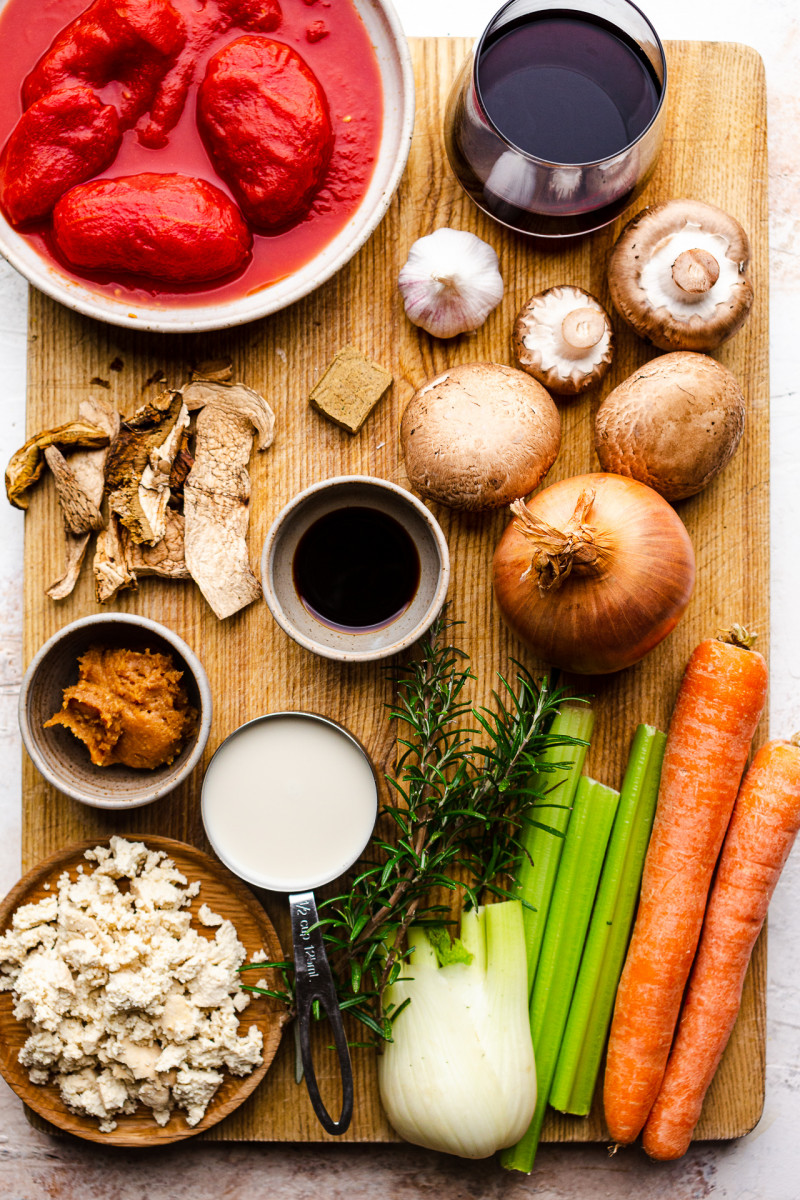
MORE ABOUT THE INGREDIENTS
ONION, GARLIC: Not much of an explanation needed here as these are true staples of any savoury dish, the world over. Some people add them to the pan together to speed things up, but I prefer to give the onion a head start as it takes considerably longer to cook than garlic and garlic is prone to burning when exposed to too much heat, which can render a dish bitter. Go slow and low with these two ingredients and remember to stir often, don’t worry if the pan catches a little – the next three ingredients (see next point) do a great job of deglazing the pan and the stuck in bits is where the true flavour lies…
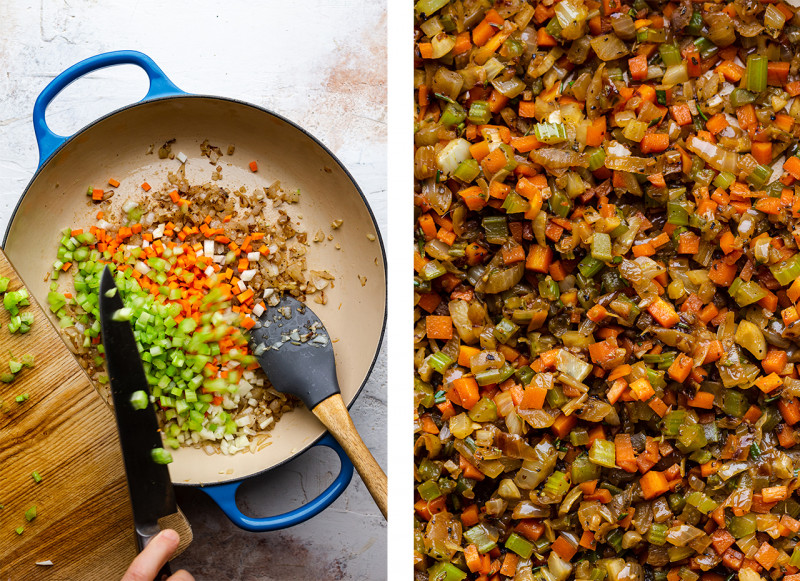
CELERY, CARROT, FENNEL: Celery and carrot (sometimes fennel, which I personally like to add) are a part of what is known in Italian cooking soffritto. Soffritto, which also includes onion, forms a base flavour of many Italian sauces, stews and soups. It requires fairly slow cooking until translucent so don’t rush this step. I like dicing all these veg but hand as I am a bit of perfectionist, but you could speed things up if you wanted. Chop them roughly and then pulse them in a food processor until small and fairly uniformly minced.
SMOKED TOFU: I used minced smoked tofu, in combination with umami-rich mushrooms, to replace traditionally used minced meat. You can either slice the tofu and crumble it small with a fork or tear it into pieces with your hands and pulse in a food processor. I used a UK brand of smoked tofu that has already been pressed by the manufacturer. It comes in 225 g / 8 oz packet. If using unpressed tofu, buy 300 g / 10.5 oz and press before using for best results. If you cannot find smoked tofu, compensate by increasing the amount of smoked paprika or by adding a few drops of liquid smoke. This ingredient can be replaced with rehydrated soya mince, cooked Puy lentils, crumbled steamed tempeh cooked pearl barley, chopped toasted walnuts or sunflower seeds – there are a lot of options but I love the meatiness and savouriness that smoked tofu provides and if you don’t want to eat tofu because you are worried you will grow man boobs (if you are a man) or get cancer, don’t believe dairy and meat industry lies! Unless, you are allergic to it, soy is healthy! Here is some peer-reviewed science to back it up.
MUSHROOMS: Finely minced mushrooms are the second part of my mince replacement strategy 🙂 . They bring so much flavour to this dish that it would be unwise to swap them for anything else. Even if you dislike mushrooms, do give this dish a try – they are chopped so small that they won’t jump out from the medley of flavours, I promise. I used widely accessible brown chestnut (known as cremini in the US) mushrooms, but I used regular button mushrooms for one of my tests and they work just as well. Any mushrooms you enjoy will work. You can either process them in a food processor (which I prefer in this case) or dice very finely by hand.
RED WINE: Dry wine (I used red) is used to deepen the flavour of the sauce and if you worry about alcohol content know that it cooks out during cooking, or you could use non alcoholic wine instead. If that’s not a option, use veggie (or more mushroom) stock and a tablespoon of good balsamic vinegar.
MUSHROOM STOCK: Mushroom stock adds flavour to the sauce. You can either make it by immersing dry porcini mushrooms in boiling water for as long as you can or dissolving a mushroom (often also called umami) stock cube in water instead. If using procini be aware that they are often very gritty and sometimes contain little bugs (!) too. I like to drain porcini stock through a paper towel lined sieve to ensure none of these things end up in my sauce.
PLUM TOMATOES: A small amount of canned tomatoes adds body and tanginess to the sauce and improves its texture. I use peeled plum tomatoes, which I crush with a potato masher before adding to the pan to ensure even distribution throughout the sauce.
SOY SAUCE: A small amount of soy sauce adds depth of flavour to this sauce alongside some saltiness. Use wheat free tamari if making this dish gluten-free.
RED MISO PASTE: Red miso paste, which is a more assertive cousin of white miso paste. Miso is used here to add umami and savouriness to this sauce and it delivers that in spades. It could be subbed with white miso at a push, but I would recommend trying to get your hands on red miso paste if you can – nowadays it’s available not only in Asian grocery stores, but in well stocks supermarkets too. If you are making this dish gluten-free, look for miso that is based on chickpeas, brown rice, millet etc., rather than wheat.
HERBS: In terms of choice of herbs, you can use whatever combination you enjoy in a sauce like that. I went for fresh rosemary – 1 long sprig, leaves chopped finely – purely because I have it growing in my garden. I topped it up with some dried sage and oregano. You can use fresh or dry herbs, but it’s worth remembering that dry herbs (provided they are not stale) tend to be roughly 3 times more potent than fresh, meaning 1 tsp of dry herbs equals 1 tbsp of chopped fresh herbs.
LASAGNE PASTA: Unless the packet states ‘egg pasta’, most lasagne sheets are vegan these days so you will have no trouble finding them. I tend to go for no cook sheets as they are less hassle but to make sure lasagne stays moist inside after baking I immerse my sheets in cold water briefly before layering. This quenches some of pasta’s thirst.
PLANT MILK: I added a cup of oat milk to the sauce at the end as per traditional lasagne bolognese recipes and used it to make bechamel too. I like oat milk (I used Oatly barista) in this dish, but you can use any creamy, neutrally flavour plant milk instead.
OLIVE OIL: I use mild olive oil as a base for my bechamel sauce, but vegan butter or a mixture of the two works well too.
FLOUR: I use all purpose wheat flour to make a roux for my bechamel. If making this dish gluten-free, use a good gluten-free flour mix that includes starches and ideally some xantham gum.
Sauté onion and garlic in some olive oil until translucent, then add finely chopped celery, carrot and fennel – soffritto. Season and sauté until no longer opaque. Remove from the pan and set aside.
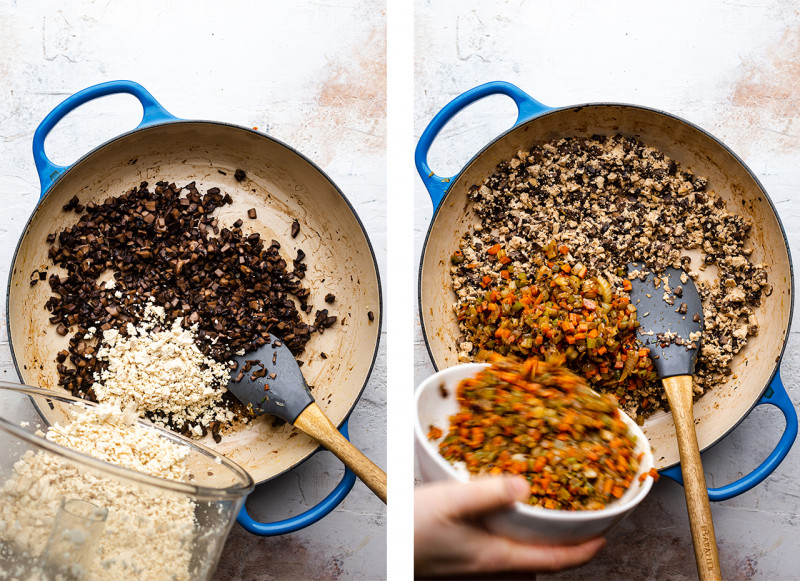
Add minced mushrooms and a pinch of salt to the same pan. There is no need to wash it and if there are bits of soffritto that stuck to the pan, the moisture from the mushrooms will deglaze the pan beautifully. Cook the mushrooms on low heat until dark brown and all of the water has evaporated. Once the mushrooms are dry, add some oil, minced tofu, herbs, smoked paprika, and soy sauce. Cook a little further, stirring from time to time, to caramelise. Then sautéed vegetables back in before proceeding to the next step.
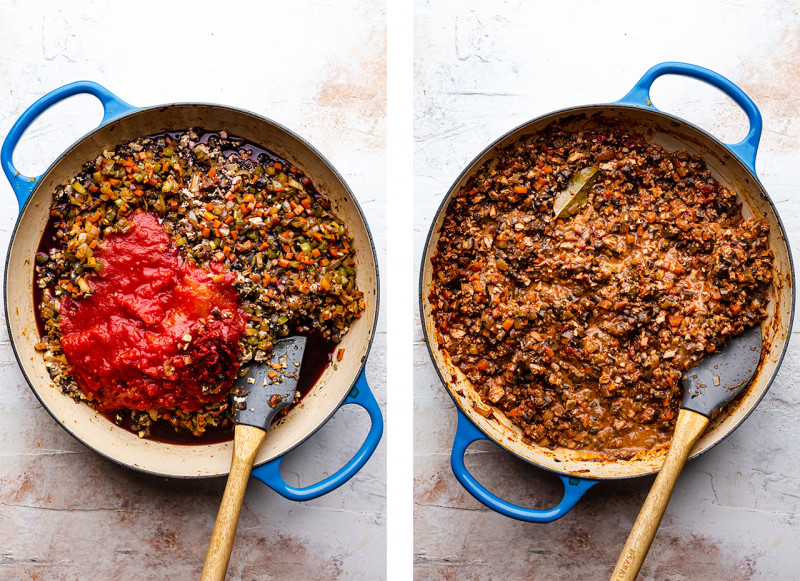
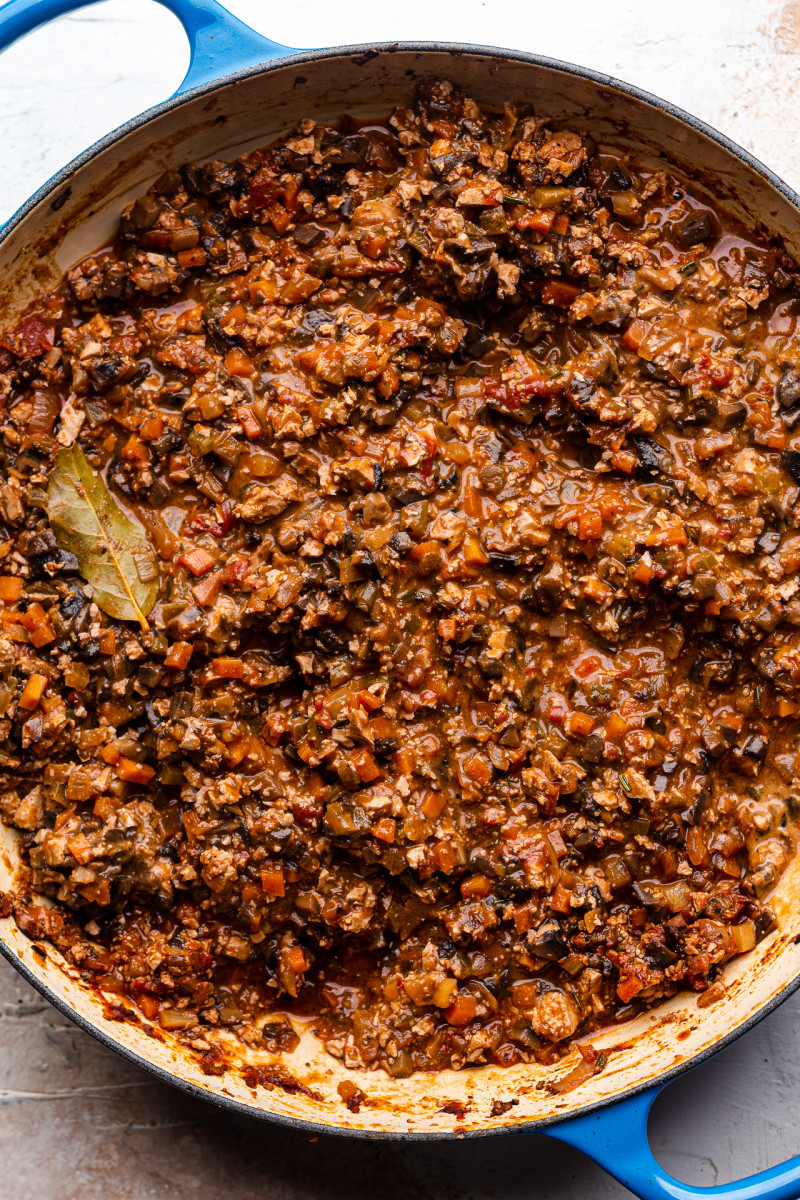
Next add in wine, crushed plum tomatoes (I crush them with a potato masher), tomato paste and miso paste diluted in mushroom stock. Mix well and allow this whole mixture to come to a gentle simmer. Simmer for about 30 minutes uncoverer, until tomatoes are cooked and thickened. Finally stir in oat milk, simmer for 5 more minutes, adjust the seasoning and switch off the heat.
Once the sauce is cold, it is ready to store for up to 3 days or for you to assemble your lasagna.
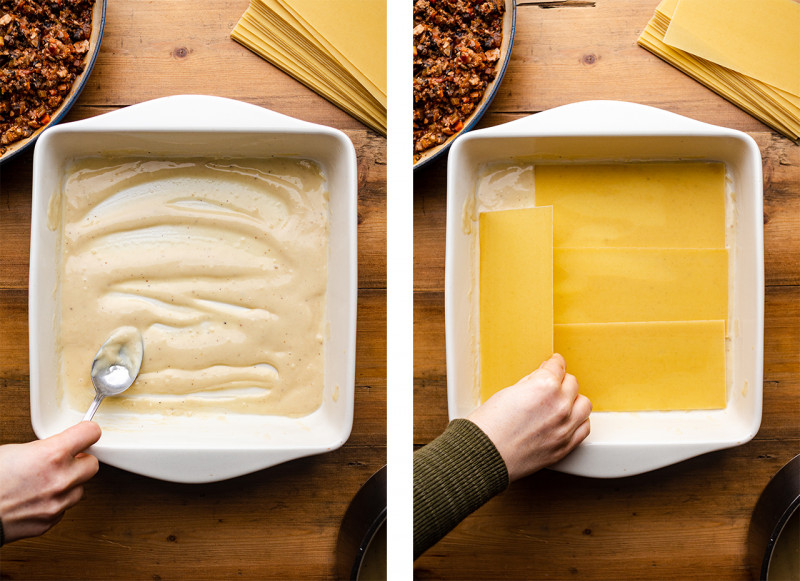
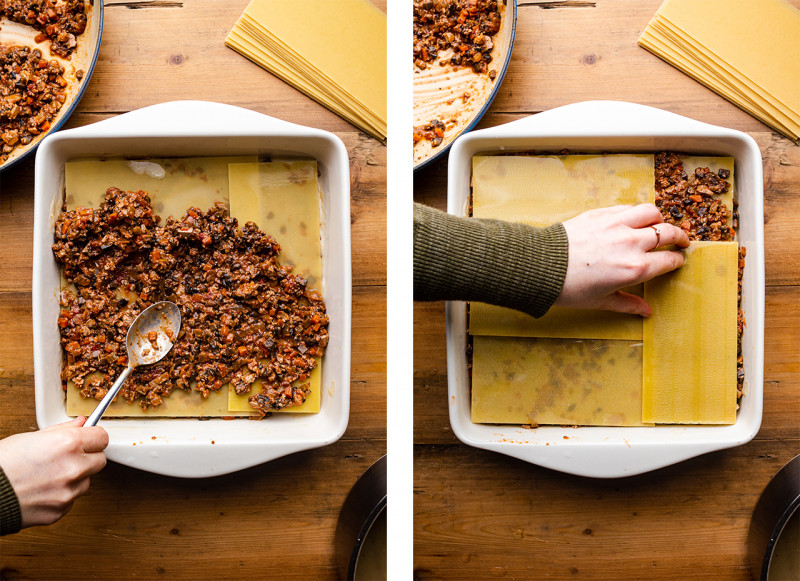
Start off with a small amount of béchamel sauce and a splash of water mixed together, cover them with pasta sheets – overlapping the slightly if needed and breaking some with your hands to cover smaller gaps. I like to immerse my no cook pasta sheets in cold water before using so that the pasta does not suck too much moisture out of the sauce.
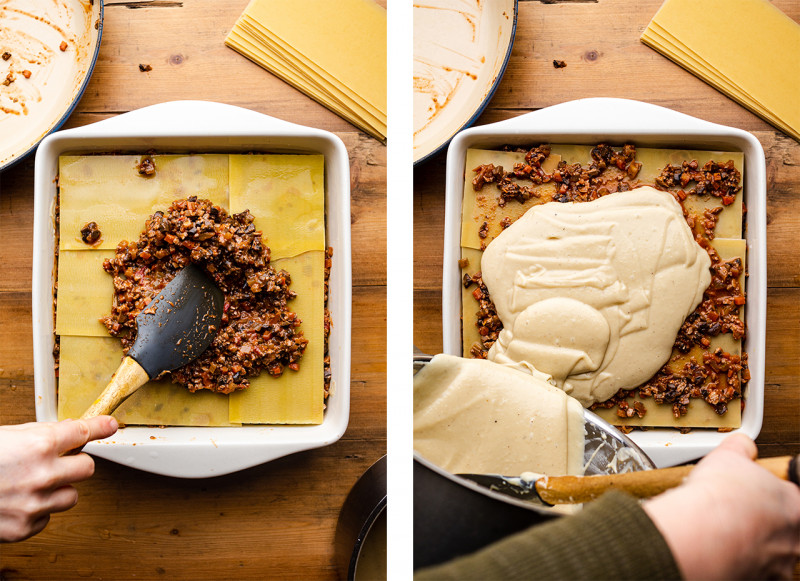
Spread a layer of bolognese sauce over the pasta and follow up by more pasta sheets. Carry on in this manner until you have 4 layers of bolognese covered by a layer of pasta.
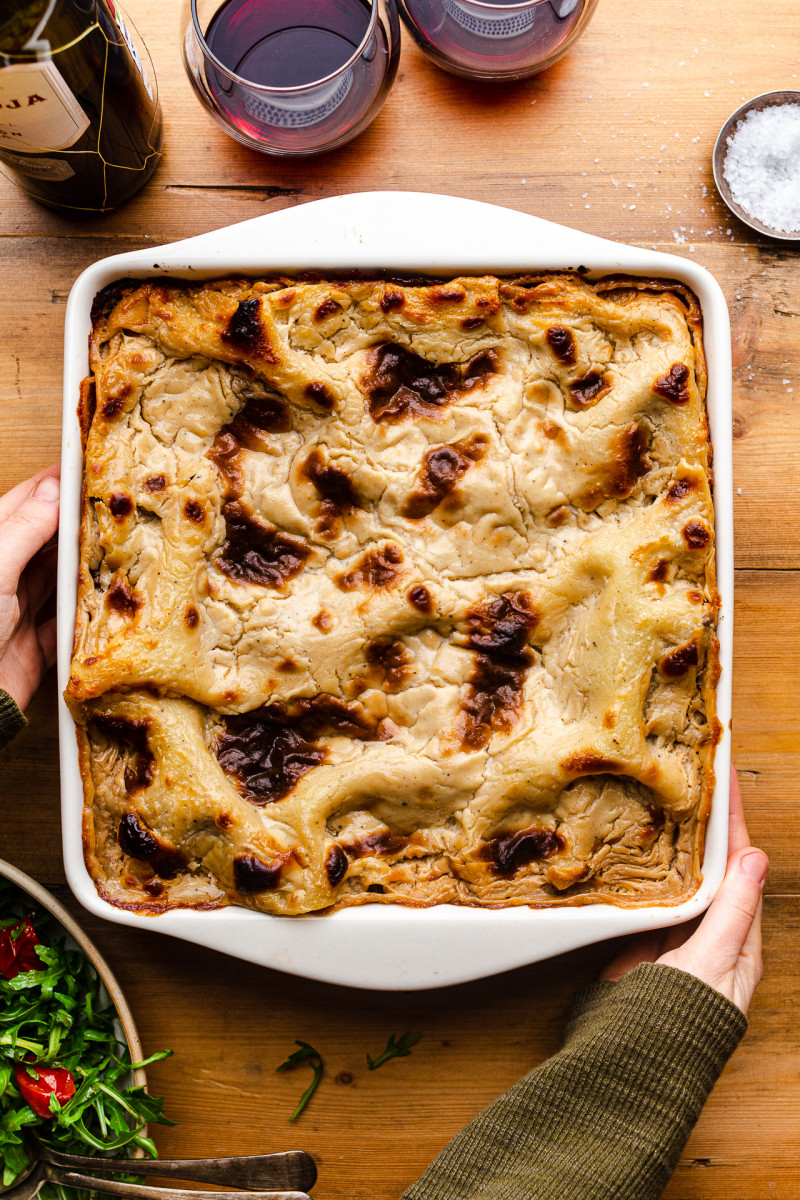
Spread some more bolognese sauce (a smaller amount is fine) on the last layer of pasta and then pour bechamel directly on top. Spread it with a spatula and bake for 40-45 minutes, until the dish is bubbling and the top is golden brown. Allow it to set for an hour before cutting or, even better, wait to serve until the next day – lasagne’s flavours will benefit from a prolonged rest.
BOLOGNESE SAUCE
240 ml / 1 cup mushroom stock (from 15 g / 1 oz dry porcini or mushroom stock cube)
60 ml / 4 tbsp olive oil, divided
1 large onion
5 garlic cloves
150 g / 2 celery ribs
200 g / 2 large carrots
100 g / ½ large fennel
225 g / 8 oz pressed smoked tofu* (see NOTES)
500 g / 17½ oz mushrooms (I used chestnut/cremini)
½ tbsp chopped rosemary leaves or ½ tsp dry
½ tsp dry rubbed sage
½ tsp dry oregano
1 tsp smoked paprika (add more if using regular tofu)
freshly grated nutmeg, to taste (or scant ¼ tsp ground)
METHOD
BOLOGNESE SAUCE (makes 1.5 lt / 6 cups)
Make mushroom stock by pouring boiling water over dried porcini or dissolving a mushroom stock cube in hot water. If using procini, let it infuse at least 45 minutes (longer is better).
Dice garlic, onion, celery, carrot and fennel very finely or dice the first two finely and chop the last three coarsely and pulse in a food processor until small and uniform.
Remove vegetables from the food processor and pulse tofu (torn into chunks) until finely minced or mash it with a fork. Remove the tofu and add sliced mushrooms. Pulse until chopped very small without many big pieces left. Alternatively, dice finely by hand.
Heat up 2 tbsp olive oil in 30 cm / 12″ heavy-bottom pan. Once the oil starts shimmering, add diced onion and sauté, on a low-medium heat, until soft and translucent (about 10 minutes).
Add in the garlic and fry for a few more minutes until fragrant. Don’t worry if the pan catches a little, it will get delgazed in the next step.
Next, add in celery, carrot and fennel and a good pinch of salt and pepper. Sweat on low heat until translucent, stirring from time to time (about 15 minutes).
Remove soffritto (aromatics and vegetable mixture) from the pan and set aside.
Add mushrooms and a good pinch of salt and pepper to the same pan. Sauté, stirring occasionally, until mushrooms turn dark brown and all of their moisture cooks out (evaporates).
Next add in 2 tbsp of oil, minced tofu, herbs, smoked paprika and soy sauce. Mix everything together and sauté for a few more minutes stirring now and then, don’t worry if some of the mixture sticks to the pan.
Return soffritto to the pan, add crushed plum tomatoes (I use potato masher), tomato and miso paste, wine, mushroom stock and bay leaves.
Simmer for about 30-45 minutes, until tomatoes have fully broken down – check up on the sauce and add a splash of water if the sauce is looking dry.
Finally stir in a cup of plant milk (I use Oatly barista) and simmmer for 5 more minutes before switching the heat off – this sauce needs to be quite moist as it will dry out more during baking.
Adjust the seasoning and add a touch of sweetness if desired. Set aside to cool.
BECHAMEL
Warm plant milk up in a small saucepan. Place miso in a small bowl and add a couple of tablespoons of milk from the saucepan, stir until it dissolves, set aside.
Slowly heat up olive oil in a large saucepan (stainless steal works best for this). Once the oil starts to shimmer, sprinkle in flour while whisking to avoid lumps.
Allow the fat-flour mixture (known as roux) to bubble gently on low-medium heat for a whole minute, whisking the whole time. Don’t let it brown.
Take the pot off the heat and slowly pour in warmed plant milk while whisking the whole time. Initially the mixture may look a bit lumpy – don’t worry, it will recover once all the milk has been whisked in. Once the mixture looks stable and smooth, whisk in miso and nutritional yeast and garlic powder (if using).
Return the pot to the stove. Simmer only just enough for the sauce to thicken slightly, to a consistency of cream. Season with salt, pepper and nutmeg to taste.
ASSEMBLY
Preheat the oven to 180° C / 390° F (or 20° C / 70° F less with fan). Grab a bowl of cold water.
Add 2 tbsp of water and 1/3 cup (80 ml) of béchamel sauce to the bottom of the dish, mix the two together. Immerse each pasta sheet in cold water briefly before placing it on top of each filling – it keeps your lasagne from drying.
Spread heaped 1¼ cups (300 ml) of bolognese sauce on top and cover with a layer of pasta. Repeat 3 more times so that there is 4 layers of bolognese sauce covered with a layer of pasta.
Spread what is left of bolognese sauce on top of the last pasta laye and pour the béchamel on top of the last portion of bolognese sauce, spread evenly.
Bake for about 30 minutes then increase the oven temperature to 220° C / 430° F for the last 10-15 minutes to speed up browning.
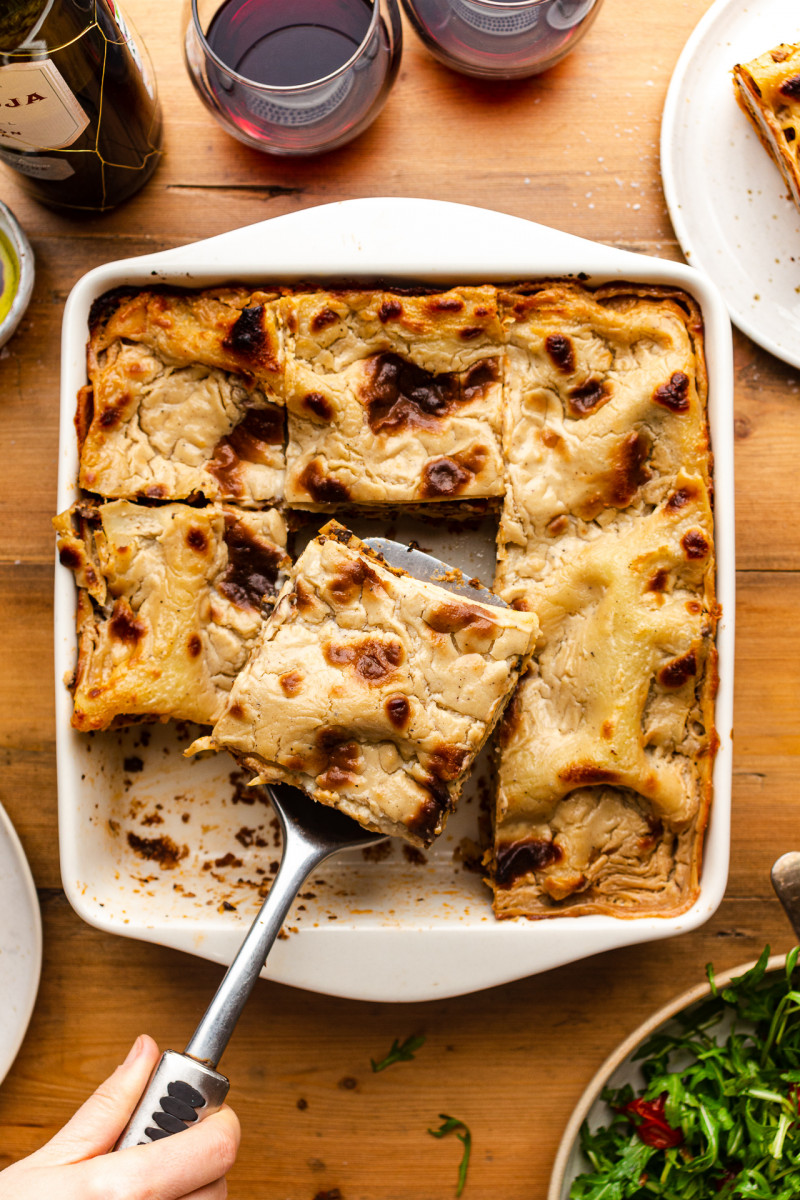
Allow the dish to set for at least an hour or else the slices will come out messy. Store the leftovers for up to 5 days in the fridge or freeze in air-tight containers.
NOTES
*TOFU: I used a UK brand of tofu that is already pressed and weights 225 g / 8 oz. If using unpressed tofu, go for 300 g / 10.5 oz and press before crumbling for best results. I recommend using smoked tofu in this dish, but you could also use regular tofu and add more smoked paprika or a few drops of liquid smoke to compensate.
*SALT: It may seem like a lot of salt given that both miso and soy sauce also contribute saltiness, but I am happy with this amount as no cook pasta layers go in unseasoned and so the sauce compensates for that lack of seasoning. Do, however, use your own judgement when seasoning as everyone’s palate is a little different.
*TOMATOES: I used 1 x 400g / 14 oz can of tomatoes to keep this recipe as close to the original as possible and to let other flavours shine, but if you prefer a saucier version, feel free to add two cans instead. Be aware that the simmering time required will be a little longer.
*PASTA SHEETS: If you wish to make this dish gluten-free, find gluten-free pasta sheets and a gluten-free miso that is based on something other than wheat (rice, chickpeas, millet etc.). To make bechamel, use a gluten-free flour mix containing starches and xanthan gum.
*GARLIC: Usually I love adding an entire head of roasted garlic cloves to my béchamel, but I’ve removed that ingredient here as I didn’t want the recipe to be even more involved. If your oven is on at 200° C / 390° F at any point, whack one (or more) head of garlic in for about 30 minutes. Cut the top of the garlic head off to expose the cloves, drizzle exposed cloves with a teaspoon of olive oil and wrap tightly in a piece of kitchen foil (or triple layer of baking paper) and bake until the cloves are soft, semi-translucent and caramelised (sticky). Store leftovers in the fridge, in an air-tight container for 1-2 weeks.
*BAKING DISH SIZE: I used a square 25 cm / 10 inch dish that is 5 cm / 2 inches tall, a rectangular 33 cm / 13 inches by 22.5 cm / 9 inches dish works well too.
When it comes to small supplement tubs that pack a big punch, L-glutamine is possibly one of the most beneficial.
L-glutamine is the most abundant free amino acid in muscle cells, and is a vital compound required to preserve muscle during and after exercise.
READ MORE | 5 Easy Ways To Boost Your Protein Intake
Conditionally essential in times of stress
During times of heightened stress, which can include intense or high-volume training blocks, recovering from illness, or periods of psychological or emotional stress, the body’s glutamine requirements may exceed what it can produce from food alone (your body makes glutamine from BCAAs in muscle cells).
And low muscle glutamine levels can negatively impact recovery, result in muscle loss and a depress your immune response.
READ MORE | Recovering After Exercise. Is It All About Nutrient Timing?
Support your recovery with supplements
Supplementing with glutamine may help to prevent this drop in muscle glutamine, which can provide a potent anti-catabolic effect while also helping to boost muscle cell volume and hydration.
Supplementing with glutamine also plays an important role in maintaining optimal muscle metabolism, supporting the immune system and speeding up recovery.
READ MORE | How To Boost Your Immunity
Digestion and immune support
L-glutamine also plays a valuable role in promoting a healthy digestive tract by supporting the structural integrity of the intestinal lining, potentially helping to reduce inflammation, and positively impacting the balance of beneficial probiotic bacteria in the microbiome.
In terms of the immune system, various immune cells require glutamine to replicate. However, these cells cannot produce this ‘non-essential’ amino acid themselves. And when we’re sick, we require additional glutamine to support immune cell function.
In these instances, glutamine becomes a ‘conditionally essential’ amino acid, which means the body is unable to produce sufficient glutamine to meet its requirements.
During these periods, glutamine supplements can help protect your muscles, aid recovery and support your immune system.
Author: Pedro van Gaalen
When he’s not writing about sport or health and fitness, Pedro is probably out training for his next marathon or ultra-marathon. He’s worked as a fitness professional and as a marketing and comms expert. He now combines his passions in his role as managing editor at Fitness magazine.
I compare the diets of the Roman gladiator “barley men” and army troopers to the modern Spartans of today.
The remains of dozens of Roman gladiators were recently discovered in a mass grave in ancient Ephesus (Turkey). The clue to their identities was the rather distinct types of mortal injuries the researchers found, like being speared in the head with a trident, as you can see at 0:15 in my video The Gladiator Diet: How Vegetarian Athletes Stack Up. Just by examining the skeletons, the researchers were able to reconstruct the deathblows, show just how muscular and buff the gladiators really were, and even try to reconstruct their diet “of barley and beans.” You can look at carbon isotopes and see what kinds of plants they ate. Nitrogen isotopes reflect intake of animal protein, for example, and looking at the sulphur in their bones and the amount of strontium led commentators to submit that the best athletes in ancient Rome ate largely plant-based diets.
The legionnaires, the Roman army troopers famed for their fighting abilities, also ate a similar kind of diet, suggesting the “best fighters in the ancient world were essentially vegetarian.” So, if the so-called perfect fighting machines, the great sports heroes of their day, were eating mostly grains and beans, what does that tell us about sports nutrition and the preferred diets of elite athletes? “The diet of most Greeks and Romans was basically vegetarian,” centered on grains, fruits, vegetables, and beans, so maybe the gladiators’ diets weren’t that remarkable. Ancient Greek philosopher Plato pushed plants, for instance, preferring plant foods for their health and efficiency.
The Roman gladiators were known as the “barley men.” Did they eat barley because it “gave them strength and stamina,” or just because barley was a common, “basic food” people ate at the time—not necessarily for performance, but because it was cheap?
Let’s look at the modern Spartans, the Tarahumara Indians, who run races where they kick a ball for 75 miles just for the fun of it. They run all day, all night, and all the next day for “as much as 150 miles and more” if they’re feeling in the mood. What do they get if they win? “Interestingly, a traditional prize of victory is said to be a special popularity with the women (although how much of a reward that would actually prove to be for a man who had been running for two days and a night is questionable, to say the least!).” Though, maybe their endurance extends in other arenas, as well.
“Probably not since the days of the ancient Spartans has a people achieved such a high state of physical conditioning.” So, what do they eat? They eat the same kind of 75 to 80 percent starch diet, based on beans, corn, and squash, and have the cholesterol levels to prove it, with total cholesterol levels down at 136 mg/dL, which is essentially heart attack-proof. They don’t have special genetics, either, because data show that if you feed them enough egg yolks, their cholesterol levels creep right up, as you can see at 2:52 in my video.
Modern day Olympic runners eat similarly. What are they eating in Kenya? They’re following a 99 percent vegetarian diet centered mostly on various starches. But, as in all of these cases, is their remarkable physical prowess because of their diets or in spite of them? Or, does their athleticism have nothing to do with what they’re eating? You don’t know until you put it to the test.
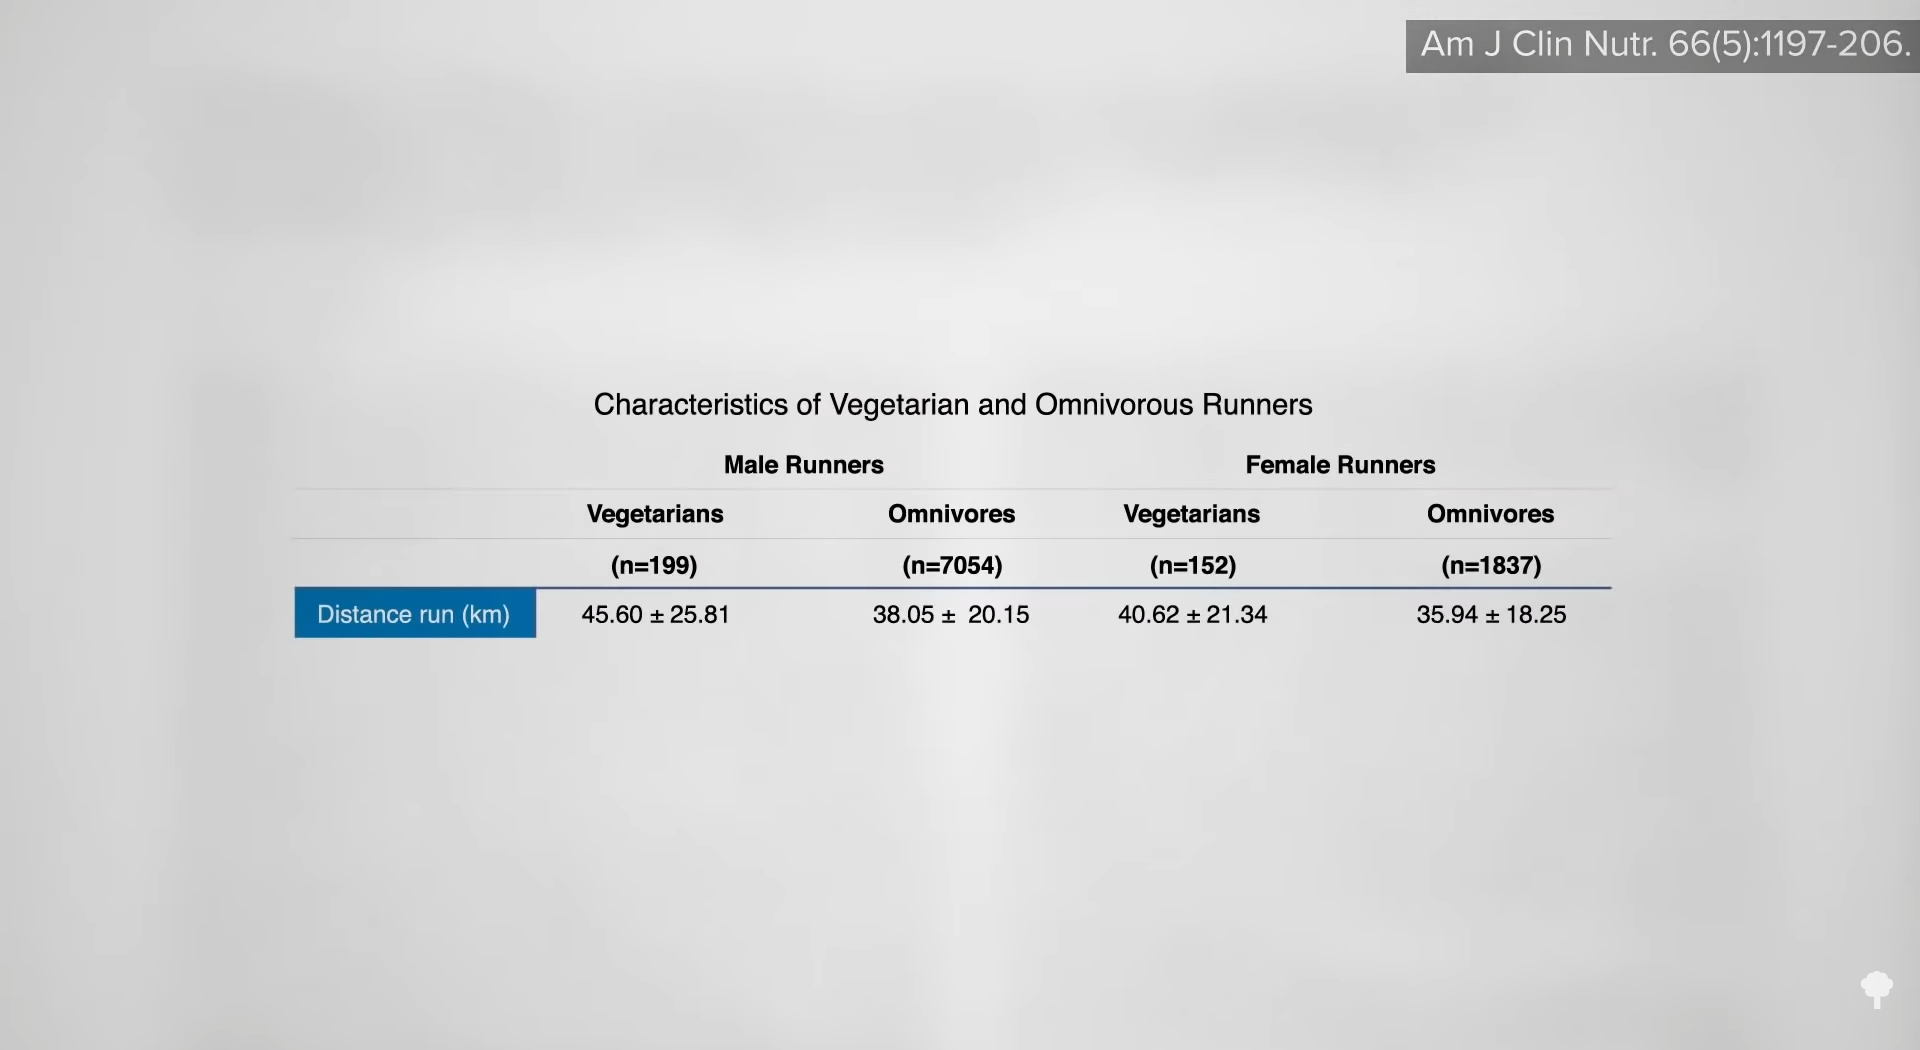
“In spite of the well-documented health benefits of vegetarian diets, less is known regarding the effects of these diets on athletic performance.” Researchers compared elite vegetarian and omnivore endurance athletes for aerobic fitness and strength by comparing oxygen utilization on the treadmill and quad strength with leg extensions. The vegetarians beat out their omnivore counterparts for cardiorespiratory fitness, but their strength didn’t differ. This suggests, at the very least, “that vegetarian diets do not compromise performance outcomes and may facilitate aerobic capacity in athletes.” But, this was a cross-sectional study. Is it possible the vegetarian athletes were just more fit because they trained harder? The National Runners’ Health Study looked at thousands of runners, and, as you can see at 4:06 in my video, vegetarian runners were recorded running significantly more on a weekly basis. Maybe that explains their superior fitness, though perhaps their superior fitness explains their greater distances.
Other cross-sectional studies have found no differences in physical fitness between vegetarian and non-vegetarian athletes, while another one found even worse performance among vegetarian athletes, but there could have been socioeconomic or other confounding factors. That’s why we need interventional studies to put different diets to the test and then compare physical performance.
This year we celebrate Ginger as herb of the year for 2023 according to the International Herb Association. This is an important herb to us and was
cherished by Dr. Christopher. He used ginger in many of his herbal formulas. He called it a lead sheep because it has the ability to take the other herbs where they need to go. He was able to target the area in need because of the ginger in the formula.
Dr. Christopher tells the following story about ginger:
I remember when a lady called from Salt Lake to my residence in Cottonwood at three o’clock in the morning. Her daughter was screaming in the background with terrible stomach pain. I was tired, as I had been out on night calls and had just barely retired to bed, and I said, “Take some ginger and baking soda. The pain will stop; and go back to bed. I’ll call in the morning.” She begged, “Oh, you’ve got to come.” So I said, “all right.”
I pulled on my clothes and set out. It was eight or ten miles, so before I got there the pains grew so acute that she finally decided to do what I told her to do. And when I arrived, the daughter met me at the door – all smiles – no pain. (School of Natural Healing, page 418).
In the School of Natural Healing book, it mentions ginger as a mild stimulant. It goes from the capillaries, through the venous structure, to the heart and back again. It is more diffusive than cayenne but may be used as a substitute for it when it is unavailable. Ginger is well known for its circulatory and digestive
properties.
Studies have shown ginger to be useful in motion sickness and nausea, rheumatoid arthritis, migraines, and as an
anti-inflammatory agent.
Historically ginger has been used as a carminative. It helps to expel excess gas out of the
intestinal tract. Its qualities are antispasmodic, diaphoretic, sternutatory (makes you sneeze), rubefacient, pungent and condiment. Some of the things it has been used for are boils, bronchitis, colds, congestion, diarrhea, flatulence, flu, gout, headache, menstruation, nausea, neuralgia, paralysis of tongue, sore throat, and toothache.
Externally ginger can be used for inflammation. A decoction can be made and used as a fomentation to relieve pain and congestion. In the tub a couple of tablespoons can be added to the water to promote perspiration in case of fevers. This can also help relieve tired and achy
muscles.
I think ginger is a great selection for herb of the year. We have used it many times for a variety of reasons, and
we often mix it with other herbs to enhance their use. May we all honor the herb Ginger this year and always.
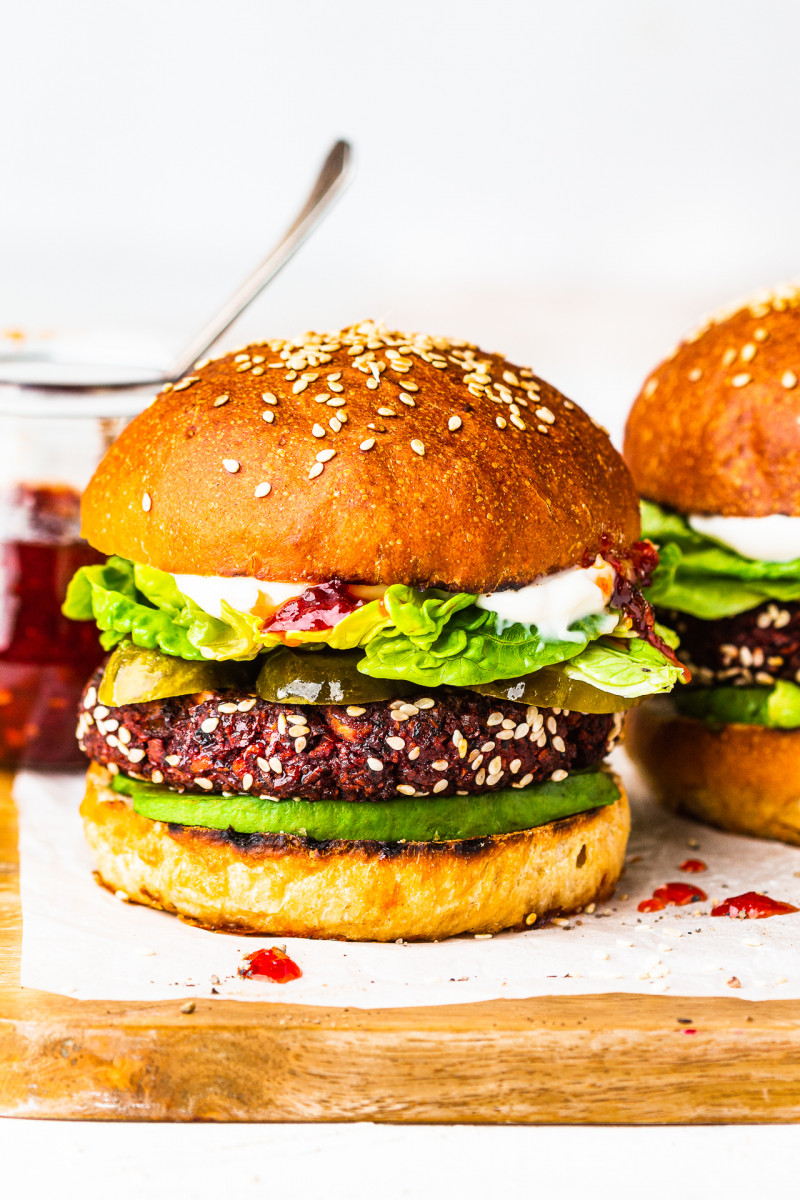
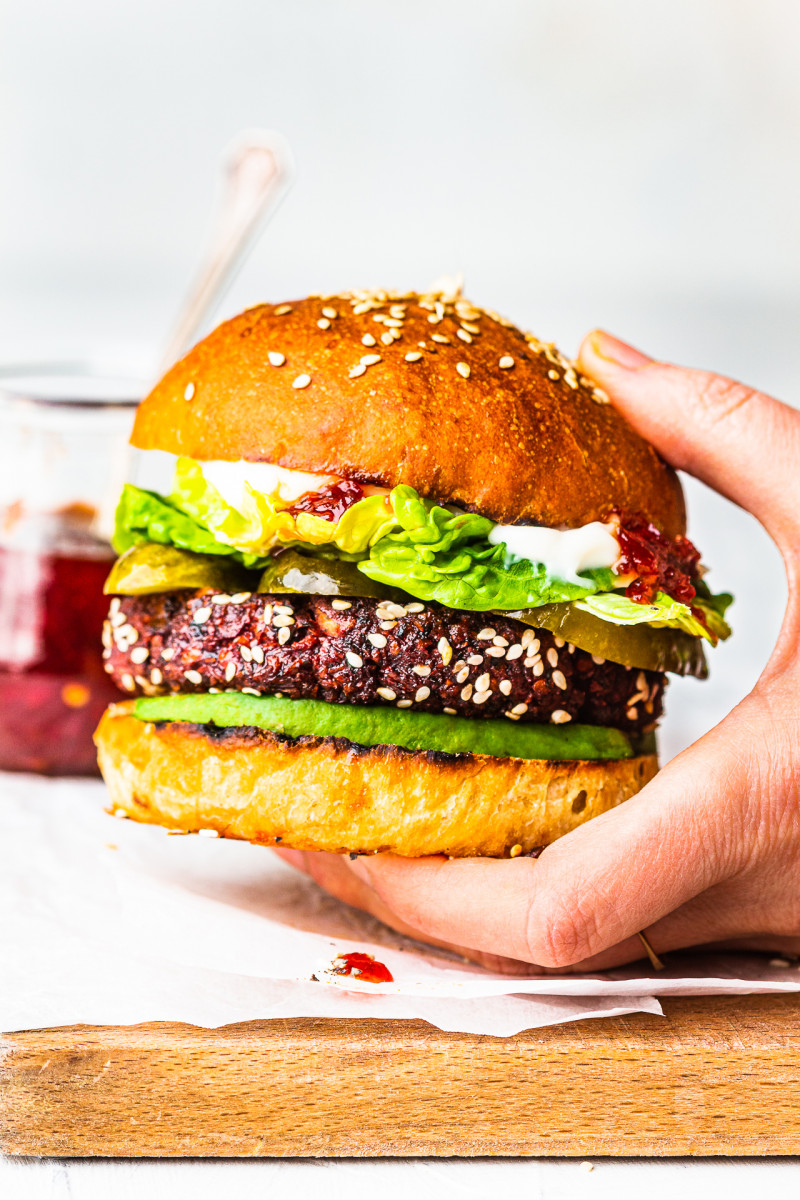
Vegan burgers, where do you stand on those? At some point I concluded that the plethora of plant-based burgers in shops is so staggering that there is little point in me coming up with a recipe as no one will bother to make them. Since then my opinion has changed…I developed a taste for a vegan burger recipe that only features wholefood ingredients and is easy to make and these vegan beet burger recipe ticks both of these boxes…
While I am a firm believer in wholefood plant based diet approach 90% of the time, I don’t have anything against shop-bought plant-based burgers, sausages, meats now and then, I use them to add variety and excitement to my meals. Through a bit of a trial and error, I found a few products I enjoy and so we have them on a regular basis, once or twice a week I would say. I sometimes add soy-based vegan chicken to my lunches or plant-based chorizo to some of my meals, but I have not had as much luck in finding a vegan burger I truly enjoy.
I did try BeyondMeat burger and while the taste blew my mind and I kept on checking with the waiter (I had it at a restaurant) that it definitely isn’t beef, I disliked its funny aftertaste and it didn’t feel so great on my stomach afterwards. It’s something I could maybe have once a year, tops! This beet burger isn’t an attempt to reinvent BeyondMeat patties with wholesome ingredients and without any of their clever food chemistry – as I don’t think that’s possible, but to offer and easy and healthy plant-based burger alterantive. For me personally, the burger eating experience is so much more than the patty itself, it’s greater than a sum of its parts. It’s almost as much about the quality of the bread, the selection of condiments, the freshness and intentionality of the remaining ingredients: crispy lettuce providing freshness, pickles adding a pleasant crunch and tang, etc.
I hope you’ll be tempted to give these burgers a go! They are easy and cheap (that’s another thing about plant based meat substitues – since, unlike meat, they are not subsidised by governments, they tend to be quite expensive) to make. I use minimal oil (about 1-2 tsp per burger) as I bake them in the oven and they contain only plant based wholefoods. I personally prefer making these with uncooked, soaked chickpeas – they make for a moistier patty, but I also tested them with tinned chickpeas and they are still quite good if dry chickpeas is not something you have at home. I hope you’ll enjoy these healthy vegan beet burger buns as much as we have.
MORE ABOUT THE INGREDIENTS
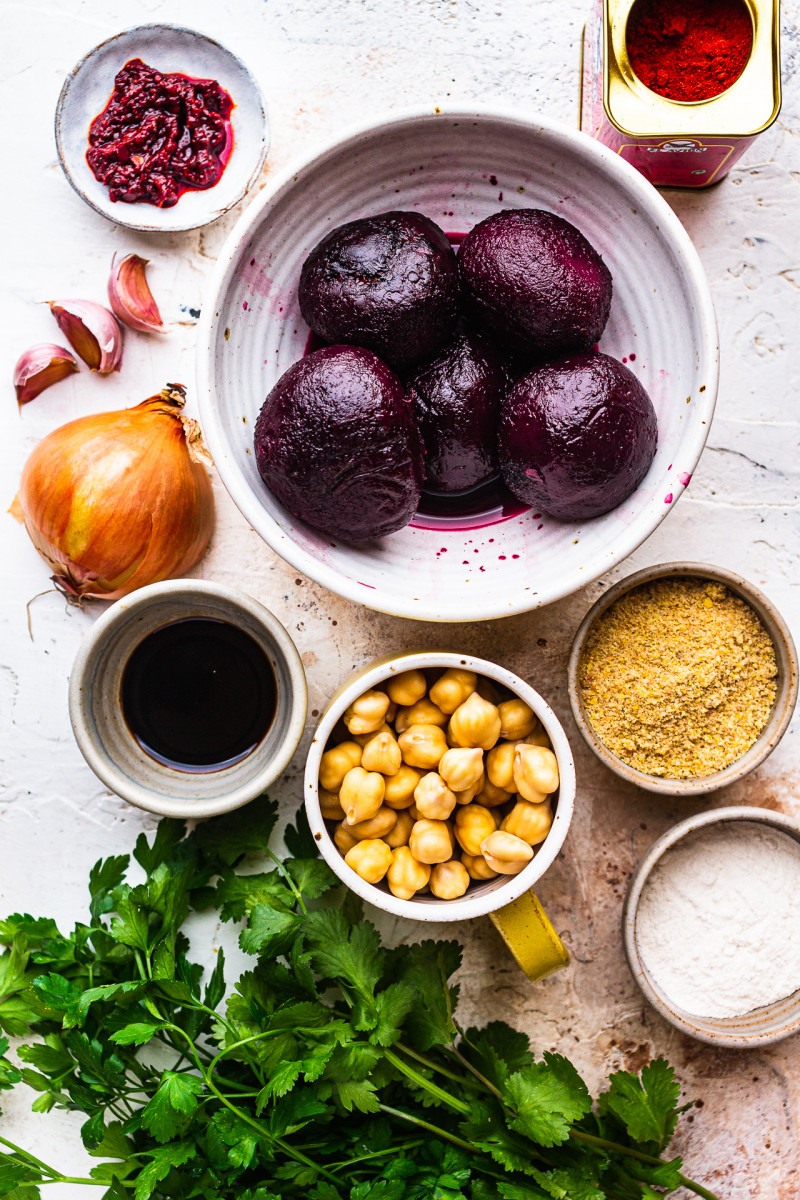
CHICKPEAS: Chickpeas are one of the main builiding blocks of this simple vegan beet burger. I used dry, soaked overnight, chickpeas to give it the desired texture, but I also tested a version made with cooked (tinned) chickpeas and it works well enough too. I personally prefer the former and the interior is moist while the outside has a firm skin that is ever so slightly crispy.
BEETROOT: The other building block of this simple burger is, of course, beetroot. I used shop-bought vacuum packed beetroot, which is a staple of UK supermakets’ shelves – pretty much every large supermarket has its own brand of this product. Be sure to purchase one preserved in natural juices as opposed to the one in vinegar. While I haven’t tested these with raw beetroot, this recipe is based on my previous recipe for beetroot falafels and I used raw beets there with great success. Use the same amount of raw beetroot per weight (250 g / 8.8 oz).
ONION, GARLIC: These two aromatics add flavour to the burger. You can either pan-fry them in little oil to mellow their flavour before adding to the burger mixture or you can simply add raw onion and garlic and a tablespoon of oil directly to the burger mixture instead. The latter is less time consuming, but it does contribute a harsher onion & garlic taste so I recommend using only one clove of garlic and maybe one eigth of an onion. Oil helps to keep the burger moist inside.
PSYLLIUM HUSKS / GROUND FLAX: Psyllium husks or ground flax are used to keep the burgers whole. Psyllium is more potent and therefore works better, but ground flax works well enough too. I tested pysllium husks as I ran out of powder, so if you were to use psyllium husk powder, use only about half a tablespoon as it’s even more potent than whole husks.
HARISSA PASTE: Harissa paste is used for flavour and it adds a bit of a kick too. If you don’t have it, use some chilli sauce (like Sriracha) and a bit of ground cumin and coriander istead.
BAKING POWDER: A small amount of baking power is added to the mixture to stop these burgers from getting dense and to help raw chickpeas cook in the oven.
HERBS: I added a handful of fresh herbs for flavour. I opted for a mixture of parsley and coriander, but either of them on their own will work well too.
BALSAMIC: A dash of balsamic gives a bit of acidity and some umami. You can also use lemon juice instead.
RICE FLOUR: A small amount of rice flour is used to make these burgers hold together and to help with shaping. Don’t be tempted to add any more flour – the mixture is designed to be as wet as possible so that it doesn’t dry out too much in the oven. I haven’t tested any other flours but I am pretty sure they will work just as well.
SESAME SEEDS: Sesame seeds are optional. I used them to coat the patties to make them look pretty.
OLIVE OIL: I small amount of olive oil is used to keep these patties from drying out too much and to enable them to crisp up a little in the oven. I haven’t tried making these oil-free and I worry that it will render them really dry and unpleasant to eat.
BURGER PATTIES
130 g / ¾ cup dry chickpeas*, soaked overnight (OR 360 g / 2 heaped cups cooked chickpeas)
45 ml / 3 tbsp olive oil, divided
½ onion, finely diced
3 garlic cloves, sliced
250 g / 8.8 oz cooked beetroot*
¾ tsp tsp salt
¼ tsp black pepper
1 tsp smoked paprika
½ tsp baking powder
2 tsp harissa paste*
15 ml / 1 tbsp quality balsamic (or lemon juice)
15 g / 0.5 oz fresh herbs (I used parsely and cilantro)
favourite condiments: vegan mayo, chilli jam / chilli sauce
METHOD
BURGER PATTIES
If making uncooked chickpea version, soak dry chickpeas in plenty of water overnight or longer (up to 24 hours).
Heat up 1 tbsp of oil in a small frying pan, once hot add onion and pan fry on low heat until almonst soft. Next add in garlic and pan fry until soft and fragrant. See NOTES for an easier alternative.
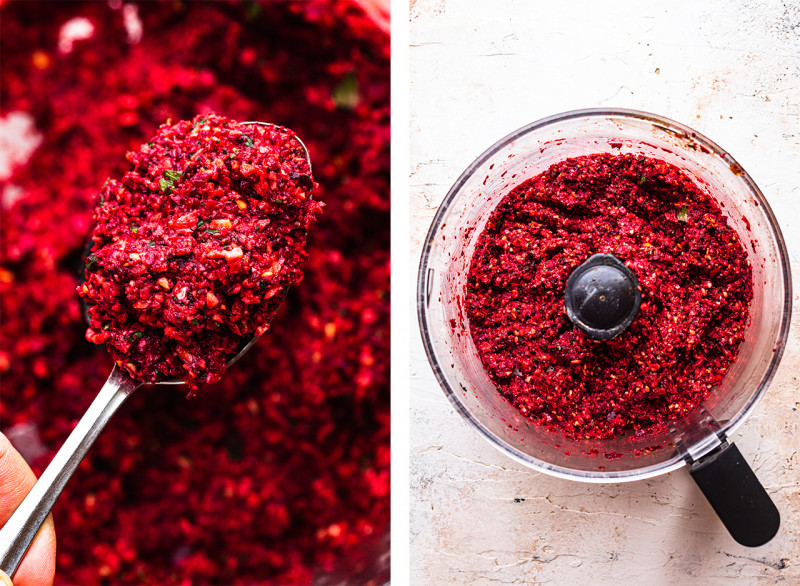
Place drained beetroot and chickpeas (if using cooked, add only half) in a food processor. Add pan-fried aromatics and all other ingredients except for 2 tbsp of oil. Pulse until finely ground up (chickpeas should be the size of bulgur wheat – see photo in the post).
Transfer the mixture to a mixing bowl. If using cooked chickpeas, process the other half of them in a food processor until only coarsely ground, then stir through the mixture.
Chill in the fridge for a couple of hours to firm up. You could also freeze the mixture at this point.
Heat up the oven to 200° C / 390° F and line a baking tray with a piece of baking paper. Prepare a plate of sesame seeds (optional), a brush and approx. 2 tbsp of olive oil.
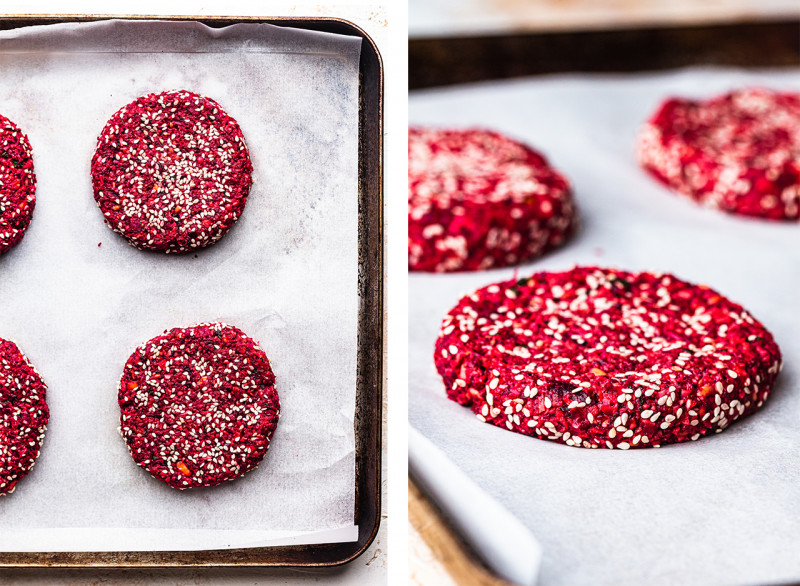
Using your hands, shape chilled mixture into patties – the mixture will be wet, that’s intentional! I made five patties measuring 9 cm / 3.5 inches across and about 15 mm / 0.6 inch tall. You could also freeze them at this point.
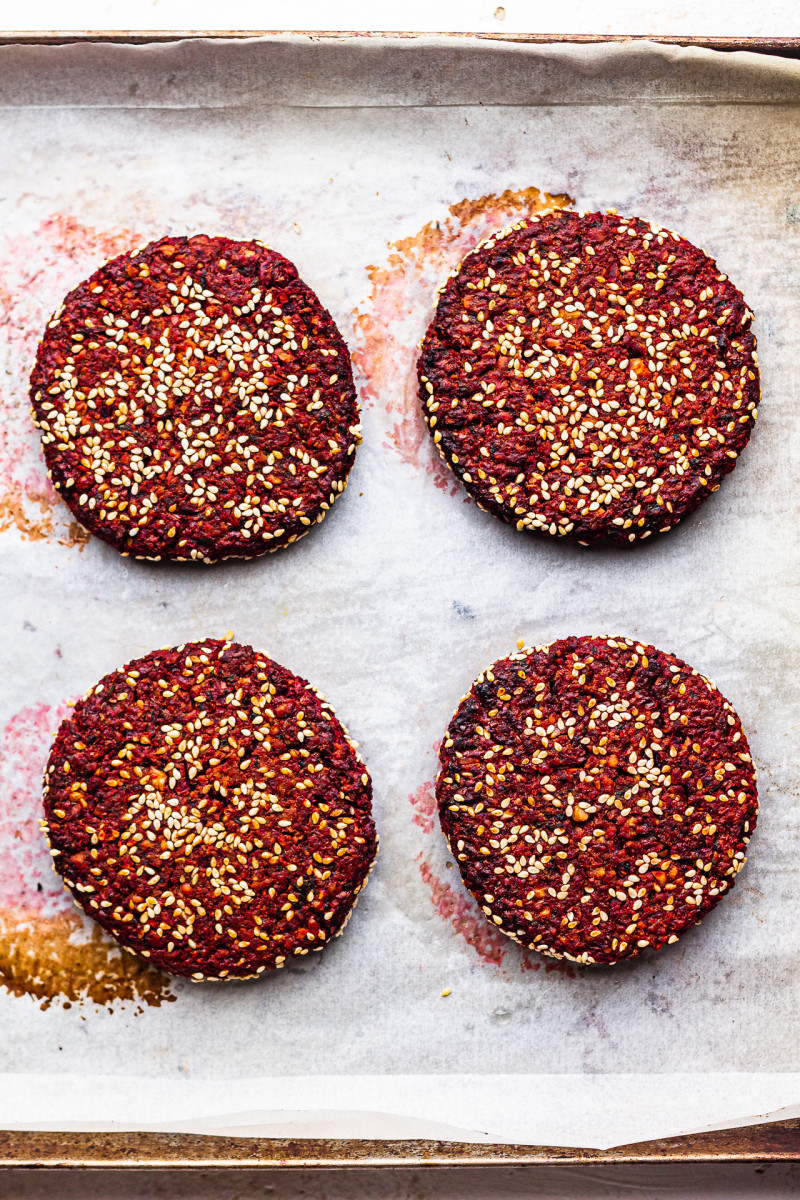
Stick some sesame seeds to the patties using your hands, then gently place them on the prepared baking tray and bake for 20 minutes, flipping them very gently at half way point.
Take the tray out of the oven and increase the temperature to 220° C / 430° F. Gently remove the baking paper so that the patties sit directly on a metal tray and grease both sides of each patty with oil (about ½-1 tsp per patty). Bake for 10 minutes.
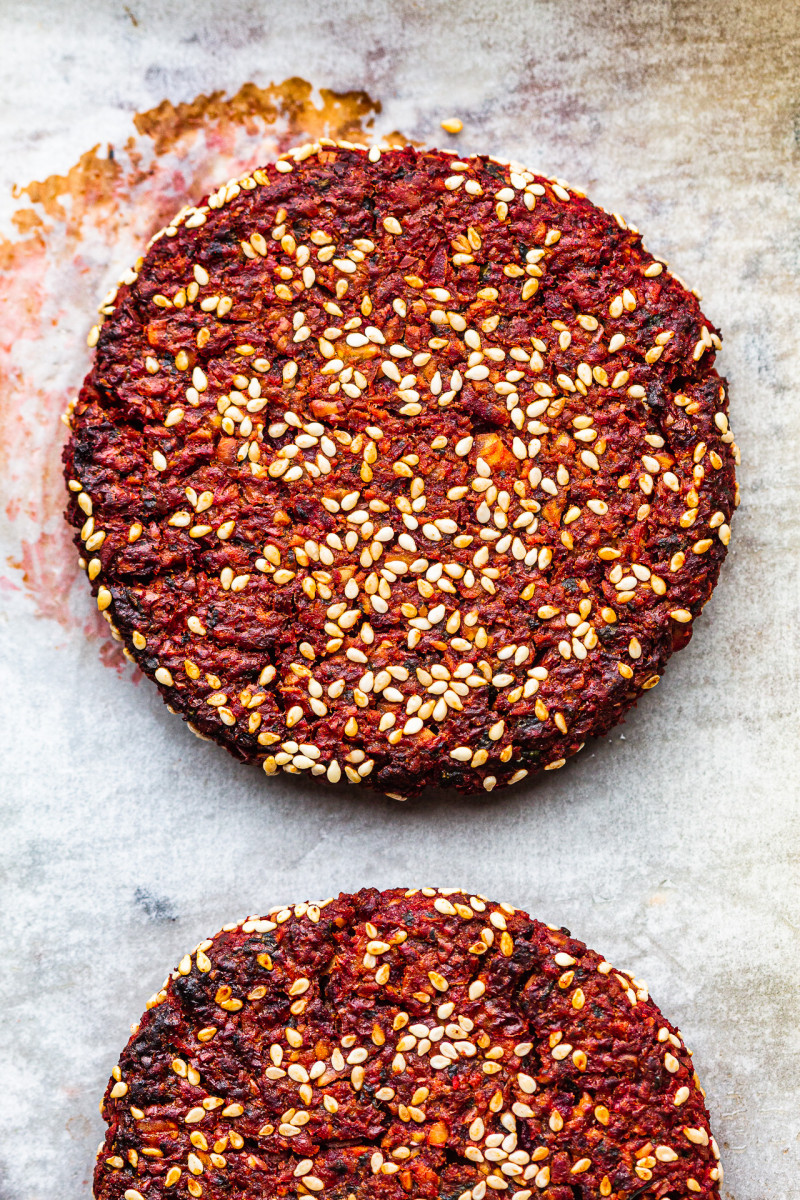
After 10 minutes, flip again, brush with oil and bake for another 5-10 minutes (35-40 minutes total) – until the patties firm up. Allow them to cool down a little after removing from the oven as they are still fragile when hot.
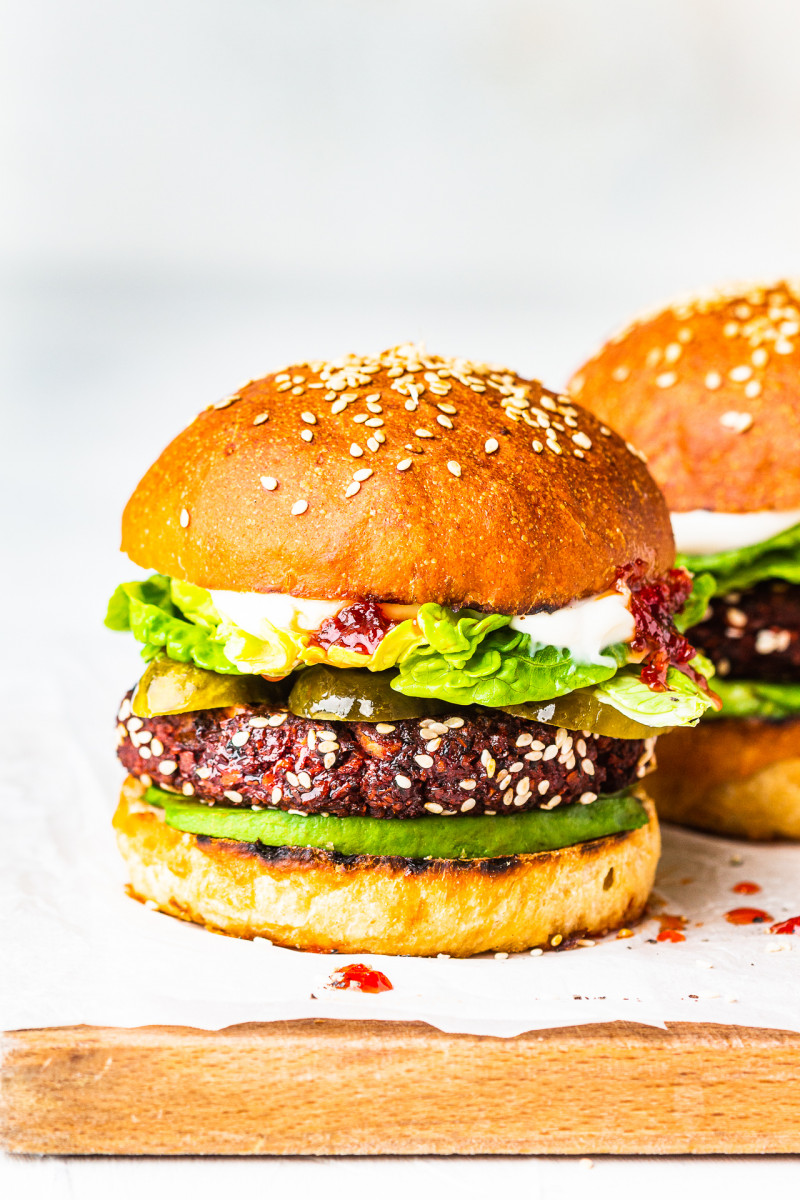
Assemble the burgers as per your preference. I like to toast my burger buns, then have a few slices of avocado at the bottom, followed by the burger pattie, sliced pickles, lettuce and mayo and chilli jam on the top half of the bun. Consume straight away, these are best straight after baking.
NOTES
*ONION & GARLIC: I recommend pan-frying them before adding to the burgers to mellow their flavour. Alternatively, add only 1/8 of an onion (or 1-2 small spring onions/scallions), 1 clove of garlic and 1 tbsp of oil (it helps to keep the burgers moist) directly to the food processor. You could also add a couple of roasted garlic cloves instead, if you have any handy.
*BEETROOT: I used vacuum packed, cooked beetroots that are a mainstay of UK supermarkets. Please be sure to pick plain cooked beetroots, not those preserved in vinegar. And yes, you can use the same amount (by weight) of raw beetroots too.
*CHICKPEAS: You could make these burgers with soaked dry chickpeas or cooked chickpeas. I recommend the former as I prefer their texture but the tinned chickpea option is also possible.
*HARISSA PASTE: You can use 1 tsp of any chilli sauce, 1 heaped tsp of cumin and coriander instead.
*BUNS: I made my burger buns by simplifying my vegan brioche buns recipe. I used 1 tbsp of sugar (you can skip it completely) and only 1 tbsp of olive oil instead of vegan butter. I kneaded them briefly in the evening and let them proof in the fridge overnight. Next morning, I shaped the buns, let them raise again and baked in a 190° C / 375° F oven for 23 minutes.
Pomegranate juice has become increasingly popular in recent years due to its health benefits and delicious flavor. Whether you’re looking for a refreshing drink to cool you off on a hot summer day or just want to get a little extra nutrition in your diet, pomegranate juice is the perfect option. In this article, we’ll discuss what pomegranate juice is, why it’s good for you, and how to make it at home. We’ll also provide some unique recipes for you to try and tips for selecting and storing pomegranates. So let’s get started!
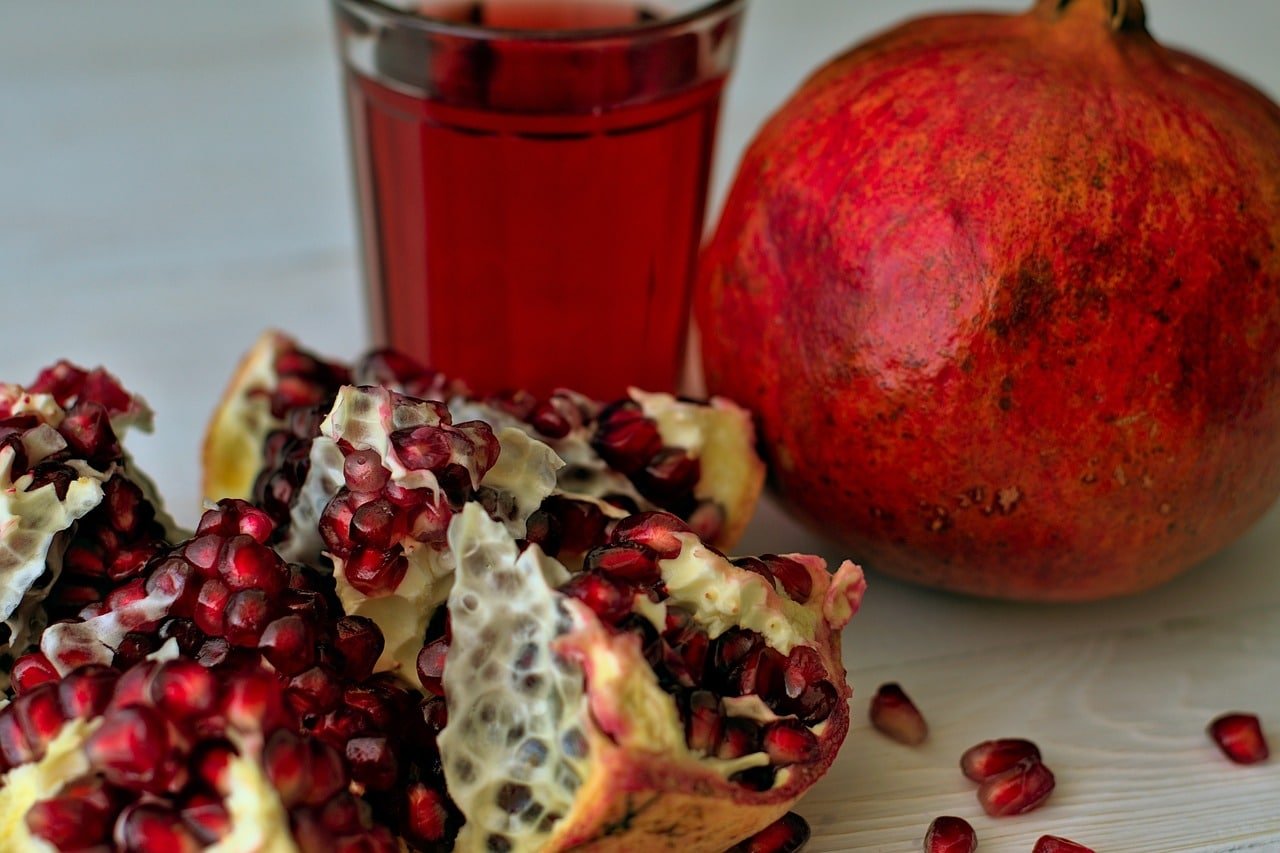
Photo by11082974 onPixabay
What is Pomegranate Juice and Why is it Good for You?
Pomegranate juice is a refreshing and delicious beverage made from the seeds of the pomegranate fruit. Pomegranate juice contains a lot of antioxidants, minerals, and vitamins that make it beneficial for your health. It’s also naturally sweet, so you don’t need to add any extra sugar or artificial sweeteners.
Pomegranate juice is a great source of vitamin C, which helps to boost your immune system. It also contains polyphenols, which are compounds that have anti-inflammatory and antioxidant properties. The juice is also high in potassium, which helps to regulate blood pressure and support heart health.
Benefits of Drinking Pomegranate Juice
There are many benefits to drinking pomegranate juice on a regular basis. It can help to reduce inflammation and improve your overall health. Studies have shown that it can help to lower blood pressure, reduce the risk of heart disease, and improve cholesterol levels. It may even help to protect your skin from damage caused by the sun’s UV rays.
Pomegranate juice is also a natural energy booster. The high levels of antioxidants, minerals, and vitamins can help to give you an extra boost of energy throughout the day. It can also help to improve your focus and concentration.
How to Make Pomegranate Juice at Home
Making pomegranate juice at home is surprisingly easy. All you need is a pomegranate, a blender, and some water. Start by cutting the pomegranate in half and scooping out the seeds. Put the seeds in the blender and add a cup of water. Blend the mixture until it’s smooth.
Once the mixture is blended, strain it through a fine mesh sieve to remove any seeds or pulp. The juice is now ready to drink! It’s best to drink the juice as soon as possible, as it will start to lose its nutritional benefits if left for too long.
Different Recipes for Pomegranate Juice
There are many different ways to make pomegranate juice. You can make it plain or add other ingredients to give it a unique flavor. Here are some recipes to get you started:
Pomegranate and Orange Juice: This is a classic combination that is sure to be a hit. Simply blend together one cup of pomegranate seeds and one cup of freshly squeezed orange juice. Strain and enjoy!
Pomegranate and Mint Juice: This refreshing combination is perfect for a hot day. Blend together one cup of pomegranate seeds, one cup of freshly squeezed lemon juice, and a handful of fresh mint leaves. Strain, sweeten with honey (optional), and enjoy!
Pomegranate and Strawberry Juice: This sweet and tart combination is a great way to start your day. Blend together one cup of pomegranate seeds, one cup of fresh or frozen strawberries, and one cup of freshly squeezed orange juice. Strain, sweeten with honey (optional), and enjoy!
What Equipment Do You Need to Make Pomegranate Juice?
Making pomegranate juice is easy and doesn’t require any special equipment. All you need is a blender, a fine mesh sieve, and a knife. If you don’t have a blender, you can use a food processor to blend the ingredients. Once you have all the necessary equipment, you’re ready to start making pomegranate juice!
Can You Juice a Pomegranate Without a Juicer?
Yes, you can juice a pomegranate without a juicer. All you need is a blender, a fine mesh sieve, and a knife. Start by cutting the pomegranate in half and scooping out the seeds. Put the seeds in the blender and add a cup of water. Blend the mixture until it’s smooth. Once the mixture is blended, strain it through a fine mesh sieve to remove any seeds or pulp. The juice is now ready to drink!
Tips for Selecting and Storing Pomegranates
When shopping for pomegranates, look for ones that are heavy for their size and have a deep red color. Avoid pomegranates that have any bruises or discoloration. If you’re not planning on using the pomegranates right away, store them in a cool, dry place. They should keep for up to two weeks.
Different Ways to Use Pomegranate Juice
Pomegranate juice is a versatile ingredient that can be used in a variety of recipes. Here are some ideas:
Add it to smoothies or protein shakes to give them a boost of antioxidants and flavor.
Use it in salad dressings or marinades to give them a tangy flavor.
Pour it over ice cream or frozen yogurt for a sweet and tart treat.
Use it to make homemade popsicles for a refreshing summer snack.
Use it in cocktails or mocktails for a unique twist.
Pomegranate Juice Cocktails
Pomegranate juice is a great mix-in for cocktails as it adds a unique flavor and a beautiful color. Here are some recipes to get you started:
Pomegranate Margarita: Blend together one cup of pomegranate juice, one-half cup of silver tequila, one-quarter cup of lime juice, and one-quarter cup of simple syrup. Serve over ice and garnish with a lime wedge.
Pomegranate Martini: Shake together one ounce of pomegranate juice, one ounce of vodka, one-half ounce of triple sec, and one-half ounce of lime juice. Strain and serve in a chilled martini glass.
Pomegranate Moscow Mule: Combine one cup of pomegranate juice, one cup of ginger beer, and two ounces of vodka in a copper mug. Garnish with fresh mint leaves and a lime wedge.
Conclusion
Pomegranate juice is a delicious and refreshing beverage that’s packed with vitamins, minerals, and antioxidants. It’s easy to make at home and can be enjoyed in a variety of ways. From smoothies and popsicles to cocktails and mocktails, there are plenty of recipes to explore. So surprise yourself and try something new with pomegranate juice today!
Some of the links I post on this site are affiliate links. If you go through them to make a purchase, I will earn a small commission (at no additional cost to you). However, note that I’m recommending these products because of their quality and that I have good experience using them, not because of the commission to be made.
About Juicing For Health
Juicing for Health was founded by certified Wellness Health Coach, Nutritional Consultant and a Detox Specialist. We help busy men and women identify their health issues at the root cause, in order to eliminate the problems for optimum physical/mental health and wellbeing.
How do you respond to acute injury? What is your first go-to when something happens to cause pain?
I recently lifted something a little too heavy for me, and “tweaked” something in my back. My whole left hip area was in pain with the slightest movement. Fortunately, I keep a stash of herbs, homeopathic remedies, and essential oils in my purse. My first response was to take Arnica Montana. This homeopathic remedy is specific for bruising, swelling, and
inflammation from injury or overexertion. I put 2 pellets under my tongue and put another 2 pellets in my water bottle. When I arrived home, I continued taking the Arnica pellets and rubbed Arnica gel and Complete Tissue & Bone oil on the area. I also applied an ice pack to help with inflammation. I took 6 capsules of Complete Tissue and Bone Formula and made myself a cup of comfrey tea to drink as I alternated cold and hot packs on the area. Hot and cold therapy helps increase the blood
flow to the area and promotes healing. I went to bed early, rubbing in more ointments, and settling myself with a heating pad and ice pack to continue the therapy.
The next morning I was very stiff and sore, so I started the day
with a warm epson salt bath and a cup of comfrey tea. I added peppermint oil to the bath to increase circulation and ended with a cold shower – making sure to really focus on the sore area. I was able to move easier after the bath.I focused on taking 6 capsules of Complete Tissue & Bone every hour throughout the day and drank more comfrey tea. I also took time to stretch and roll out the muscles in the area, using caution to not overdo. I
continued the same therapy the next day and noticed a marked improvement. I continued to take my herbs, made time to stretch, and felt better each day. Within a week the pain subsided to a minimum. There was still healing to do, but the issue was almost healed.
Remember, when the body presents us with pain it is simply telling us that something is off and needs assistance. When we listen to what our body is saying and give it the nutrients it needs to heal, the pain subsides. We can use the pain signals our body is giving us to adjust our therapy as we heal. For acute injuries I like to continue therapy for 1-2 weeks after all pain subsides. This supports the body in a deep way as it completes its healing
process.
As acute issues come up in our lives, reach for natural therapies first. They work! When we listen to what the body is telling us and respond appropriately, we can heal completely.
The cold is biting back again and I cannot wear enough layers and drink enough hot beverages to keep warm. I also crave healthy comfort food so my today’s recipe is my vegan take on a classic Indian dish – saag paneer. It’s a staple on Indian restaurants’ menus but in case you haven’t come across it, it’s a spinach and paneer cheese curry that hails from Punjab, the northern region of India.
Although I have not grown up on it myself, in a funny way it reminds me of my childhood and my childhood nemesis – creamed spinach, which I was forced to eat on a regular basis as an anemic child. Like I suspect most kids, I just had to endure it in order to get my hands on the dessert (some things have not changed 😉 ), but now the taste of this curry – which is a more delicious take on creamed spinach in my view – makes me weirdly nostalgic and brings me comfort.
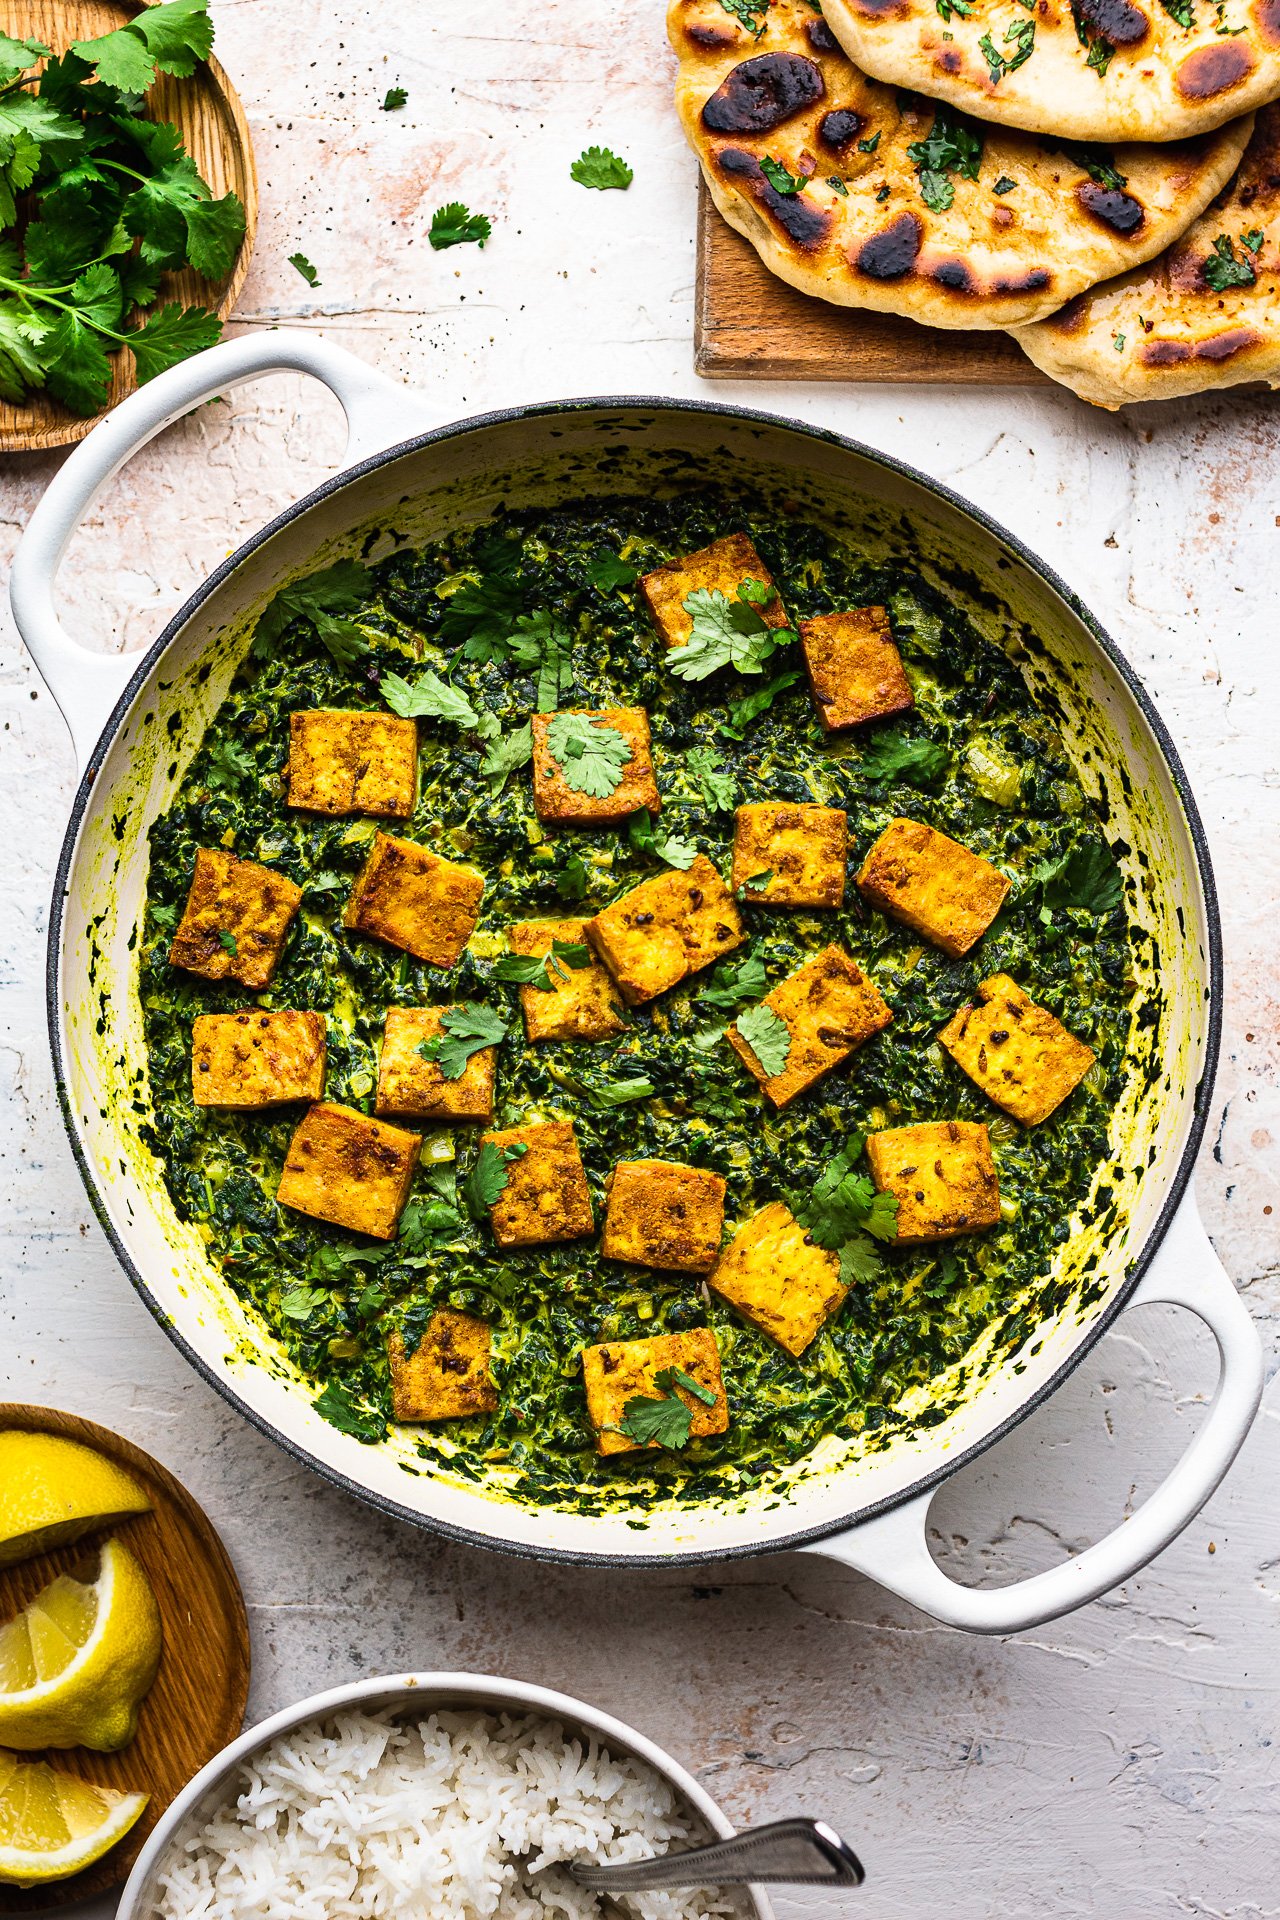
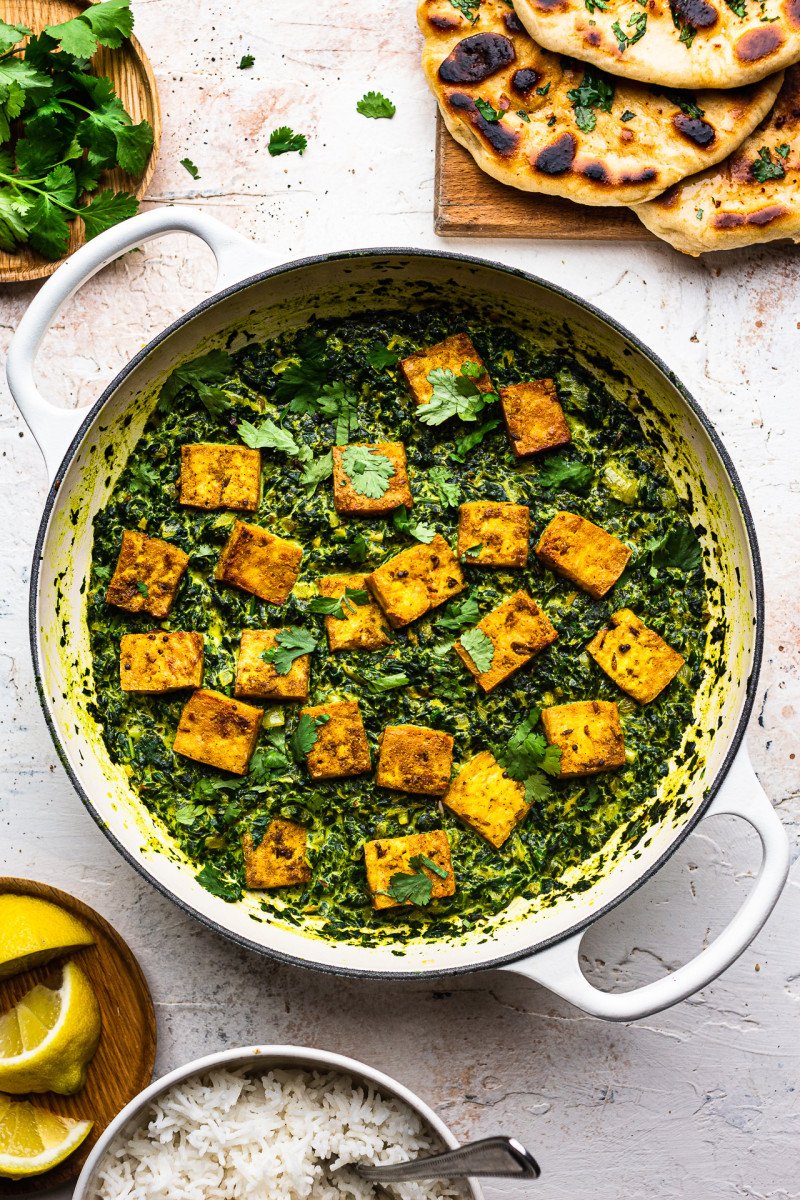
One of the key components of this dish – known all over the world as saag paneer (although palak paneer is more exact, palak = spinach) is paneer, which is a type of firm cheese made out of dairy milk. As this component is obviously out of limits for a vegan, I sought to mimic paneer with tofu. I used firm, well pressed tofu to approximate paneer’s texture. I marinated it in a blend of seasonings, aromatics and spices to banish the blandness and give it flavour. It is obviously not the same thing, but I am really happy with how the finished dish has turned out and we’ve been enjoying it a lot lately.
It is also quite quick to make. The marinade only takes seconds to put together and the spinach sauce, in contrast to many dishes of this type, doesn’t require prolonged simmering. In fact, I only cook it for about 10-15 minutes to retain as much nutritional value of spinach as possible. It benefits from being made a day in advance, but if you don’t have that luxury of time, it’s absolutely fine too. I hope you will give it a try and that you’ll enjoy it if you do.
MORE ABOUT THE INGREDIENTS
TOFU: Firm tofu serves to substitue paneer in this traditionally vegetarian recipe. For maximum flavour, I marinate the tofu in a blend of seasonings, spices and aromatics overnight so that all the flavours get absorbed. If you wanted to prepare it in advance, you could marinate it even longer, up to 3 days.
LEMON JUICE: I used lemon juice to give tofu a bit of a cheese-like tang and some more to season the spinach sauce. Apart from adding flavour, lemon juice also helps our body to absorb non-heme iron in spinach.
NUTRITIONAL YEAST: Nutritional yeast, which is a staple vegan seasoning made out of inactive yeast, helps to flavour tofu with a slight cheese-like flavour.
CUMIN SEEDS: Cumin seeds are used to flavour the oil that is the base of the curry sauce and to marinate tofu.
TURMERIC: Turmeric is another spice to that key in this Indian dish. I used a little to flavour the tofu and some more to flavour the sauce.
GARAM MASALA: Garam masala, which is a warming spice blend commonly used in Indian cuisine, is used in the sauce in two ways. I add some to the sauteed aromatics and toast it off very gently before adding in liquid and sprinkle a little more at the end to finish the dish off. I also use a small amount of this blend to flavour the tofu.
GARLIC & GINGER: Garlic and ginger need no introduction, I am sure. They belong to a group of vegetables referred to as aromatics and form the backbone of most savoury dishes all over the world. Garlic and ginger are true staple of Indian cuisine (alongside onion and fresh chillies) and so they are used here to flavour the curry sauce and I also added threw a bit of them into the tofu marinade to help me banish its blandness.
SPINACH: Spinach is the key ingredient of the sauce although traditonally mustard leaves were often used. As this dish became a staple on Indian restaurants menus all over the world, mustard greens got replaced by a more readily available spinach. I used fresh spinach, but frozen spinach works just as well. There are two options when it comes to texture. If you like the sauce to be smooth, process the spinach in a blender. I personally prefer a bit of texture to this curry sauce, which is why I only pulse a few times it in a food processor instead. If you dislike spinach, why not go back to this dishe’s roots and use a drifferent dark leafy green veg? Mustard leaves and kale would both be a fine substitute, but beware that each of them will bring their own unique flavour to this dish.
VEGAN CREAM: Cream is the final ingredient in this simple curry sauce. I used vegan single cream by Oatly, but any vegan single cream product will work just as well. Alternatively, you can make your own cream by blending soaked cashews with a small amount of water or, of coconut flavour doesn’t bother you, use full fat coconut milk in the place of vegan cream.
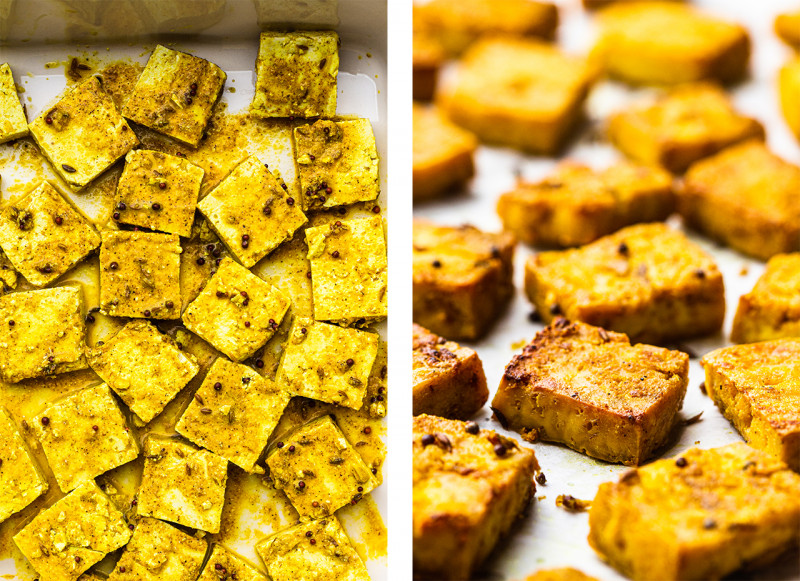
Traditionally, this dish is made with paneer – a firm type of dairy cheese, but since I wanted to make this dish vegan I decided to mimic paneer using tofu. I pressed it, cubed it and then marinated it in a heady concoction of spices, seasonings and aromatics overnight to give it maximum flavour. I then baked it in a hot oven to make it firmer, crispier and to intensify the flavours of the marindade. Another option – if you don’t mind using a bit more oil – is to coat it in potato starch after marinating and pan-fry it in hot oil until crisp on all sides.
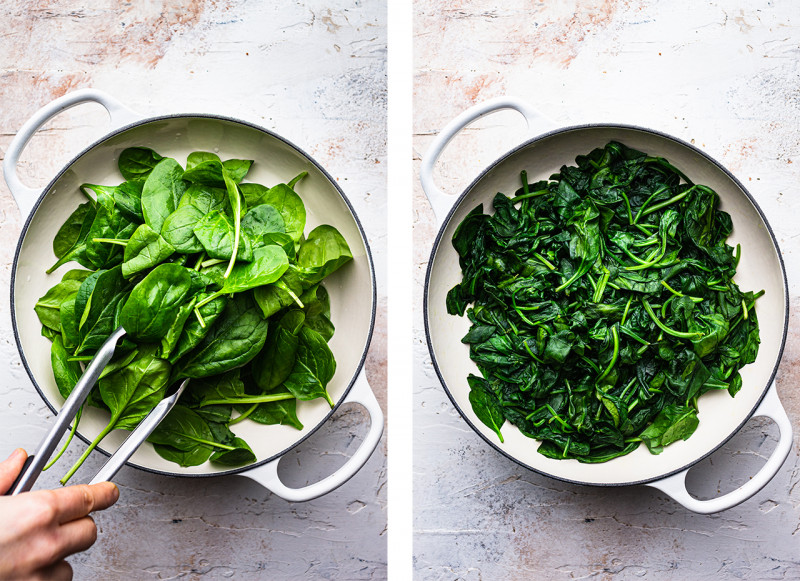
To prepare the spinach, add a splash of water to a warm pan and then pile on as much spinach as you can. Move it around all the pan using kitchen tongs so that no leaves get scorched. Add more spinach as soon as some of the first portion wilts. Switch of the heat as soon as spinach is almost all wilted and let it finish off in the residual heat.
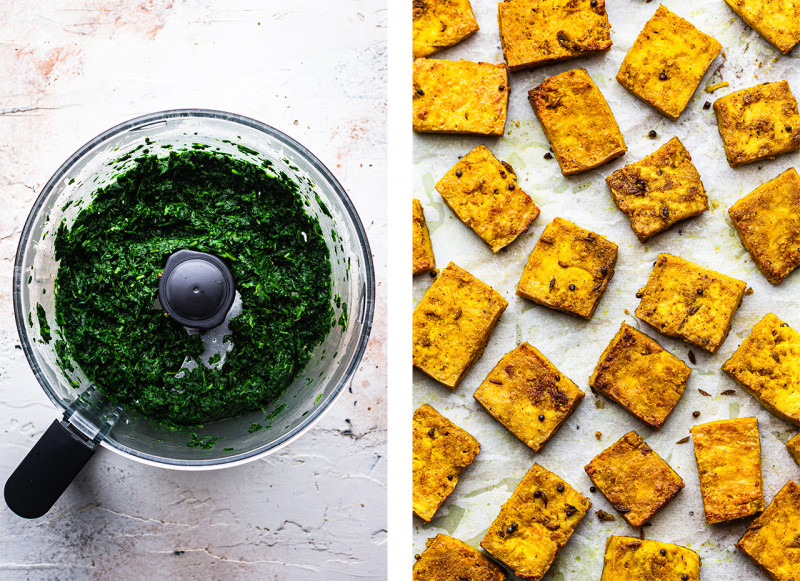
Once all of the spinach has wilted, lift it off the pan with your kitchen tongs and add to a food processor. Pulse until it’s minced quite finely. You could also blend it in a food processor (with or without aromatics that are fried in the next step), but I personally prefer some texture in this dish.
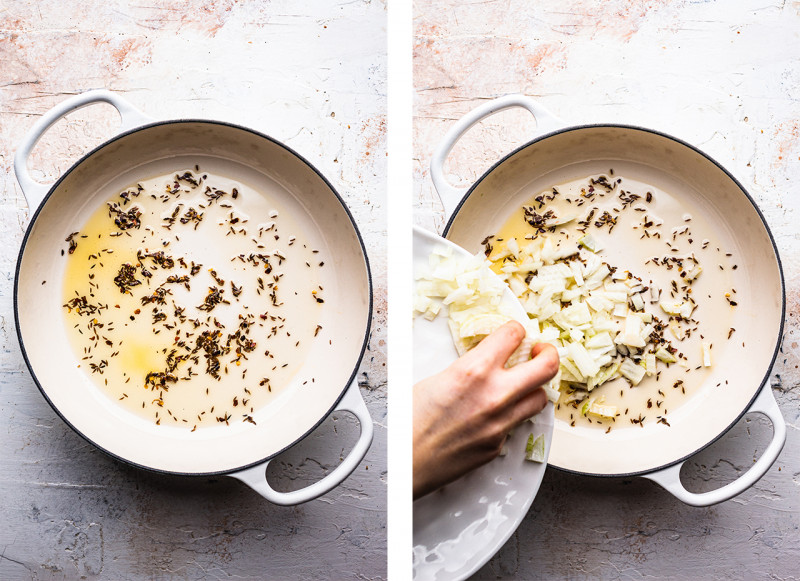
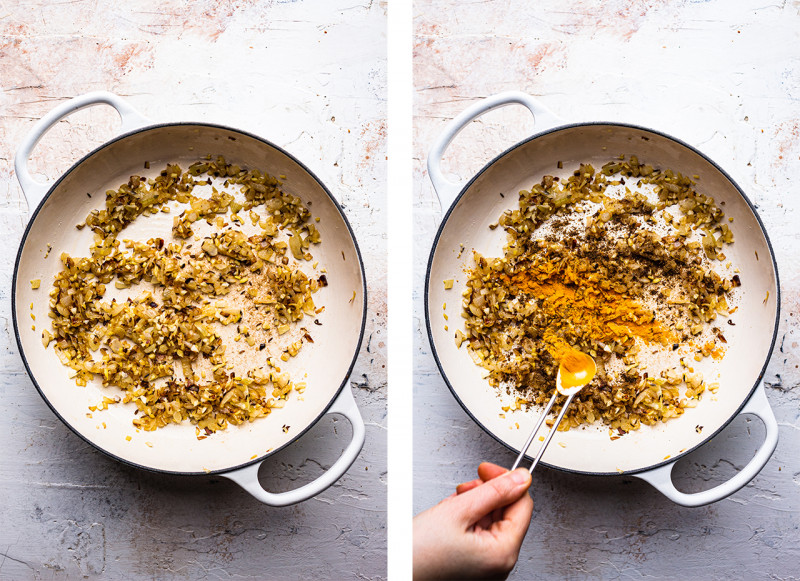
Pre-heat a medium size pan, add oil and once the oil starts to shimmer, add whole cumin seeds and I also used a good pinch of chilli flakes (you could use fresh green chilli instead, if you do that add it in later, with garlic and ginger). After a few seconds, add onion and sautee it on low-medium heat until almost translucent. Stir often.
Next, add in garlic and ginger (and fresh chilli if using) and carry on sauteeing until both are softened and fragrant. Next add in dry spices and allow them to toast gently (make sure your heat is low) with the aromatics. Stir the whole time.
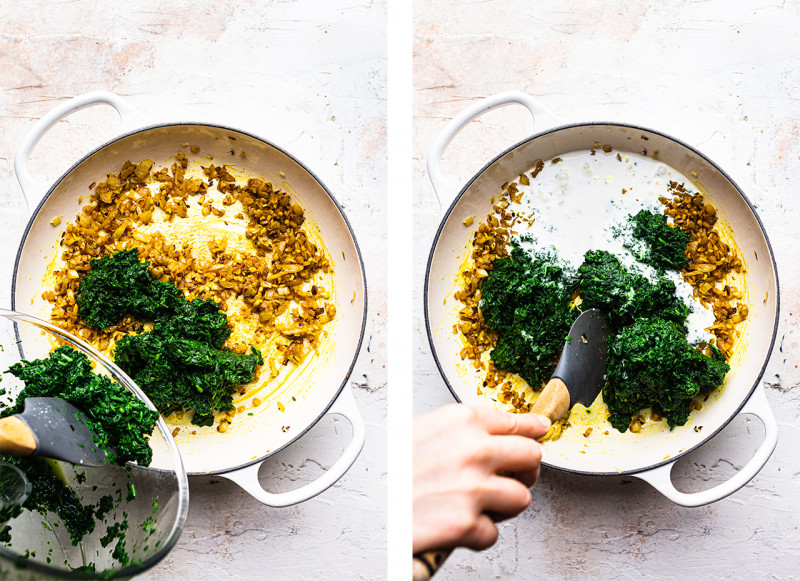
Finally, add in minced spinach and cream. Simmer for about 15 minutes and your spinach sauce is ready. Serve with baked (or fried) tofu, over rice or/and with a vegan naan bread.
‘PANEER TOFU’
400 g / 14 oz firm tofu, pressed
60 ml / ¼ cup lemon juice
2 tbsp nutritional yeast
¾ tsp fine salt
½ tsp turmeric
¼ tsp mustard seeds
½ cumin seeds
½ tsp garam masala
½ tsp garlic powder or 1 clove finely grated
vegetable oil, for baking (or frying)
2 tbsp potato starch or cornstarch (fried option)
SPINACH SAUCE
30 ml / 2 tbsp vegetable oil
1 tsp cumin seeds
a pinch of chilli flakes or fresh green chilli (optional)
Cut pressed tofu into into uniform, bite-size pieces. My were 2.5 cm / 1″ squares.
Combine all of the remaining ingredients (apart from oil and potato starch) and 120 ml / ½ cup of water in a medium-size, flat bottomed dish/box. Arrange tofu pieces on top and spoon marinade over the tofu with a spoon.
Place the tofu in the fridge. Marinate for as long as you can, ideally overnight. Give the tofu a stir now and again to all pieces are evenly coated.
BAKED OPTION: Pre-heat the oven to 200 C / 390° F. Lift tofu out of the marinade and arrange on a paper lined baking tray. Bake for 15 minutes, after 15 minutes coat dried tofu pieces in 1 tbsp (15 ml) of oil and return to the tray, bake for further 15-20 minutes.
FRIED OPTION: Lift tofu out of the marinade and coat it in potato starch on all sides. Heat up a few tablespoons of oil in a frying pan, once the oil is hot, arrange tofu in the pan. Pan-fry on low-medium heat, flipping the pieces regularily, until golden brown and crispy.
SPINACH SAUCE
Heat up a large size frying pan, add a good splash of water and half of the spinach. Using kitchen tongs, move the spinach around the pan. Once most of it has wilted, add the second half and allow it to wilt.
As soon as the spinach has wilted, lift it out of the pan (leaving any moisture behind) and place it in a food processor. Pulse a few times until uniformly minced. You can also use a blender, but I personally prefer it to retain a bit of texture.
Wipe the frying pan clean, then heat up oil in it. Once the oil is hot, add cumin seeds. Allow them to sizzle a little on low heat before adding in finely diced onion and a good pinch of salt.
Saute onion on low heat until almost translucent (about 10 minutes) before adding in garlic and ginger. Saute for another 5 minutes or so stirring frequently.
Make sure the heat is low, before adding in ground spices: turmeric, chilli, half of garam masala, plus more salt and some pepper. Mix spices into the aromatics and carry on pan-frying for another 60 seconds to toast them gently.
Add in minced spinach, vegan cream, a good pinch of salt and a squeeze of lemon. Cover and simmer gently for about 10 minutes, then uncover and cook for further 5.
Adjust the seasoning and sprinkle the other half of garam masala on top.
Serve alongside paneer tofu on a bed of rice or with a vegan naan bread. Sprinkle with corinader and extra lemon juice if liked.
NOTES
*SPINACH: I used fresh spinach, but you can use frozen spinach instead – about 285 g / 10 oz is equivalent to 400 g / 14 oz fresh. Thaw before using.
No matter what your approach – diet, exercise or a combination of the two – weight loss and fat loss are hormonally controlled processes.
By failing to take this fact into account, any efforts in the gym or kitchen aimed at transforming your body will fall short.
Hormones and your body
Hormones are chemical messengers produced by glands and organs in the endocrine system and released into the bloodstream to trigger specific effects and responses on certain cells or other organs.
They are essential for the function of every biological process in the human body, including our metabolism.
The main endocrine organs in women include:
Hypothalamus
Pituitary gland
Thyroid and parathyroid glands
Adrenal glands
Pancreas
Ovaries
READ MORE | Organic Foods & Hormones: What You Need To Know
The hormonal feedback loop
A balanced hormonal environment is essential to the optimal functioning of specific systems in isolation and the body as a whole as they regulate growth, muscle repair, development, reproduction and also determine our body’s capacity to handle physical and psychological stress.
The internal control mechanism that regulates hormone release is known as a feedback loop. As an example, increased blood glucose levels triggers the release of insulin from the pancreas, which causes an increase in glucose uptake.
This lowers blood glucose levels by drawing the substance out of the bloodstream. The resultant decrease in blood glucose then sends a ‘feedback’ message to the pancreas, which switches off the production and release of insulin.
As such, through this process insulin action inhibits its own release as the body achieves a state of balance again.
READ MORE | What It Really Means To Eat Clean To Get Lean, According To Research
Metabolic regulators
Importantly in terms of weight loss and fat loss, hormones affect how we metabolise sources of energy in the body and if excess energy is stored as fat.
For example, hormones produced by the ovaries, such as oestrogen and progesterone, may regulate where fat is deposited on the body.
This means that a hormone imbalance can result in excess fat storage around the waist or hips. These imbalances can occur due to age, inactivity, poor diets and nutrition, as well as illness or stress.
Accordingly, it’s essential to maintain an optimally functioning hormonal system, particularly if we want to avoid weight gain and create an environment conducive to weight and/or fat loss.
In this regard, there are numerous tools at our disposal to control and better regulate hormone action to maintain balance.
These include:
Diet
Exercise
Sleep
Recovery
It, therefore, pays to understand the role hormones play in the weight management process, and work to manage their effects through healthy eating and regular exercise.
Author: Pedro van Gaalen
When he’s not writing about sport or health and fitness, Pedro is probably out training for his next marathon or ultra-marathon. He’s worked as a fitness professional and as a marketing and comms expert. He now combines his passions in his role as managing editor at Fitness magazine.