Giving gifts from the heart that you have made yourself and put your love into is fun and rewarding.
Making them with children is always adventurous. We used to have fun making fizzy bath bombs that my kids would give to their friends for Christmas. They
smelled good, were inexpensive, and their friends loved them. For adults, bath salts are nice and can be just the thing people need after a stressful holiday season.
Here are a few fun ideas for making gifts from the heart.
Fizzy Bath Bombs:
1 cup baking soda
½ cup cornstarch
½ cup citric acid
10-20 drops essential oil
Mix together and sprinkle lightly with
witch hazel in a spray bottle until it holds together when a little is squeezed in the hand. Spray a little and stir, repeat. It can take some time. Add the Essential oils at the end of mixing. Kids like peppermint, or citrus scents. Lavender can be used as a relaxing scent. Pack tightly into molds. Mini cupcake molds, candy molds or ice cube trays. After about 10 minutes turn molds upside down and tap to get the bath bombs out. It takes practice. If they fall apart spray with more witch hazel
and re-mold.
Bath Salts:
1 cup epsom salts
1 cup coarse sea
salt
10-20 drops essential oil
Food coloring (optional)
Place
salts in a large bowl and mix well. Scoop about ½ cup in a small bowl. Add the drops of essential oil and food coloring and mix well. Add the blended mixture to the large bowl a little at a time until you are pleased with the scent and color. Pour your salts in a glass jar with a tight fitting lid. Shake every day for a few days before packaging.
For relaxing bath salts add 10 drops orange, 5 drops lavender, and 5 drops Ylang Ylang essential oils.
For energizing bath salts add 5 drops eucalyptus, and 10 drops peppermint essential oils
Play-dough:
1 cup flour
½ cup salt
2 teaspoons cream of tartar
1 teaspoon vegetable oil of any type
1 cup water
Essential oils about 10-15 drops (optional)
Food coloring (optional)
Combine all ingredients in a pan and heat on medium heat stirring constantly. When it all clings to the spoon and becomes a ball, remove from heat and place the dough on a piece of wax paper. Allow to cool until it can be kneaded. Knead the dough until it is smooth. If you
would like to add essential oils, use about 10 drops by poking a few holes in the dough, drop 1-2 drops of essential oil into each hole, knead the dough until it is well mixed. Keep in an airtight container.
Food coloring can be added during the heating process if desired.
So this is Christmas…and what have I done?…Hang on, not yet. I will save that song for next week 😉 but certainly there is an air of Christmas all around, most of the houses on my street have decorated Christams trees in their windows, it’s suitably cold and my fridge is full to the point of bursting – so much so that I’m having to store some of my perishable food in an insulated cardboard box outside….According to some – I am not naming names – that’s eccentric, I would argue that it’s just pragmatic and a good way to solve a real problem.
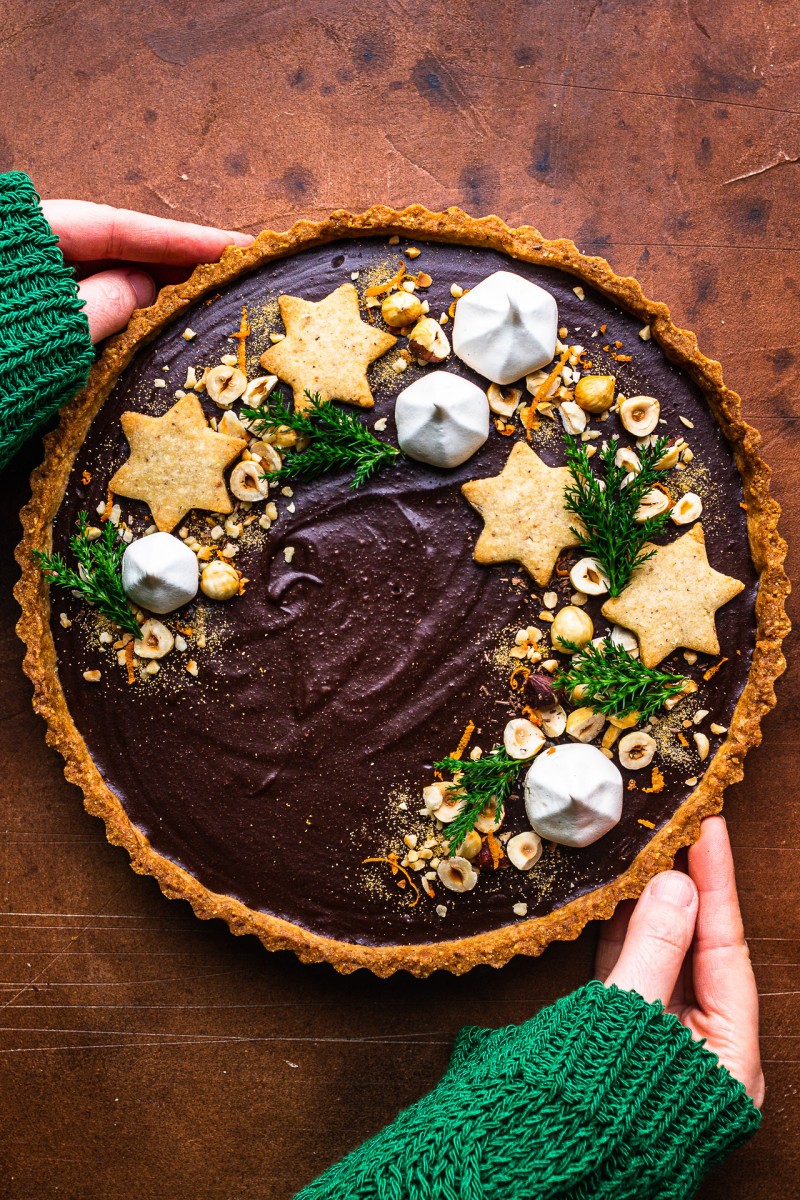
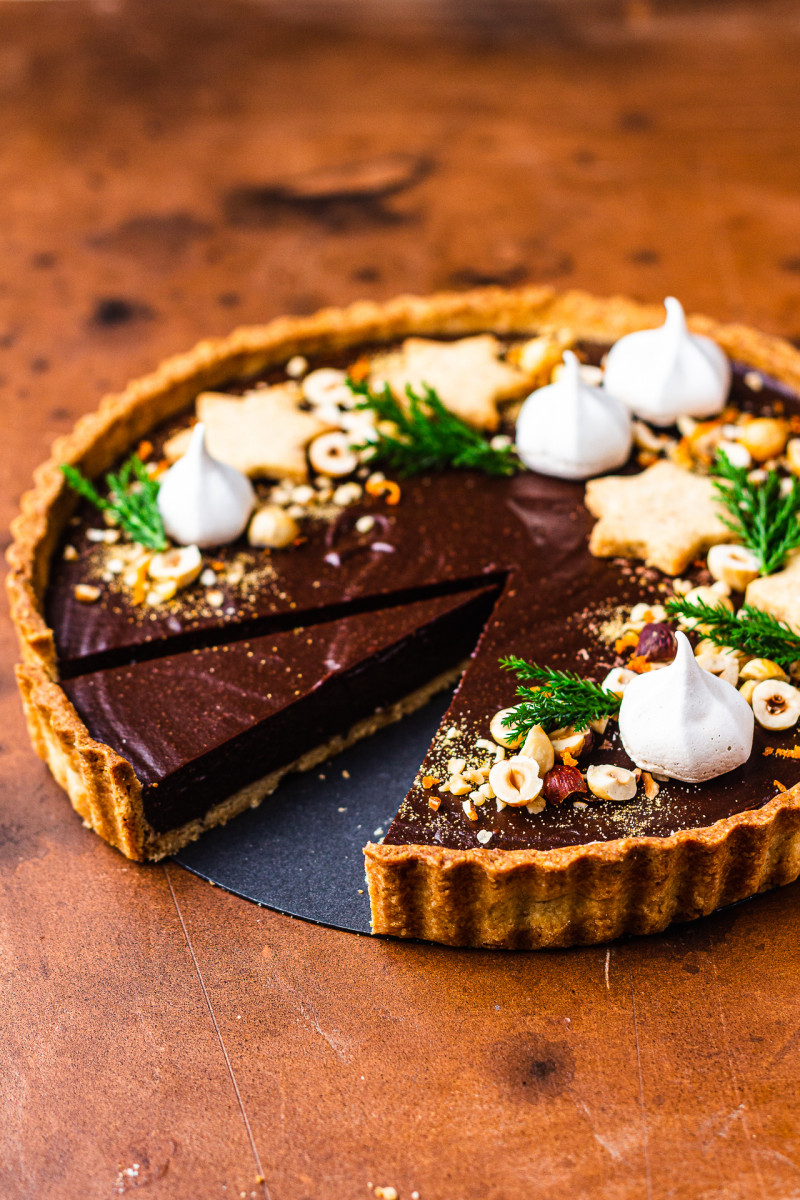
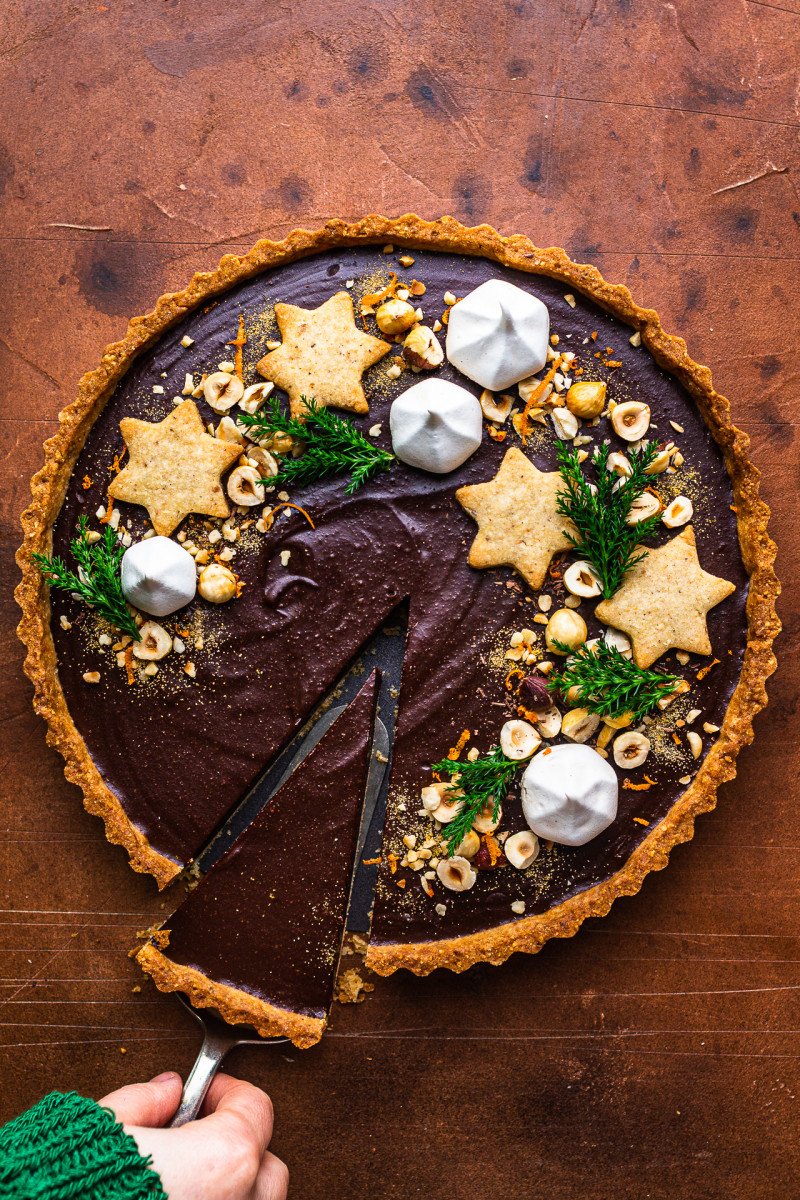
In the spirit of Christmas, I have two more festive dessert recipes for you before I sign off for the rest of this year. First up, is this delicious yet deceptively easy to make vegan chocolate hazelnut tart. I adore the combination of chocolate and hazelnuts, always have and always will so this was a non-brainer. I’ve taken lots of step by step photos for you to make sure that you are clear on what needs doing.
If you have never made an elegant tart like this before, don’t worry, this recipe is perfect for you. The shortbread pastry comes together in a food processor, in seconds, and the filling simply requires some gentle stirring and that is it. Really! It is really that simple.
Because it’s Christmas, I’ve decided to fortify this tart with a healthy glug of hazelnut liqueur – I rarely drink any alcohol but I do love a touch of booze in a dessert now and again – but that’s certainly optional. If you are making it for someone who cannot have any, simply use some plant milk instead. Below, I will talk you through all of the key ingredients and show you – how to go about making this simple yet impressive looking dessert. I hope you’ll give it a go and if you do, that you will love it as much as us and all of my neighbours who tried it.
MORE ABOUT THE INGREDIENTS
HAZELNUTS: You want to use blanched (and roasted) hazelnuts for the crust, they are quite common in the UK at least. If you can only get skinned hazelnuts, spread them on a baking tray and roast in a 175° C / 350° F for 8-10 minutes – until most skins have split and the nuts are fragrant. Place them inside a kitchen towel and rub between your hands to loosen up the skins. Allow them to cool before grinding.
FLOUR: I used all purpose (plain) flour to make my pastry. If you want to make it gluten-free, use a good gluten-free flour mix that contains a mixture of flours and starches (that’s important) and add a touch of xanthan gum to bind the pastry together. When making gluten-free crust, I find that instead of rolling it out, it works better to crumble it inside the tart case and shape it with your hands.
XANTHAN GUM: This ingredient is only needed if making a gluten-free version of the pastry. Xanthan gum is a binder that’s a staple in gluten-free cooking and it helps to keep the pastry together. Another alternative would be to use psyllium husk powder (and possibly some extra water). I have not tested in this crust, but based on my experience with this ingredient in other recipes, I recommend using 1-2 tbsp.
CARDAMOM: I like to add a bit of cardamom to this crust, but you don’t have to if you are not a fan or have never had it.
SUGAR: I used a superfine sugar (known as caster sugar in the UK) to sweeten the crust just a little. You can use less or more if you like. And if you do not have caster sugar, icing sugar (known as confectioner’s sugar in the US) would be another good option. Use the same amount by weight.
VEGAN BUTTER: Vegan butter block (I like using Naturli and Violife, but of which are available in most UK supermarkets) replace traditionally used butter. You could also use coconut oil. I recommend using a refined coconut oil like this one as it does not contribute any coconut flavour.
DARK CHOCOLATE: I used 70% cocoa vegan dark chocolate for this tart. The brand I tend to use is Green & Blacks but any dark chocolate works (I also tried Dr Oetker 72% cocoa solids) as long as the percentage of cocoa is the same.
VEGAN CREAM: I vegan single cream by Oatly to make the ganache as it’s easily accessible in the UK, but I’ve made this ganache with full fat coconut milk in the past and it works just as well, it does however add a hint of coconut flavour, which not everyone may be keen on given that this isn’t a coconut themed dessert.
MAPLE SYRUP: I used maple syrup to sweeten the ganache but any liquid sweetener with a neutral flavour should work just as well – I would steer clear from date syrup as it has quite a strong flavour. Alternatively, create a simple sugar syrup by dissolving sugar in a small amount of liquid and use that instead.
HAZELNUT LIQUEUR: A touch of hazelnut liqueur (like Frangelico) is nice and makes this tart more festive, but if you cannot have alcohol simply use plant milk instead. I used Oatly Barista in the place of alcohol in my tests.
HAZELNUT BUTTER: Hazelnut butter gives the ganache Nutella-like flavour. I make my own by grinding roasted hazelnuts in a food processor, but shop-bought one works just as well. Make sure to stir it well before using in the recipe.
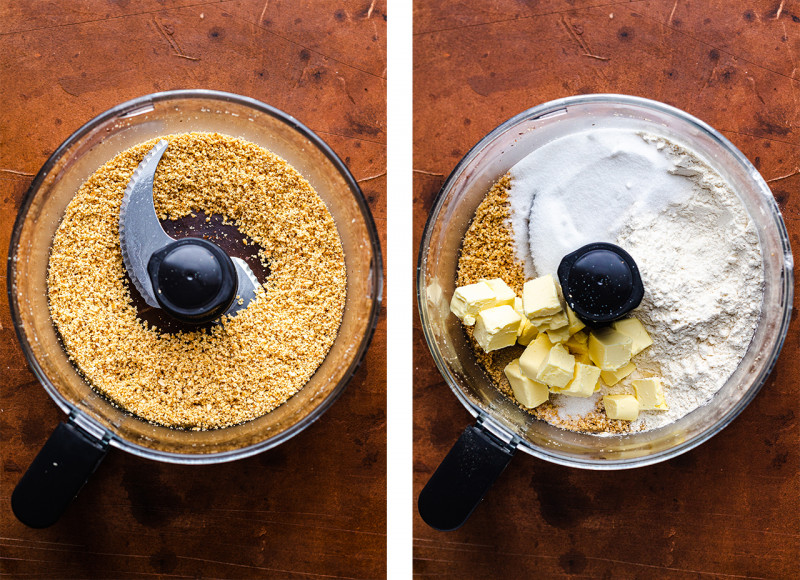
To make the shortbread crust, grind hazelnuts into fine meal in a food processor. Next, add in the rest of the dry ingredients and cubed vegan butter.
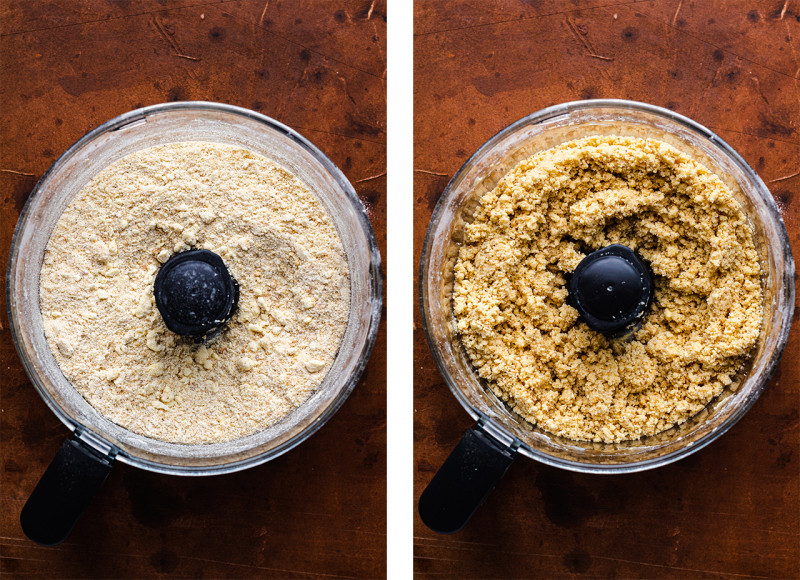
Pulse everything a few times, until the mixture resembes sand (pic on the left). Switch food processor back on and slowly trickle in fridge cold water while food processor is running. Add enough for the dough to stick together when clumped in your hand, but not any more than that. I added 45 ml (3 tbsp). The photo on the right shows what the mixture looks like after all of the water has been added – don’t rely on the looks though – squeeze a bit in your hand to be sure.
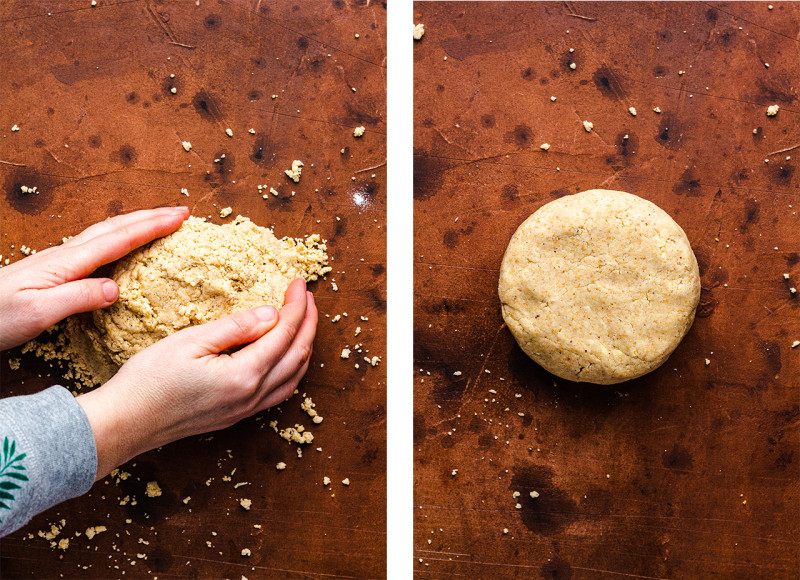
Empty the food processor onto your working surface and using your hands gently bring the dough together, do not knead it, simply press it all into a lump and then form into a disc. Refridgerate for at least 1 hour.
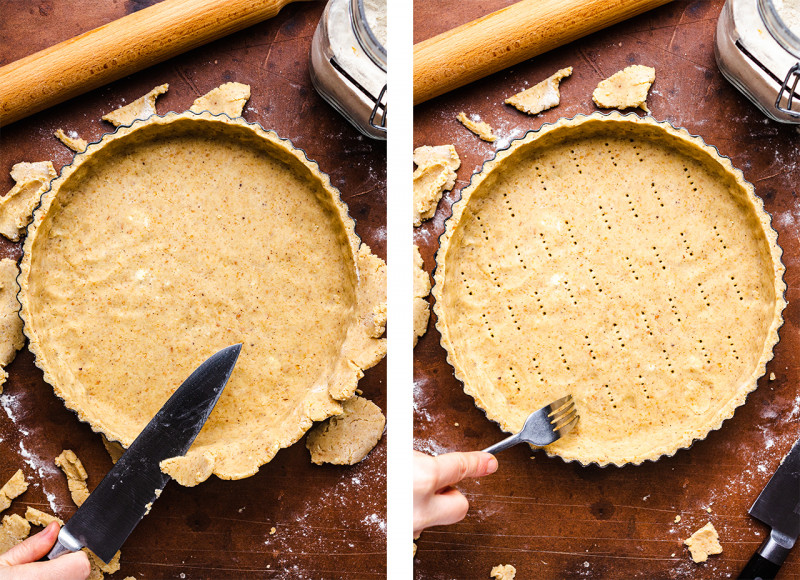
Roll out rested pastry on a lightly floured surface. Wrap it gently around the rolling pin and transfer over the tart, unravel and line the tart with it, cut off excess and use it to patch up any holes (and make cookies from the rest). Bake and cool.
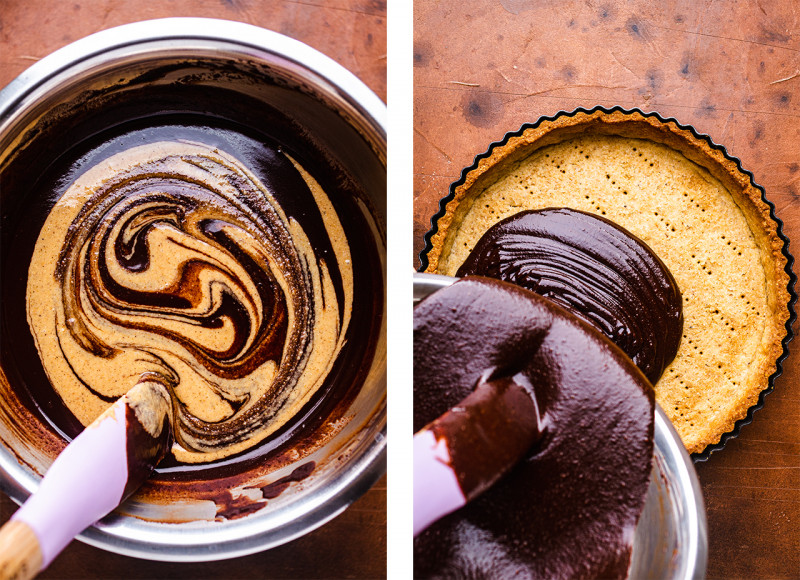
Melt chocolate and vegan cream together over a pot of simmering water. Once melted, stir gently until you get a homogenous mixture, next add in maple syrup, liqueuer and finally hazelnut butter. Stir gently to incorporate then fill the tart case with it, refridgerate until set.
60 ml / ¼ cup hazelnut liqueur (like Frangelico) or plant milk
180 g / ¾ cup smooth hazelnut butter*
¼ tsp salt
METHOD
SHORTBREAD BASE
Place hazelnuts in a food processor and process until ground into a meal.
To the hazelnuts, add flour, xanthan gum (only if using GF flour mix), salt, cardamom, sugar and cubed cold vegan butter. Pulse until the fat has been cut into the dry ingredients and the mixture resembles sand (see photos above).
While the food processing is running, gradually add cold water. I found that 45 ml / 3 tbsp of water was enough – to check stop the food processor and grab a bit of dough in your hand, if it clumps together you’ve added enough. If it’s too dry, process the mixture again add more in 1 tsp increments – you want to add as little water as possible. The exact amount of water depends on how accurate you are with your measuring and how absorbent your flour is.
Empty food processor on a clean surface and using your hands bring the pastry together gently, do not knead. Form it into a flat disc, wrap in a piece of clingfilm and refrigarate for at least 1 hour.
I use a non-stick pastry case with a removeable buttom, if yours isn’t like that, you may want to grease it or/and line it with baking paper.
Place chilled pastry on a lightly floured surface, gently whack it with a rolling pin a few times and then roll out into a 3-4 mm thin circle that is large enough to cover the base of the tart tin and the sides.
Roll the rolled out pastry around a rolling pin, place the rolling pin over the tart case and gently unroll the pastry on the top of the tin. Ground hazelnuts make this pastry a little more fragile, but don’t worry – patch up any breakagaes with the off-cuts. I had enough leftover pastry to make 20 small star-shaped biscuits (baked them for 12 minutes at 175° C / 350° F).
Mould the pastry into the tart case (making sure it fits really snugly everywhere) and trim the excess with a sharp knife. Pierce the bottom of the pastry with a fork.
Place the lined tart case back in the fridge while you heat up the oven to to 175° C / 350° F.
Once the oven is ready, line the inside of the pastry case with a large piece of crumpled baking paper and then arrange baking beads (or dry beans) on top of the pastry. Blind bake for 15 minutes.
After 15 minutes, take the beads and the baking paper off and return to the tart to the oven for another 5-7 minutes. If the edges are browning too quickly, protect them with a piece of foil (like in the photos for this recipe). Cool completely before filling.
GANACHE FILLING
Place the broken up chocolate pieces and vegan cream in a glass or metal bowl over a bain marie (water bath). Place the pot on the on the low heat (the water underneath should barely simmer and not boil) until the chocolate has been melted. Make sure the water does not touch the bowl with chocolate.
Once the chocolate looks melted, gently whisk it into the cream with a wire whisk, then add maple syrup, hazelnut liqueur (or plant milk) and hazelnut butter. If using hazelnut liqueur, which tends to be sweet, you may wish to reduce the amount of maple syrup a little (to 80 ml /1/3 cup) and replace it with more plant milk.
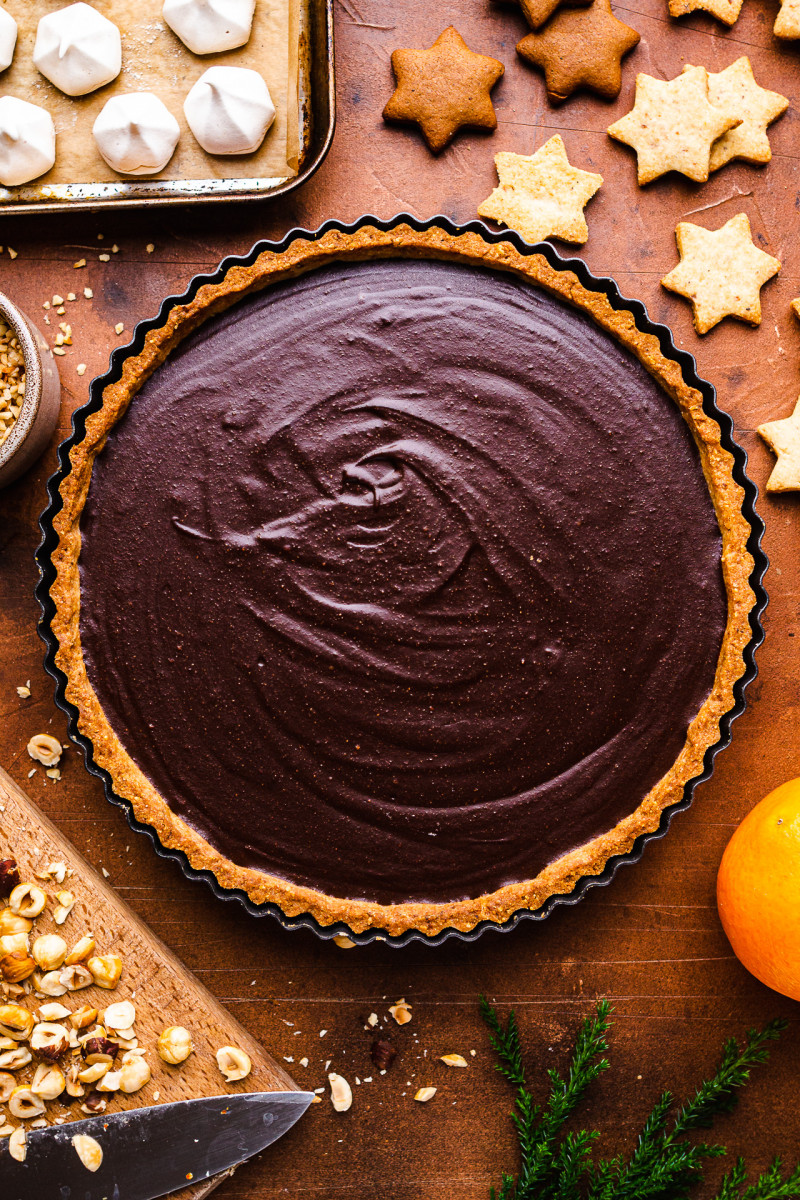
Allow the mixture to cool down, but it should be still pourable, then fill the tart case.
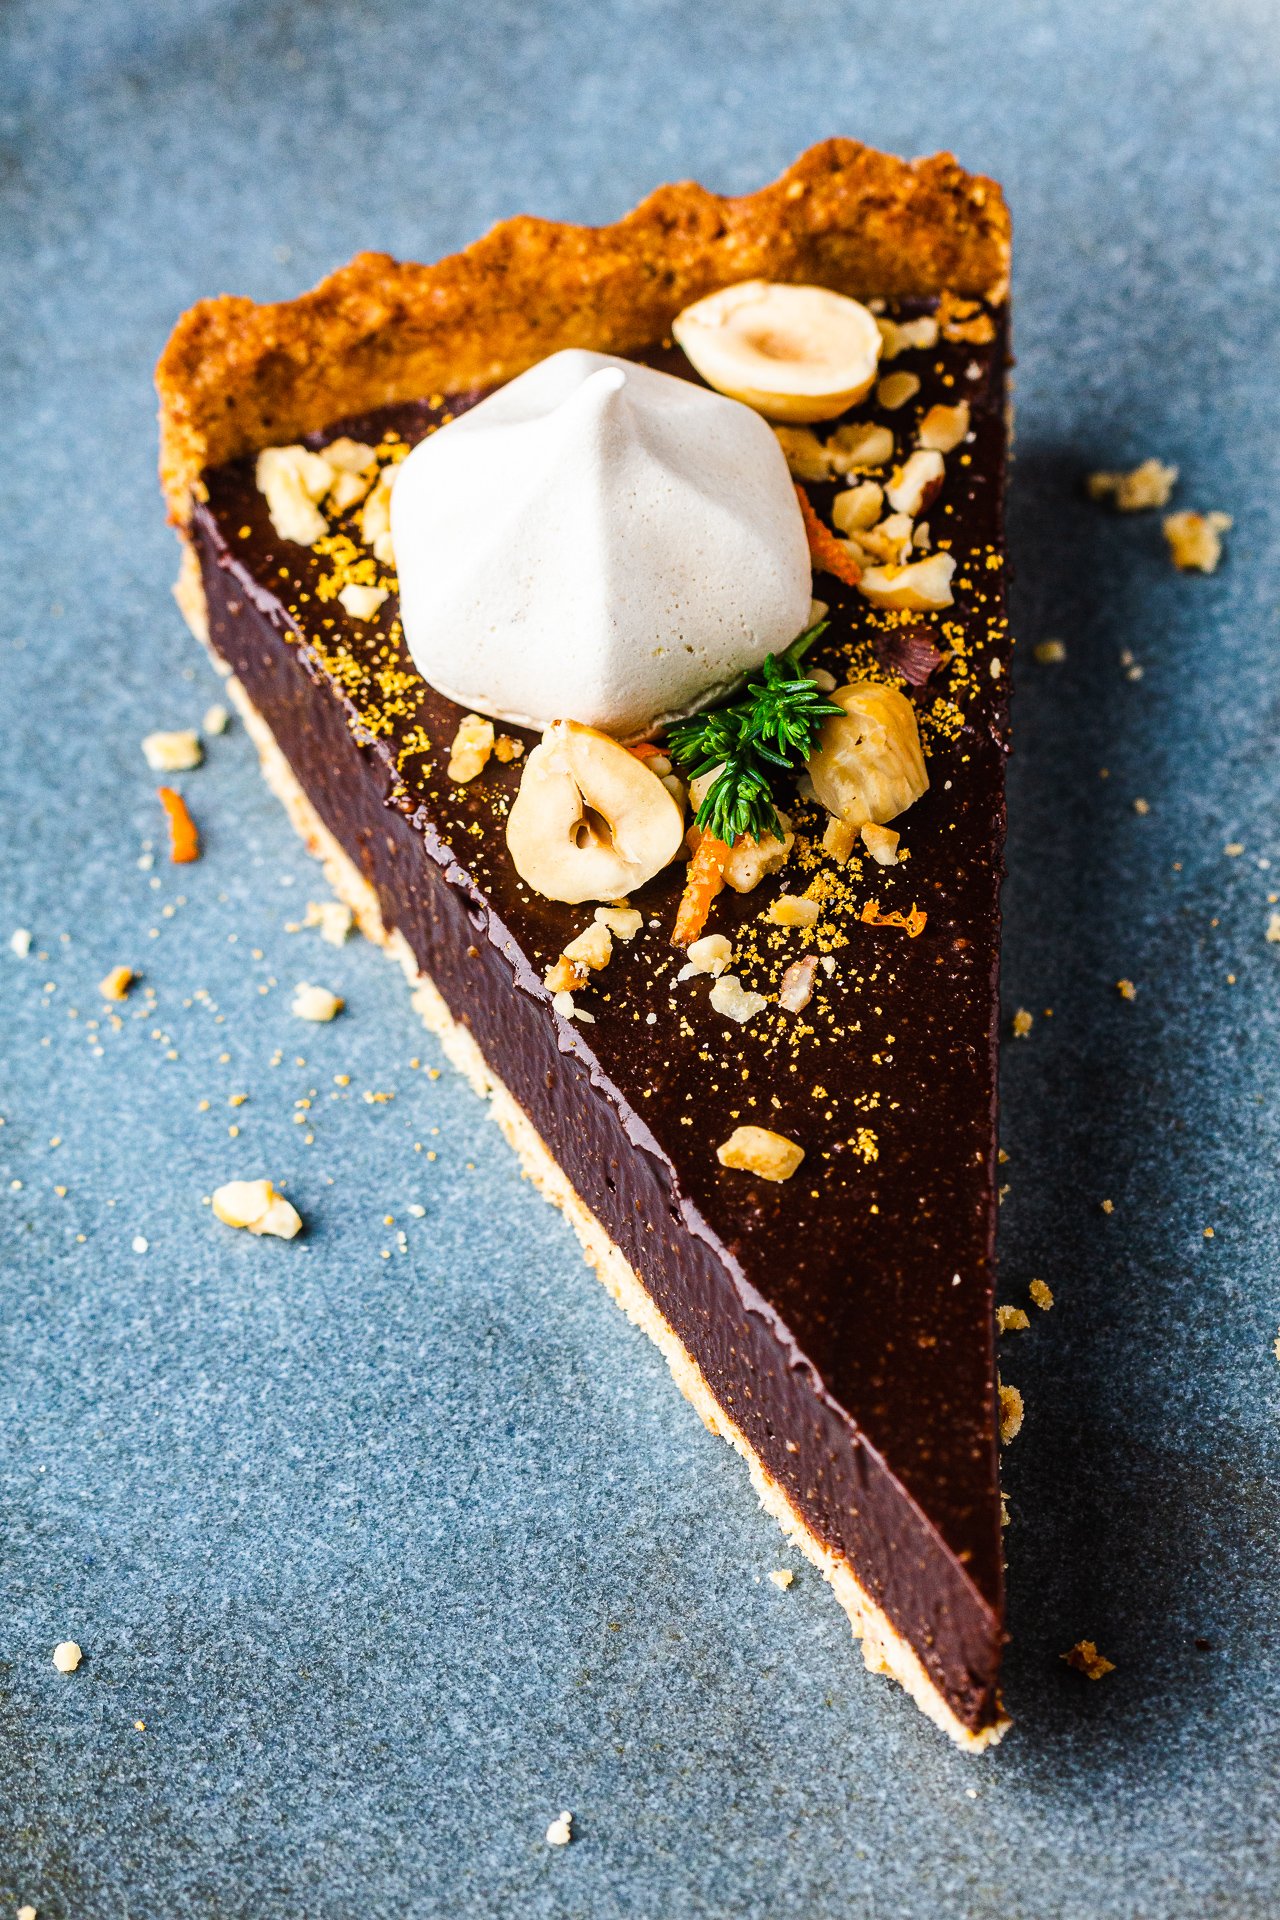
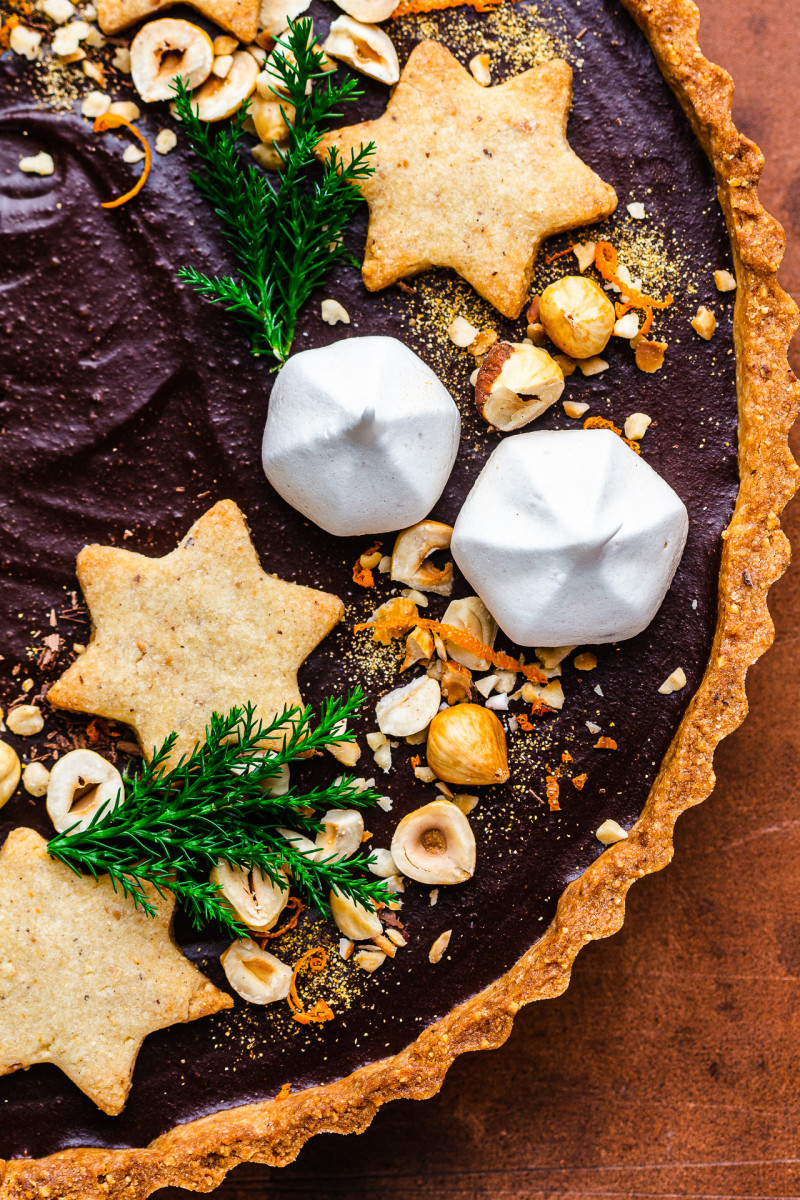
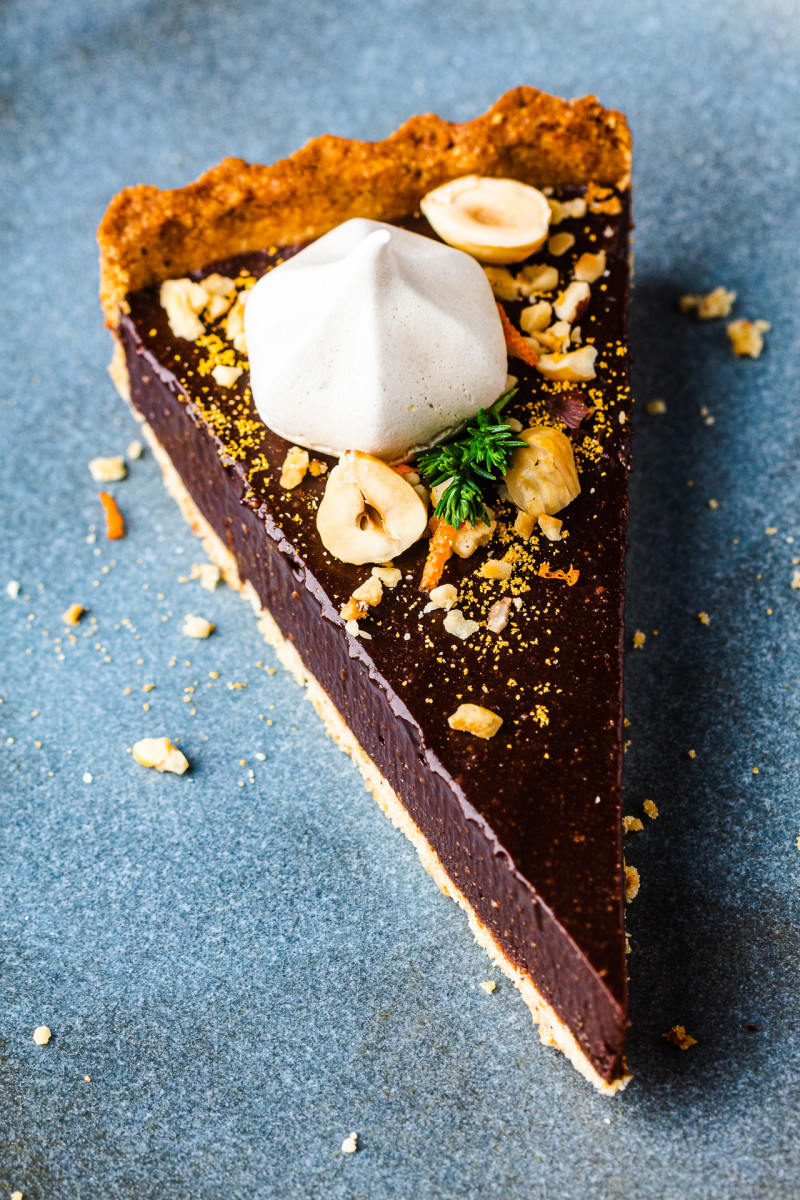
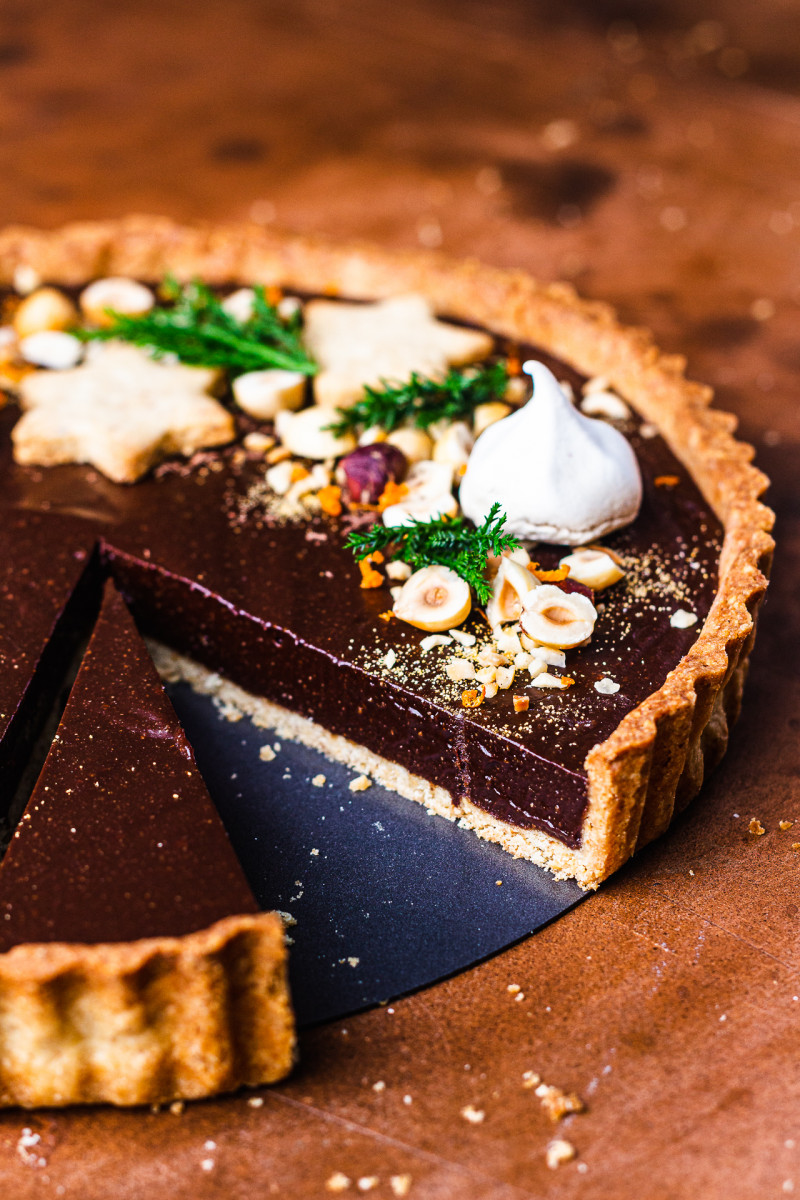
Transfer the tart into the fridge. Allow to set for 4-8 hours then decorate if wish. I used biscuits from pastry offcuts, mini vegan meringues, hazelnuts and orange zest.
Cut with a sharp knife warmed up by dipping it in hot water. Keep in an air-tight container in the fridge or freezer.
NOTES
*HAZELNUTS: you can of course use shop-bought hazelnut meal in the crust. You could also use almond meal, replace hazelnut butter with almond butter and hazelnut liqueur with Amaretto (almond liqueur) for an almond version of this dessert.
*For the GLUTEN-FREE version, use a good GF flour mix (I like this one) and ½ teaspoon of xanthan gum. When using GF flour, it usually works better to place the dough inside the tin case and mould it its shape with your fingers.
*HAZELNUT BUTTER: I make my own by grinding roasted hazelnuts in a food processor, but shop-bought one works just as well. Make sure to stir it well before using.
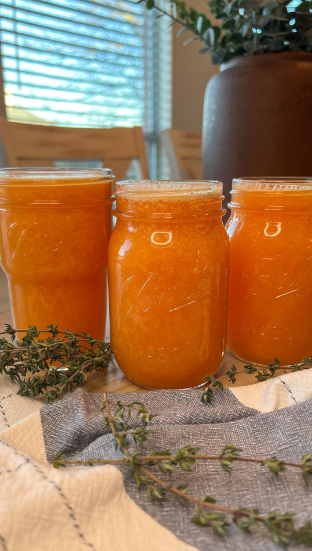
Freshly Squeezed Orange And Grapefruit Juice by thejuiceyard
It’s the best of both worlds! Nothing beats freshly squeezed orange AND grapefruit juice. Try it out for yourself. Happy juicing! 💞
Some of the links I post on this site are affiliate links. If you go through them to make a purchase, I will earn a small commission (at no additional cost to you). However, note that I’m recommending these products because of their quality and that I have good experience using them, not because of the commission to be made.
About user
Juicing for Health was founded by certified Wellness Health Coach, Nutritional Consultant and a Detox Specialist. We help busy men and women identify their health issues at the root cause, in order to eliminate the problems for optimum physical/mental health and wellbeing.
Dr. Christopher recommended cleansing as a way of purifying the body for healing. In his 3-Day Cleansing Program book he states, “The purpose of the entire program is to eliminate mucus from the body. With the mucus
out of the body, a natural healing is obtained in a more simplified way, with the least inconvenience to the patient.”
Many people see the 3-Day Cleanse as a one-time event, however, Dr.
Christopher recommended this as the beginning of the cleansing program, a monthly maintenance, and a way to start living a healthier lifestyle. He recommends using the 3-Day Cleanse to kick start detoxification and set the body up for further cleansing and healing. At the end of the three days, approximately three gallons of toxic lymph will have been eliminated from the body and replaced with three gallons of juices, which is key in re-alkalinizing the system.
After the three days of juice fasting Dr. Christopher recommends starting on the Mucusless Diet, using raw, living foods. I have found this to be an easy transition. After three days of juice cleansing my
body feels fresh and clean, and I find myself only wanting to consume foods that will keep it that way.
The beginning of a new year is the perfect time to do a 3-Day Cleanse and then start or improve upon the Mucusless Diet. Dr. Christopher tells us that eating foods that are alive, nutritious, and healthful can rebuild our bodies, facilitate healing, and keep us free from common issues of old age. Join
me in a 3-Day Cleanse in January and let’s start our year off in the healthiest way possible!
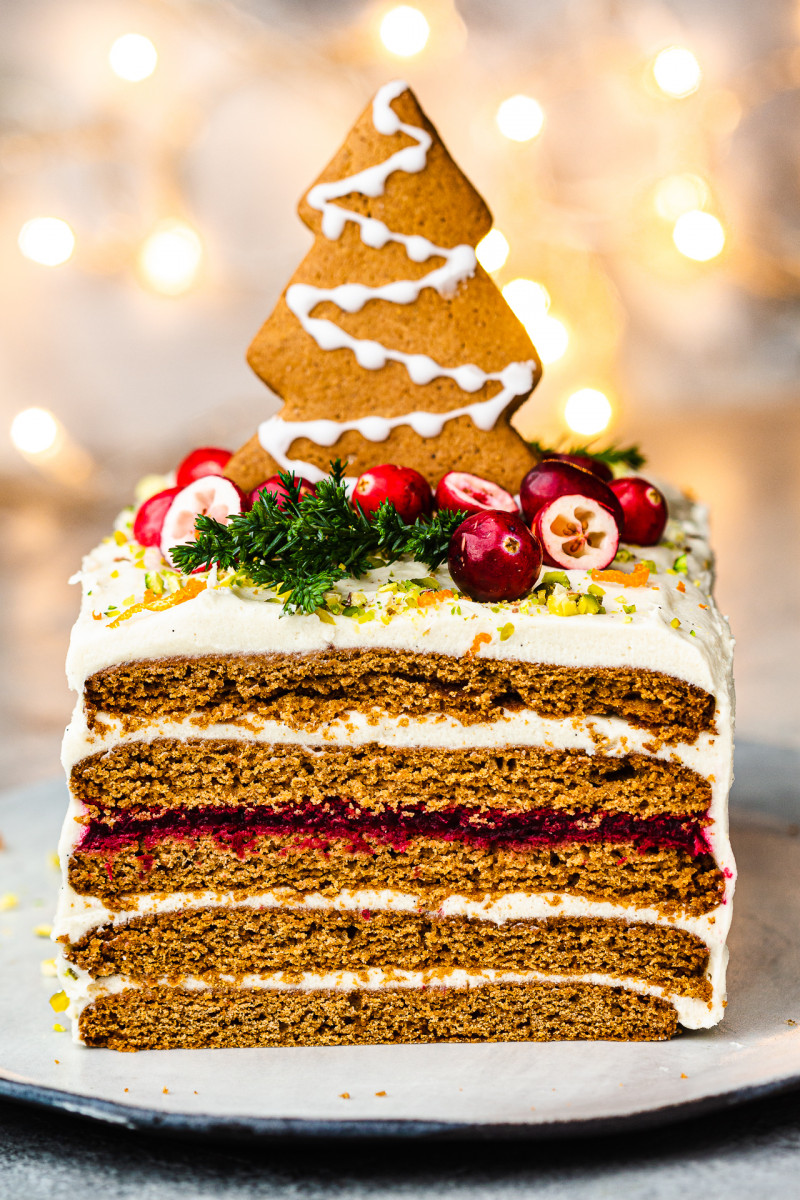
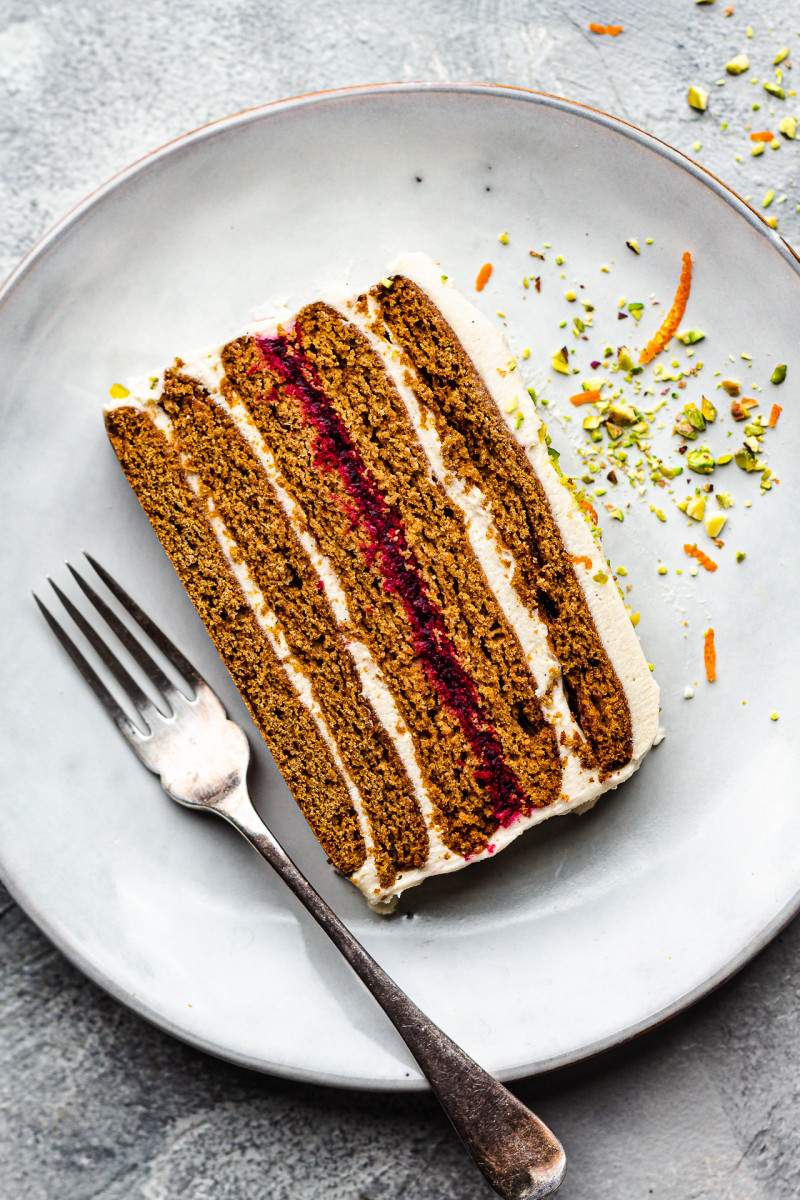
This is my last recipe of 2022 and I am signing off with something very special. It’s my gran’s layered gingerbread recipe that my mum has kindly allowed me to veganise for my blog. My mum makes this cake for Christmas every year and everyone loves it. It’s one of many Christmas desserts my mum makes (this sweet tooth I complain about now and again runs in my family…) and it’s a non negotiable part of the Christmas menu in her opinion…
My attempts at veganising this cake have been pretty hilarious and a little frustrating, I won’t lie. My gran’s recipe book has some obscure units of measurements, which led me to make some mistakes initially. One thing I realised after my attempts at the custard buttercream have turned out a little below par was that when my mum says ‘tablespoons’ she actually means a specific tablespoon that was a part of my gran’s wedding crockery set and said tablespoon measures 20 ml (as opposed to 15 ml) so I kept on using too little flour for the amount of cream.
Finally, we worked it out at which point my mum seemed geniunely bewildered that I did not know that she meant ‘gran’s tablespoons’ although I am pretty sure she never stressed that point. Anyway, we had a good laugh and I gave her a gentle ribbing about how delightfully imprecise some aspects of gran’s recipe were.
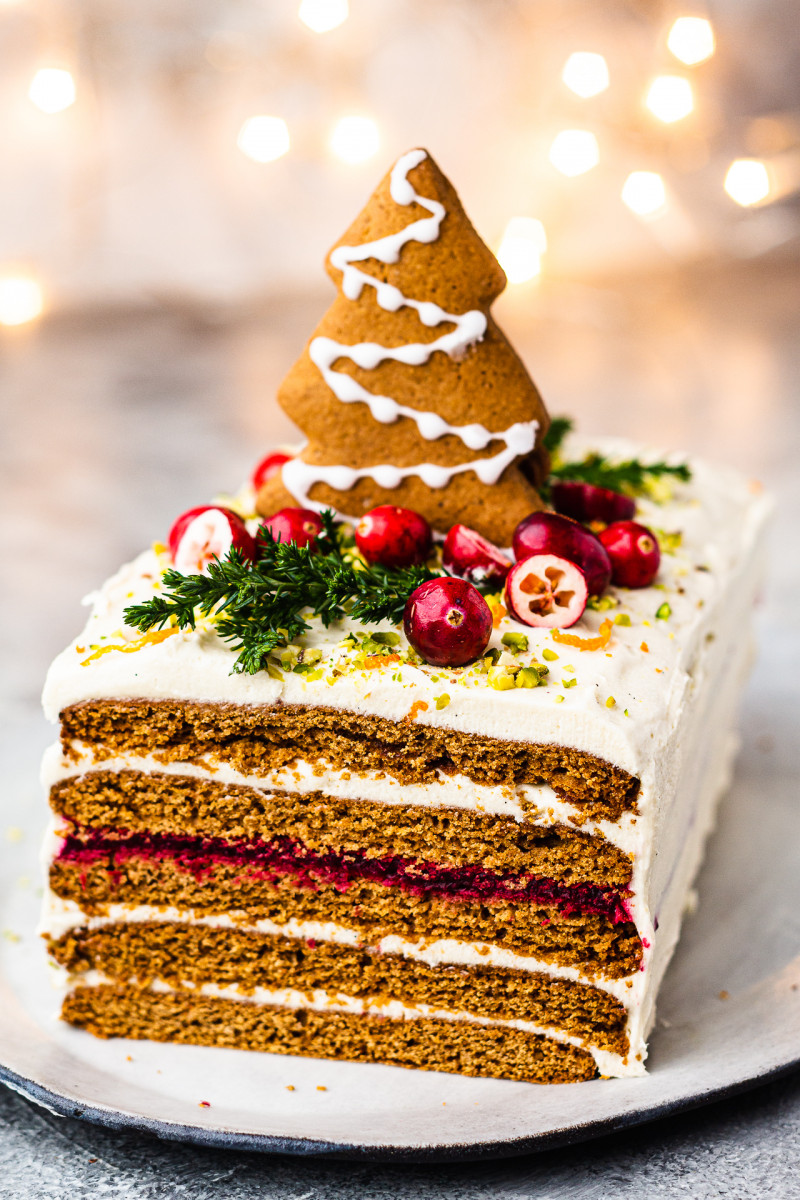
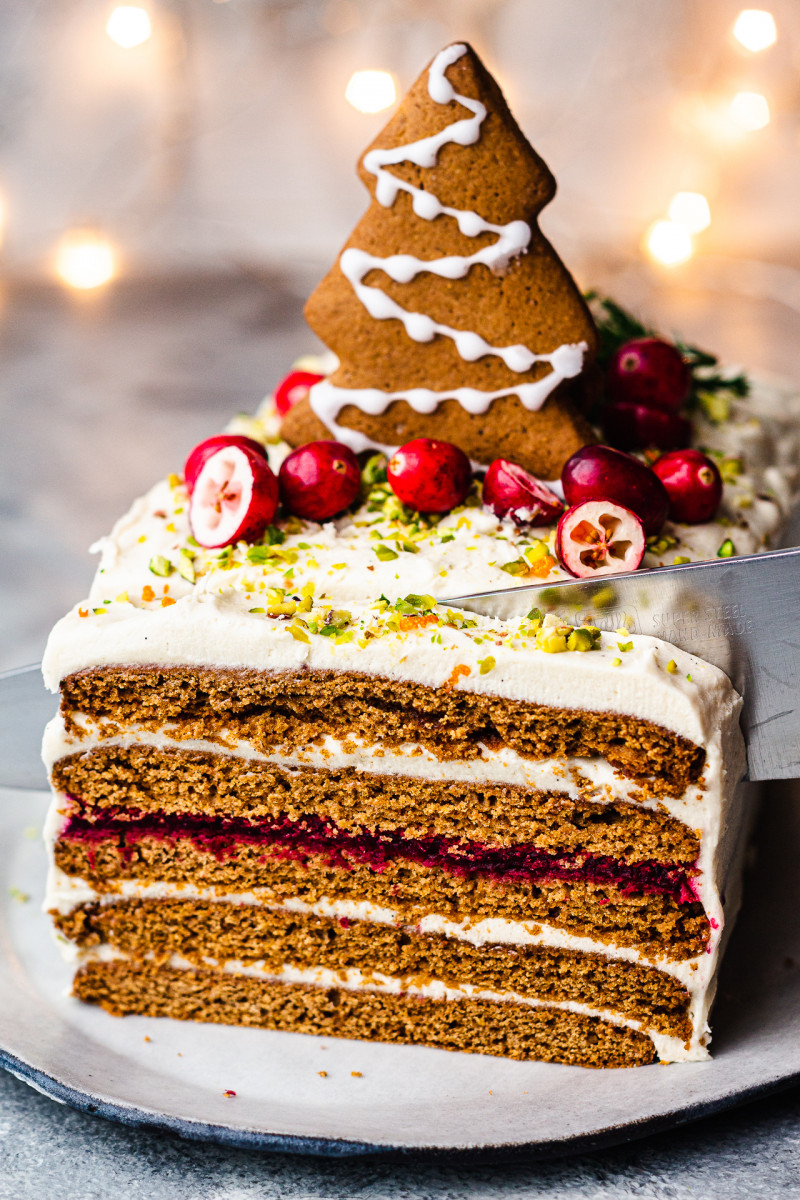
In the end, we hit the jackpot and I am super chuffed as it’s one of my favourite Christmas cakes. The concept behind this cake is actually fairly similar to a tiramisu although the ratios of biscuit base to cream is different and so are the flavours. My mum’s cake has four layers, but I wanted it more regal and photogenic so ended up settling on five. Although it’s tempting, I don’t recommend stacking any more than five sheets as the total weight of the cake is too much and some of the buttercream may start to squeeze out.
The base of this dessert is gingerbread, but instead of cutting it into cookies, it’s shaped into large rectangular sheets. These sheets get moistened with a choice of soaking liquid – Amaretto, lemon water, chai tea – and stacked together in between layers of custard buttercream and some sour jam for contrast. The entire edifice (it feels like one when you are building it) then needs a good rest (72 hour is ideal) for the gingerbread layers to soften and for the flavours to develop and mingle.
Flavours aside, what is great about this cake is that you can split the work into stages and make some items as far as two weeks ahead of time. My mum tells me that she bakes the gingerbread bases two weeks before Christmas and does not prepare the cream until 6-5 days ahead and only assembles the whole thing 4 days before Christmas. It is a perfect cake for when you want to make something impressive, crowd-pleasing (who does not like gingerbread?) yet something that does not require any work on the day. I am a massive fan of this cake and I am so chuffed that I now have it in my fridge – it makes me feel a little less homesick this Christmas. I hope you’ll be tempted to make it and that you will enjoy it as much as my family does.
MORE ABOUT THE INGREDIENTS
GINGERBREAD SHEETS
VEGAN BUTTER: I used vegan butter block (Violife) in both gingerbread bases and buttercream. Another brand, which I actually prefer but it’s not available locally to me, is the Danish brand Naturli. Use any vegan butter you enjoy, but make sure to go for one that comes in a block, not the softened, spreadable variety that comes in a tub.
MUSCOVADO SUGAR: Muscovado sugar, which is much less refined than other sugars so it contains a lot of naturally present molasses, contributes a lot of flavour to these gingerbread sheets. It exists in dark and light variety, and while both will work, I recommend using dark muscovado sugar for maximum flavour. Muscovado sugar is quite a wet sugar so it tends to clump a lot when being store. If yours has any clumps, squash them between your fingertips before adding to the bowl with butter.
GROUND FLAX: If you are making these with regular flour, there is no need to add flax at all. If however, you want to make these gluten-free use a well-balanced GF flour mix (that contains some starches) and add some flax to keep these from crumbling.
PLANT MILK: I like using protein rich soy milk in baking but, any plant milk will do in this recipe.
BAKING SODA: Baking soda is what helps these gingerbread sheets rise a little and stops them from being too dense.
SPICES: I used the following combination of classic gingerbread spices to flavour these gingerbread sheets: ginger, cinnamon, nutmeg, cardamom and cloves. You can adjust the amounts and maybe swap out some spices to your liking. All spice, coriander and black pepper are often also used.
FLOUR: all purpose (also known as plain) flour is what I used to make these and this GF flour mix to make gluten-free version.
CRANBERRY LAYER
CRANBERRIES: I cooked down unsweetened fresh (frozen work well too) cranberries to create a tangy layer of filling, which provides a nice contrast with the sweet custard buttercream and gingerbread. You could also use a ready made jam or preserve if you prefer – my mum uses her homemade sour cherry jam, which works a treat. Plum jam also works well. If your jam isn’t very sour, be sure to decrease the amount of sugar added to the buttercream to ensure the dessert isn’t overly sweet.
CUSTARD BUTTERCREAM
VEGAN SINGLE CREAM: vegan cream provides the base for the custard component. I used Oatly single cream but my mum also made it for me once using full fat coconut milk and it was just as nice, albeit with an added flavour of coconut. I have not had the chance to test, but I am pretty sure that thick plant milk will also render good results (Oatly barista, for example) as my mum’s non-vegan recipe is simply based on full fat dairy milk.
FLOUR: all purpose (also known as plain) flour is one of the two flours I used to thicken the custard. In the absence of egg yolks – which my mum’s non-vegan recipe doesn’t use either btw – we are using what may seem like a fair bit of flour. You you want to keep this dessert gluten-free, use a good GF flour mix or increase the amount of starch by weight.
POTATO STARCH: potato starch is what my mum uses, in conjunction with plain flour, to firm up the custard base. I have also tried using cornflour (known as cornstarch in the US) and it work just as well. Use the same amount by weight.
SUGAR: I used caster sugar to sweeten the custard and although you could use any sugar you like, be aware of the fact that non white sugar will turn the colour of the buttercream darker. This buttercream is quite sweet, which you can adjust to your liking, but I personally like how it sweetness shines against lip puckering unsweetened cranberries.
VANILLA: a good glug of vanilla makes this custard buttercream really delicious so I recommend using as much as 1 tbsp for this amount of cream. Orange zest is also a nice addition, but I wanted to keep this already involved recipe as simple as I can.
VEGAN BUTTER: as we are making a type of buttercream for this cake, we will need vegan butter to stiffen the filling and give it a whipped texture. I used vegan butter block (Violife).
HOW TO MAKE THE BUTTERCREAM
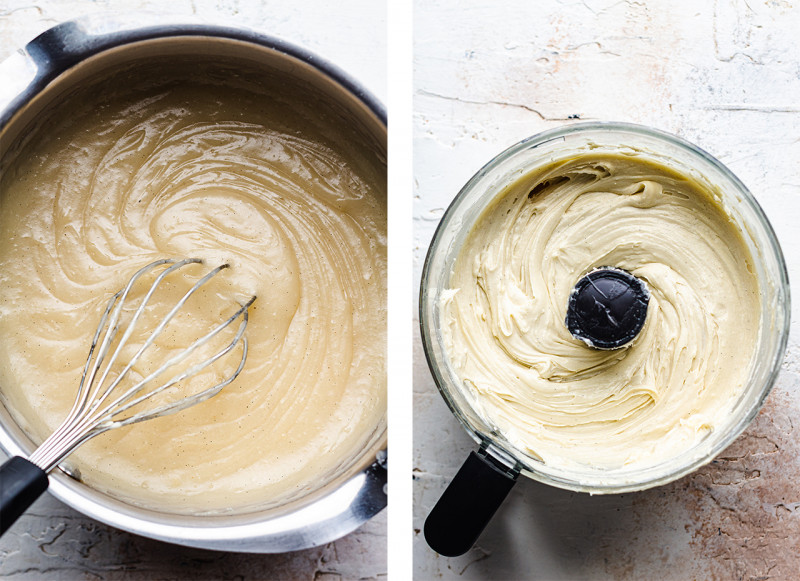
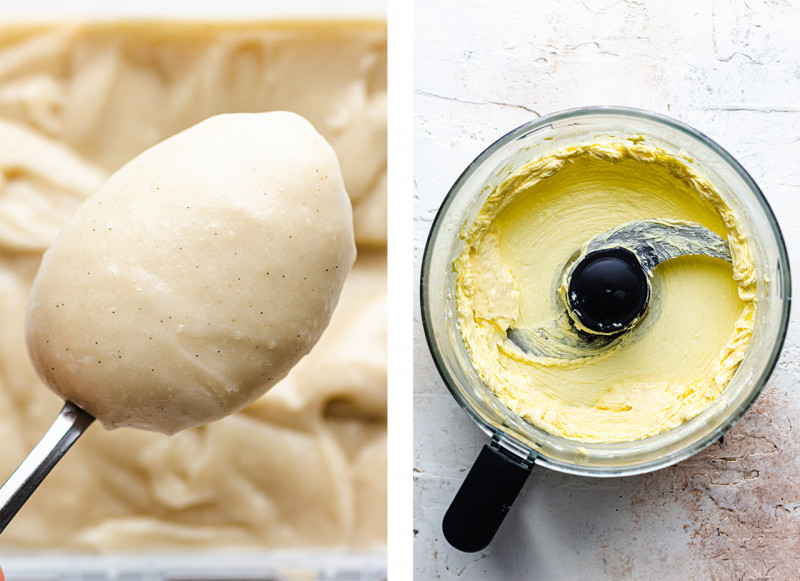
Start off with making a simple custard in a pot, allow it to go cold. Whip softened vegan butter in a food processor until smooth and lump-free, use a spatula to help the process.
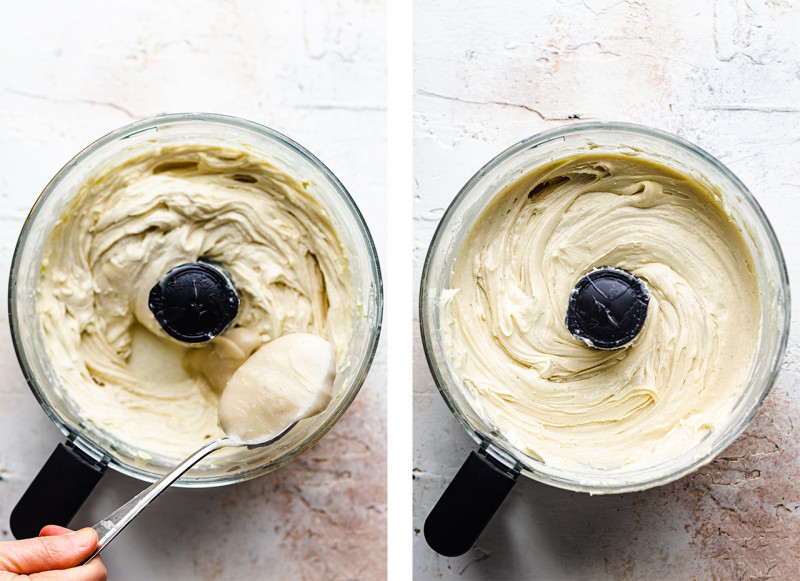
Once the butter is smooth, add cold custard to the food processor – tablespoon by tablespoon – incorporating well after each addition. By the end of this process, you should end up with a stable and fluffy custard buttercream.
HOW TO ASSEMBLE
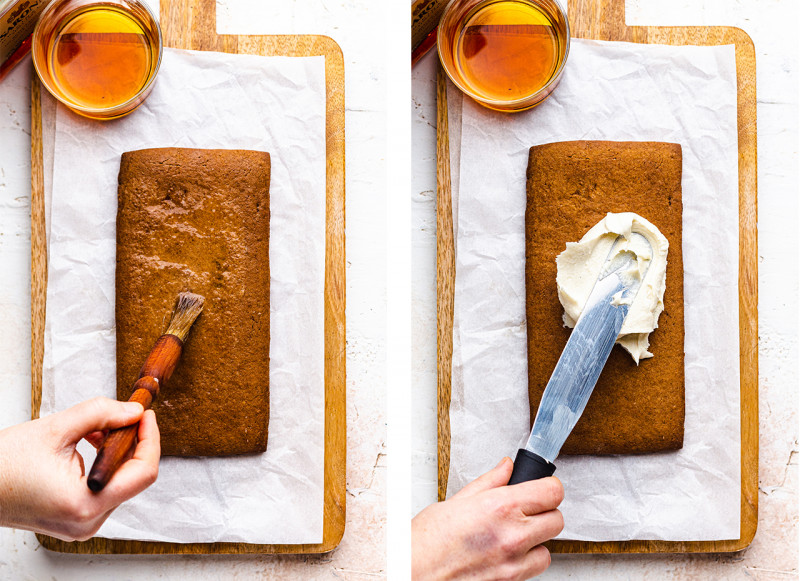
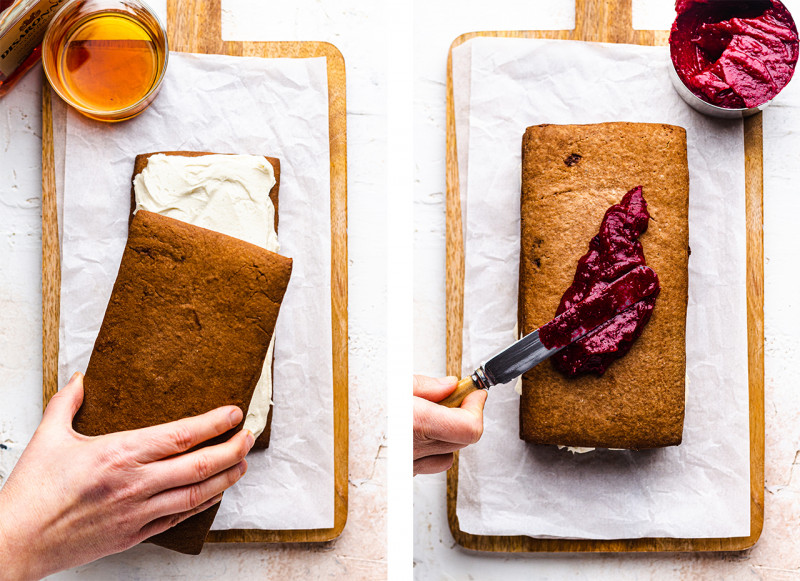
First of all, make sure all the components are cold. Place a sheet of gingerbread on a surface (tray, plate) that will comfortably fit in your fridge. Brush each successive gingerbread – don’t brush in advance as this will make gingerbread fragile and easy to break – with 2 tbsp of soaking liquid of choice and allow that liquid to soak in before topping with a layer of custard buttercream (or cranberry jelly).
Even though this amount of dough can give you as many as 7 layers of gingebread base, do not be tempted to stack this cake too high – I would say that 5 layers is the upper limit – as otherwise the cake becomes too heavy, which means that the bottom layers get squashed and the filling starts to be pushed out instead of staying in between layers.
Place vegan butter in a large mixing bowl and leave on the counter to soften.
If making these with gluten-free flour, combine ground flax with plant milk and set aside to thicken. Otherwise skip to the next step.
Once the butter has softened, add dark muscovado sugar and whisk with electric beaters until homogenous and fluffy. If your sugar has clumps, squash them between your fingers first.
Next add plant milk (or activated flax if using GF flour). Whisk until well combined and creamy.
Place a sieve over the bowl and sift in all of the dry ingredients including approximately a half of flour. Mix well to combine, then sift in another half of flour. Use your hands to gently bring the dough together but do not knead.
The dough should be soft and a little sticky. Form it into a disc, wrap in cling film and refrigerate for about 3 hours, until the dough has hardend.
Before you are about to take the dough out of the fridge, set the oven to 180° C / 355° F and line two baking trays with a piece of baking paper.
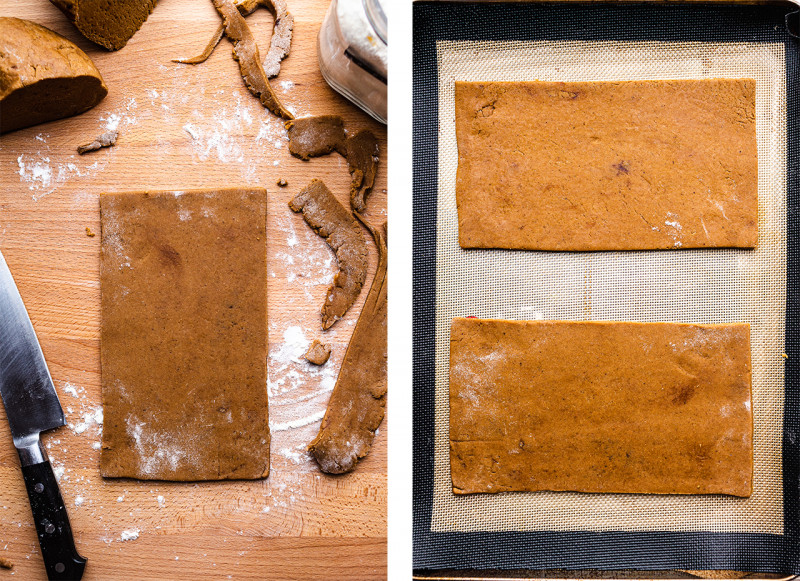
Take the dough out of the fridge, weigh it and divide into 5 equal pieces.
Roll each piece into a long oblog then cut out a rectangle measuring 20 cm / 8 inches by 10 cm / 4 inches and 5 mm / 0.2 inch thick. Keep off cuts for gingerbread cookies.
Arrange gingerbread sheets on the prepared baking trays and bake for about 18 minutes. Cool down completely. You can store these away in an air-tight box 1-2 weeks before assembling.
CRANBERRY LAYER
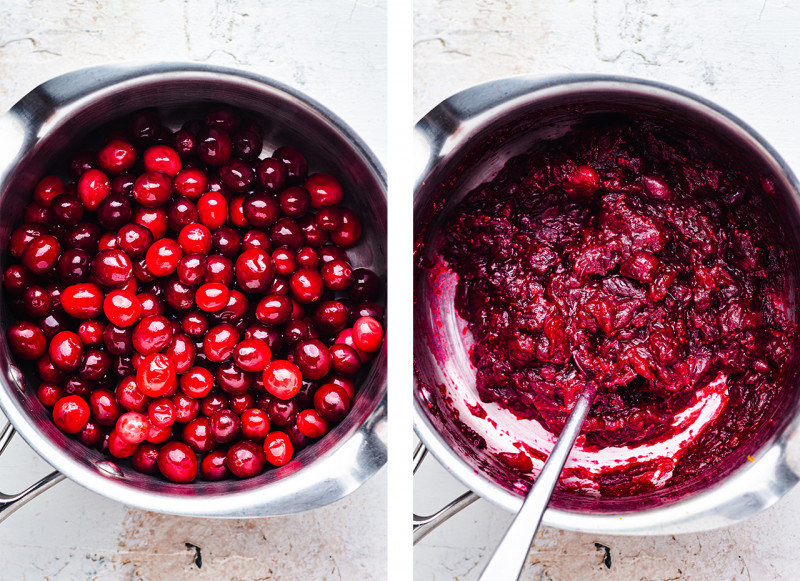
Place cranberries and two tablespoons of water in a medium size pot on low heat.
Simmer until completely softened stirring the whole time so that the mixture doesn’t catch.
Cool a little then blend until smooth. I needed to add 60 ml / 4 tbsp of water to be able to blend it in my mini blender – add as little water as possible or else it will run off the cake.
Refridgerate until needed, you will have leftovers but smaller amount doesn’t blend so well. This keeps for about a week.
CUSTARD BUTTERCREAM
Place cream and vanilla in a large pot, warm it up on a low heat.
Place sugar, flour and potato flour in a medium bowl and whisk together well.
Once the cream is simmering gently, start adding flour and sugar mixture in a slow yet steady stream while whisking the entire time. This should minimise any lumps but if there are any, press the mixture through a fine sieve once thickened.
Carry on heating the mixture (whisking the whole time) until it starts bubbling gently – stop whisking for a few seconds to see if it does. From that point onwards allow the mixture to bubble for 5 minutes on a low heat to thicken and to cook off raw flour taste.
Take off the heat, allow to cool, then refridgerate until cold (overnight if you have time).
Cut butter into slices and place it in a food processor. Leave at room temperature until the butter is completely soft, then process until smooth and lump free.
Slowly add cold custard, tablespoon by tablespoon, allowing each addition to get incorporated into the butter. By the end of this process you should end up with a fluffy white buttercream. Refridgerate for a couple of hours at least before icing the cake.
ASSEMBLY (2-3 days before consumption!)
Place first gingerbread layer on a dish/surface that will fit into your fridge comfortably.
Brush it with 2 tbsp of your soaking liquid of choice, allowing it to soak in before spreading the buttercream gently on top.
Follow exactly the same step with the next layer, then switch up buttercream for cranberry jelly/jam.
Follow the same steps until you’ve used up all gingerbread sheets. Use leftover cream to cover the top – don’t forget to soak the last gingerbread sheet too before adding cream.
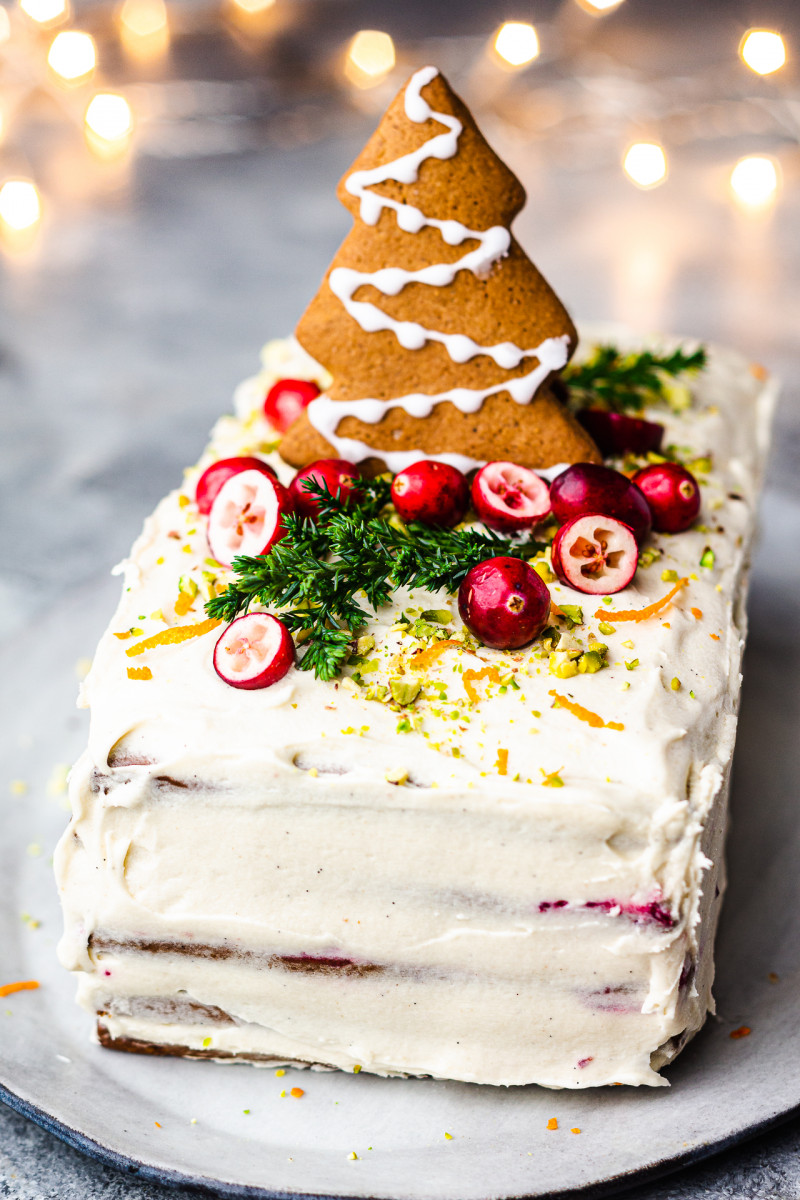
Keep leftover buttercream to cover the sides once the cake has set amd place assembled cake in the fridge at least 48 hours (72 hours is better) before serving days so that gingerbread has a chance to soften.
Decorate however you wish – I used gingerbreads made from leftover dough, chopped pistachios, fresh cranberries, bits of Christmas tree and orange zest.
Keep in the firdge for up to 5 days, I have not tried freezing it yet but will test that shortly.
NOTES
*MOLASSES: If you wanted to add molasses to the gingerbread dough, you can. Use unsulphured molasses or black treacle rather than blackstap molasses, which are bitter. Use 80 g / ¼ cup of molasses and decrease the amount of sugar by 50 g sugar / ¼ cup.
*SOAKING LIQUID: my mum uses lemon water (approx. 30% lemon juice, the rest water), I have tried using Amaretto and I have no regrets (you may want to water it down for less punchy flavour), cold spiced chai tea or cranberry juice will also be delicious.
*CRANBERRIES: I both fresh and frozen cranberries work well. I did not add any sugar as I wanted a sour conterpoint to the sweet gingerbread and buttercream. Alternatively, use a sour jam – my mum useses her homemade sour cherry jam.
*POTATO STARCH: can be replaced with the same amount of cornflour / cornstarch by weight.
Avoiding animal-based products like milk used to be a challenge for those following a vegan lifestyle.
Thankfully, innovations in food manufacturing make it easier than ever to make tasty recipes that tick the nutritional and flavour boxes, like this vegan blueberry smoothie option.
Ingredients
Biogen Plant Based Protein is made using rice and pea protein and is an excellent choice of protein for athletes and individuals following a vegan or dairy-free lifestyle.
Method:
Add the ingredients to your blender and blitz until smooth.
Serve and enjoy!
When made from unrefined whole grains like steel cut or rolled oats, oat milk contains fibre, including beta-glucans, various trace minerals, plant-based protein and some fatty acids.
Author: Pedro van Gaalen
When he’s not writing about sport or health and fitness, Pedro is probably out training for his next marathon or ultra-marathon. He’s worked as a fitness professional and as a marketing and comms expert. He now combines his passions in his role as managing editor at Fitness magazine.
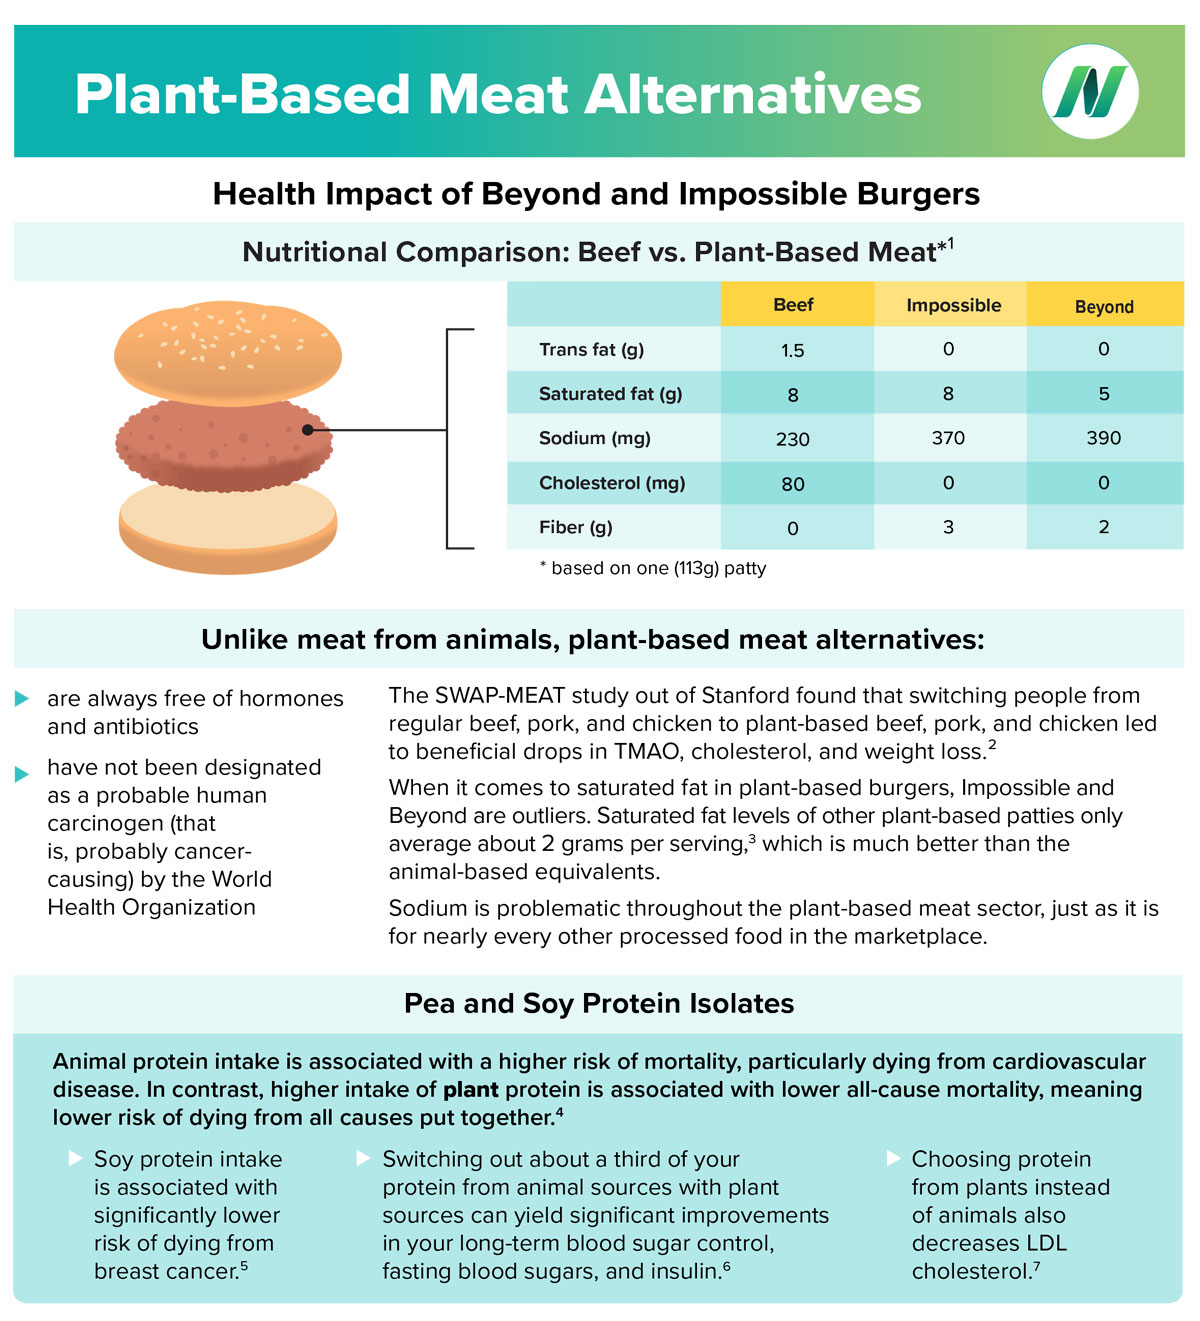
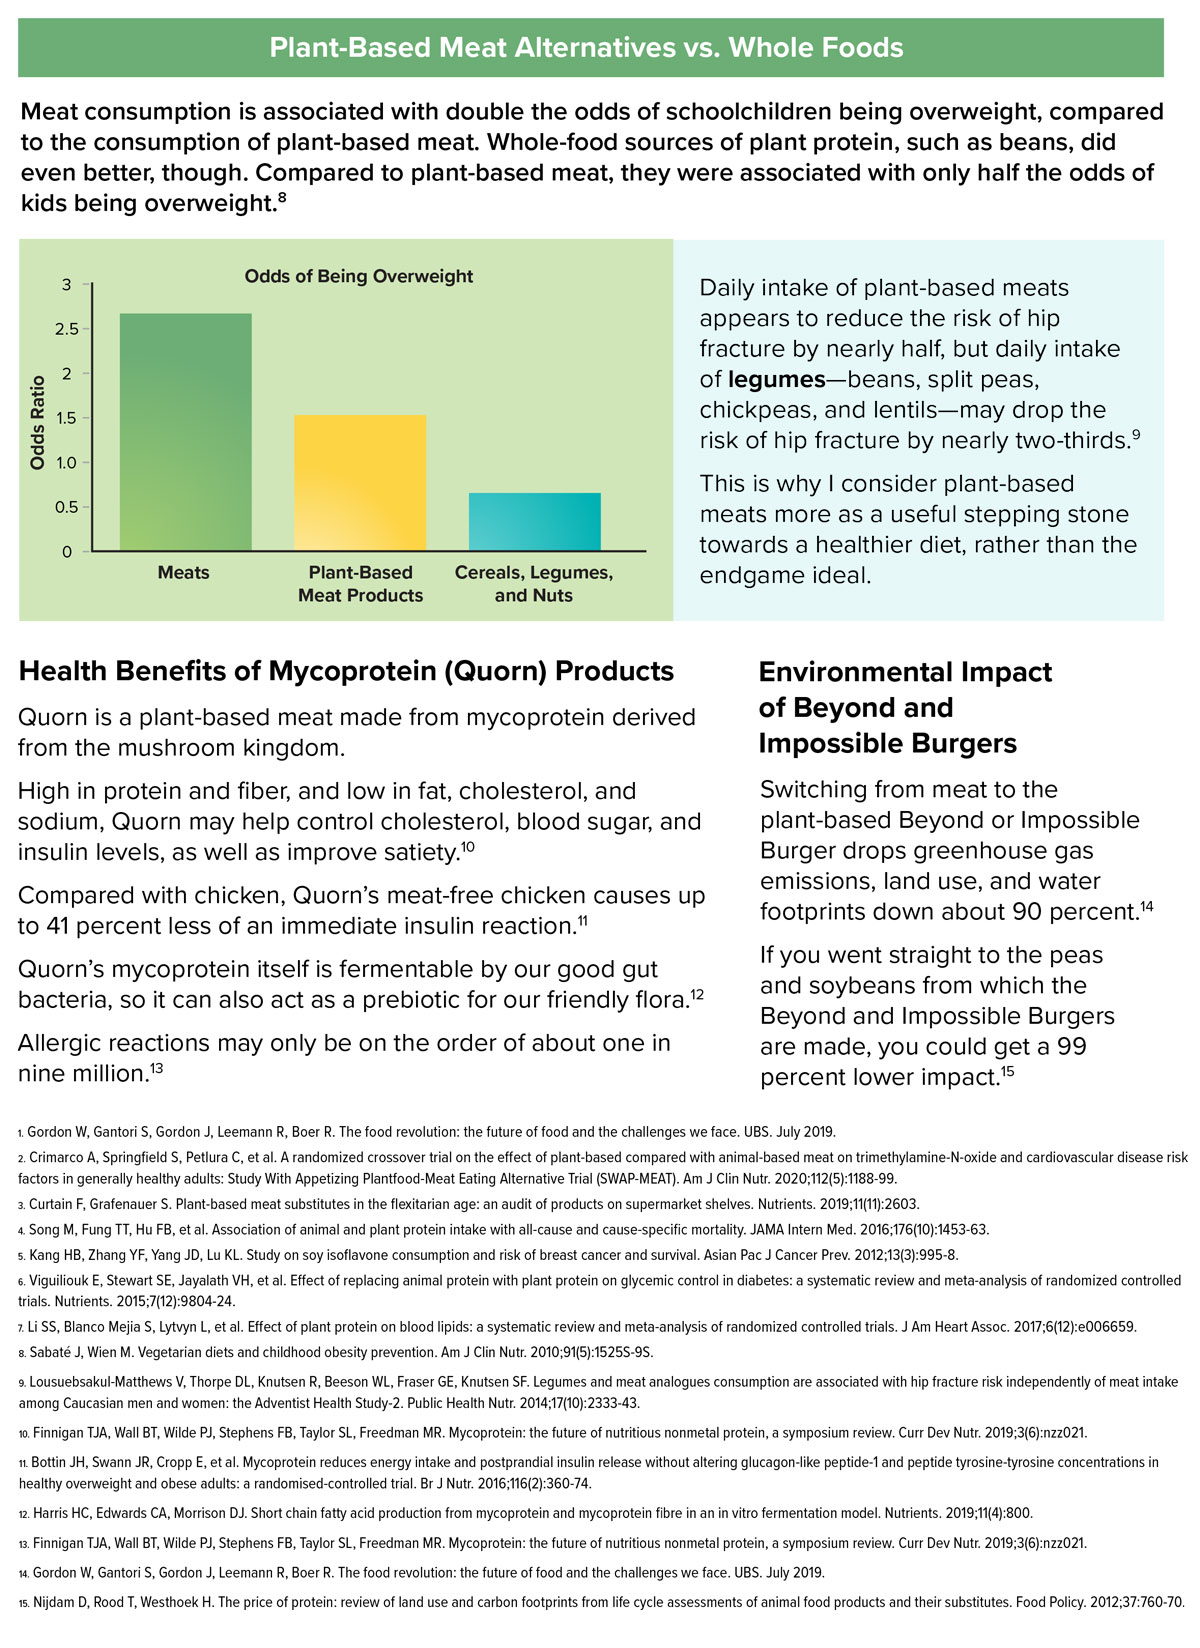
We can address human health and climate crises at the same time by increasing consumption of plant-based foods, including animal-free meat substitutes, and substantially reducing our intake of meat, eggs, and dairy.
What does the latest research on plant-based meat alternatives say? This fact sheet is a summary of the main takeaways.
Get this fact sheet as a downloadable PDF here.
For more details about these studies, watch the free videos on the NutritionFacts.org’s YouTube channel or on the website’s Meat Substitutes topic page.
I receive so many calls from people suffering from sun-phobia that I had to write this article to help alleviate their fears. Dr. John R. Christopher spent a lifetime trying to help
people live a healthy, natural lifestyle that included plenty of sunshine, wholesome food, deep breathing of clean air, and grounding by going bare foot. All these concepts are valuable and work synergistically.
Sun exposure therapeutic affects the body in the following ways: the immune system through the creation of Vitamin D, the skin via melanin for protection, the eyes that require full spectrum light, the brain via release of anti-depressants and mood modifiers, the circulatory system via release of nitric oxide, and all cellular structures by stimulating release of melatonin to counter the byproduct of oxidative stress created as
the mitochondria constantly produce energy.
Dr. Roger Seheult relates that many well-designed studies show benefit of sun exposure. One such study done in
southern Sweden, which randomly chose 30,000 women to participate in a long-term study of 20 years. In this study precise observation showed those women that had sun avoiding exposure had a higher mortality than those that went freely into the sun.
Science is never absolute, and its very existence depends on constant challenges, especially through new research. Patterns of anecdotal experiences trigger new studies which challenges or confirms existing scientific theories.
Dr. Christopher’s “anecdotal,” experience with melanoma skin cancer hopefully will trigger a plethora of case histories that will lead to studies and eventual challenges to medical dogma on the sun causing cancer.
Dr. Christopher had a patient with melanoma in an area that never had exposure to the sun. He was a sheepherder who’s face and hands had constant sun exposure with no cancer, yet
his lower abdomen, which never had exposure had a melanoma tumor. Upon discovering that the man was isolated all summer, Dr. Christopher recommended that the sheepherder herd his sheep, the entire summer, without clothes. He instructed him to build up his time in the sun, starting with two minutes the first day and adding two minutes each day. He was also
instructed to fill his chuck-wagon with only grape juice, and this was to be his only sustenance the entire summer. He returned in the fall very healthy and cancer free.
If we follow Dr. Christopher’s lifestyle and dietary advice, eating nothing but wholesome food, raised organically and in it’s fresh living state, we too can enjoy the benefits of the sun and remain
cancer free. We never want to burn our skin and we need to get all the nutrient, especially antioxidants, from fresh raw produce. May we all be healthy and cancer free.
New year, new me! Who else is tired of this new year trope? As I am the kind of person that is on a constant cycle of self-improvement, I really don’t need an extra stick to beat myself with really… With this in mind, I don’t plan to delve into diet food this January, but bring you cosy, comforting and nourishing food that will make this dreary winter feel a little less oppressive.
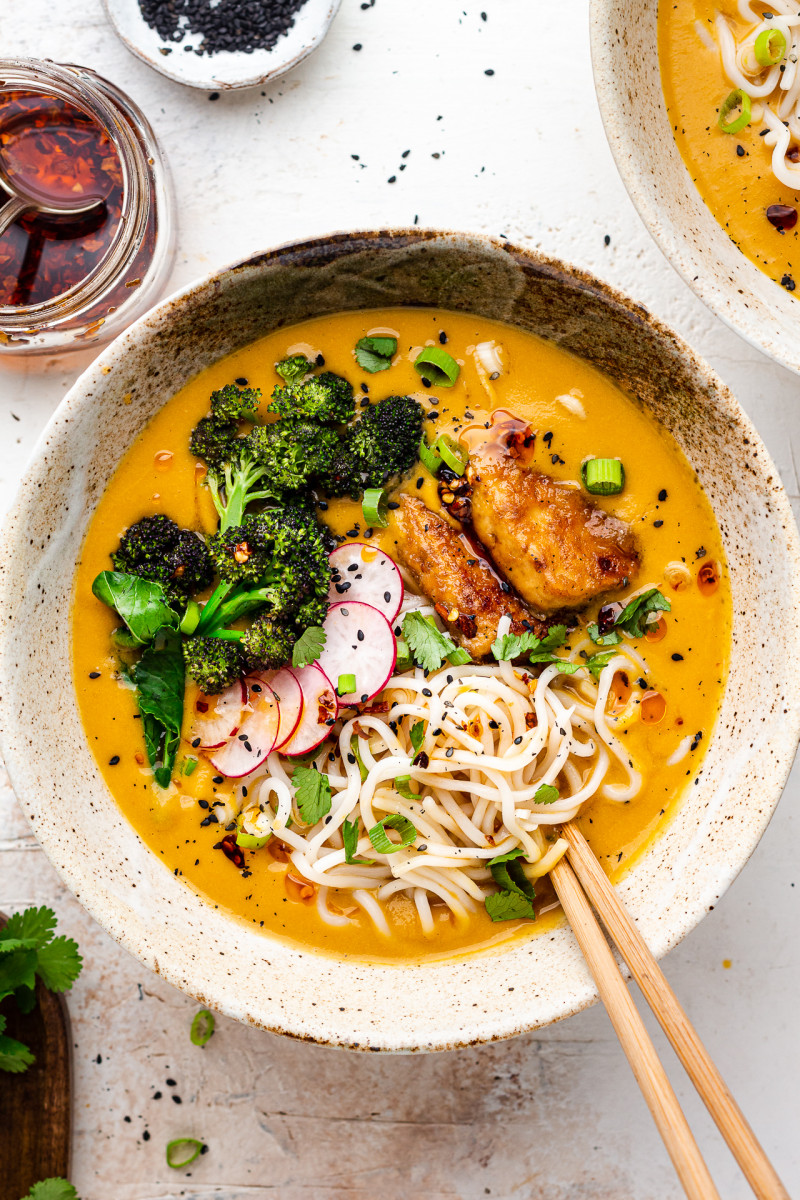
Today’s recipe – my first of this year – is a fairly simple but delicious ramen-inspired soup. It’s by no means authentic – it’s a bit of a fusion and a bit of cheat but I find it delicious, nourishing and perfect for this time of the year so I thought I would share. My aim was to use up some butternut squash I had lying around in a new way and to make it as hands off as possible.
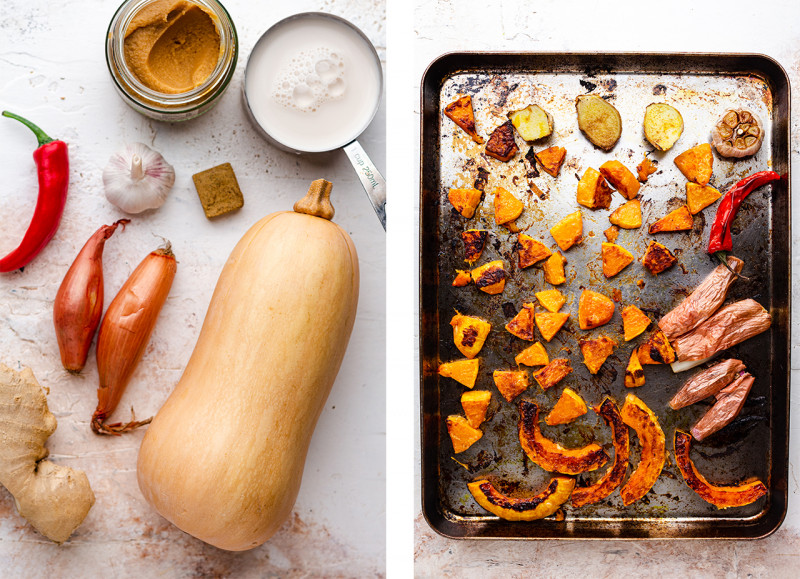
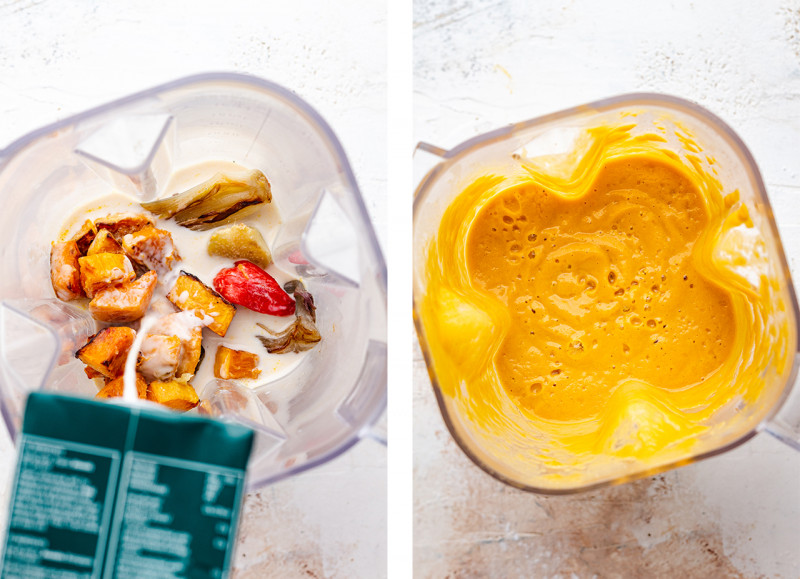
The bulk of this soup gets made in an oven so that ticks ‘hands-off’ part to a large degree. I char sweet pumpkin flesh and a bunch of aromatics in a hot oven and then blend them with some soy milk and a host of flavour enhancers until thick and creamy.
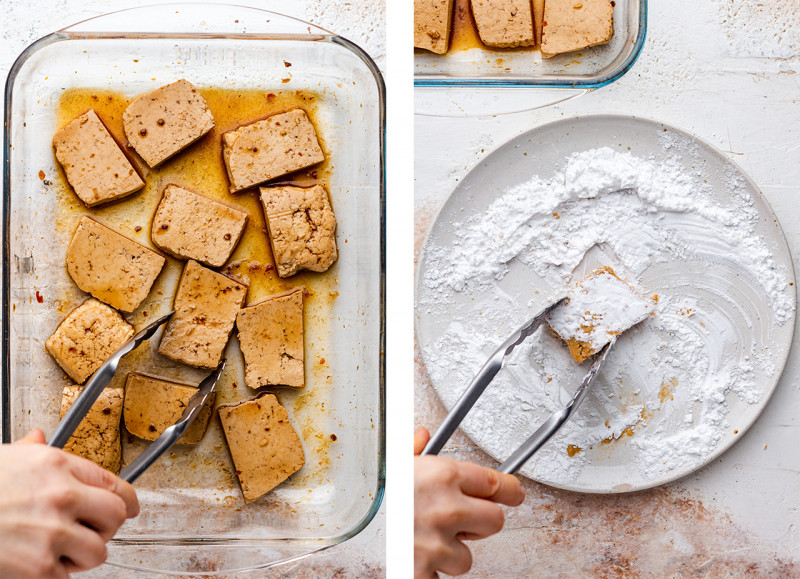
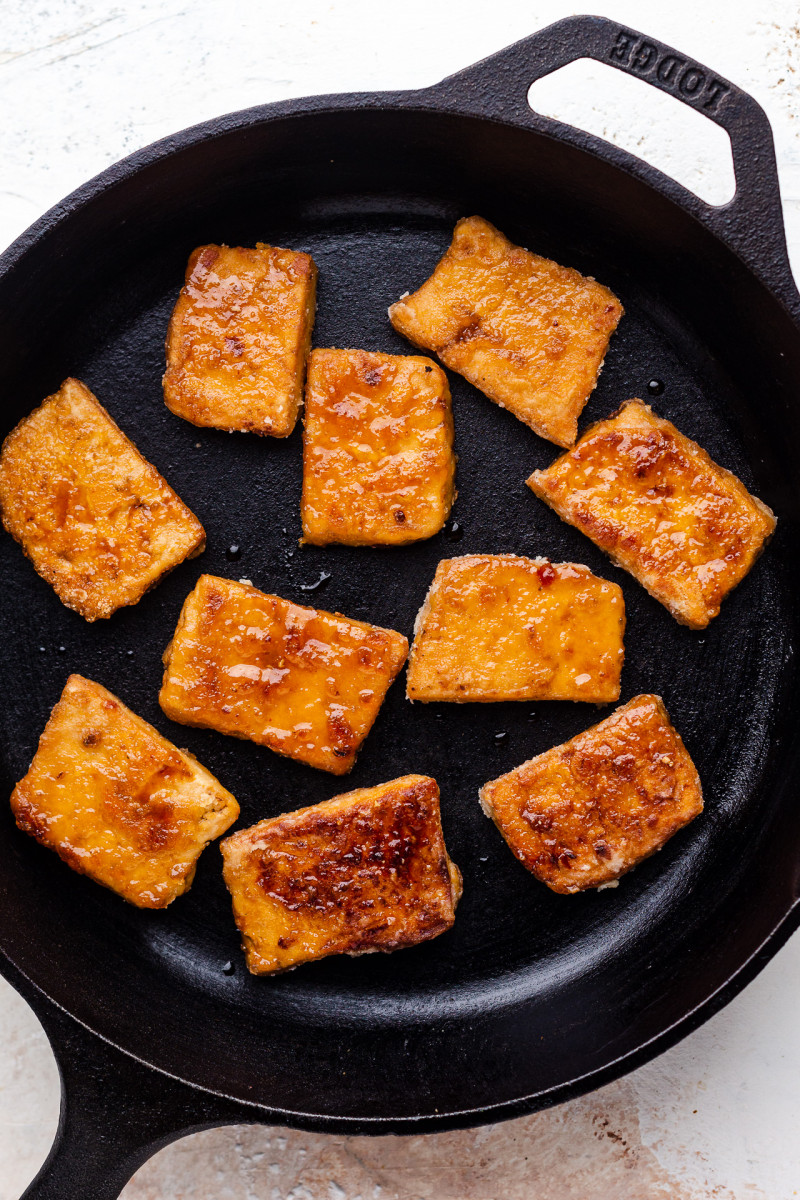
The toppings are also fairly simple. I tend to use shop-bought tofu that I either whack into the oven alongside the veg or pan-fry in a small amount of oil when I am feeling indulgent. If you would rather make your own tofu, you could also do that. For the photos I marinated well pressed tofu in a mixture of soy sauce, mirin and sake for a few hours, then coated it in a thin layer of potato starch and pan-fried it. It’s delicious, but it requires some forward planning so I skip this entire process when I want to have a bowl of nourishing soup in front of me fast!
Anyway, this simple ramen-inspired pumpkin soup has been a big success in my house and I hope you will fall in love with it too. Happy January!
MORE ABOUT THE INGREDIENTS
SOUP
GARLIC: If it seems like this recipe is over the top with garlic, don’t worry. The head of garlic gets roasted and beautifully caramelised in the oven and all the harshness is taken out of it. If you are still a bit unsure, use half of the roasted cloves and add more if needed. The raw garlic clove adds a bit of zing and freshness to this soup at the end, but I mellow it by steeping it in vinegar at the beginning so there is no harsh garlic taste here either, I promise.
RICE WINE VINEGAR: I used a small amount of rice wine vinegar (Mizkan is the brand I am currently using) to contrast the sweetness of the pumpkin beautifully. Add more if your palate craves it!
PUMPKIN: Sweet roasted pumpkin is what gives this simple soup body and creaminess without making it heavy. I used butternut squash (or butternut pumpkin as it’s known in many countries worldwise), but any sweet firm pumpkin will work just as well.
GINGER: I like a little ginger kick here but not too much so I’ve used only a small piece, use more if you prefer.
CHILLI: I used a medium heat red chilli that I roasted in the oven with all other vegetables to mellow it a little. If you are not keen on spicy heat, simply skip it and maybe add a small drizzle of chilli oil at the end if liked. Otherwise, use only half of this chilli (save the other half for another dish) or scrape the seeds out (that’s where most of the heat lies) and only use the flesh for a gentle kick.
SHALLOT: I charred halved banana shallot to deepen and mellow its flavour. You can use any shallots or even half a small onion if that’s what you have.
VEGETABLE OIL: Any neutral vegetable oil will work here like peanut oil, sunflower oil, grapeseed oil or rice bran oil.
SOY MILK: I used creamy soy milk (made out of just soy and water, no additives) to add creaminess to this simple soup. You can use any neutral flavour plant milk instead or water and a tablespoon or two of nut butter (peanut butter works well) or seed butter (hulled tahini).
UMAMI STOCK CUBE: As this is a bit of a cheat recipe and all the action happens in the oven, I added an umami stock cube to this soup to give it more of a depth of flavour. If you happen to have kombu (seaweed that is a traditional ramen ingredient) in your cupboard already, you may want to simmer a large piece of it in the water that you’ll be adding to this soup in step 9 for 20 minutes or so to infuse it with even more flavour. Once done, fish your kombu out and add seaweed infused water to dilute the soup, boost its nutritional profile and its flavour at the same time.
MISO PASTE:Pumpkin and miso are a match made in heaven and I am big fan of them both so adding a hefty amount of miso paste to this soup is no brainer. I opted for white miso paste, which is quite mellow, but more assertive red miso will work just as well – although you may want to decrease its amount to taste.
SOY SAUCE: A small amount of soy sauce is nice to add more flavour and adjust the seasoning. If you are gluten-free or making this dish for someone who is make sure to use gluten-free tamari instead. Or if neither of these are available, use a small amount of salt to finish this dish off.
MIRIN: A touch of mirin, sweet Japanese wine, complements the flavours of this soup really well. It reinforces sweetness of the pumpkin and contrasts with a touch of vinegar nicely. If you haven’t got any mirin in your cupboard, use a smaller amount (as it’s way sweeter) of maple syrup or even sugar.
TOPPINGS
NOODLES: Use any noodles you enjoy. As this soup is on the thicker side, I went for thicker ramen noodles rather than the wavy instant type that probably comes to mind when you hear ‘ramen’. I used pre-cooked ramen noodles by a company called Seven Moons. They take 2 minutes to cook and I really enjoy them. Depending on appetite, I suggest approximately 400-600 g / 14-21 oz of pre-cooked ramen noodles for 4 portions. If you are using dry ramen noodles, you want something like 250-300 g / 8.8-10.5 oz instead.
TOFU: When I make this or any other soup like that for myself at home, I often reach for shop-bought pre-marinated tofu to cut down on my workload and prep time and this is what I advise for this recipe. If you prefer to prepare your own tofu from scratch, however, that’s also an option. For these photos, I marinated well-pressed tofu in a simple marinade (2 tbsp soy sauce, 2 tbsp mirin, 2 tbsp cooking sake) for a few hours, then coated it in potato starch and pan-fried in oil.
BROCCOLI: You can use any greens you enjoy. I opted for purple tenderstem broccoli as it’s grown in the UK at this time of the year and widely available in local supermarkets. Pak choi, choi sum, Chinese spinach, napa cabbage would all be just as appropriate.
CHILLI OIL: I love to top my ramen with chilli oil – it’s a fairly ubiquitous ramen condiment that any ramen or Asian food lover is bound to have in their cupboard or fridge. I make an all purpose (only chilli flakes and salt) chilli oil that I drizzle on everything all the time, but you can get a more exciting chilli oil in well stocked Asian grocers. Alongside chilli flakes, it tends to contain garlic, onion, star anise, fennel, peppercorns. If you don’t like spicy heat, use a drizzle of flavoursome toasted sesame oil instead.
Place rice vinegar in a small bowl and finely grate a clove of garlic into it, set aside until needed.
Heat up the oven 220° C / 425° F (or 20° C / 70° F less if using fan function) and grab a large baking tray.
Cut the top of the garlic head off to expose the cloves, drizzle with ½ tsp of oil, wrap in kitchen foil and pop on the baking tray.
Peel your pumpkin (unless the skin is tender and edible), and cut into 2.5 cm / 1 inch cubes. Place in a mixing bowl (keep it afterwards for the next step) and stir 2 tsp of oil through it. Scatter on the baking tray and pop into the oven for 15 minutes.
Throw a whole chilli and unpeeled ginger cut into 2 slices into the bowl with residual oil, toss to coat. Cut shallot in half (keep the skin on) and brush the underside with a bit of oil.
After 15 minutes, flip pumpkin pieces to the other side. Add chilli, ginger slices and shallot (cut side down) to the baking tray. Bake for further 15 minutes – until pumpkin, chilli and the underside of the shallot look charred and ginger is soft. If some ingredients are ready before others, remove them from the baking tray.
As soon as chilli is ready, place it under a small bowl for 5 minutes – the steam will help to take the skin off. Skin it and remove the seeds if you don’t want too much heat. Peel the ginger and shallots. Place them in a blender with charred pumpkin and squeezed out garlic cloves.
Add soy milk, a stock cube, miso paste and garlic steeped in vinegar to the blender. Blend until smooth then transfer to a large pot.
Add approximately 2.5 cups (600 ml) of water to the pot to give the soup the right consistency – you want the soup thick and nourishing but not like a cream of soup. Taste and season with soy sauce (or salt) and mirin (or maple syrup).
Warm the soup up just before you are ready to plate.
TOPPINGS
Prepare your favourite tofu. For ease, I use shop-bought premarinated tofu that I just whack into the oven (alongside pumpkin), but you could also make a simple tofu yourself. I marinate well-pressed tofu in a simple marinade (2 tbsp soy sauce, 2 tbsp mirin, 2 tbsp cooking sake) for as long as I can, then coat it in potato starch and pan-fry in oil.
Boil a pot water and grab a bamboo steamer. Prepare broccoli by cutting them into bite-size segments and slicing stems in half vertically.
Once the water comes to a boil, place prepared brocolli in the steamer above the pot. Cook until knife tender, approximately 7 minutes.
Boil the noodles in the water underneath the steamer. My pre-cooked Seven Moons ramen noodles needed 2 minutes, follow the instructions on your packet.
ASSEMBLY
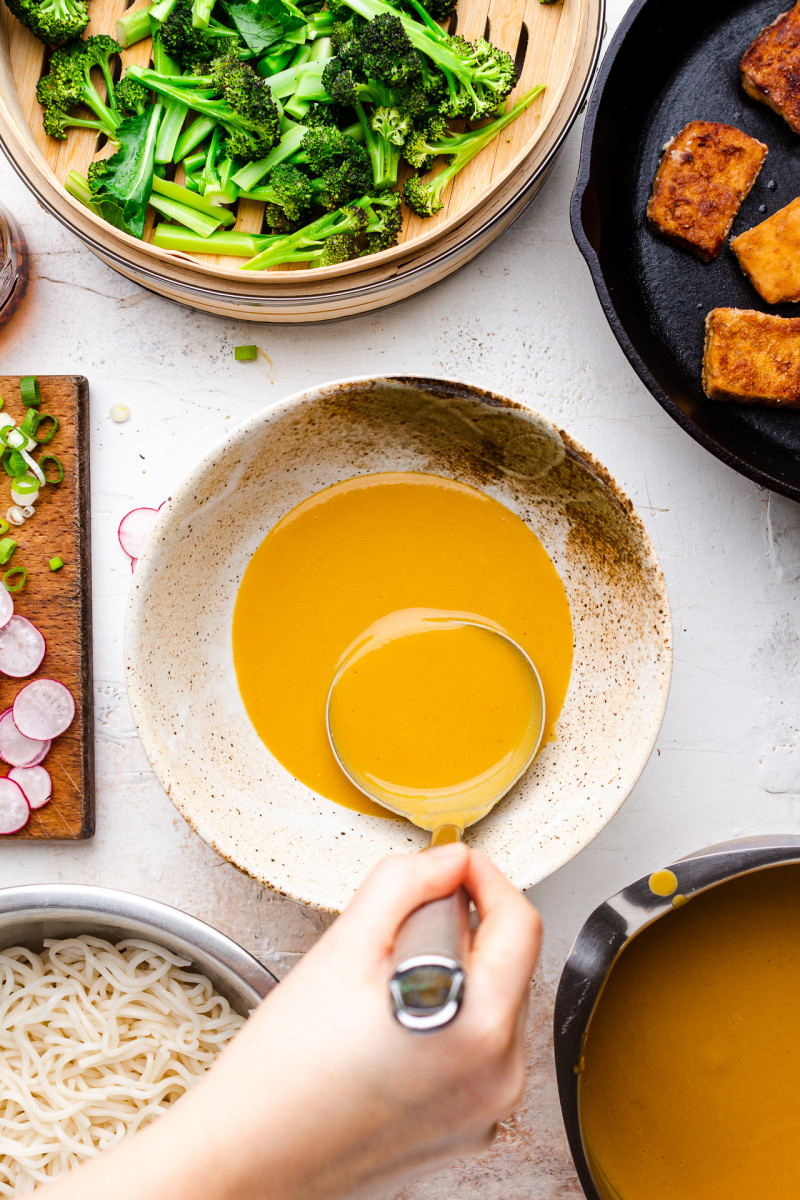
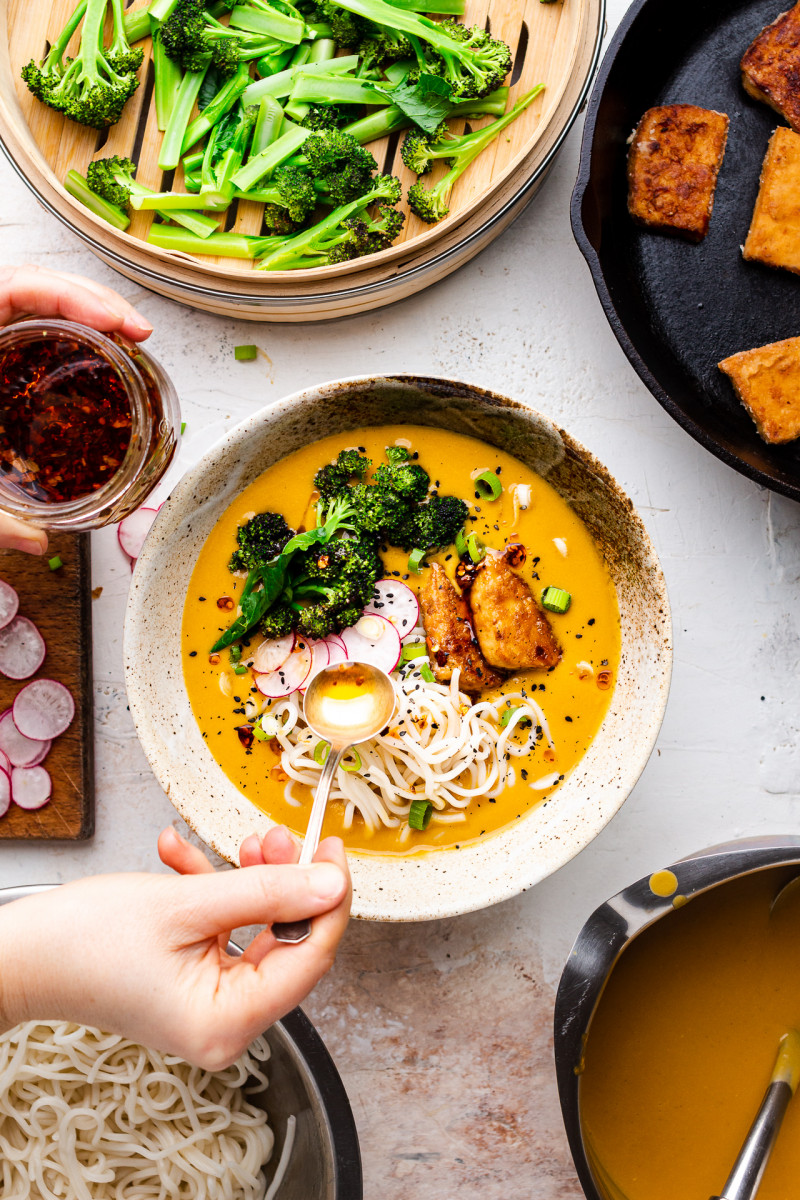
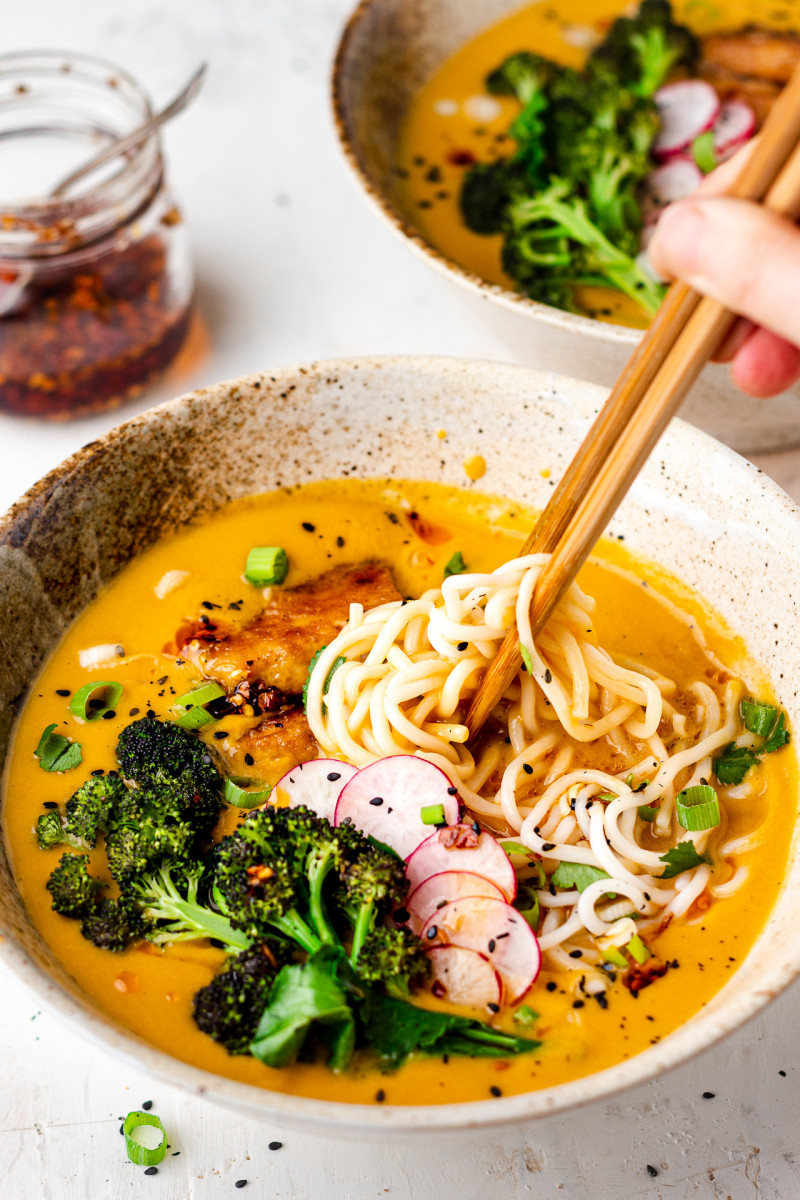
Divide noodles and hot soup between bowls, top with sliced of tofu, steamed broccoli, thinly sliced radish and spring onions. Scatter some sesame seeds on top and drizzle with chilli oil (or toasted sesame oil if you do not like heat).
NOTES
*SOY MILK: I like using soy milk (soy and water, no additives) as it’s creamy, full of plant-based protein and the flavour works well here, but if you cannot have soy, use another neutral tasting plant milk instead. You could also use water and simply add 1-2 tbsp of your favourite nut butter to make this soup creamy – peanut butter or tahini would work well here.
*TENDERSTEM BROCCOLI: you can use any greens you enjoy. I opted for purple tenderstem broccoli as it’s grown in the UK at this time of the year and widely available in local supermarkets. Pak choi, choi sum, Chinese spinach, napa cabbage would all be just as appropriate.
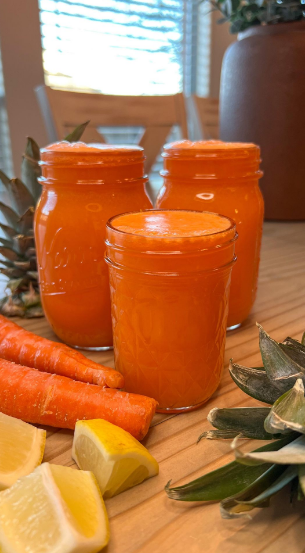
This is the best carrot juice ever by thejuiceyard
Anyone here hate carrot juice? 🙋♀️ Well, I’ve got some good news for you. This is the BEST carrot juice ever! Adding the pineapple was a win-win all around. The balance between carrots and sweet pineapple is 😍
Carrots have so many benefits:
1. Helps boost immunity.
2. Helps improve eye health (how many parents have told their kids they’ll have great eyesight if they eat carrots? 😜).
3. Helps boost heart health.
…and so much more!!
Try it out for yourself – happy juicing!
Some of the links I post on this site are affiliate links. If you go through them to make a purchase, I will earn a small commission (at no additional cost to you). However, note that I’m recommending these products because of their quality and that I have good experience using them, not because of the commission to be made.
About user
Juicing for Health was founded by certified Wellness Health Coach, Nutritional Consultant and a Detox Specialist. We help busy men and women identify their health issues at the root cause, in order to eliminate the problems for optimum physical/mental health and wellbeing.



![[#RECIPE] Vegan Blueberry Smoothie | Fitness Magazine](https://naturalhealthwatchers.com/wp-content/uploads/2023/02/Vegan-Blueberry-Smoothie.jpg)